
Apache Ignite on AWS User Guide
Overview
This image runs Apache Ignite, the open source distributed in-memory database and compute grid. Ignite stores data as key-value entries and queryable SQL tables spread across a cluster and serves reads and writes at memory speed, with an optional durable store on disk. Ignite is the only workload on the image, so the platform stays lean, predictable and easy to reason about. Apache Ignite 2.16.0 is provided, installed from the official Apache binary release under /opt/ignite, running on OpenJDK 11.
The image is security hardened from the first boot. Ignite authentication is enabled, and every data-grid port binds to the loopback address only. On the first boot of your instance a one-shot service activates the cluster, generates a fresh strong password for the built-in ignite user, unique to that instance, applies it to the Ignite authentication subsystem and writes it to /root/ignite-credentials.txt, a file that only the root user can read. The default ignite / ignite credential that Apache Ignite ships with is rotated away, so it no longer works. No shared or default database credential ships in the image.
Ignite native persistence is enabled, and the work directory, the persistence store and the write-ahead log live on a dedicated storage volume mounted at /var/lib/ignite. Keeping database files on their own volume means storage can be grown, snapshotted and backed up independently of the operating system disk, and the cluster state survives restarts. The node runs as a single node cluster by default; the final section of this guide explains how to expand it.
This is a headless image. Ignite has no bundled web console (GridGain Control Center is a separate commercial product and is deliberately not shipped). You administer the node over SSH with the sqlline.sh SQL shell and the control.sh cluster utility, both covered below.
The loopback only security model
A data grid is dangerous when left open. With its default configuration Ignite would accept unauthenticated connections on the thin-client, discovery and communication ports, and anyone able to reach those ports could read and write the grid or run compute tasks against it. This image closes that exposure in two ways:
- Authentication is on. Every connection must present the per-instance credential generated on first boot.
- Every data-grid port is bound to loopback (
127.0.0.1) only. The thin-client and JDBC SQL port10800, the discovery port47500and the communication port47100are reachable from the instance itself and are never exposed on the network. The security group only needs inbound port22for SSH.
To reach Ignite from your workstation, open an SSH tunnel (shown in step 8) or bind Ignite to a private address inside your VPC. Do not open port 10800 to the internet without TLS in front of it.
Prerequisites
Before you deploy this image you need:
- An Amazon Web Services account where you can launch EC2 instances
- IAM permissions to launch instances, create security groups, and subscribe to AWS Marketplace products
- An EC2 key pair in the target Region for SSH access to the instance
- A VPC and subnet in the target Region, with a security group allowing inbound port 22 from your management network
- The AWS CLI (version 2) installed locally if you plan to deploy from the command line
Recommended instance type: m5.large (2 vCPU, 8 GB RAM) or larger. Ignite holds the hot data set in memory, so choose an instance whose RAM comfortably exceeds your working set; memory-optimized instances suit larger datasets.
Step 1: Launch the Instance from the AWS Marketplace
Sign in to the AWS Management Console, open the EC2 service, and select Launch instance. Under Application and OS Images choose AWS Marketplace AMIs and search for Apache Ignite. Select the cloudimg listing and choose Select, then Continue on the subscription summary.
Pick an instance type of m5.large or larger. Choose your EC2 key pair under Key pair (login). Under Network settings select your VPC and subnet, and either create or select a security group that allows inbound port 22 from your management network. Leave the root volume at the default size or larger; the Ignite data volume is attached automatically from the image.
Select Launch instance. First boot initialisation, which activates the cluster and generates the per-instance password, takes a minute or two after the instance state becomes Running and the status checks pass.
Step 2: Launch the Instance from the AWS CLI
The following block launches an instance from the cloudimg Apache Ignite Marketplace AMI into an existing subnet and security group. Replace <ami-id> with the AMI ID shown on the Marketplace listing, <key-name> with your EC2 key pair name, <subnet-id> with your subnet ID, and <security-group-id> with a security group that opens inbound port 22.
aws ec2 run-instances \
  --image-id <ami-id> \
  --instance-type m5.large \
  --key-name <key-name> \
  --subnet-id <subnet-id> \
  --security-group-ids <security-group-id> \
  --metadata-options HttpTokens=required \
  --tag-specifications 'ResourceType=instance,Tags=[{Key=Name,Value=ignite-01}]'
The command prints a JSON document on success. Note the instance ID, then retrieve its public address once it is running with aws ec2 describe-instances --instance-ids <instance-id> --query "Reservations[].Instances[].PublicIpAddress" --output text.
Step 3: Connect over SSH
Connect over SSH with the key pair you selected and the public IP address from step 2. The SSH login user depends on the operating system of the AMI variant you launched:
| AMI variant | SSH login user |
|---|---|
| Apache Ignite 2.16 on Ubuntu 24.04 | ubuntu |
ssh <login-user>@<public-ip>
Wait until the instance has passed both EC2 status checks before connecting. The first boot service runs before the SSH daemon is ready, so Ignite is initialised by the time you can log in.
Step 4: Retrieve the Generated Password
The first boot service generates a fresh password for the ignite user on this instance and writes it, with the connection details, to /root/ignite-credentials.txt. The file is readable only by the root user. Display it from your SSH session:
sudo cat /root/ignite-credentials.txt
The file looks like this, with a unique password on your instance:
IGNITE_USERNAME=ignite
IGNITE_PASSWORD=<your generated password>
IGNITE_HOST=127.0.0.1
IGNITE_SQL_PORT=10800
IGNITE_PUBLIC_IP=<your instance public IP>
The default ignite / ignite account that ships with Apache Ignite is rotated away during first boot, so it no longer works. Use the generated password for every connection.
Step 5: Confirm the Service and the Listener
Ignite runs under systemd as the ignite service and starts automatically on boot. Confirm it is active:
systemctl is-active ignite
The command prints active. Confirm the thin-client / SQL connector is listening. Ignite binds to the loopback address 127.0.0.1 on port 10800, so it is reachable from the instance itself:
ss -tln | grep 10800
You should see a listening socket on 127.0.0.1:10800. The discovery (47500) and communication (47100) ports are bound to loopback in the same way.
Step 6: Run SQL with sqlline
Ignite bundles sqlline.sh, a SQL shell that connects over the thin-client JDBC driver. Open an interactive session against the local node with the generated password. Replace <password> with the value from /root/ignite-credentials.txt:
export JAVA_HOME=/usr/lib/jvm/java-11-openjdk-amd64
/opt/ignite/bin/sqlline.sh -u 'jdbc:ignite:thin://127.0.0.1/' -n ignite -p '<password>'
The screenshot below shows a complete session that creates a table, inserts rows and reads them back on the running node.
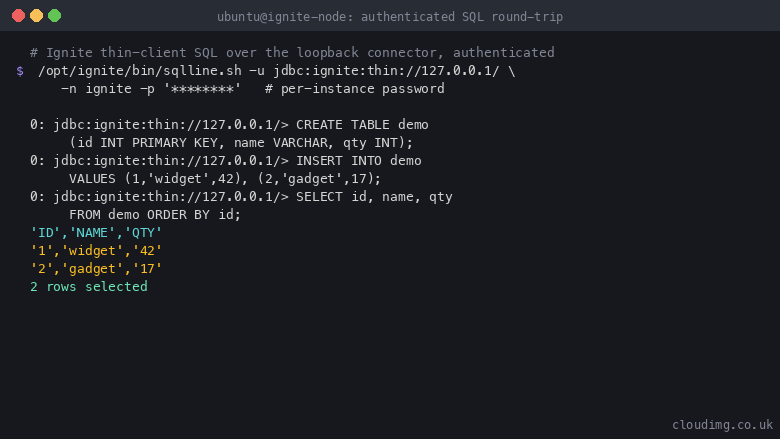
An authenticated Ignite thin-client SQL session creating a table, inserting rows and reading them back.
The following command runs a full create, insert and read round-trip in a single non-interactive invocation. It creates a table, inserts two rows, reads them back and drops the table. Replace <password> with the value from /root/ignite-credentials.txt:
export JAVA_HOME=/usr/lib/jvm/java-11-openjdk-amd64 IGNITE_HOME=/opt/ignite
printf '%s\n' \
  "CREATE TABLE IF NOT EXISTS demo (id INT PRIMARY KEY, name VARCHAR, qty INT);" \
  "INSERT INTO demo (id, name, qty) VALUES (1, 'widget', 42);" \
  "INSERT INTO demo (id, name, qty) VALUES (2, 'gadget', 17);" \
  "SELECT id, name, qty FROM demo ORDER BY id;" \
  "DROP TABLE demo;" \
  "!quit" \
  | /opt/ignite/bin/sqlline.sh --silent=true --showHeader=true --outputformat=csv \
      -u 'jdbc:ignite:thin://127.0.0.1/' -n ignite -p '<password>'
The SELECT returns the two rows you inserted, confirming the authenticated data path end to end.
Step 7: Check Cluster State with control.sh
control.sh is the cluster administration utility. Because authentication is enabled, pass the ignite user and the generated password. Report the cluster state, which is ACTIVE on this image:
export JAVA_HOME=/usr/lib/jvm/java-11-openjdk-amd64 IGNITE_HOME=/opt/ignite
/opt/ignite/bin/control.sh --user ignite --password '<password>' --state
The screenshots below show the service active with every data-grid port bound to loopback, and the default credential rejected while native persistence lives on the dedicated volume.
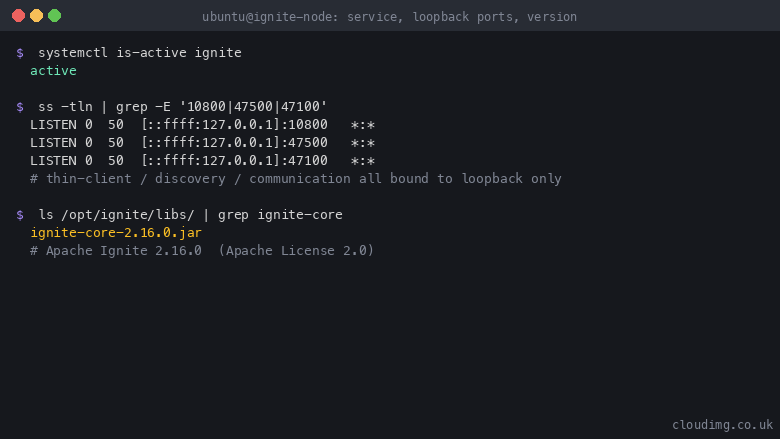
The Ignite service active, the thin-client, discovery and communication ports bound to loopback only, and the Apache Ignite 2.16.0 core library.
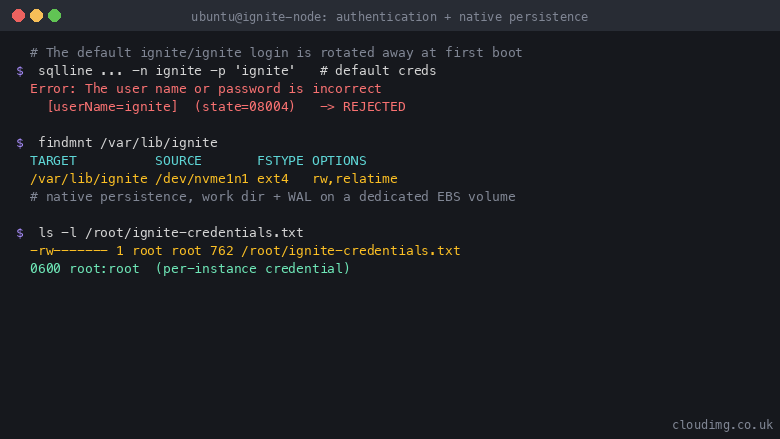
The default ignite credential rejected after first-boot rotation, and native persistence on a dedicated data volume with a per-instance credential file.
Step 8: Reach Ignite from Your Workstation over an SSH Tunnel
Because the thin-client port is loopback only, connect a remote SQL client or application by forwarding the port over SSH. From your workstation, replace <login-user> and <public-ip> with your instance's values:
ssh -L 10800:127.0.0.1:10800 <login-user>@<public-ip>
While that tunnel is open, point any Ignite thin-client, JDBC tool or application at 127.0.0.1:10800 on your workstation and it reaches the node securely, authenticating with the generated password. For a production deployment, bind Ignite to a private address inside your VPC and control access with security groups instead of a tunnel.
Step 9: The Ignite Data Volume
Ignite native persistence, the work directory and the write-ahead log are stored under /var/lib/ignite, which is a dedicated EBS volume separate from the operating system disk. Confirm the mount:
findmnt /var/lib/ignite
The output shows /var/lib/ignite is its own ext4 filesystem on a separate device. Because the data directory is on its own volume you can take an Amazon EBS snapshot of it on its own schedule, and you can grow it independently of the root volume. Check the available space at any time with:
df -h /var/lib/ignite
Step 10: Managing the Ignite Service
Ignite is managed through systemd. The service starts automatically on boot.
Check the service status:
systemctl status ignite --no-pager
Stop, start and restart the service when needed:
sudo systemctl stop ignite
sudo systemctl start ignite
sudo systemctl restart ignite
Because native persistence is enabled, the cluster state and all persisted data survive a restart. The node comes back up ACTIVE with your data intact. The Ignite log is written under the work directory on the data volume and via the systemd journal; review it when diagnosing a startup or runtime problem:
sudo journalctl -u ignite --no-pager | tail -n 100
Step 11: Backups
Because /var/lib/ignite is a dedicated EBS volume, the simplest durable backup is an Amazon EBS snapshot of that volume, which captures the persistence store, work directory and write-ahead log as a point-in-time copy. Schedule snapshots with Amazon Data Lifecycle Manager or AWS Backup.
For a file-level archive, stop the service first so the store is quiesced, then archive the data directory:
sudo systemctl stop ignite
sudo tar -czf /var/backups/ignite-$(date +%F).tgz -C /var/lib/ignite .
sudo systemctl start ignite
Ignite also supports its own snapshot feature through control.sh --snapshot create <name> for consistent online backups of persisted caches; consult the Ignite documentation for restore procedures.
Step 12: Expanding to a Multi Node Cluster
This image runs Ignite as a single node cluster, which suits development, testing and smaller production workloads. Ignite is designed to scale horizontally by adding nodes. To build a multi node cluster:
- Launch additional instances from this same AMI, one per node, in the same VPC
- Allow inbound TCP ports
47500(discovery) and47100(communication) between the nodes, and10800from your application tier - On every node, edit
/etc/ignite/ignite-config.xmland changelocalHostfrom127.0.0.1to the node's own private IP address, and list the private addresses of the cluster in theTcpDiscoveryVmIpFinderaddresses - Restart Ignite on each node and confirm with
control.sh --statethat the cluster isACTIVEwith the expected number of server nodes
The Apache Ignite documentation at https://ignite.apache.org/docs/latest/ covers clustering, data partitioning, SQL, compute and performance tuning in depth.
Support
cloudimg provides 24/7/365 expert technical support for this image. Guaranteed response within 24 hours, one hour average for critical issues. Contact support@cloudimg.co.uk.
For general Apache Ignite administration questions consult the official documentation at https://ignite.apache.org/docs/latest/.