Apache ShardingSphere Proxy on Ubuntu 24.04 on Azure User Guide
Overview
Apache ShardingSphere Proxy is a database middleware that speaks the MySQL and PostgreSQL wire protocols. Applications connect to it with an ordinary MySQL client or driver and see one logical database, while ShardingSphere transparently routes reads and writes across the backend storage according to your sharding rules. This cloudimg image ships ShardingSphere Proxy 5.5.3 with the MySQL front end on 127.0.0.1:3307, a local MySQL 8 server on the same VM as the backing data store, and a ready-to-use sharded demo database so you can evaluate distributed SQL immediately. The backend data and the proxy logs live on a dedicated Azure data disk, and a unique password is rotated into the image on first boot. Apache-2.0 licensed and backed by 24/7 cloudimg support.
What is included:
- Apache ShardingSphere Proxy 5.5.3 - distributed SQL / data sharding middleware, Apache-2.0 licensed
- OpenJDK 17 runtime and the MySQL Connector/J driver in
ext-lib - A local MySQL 8 backend server as the actual data store, with two demo schemas
demo_ds_0anddemo_ds_1 - A preconfigured logical sharded database
sharding_dbwith an inline-shardedt_ordertable - A unique per-VM password generated on first boot (no shared default credential)
- The MySQL data directory and proxy logs on a dedicated 40 GiB Azure data disk at
/var/lib/shardingsphere - Loopback-only MySQL wire-protocol listener on
3307with ShardingSphere authority authentication - 24/7 cloudimg support
This is a database product: ShardingSphere Proxy listens on 127.0.0.1:3307 only by default, and the backend MySQL listens on 127.0.0.1:3306 only. The wire-protocol port is not opened to the internet until you open it in your NSG - connect locally on the VM, over an SSH tunnel, or open 3307 deliberately (see Step 9). ShardingSphere UI is deprecated and is not included; the Proxy is a headless database endpoint.
Prerequisites
An active Azure subscription, an SSH key pair, and a VNet + subnet in the target region. Standard_B4ms (4 vCPU / 16 GiB RAM) is a good starting point because the proxy JVM and the backend MySQL run on the same VM. NSG inbound: allow 22/tcp from your management network. Open 3307/tcp only when you intend to reach the proxy remotely (Step 9).
Step 1 - Deploy from the Azure Marketplace
Sign in to the Azure Portal, choose Create a resource, search the Marketplace for Apache ShardingSphere by cloudimg, and select Create. On Basics pick your subscription, resource group, region and size; under Administrator account choose SSH public key and paste your key; under Inbound port rules allow SSH (22) only. Then Review + create -> Create.
Step 2 - Deploy from the Azure CLI
az vm create \
  --resource-group <your-rg> \
  --name shardingsphere \
  --image <marketplace-image-urn> \
  --size Standard_B4ms \
  --admin-username azureuser \
  --ssh-key-values ~/.ssh/id_ed25519.pub \
  --vnet-name <your-vnet> --subnet <your-subnet> \
  --public-ip-sku Standard
Step 3 - Connect to your VM
ssh azureuser@<vm-public-ip>
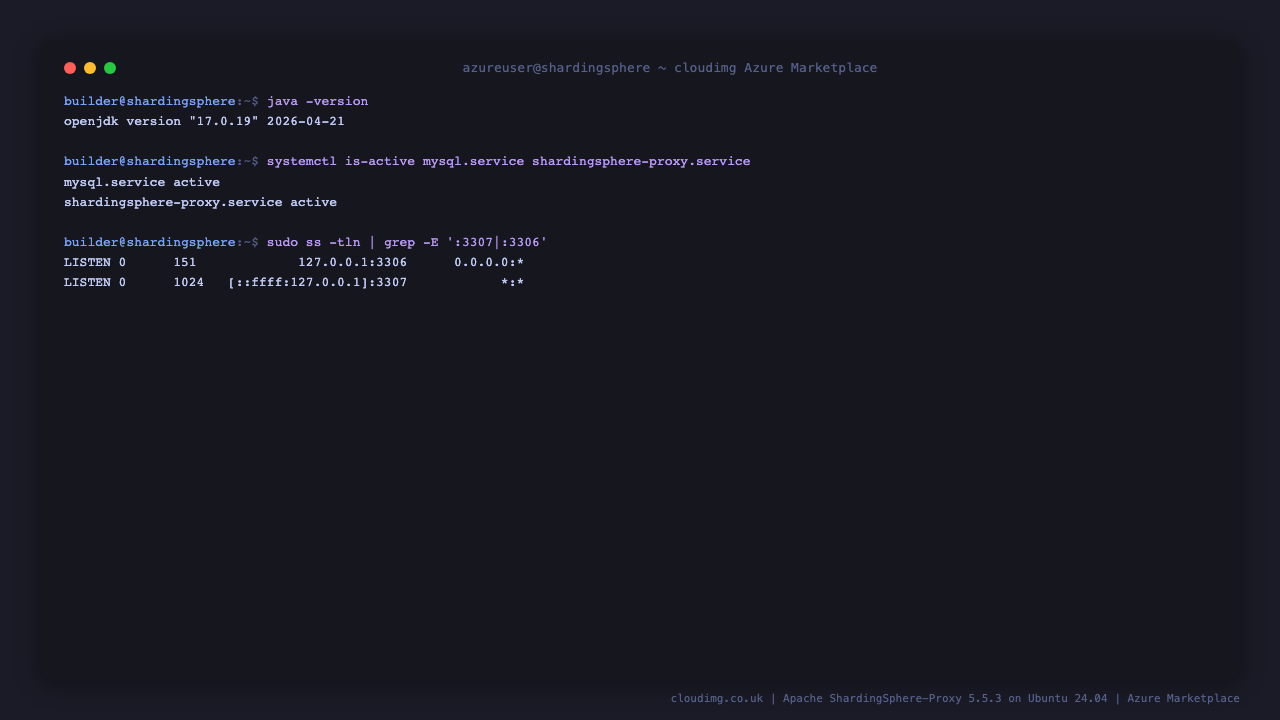
Step 4 - Confirm ShardingSphere Proxy and MySQL are running
The proxy runs alongside its local MySQL backend. Confirm the version banner, that both services are active, and that the listeners are loopback only:
java -version 2>&1 | head -1
systemctl is-active mysql.service shardingsphere-proxy.service
sudo ss -tln | grep -E ':3307|:3306'
You should see OpenJDK 17, both services active, and the loopback-only listeners (the proxy is reported in IPv4-mapped form):
openjdk version "17.0.19" 2026-04-21
active
active
LISTEN 0  1024   [::ffff:127.0.0.1]:3307   *:*
LISTEN 0  151        127.0.0.1:3306         0.0.0.0:*
Step 5 - Review the sharding configuration
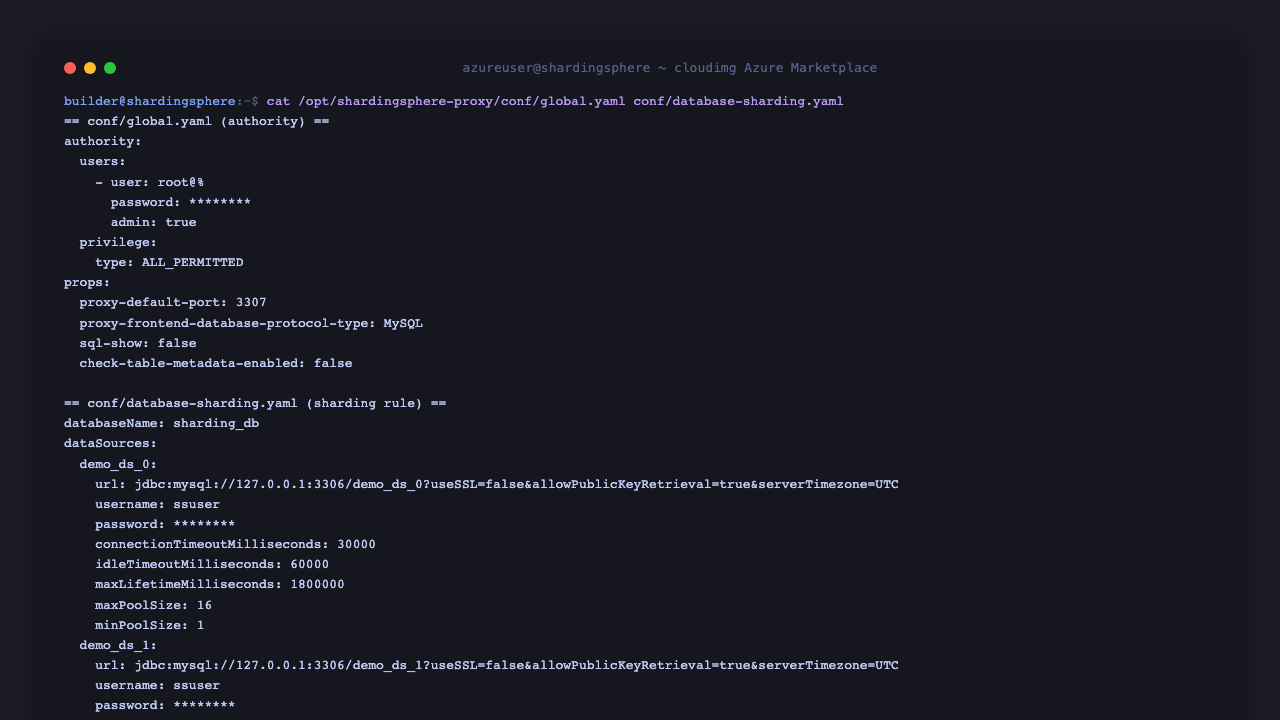
ShardingSphere reads its rules from conf/. The proxy authority (the front-end users) is defined in global.yaml, and the demo sharding rule that maps the logical sharding_db onto the two backend schemas is in database-sharding.yaml. View the sharding rule (the password lines are redacted here, they hold the per-VM secret):
sudo sed 's/^\(\s*password:\).*/\1 ********/' /opt/shardingsphere-proxy/conf/database-sharding.yaml | sed -n '1,60p'
The logical t_order table is sharded across demo_ds_${0..1}.t_order_${0..1}: user_id % 2 selects the backend database and order_id % 2 selects the backend table, with Snowflake key generation available.
Step 6 - Retrieve your per-VM password
Each VM generates its own unique password on first boot and writes it to a root-only credentials file. The proxy username is root:
sudo cat /root/shardingsphere-credentials.txt
The file contains SHARDINGSPHERE_USERNAME, SHARDINGSPHERE_PASSWORD, the connection string, the logical database name and the access instructions. Store the password in your secrets manager. In the commands below, <SHARDINGSPHERE_PASSWORD> stands for the value of SHARDINGSPHERE_PASSWORD.
Step 7 - Connect through the proxy and list the sharded database
Connect with the ordinary MySQL client through the proxy on port 3307 and list the databases. The single logical sharding_db is what your application sees:
mysql -h127.0.0.1 -P3307 -uroot -p<SHARDINGSPHERE_PASSWORD> -e "SHOW DATABASES; USE sharding_db; SHOW TABLES;"
You should see sharding_db in the database list and the logical t_order table inside it:
Database
information_schema
sharding_db
Tables_in_sharding_db
t_order
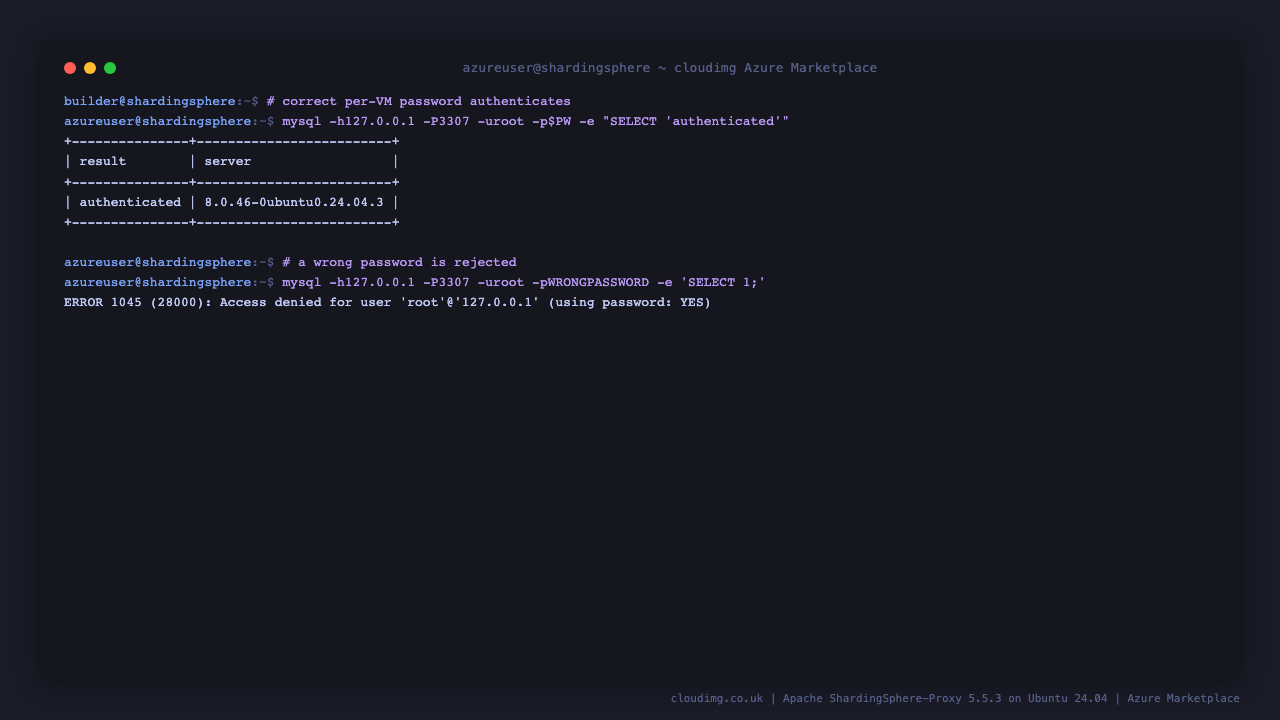
A wrong password is rejected with an access-denied error, so the database is never open without the credential. Any MySQL driver (Python, Go, Java, Node, etc.) connects with the same host, port 3307, user root and this password.

Step 8 - Run a distributed INSERT and SELECT across shards
Insert rows through the proxy. ShardingSphere routes each row to the correct backend shard based on the sharding columns, then a single logical SELECT reads them back transparently from across the shards:
mysql -h127.0.0.1 -P3307 -uroot -p<SHARDINGSPHERE_PASSWORD> sharding_db -e "INSERT INTO t_order (order_id,user_id,status) VALUES (1001,10,'NEW'),(1002,11,'PAID'),(2001,20,'SHIPPED'); SELECT order_id,user_id,status FROM t_order ORDER BY order_id;"
The logical SELECT returns all three rows even though they were physically distributed across both backend schemas:
order_id    user_id status
1001    10  NEW
1002    11  PAID
2001    20  SHIPPED
You can confirm the physical distribution on the backend MySQL: user_id 10 and 11 land in different database shards, and order_id 1001 vs 2001 land in different table shards. Remove the demo rows when you are done:
mysql -h127.0.0.1 -P3307 -uroot -p<SHARDINGSPHERE_PASSWORD> sharding_db -e "DELETE FROM t_order WHERE order_id IN (1001,1002,2001);"
Step 9 - Remote access (optional)
The proxy is bound to 127.0.0.1:3307 and is not reachable from outside the VM by default. To reach it from your workstation, open an SSH tunnel and connect the local MySQL client through it (no NSG change needed):
# On your workstation:
ssh -L 3307:127.0.0.1:3307 azureuser@<vm-public-ip>
# then, in another terminal:
mysql -h127.0.0.1 -P3307 -uroot -p<password>
Alternatively, to expose the proxy on the network, edit the -a bind address in ExecStart= in /etc/systemd/system/shardingsphere-proxy.service to a private NIC address, run sudo systemctl daemon-reload && sudo systemctl restart shardingsphere-proxy, and open 3307/tcp in your Azure NSG only to the trusted clients that need it. Do not expose 3307 to the internet without TLS.
Step 10 - Data disk and persistence
The backend MySQL data directory (/var/lib/shardingsphere/mysql) and the proxy logs (/var/lib/shardingsphere/proxy-logs) live on a dedicated 40 GiB Azure data disk mounted at /var/lib/shardingsphere, captured into the image and re-provisioned on every VM. Confirm the mount:
findmnt /var/lib/shardingsphere
sudo ls /var/lib/shardingsphere
To grow storage, resize the data disk in the Azure Portal and grow the filesystem with sudo resize2fs /dev/disk/azure/scsi1/lun0. Because the data lives on its own disk, it persists across VM restarts and the volume is independently resizable and snapshottable.
Step 11 - Operations
- Password: the proxy
rootpassword is set in theauthorityblock of/opt/shardingsphere-proxy/conf/global.yamland mirrored to the backend MySQLssuserand thedatabase-sharding.yamldata sources. To rotate it, update those three locations andsudo systemctl restart shardingsphere-proxy. - Adding sharding rules: define additional logical databases as extra
database-*.yamlfiles inconf/, or editdatabase-sharding.yamlto add tables, then restart the proxy. See the ShardingSphere documentation. - Backend storage: the demo backs onto the local MySQL on
127.0.0.1:3306. To shard across remote databases instead, point theurlof each data source indatabase-sharding.yamlat your external MySQL instances and place their JDBC drivers in/opt/shardingsphere-proxy/ext-lib. - Logs: proxy logs are under
/var/lib/shardingsphere/proxy-logs; backend MySQL logs viasudo journalctl -u mysql. - Services:
sudo systemctl status shardingsphere-proxy mysqlshows both; the proxyRequires=and startsAfter=the MySQL backend.
Support
This image is maintained by cloudimg with 24/7 support. Email support@cloudimg.co.uk for help with deployment, sharding configuration, scaling or security hardening.