Caddy 2 on Ubuntu 24.04 on Azure User Guide
Overview
This guide covers the deployment and configuration of Caddy 2 on Ubuntu 24.04 on Azure using cloudimg Azure Marketplace images. Caddy is the modern open-source web server with automatic HTTPS via Let's Encrypt baked in — no Certbot dependency, no manual cert ceremony. Drop a domain into the Caddyfile, reload, and Caddy provisions a real cert on the first request and auto-renews it forever.
The image ships Caddy 2.x from the official Caddy team Cloudsmith APT repo. The default Caddyfile serves the cloudimg landing page on plain HTTP port 80; a comment block at the top shows customers exactly how to swap in their domain to flip on automatic HTTPS in one edit.
What is included:
-
Caddy 2.x server installed from the official Caddy team Cloudsmith APT repo
-
Default Caddyfile at
/etc/caddy/Caddyfileserving the cloudimg landing page on TCP 80 -
Document root at
/var/www/html -
caddy.servicesystemd unit auto-starting on boot, running as thecaddysystem user -
caddy-firstboot.servicesystemd oneshot that writes endpoint info on first customer boot -
Listeners: TCP 80 (HTTP), TCP 443 (HTTPS once domain configured), TCP 2019 (admin API on
127.0.0.1only — loopback only by default) -
Ubuntu 24.04 LTS base with latest security patches applied at build time
-
Azure Linux Agent for seamless cloud integration and SSH key injection
-
24/7 cloudimg support with guaranteed 24 hour response SLA
Prerequisites
-
An active Azure subscription
-
A subscription to the Caddy 2 on Ubuntu 24.04 listing on Azure Marketplace
-
An SSH public key for VM authentication
-
A virtual network and subnet in the target region
-
A registered domain name + DNS A record pointing at the VM public IP (required for Let's Encrypt automatic HTTPS — Caddy proves domain ownership via the HTTP-01 challenge over port 80)
Recommended virtual machine size: Standard_B2s (2 vCPU, 4 GB RAM) for typical web traffic. Caddy is efficient — scale up only for very high request rates or large reverse-proxy fleets.
Step 1: Deploy from the Azure Portal
Navigate to Marketplace in the Azure Portal, search for Caddy 2, select the cloudimg publisher entry, and click Create.
On the Networking tab attach a network security group that allows inbound TCP 22 from your management IP range, TCP 80 from 0.0.0.0/0 (required for the Let's Encrypt HTTP-01 challenge and renewal), and TCP 443 from your client networks. Port 80 must remain open from the internet for Caddy to issue and renew certificates.
Click Review + create, wait for validation, then Create. Deployment takes around two minutes.
Step 2: Deploy from the Azure CLI
RG="caddy-prod"
LOCATION="eastus"
VM_NAME="caddy-01"
ADMIN_USER="azureuser"
GALLERY_IMAGE_ID="/subscriptions/<sub-id>/resourceGroups/azure-cloudimg/providers/Microsoft.Compute/galleries/cloudimgGallery/images/caddy-2-ubuntu-24-04/versions/<version>"
SSH_KEY="$(cat ~/.ssh/id_rsa.pub)"

az group create --name "$RG" --location "$LOCATION"

az network vnet create \
  --resource-group "$RG" \
  --name caddy-vnet --address-prefix 10.96.0.0/16 \
  --subnet-name caddy-subnet --subnet-prefix 10.96.1.0/24

az network nsg create --resource-group "$RG" --name caddy-nsg

az network nsg rule create \
  --resource-group "$RG" --nsg-name caddy-nsg \
  --name allow-ssh --priority 100 \
  --source-address-prefixes "<your-mgmt-cidr>" \
  --destination-port-ranges 22 --access Allow --protocol Tcp

az network nsg rule create \
  --resource-group "$RG" --nsg-name caddy-nsg \
  --name allow-http-public --priority 110 \
  --source-address-prefixes "*" \
  --destination-port-ranges 80 --access Allow --protocol Tcp

az network nsg rule create \
  --resource-group "$RG" --nsg-name caddy-nsg \
  --name allow-https --priority 120 \
  --source-address-prefixes "*" \
  --destination-port-ranges 443 --access Allow --protocol Tcp

az vm create \
  --resource-group "$RG" --name "$VM_NAME" \
  --image "$GALLERY_IMAGE_ID" \
  --size Standard_B2s --storage-sku StandardSSD_LRS \
  --admin-username "$ADMIN_USER" --ssh-key-values "$SSH_KEY" \
  --vnet-name caddy-vnet --subnet caddy-subnet --nsg caddy-nsg \
  --public-ip-sku Standard
Step 3: Connect via SSH
ssh azureuser@<vm-ip>
caddy.service will already be running and caddy-firstboot.service will already have written the endpoint info file.
Step 4: Verify the Caddy Service
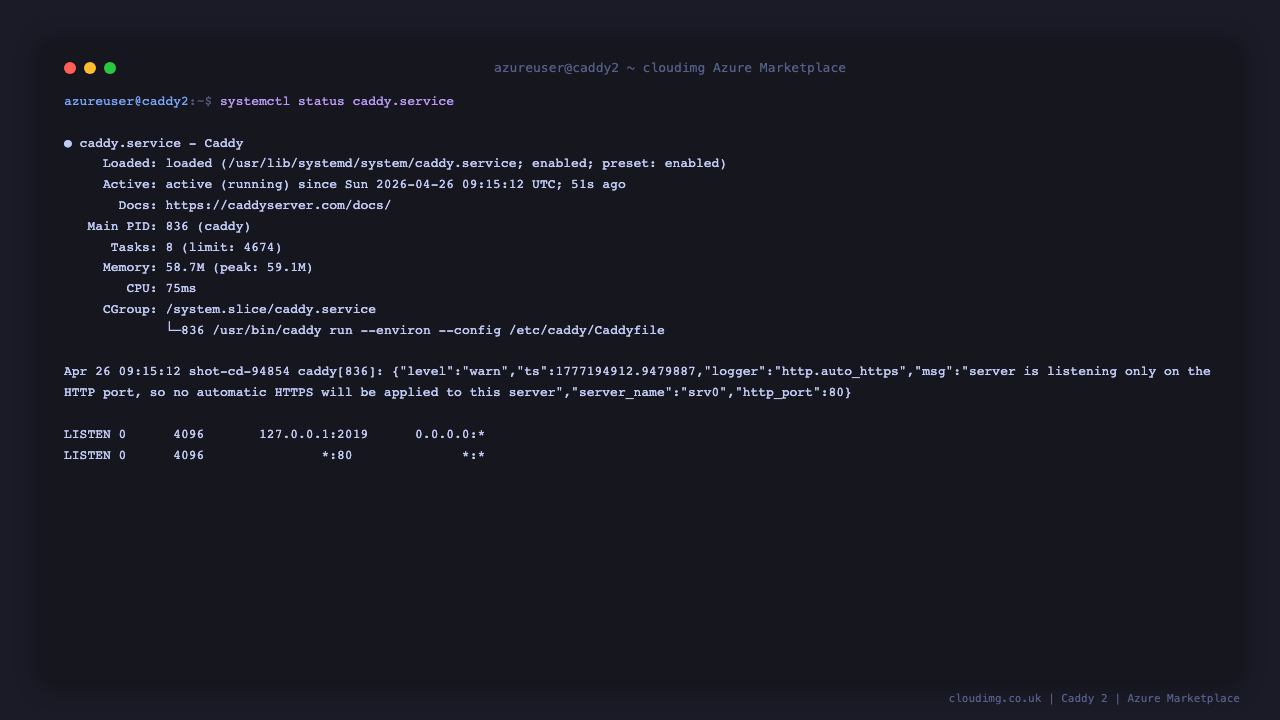
sudo systemctl status caddy.service --no-pager
Expected: active (running) with the listeners on :80 (public) and :2019 (loopback only):
Confirm the firstboot sentinel:
sudo test -f /var/lib/cloudimg/caddy-firstboot.done && echo FIRSTBOOT_DONE
Confirm the listener on port 80:
sudo ss -tln | grep ':80 '
Confirm the admin API is bound to localhost only (defence-in-depth):
sudo ss -tln | grep ':2019 '
The above should show 127.0.0.1:2019 and not 0.0.0.0:2019 or *:2019. The admin API gives full control over the running Caddy and must never be exposed beyond the loopback interface.
Step 5: Verify the Default Site
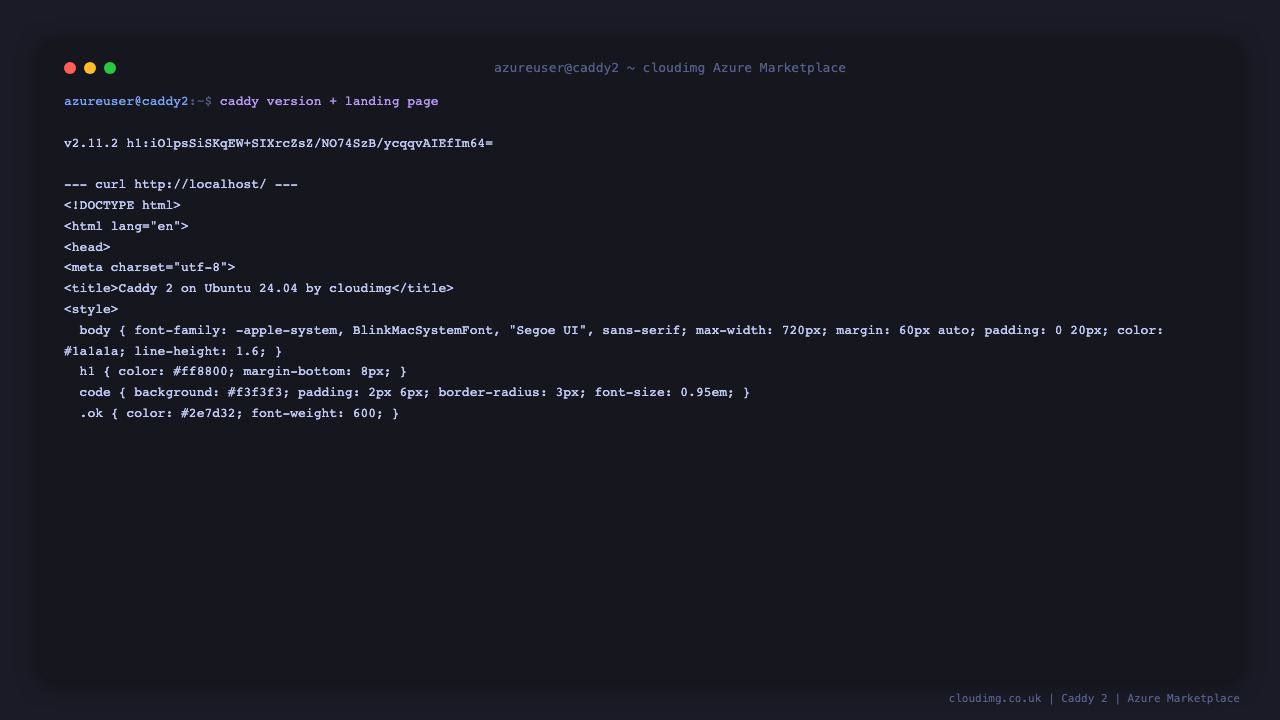
curl -s http://localhost/ | head -10
You should see the cloudimg landing HTML, and caddy version reports v2.x:
Step 6: Enable Automatic HTTPS for Your Domain
This is the headline workflow Caddy is built around — three edits, one reload, real cert in 60 seconds.
Step 6a — Point your DNS A record at the VM public IP. Done at your DNS provider (Route 53, Cloudflare, GoDaddy). Confirm propagation:
dig +short www.example.com
The output must equal the VM's public IP before continuing.
Step 6b — Edit the Caddyfile.
The shipped default Caddyfile + a caddy validate pass:
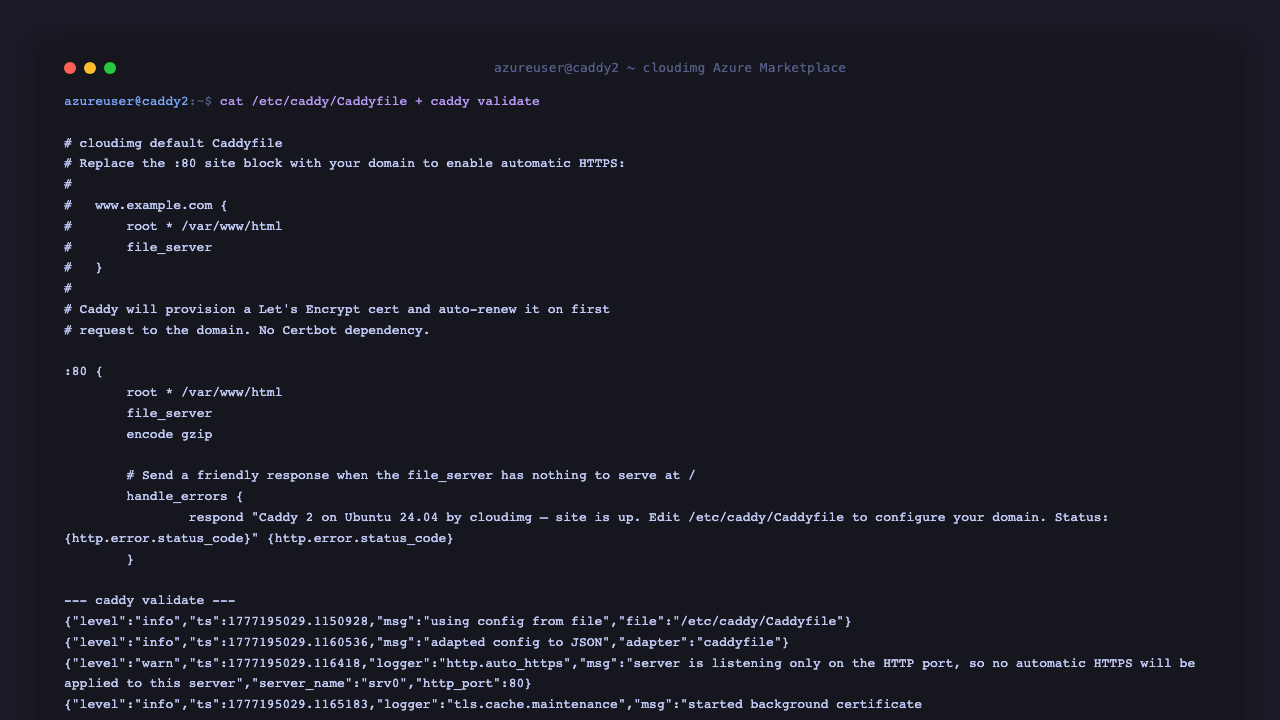
sudo nano /etc/caddy/Caddyfile
Replace the :80 { ... } block with your domain block:
www.example.com {
    root * /var/www/html
    file_server
    encode gzip
}
Save and exit.
Step 6c — Validate then reload.
sudo caddy validate --config /etc/caddy/Caddyfile --adapter caddyfile
sudo systemctl reload caddy
Caddy provisions a Let's Encrypt cert on the first request to https://www.example.com/, installs it, and serves the site. Subsequent requests reuse the cached cert. Renewal runs silently in the background — Caddy renews any cert ≤30 days from expiry automatically.
Step 7: Verify HTTPS
curl -sI https://www.example.com/ | head -5
You should see HTTP/2 200. Inspect the cert with openssl:
echo | openssl s_client -servername www.example.com -connect www.example.com:443 2>/dev/null | openssl x509 -noout -issuer -subject -dates
You should see issuer=C = US, O = Let's Encrypt (or similar).
Step 8: Reverse Proxy Pattern
Caddy excels at TLS-terminating reverse proxying. To put HTTPS in front of an internal app server (e.g. Grafana on port 3000):
www.example.com {
    reverse_proxy localhost:3000
}
Or with custom headers, gzip, and a request body limit:
www.example.com {
    encode gzip
    request_body {
        max_size 10MB
    }
    reverse_proxy localhost:3000 {
        header_up Host {host}
        header_up X-Real-IP {remote_host}
    }
}
sudo systemctl reload caddy and Caddy hot-reloads with no downtime.
Step 9: Server Components
Component Path
Caddy binary /usr/bin/caddy
Config file /etc/caddy/Caddyfile
Document root /var/www/html
Caddy data directory /var/lib/caddy
ACME cert storage /var/lib/caddy/.local/share/caddy/
Systemd unit /lib/systemd/system/caddy.service
Firstboot script /usr/local/sbin/caddy-firstboot.sh
Firstboot service /etc/systemd/system/caddy-firstboot.service
Endpoint info file /stage/scripts/caddy-credentials.log
Firstboot sentinel /var/lib/cloudimg/caddy-firstboot.done
Inspect installed version:
HOME=/root caddy version
(The HOME=/root prefix suppresses Caddy's "no $HOME" warning when running outside an interactive shell.)
Step 10: Managing the Caddy Service
Status:
sudo systemctl status caddy.service --no-pager
Stop / Start / Restart:
sudo systemctl stop caddy.service
sudo systemctl start caddy.service
sudo systemctl restart caddy.service
Reload config without dropping connections:
sudo systemctl reload caddy
Validate config before reload:
sudo caddy validate --config /etc/caddy/Caddyfile --adapter caddyfile
View logs:
sudo journalctl -u caddy.service --no-pager -n 50
Format the Caddyfile (Caddy is opinionated about indentation):
sudo caddy fmt --overwrite /etc/caddy/Caddyfile
sudo systemctl reload caddy
Step 11: Admin API (Localhost Only)
Caddy ships with a programmable admin API on 127.0.0.1:2019. Useful for automation, but never bind it to a public interface without putting auth in front.
Confirm the bind + see a sample of what the API returns:
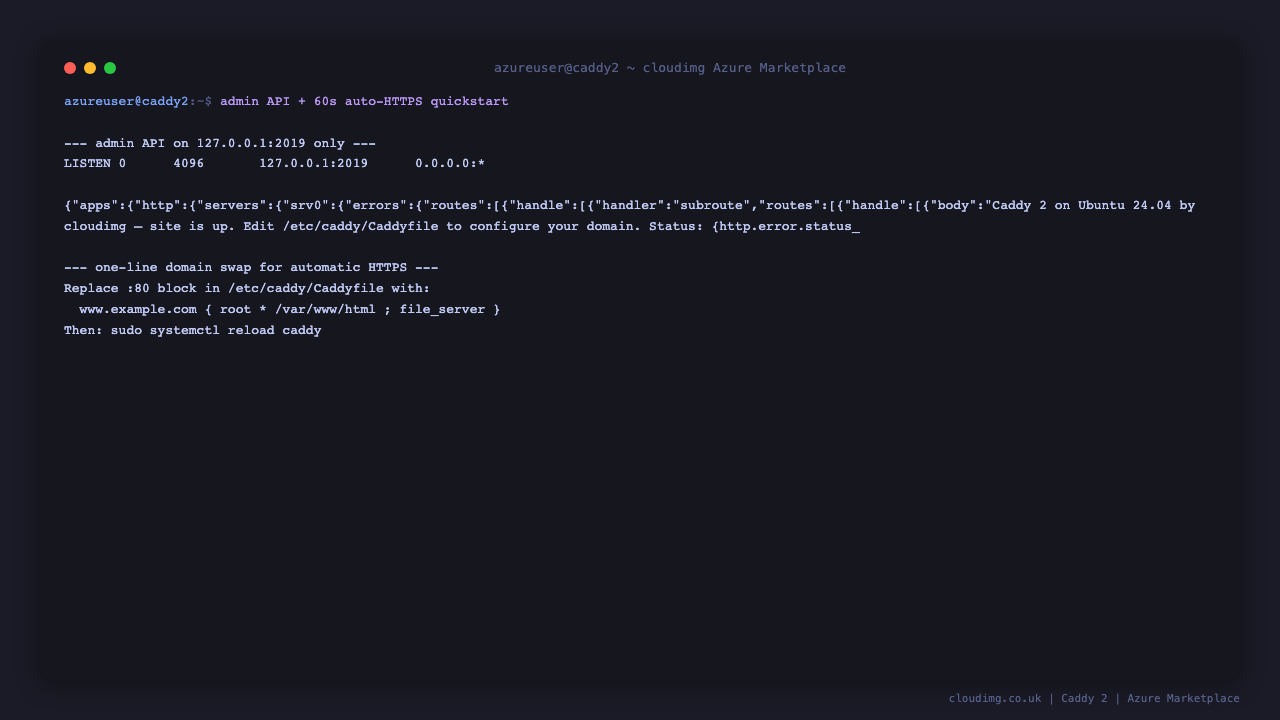
curl -s http://127.0.0.1:2019/config/ | head -c 500
To reload from a JSON config file (alternative to systemctl reload):
sudo curl -s -X POST -H "Content-Type: application/json" \
    -d @/path/to/config.json http://127.0.0.1:2019/load
Step 12: Troubleshooting
Cannot reach Caddy on port 80
-
Confirm service running:
sudo systemctl status caddy.service -
Confirm listener bound:
sudo ss -tln | grep ':80 ' -
Check journal:
sudo journalctl -u caddy.service --no-pager -n 50 -
Confirm NSG allows TCP 80 from your client source IP
Automatic HTTPS not working
-
Confirm port 80 is open from the internet (Let's Encrypt HTTP-01 challenge requires it)
-
Confirm DNS A record points at the VM public IP:
dig +short <your-domain> -
Check Caddy log for ACME errors:
sudo journalctl -u caddy.service --no-pager | grep -i acme | tail -10 -
If you exceeded Let's Encrypt rate limits (50 certs/week per registered domain), wait and retry
Caddyfile syntax errors
-
Run
sudo caddy validate --config /etc/caddy/Caddyfile --adapter caddyfilefor a precise error message -
Run
sudo caddy fmt /etc/caddy/Caddyfileto print a properly formatted version side-by-side
Service fails to start
-
Check journal:
sudo journalctl -u caddy.service --no-pager -n 50 -
Check filesystem space:
df -h /var/lib/caddy -
Verify caddy user owns the document root:
sudo ls -la /var/www/html
Step 13: Security Recommendations
-
Restrict port 22 to your management IP ranges only
-
Keep port 80 open from the internet — required for Let's Encrypt HTTP-01 challenge and renewal. If you cannot expose port 80 publicly, switch to the DNS-01 challenge (Caddy's
tls.dns.azureplugin works with Azure DNS) -
Add Strict-Transport-Security to your domain block:
www.example.com { header Strict-Transport-Security "max-age=31536000; includeSubDomains; preload" ... } -
Restrict the admin API (port 2019) to localhost only — the default — and never proxy it through a public interface
-
Keep Caddy updated by running
sudo apt-get update && sudo apt-get upgrade caddyperiodically; the official Caddy Cloudsmith repo is already configured -
Monitor Caddy access logs via journald (
journalctl -u caddy.service) or by configuring alogdirective in the Caddyfile to ship to a file or remote syslog
Step 14: Support and Licensing
Caddy is licensed under the Apache License 2.0. There is no per-domain, per-cert, or per-server fee. Caddy is a registered trademark of ZeroSSL Inc.
cloudimg provides commercial support for this image separately from the upstream project.
-
Email: support@cloudimg.co.uk
-
Website: www.cloudimg.co.uk
-
Support hours: 24/7 with guaranteed 24 hour response SLA
Deploy on Azure
Launch Caddy 2 on Ubuntu 24.04 with 24/7 support from cloudimg.
View on Marketplace
Need Help?
Our support team is available 24/7.
support@cloudimg.co.uk