
Crawl4AI on AWS User Guide
Overview
This image runs Crawl4AI, a fast, open source web crawler and scraper that converts web pages into clean, LLM-ready Markdown and structured data through a simple REST API. It drives a real headless Chromium browser, so it renders JavaScript-heavy pages the way a browser sees them, and returns Markdown tuned for large language model context, extracted structured data, screenshots and PDFs.
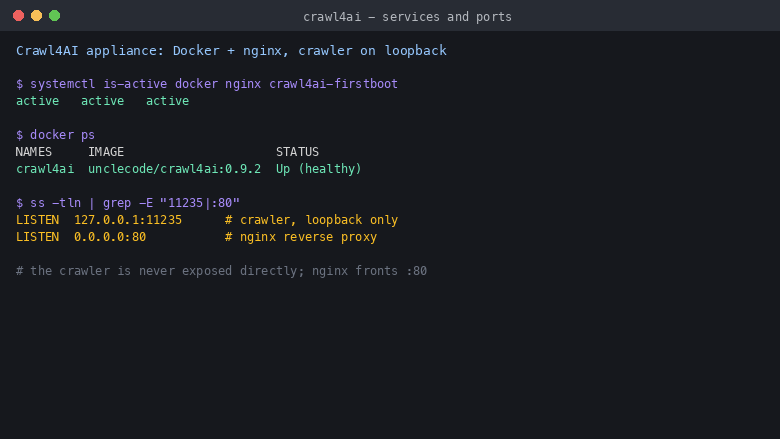
Crawl4AI runs as the official server Docker container (unclecode/crawl4ai:0.9.2), which bundles the headless Chromium backend and all of its operating system dependencies. The container binds only to the loopback interface on 127.0.0.1:11235 and is fronted by nginx as a reverse proxy on port 80 (and port 443 once you add TLS). The deployment is CPU only, with no GPU required.
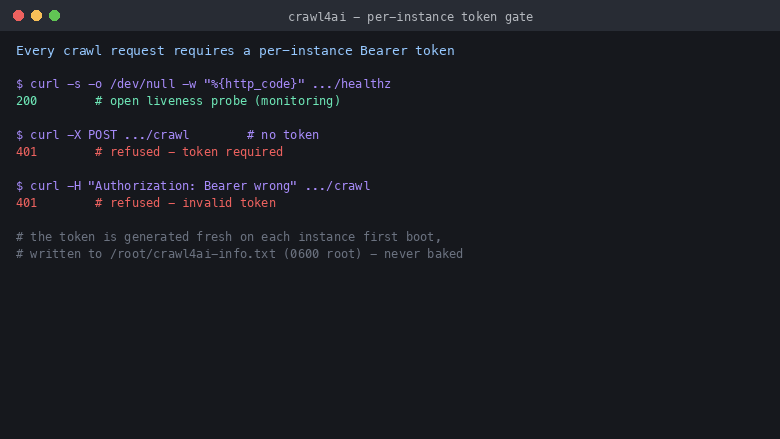
The appliance is secure by default. An unauthenticated web crawler is a server side request forgery (SSRF) and denial of service risk, so the crawler is never exposed openly. On the first boot of every deployed instance, a one-shot service generates a unique API token, passes it to Crawl4AI as its native CRAWL4AI_API_TOKEN, verifies the crawl round-trip, and records the token in /root/crawl4ai-info.txt with mode 0600. Every crawl request must present that token as a bearer credential; only an open health probe stays unauthenticated for monitoring. No shared or default token ships in the image.
Prerequisites
Before you deploy this image you need:
- An Amazon Web Services account where you can launch EC2 instances
- IAM permissions to launch instances, create security groups, and subscribe to AWS Marketplace products
- An EC2 key pair in the target Region for SSH access to the instance
- A VPC and subnet in the target Region, with a security group allowing inbound port 22 from your management network and inbound ports 80 and 443 from the networks that your crawl clients will reach the API on
- The AWS CLI (version 2) installed locally if you plan to deploy from the command line
Step 1: Launch the Instance from the AWS Marketplace
Sign in to the AWS Management Console, open the EC2 service, and select Launch instance. Under Application and OS Images choose AWS Marketplace AMIs and search for Crawl4AI. Select the cloudimg listing and choose Select, then Continue on the subscription summary.
Choose an instance type. Crawl4AI drives a headless Chromium browser, which is memory hungry, so the recommended size is m5.large (2 vCPU, 8 GiB) for light to moderate crawling; increase the size for higher concurrency. Select your key pair, and attach a security group that opens port 22 from your management network and ports 80 and 443 from the networks your crawl clients will use. Launch the instance.
To launch from the AWS CLI instead, subscribe to the product in the Marketplace console first, then run the following (substitute your own AMI id, key pair, subnet and security group):
aws ec2 run-instances \
  --image-id <ami-id> \
  --instance-type m5.large \
  --key-name <your-key-pair> \
  --subnet-id <subnet-id> \
  --security-group-ids <security-group-id> \
  --metadata-options "HttpTokens=required" \
  --tag-specifications 'ResourceType=instance,Tags=[{Key=Name,Value=crawl4ai}]'
HttpTokens=required enforces IMDSv2, which is part of the SSRF safety model described below.
Step 2: Connect to Your Instance over SSH
Connect using the private key for the key pair you selected at launch. The login user depends on the operating system variant you launched:
| Operating system variant | SSH login user |
|---|---|
| Ubuntu 24.04 LTS | ubuntu |
ssh -i /path/to/your-key.pem ubuntu@<public-ip>
Step 3: Retrieve Your Per-Instance API Token
Crawl4AI requires a bearer token on every crawl request. A unique token was generated on this instance's first boot and written to a root-only file. Read it with:
sudo cat /root/crawl4ai-info.txt
The file shows your CRAWL4AI_URL (the API base URL for this instance) and your CRAWL4AI_TOKEN. Treat the token as a secret. If the file only contains a placeholder note, first boot has not finished yet; wait a minute and re-read it.
Step 4: Verify the Service
Confirm Docker, nginx and the Crawl4AI container are running and that the open health probe answers. Run these on the instance:
systemctl is-active docker.service nginx.service
docker ps --format '{{.Names}} {{.Image}} {{.Status}}'
curl -s -o /dev/null -w 'healthz: HTTP %{http_code}\n' http://127.0.0.1/healthz
You should see active for both services, the crawl4ai container reported as healthy on unclecode/crawl4ai:0.9.2, and healthz: HTTP 200.
The token gate refuses any crawl request that does not present a valid token. You can confirm it locally:
curl -s -o /dev/null -w 'unauthenticated /crawl: HTTP %{http_code}\n' \
  -X POST http://127.0.0.1/crawl \
  -H 'Content-Type: application/json' \
  -d '{"urls":["raw:<h1>test</h1>"]}'
This returns 401, proving the endpoint is not open.
Step 5: Your First Crawl
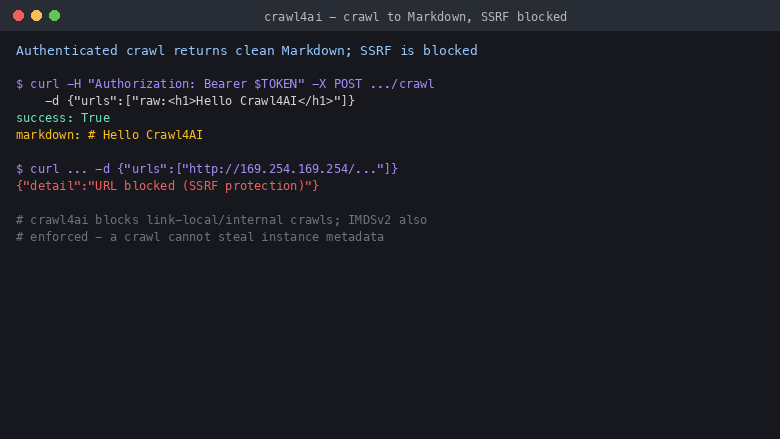
The following runs a real crawl on the instance, reading the token straight from the info file so nothing is echoed. It uses Crawl4AI's raw: scheme, which converts supplied HTML with no network fetch, so it works even with no outbound internet access:
TOKEN=$(sudo grep '^CRAWL4AI_TOKEN=' /root/crawl4ai-info.txt | cut -d= -f2-)
curl -s -X POST http://127.0.0.1/crawl \
  -H "Authorization: Bearer $TOKEN" \
  -H 'Content-Type: application/json' \
  -d '{"urls":["raw:<h1>Hello Crawl4AI</h1><p>clean markdown</p>"],"crawler_config":{"type":"CrawlerRunConfig","params":{"cache_mode":"bypass"}}}'
The response is JSON with "success": true and a markdown field containing # Hello Crawl4AI.
To crawl a real public URL, pass its address in urls. From your own workstation you would call the instance's public address with your token:
curl -X POST http://<public-ip>/crawl \
  -H "Authorization: Bearer <your-api-token>" \
  -H "Content-Type: application/json" \
  -d '{"urls":["https://example.com"]}'
Crawl4AI returns clean Markdown extracted from the rendered page, ready to feed into a retrieval augmented generation pipeline, an AI agent, or a dataset.
Step 6: More Endpoints
Crawl4AI exposes several endpoints through the same authenticated proxy. Pass the same Authorization: Bearer <your-api-token> header to each:
POST /crawl— crawl one or more URLs and return Markdown and extracted dataPOST /crawl/stream— stream results as each URL completesPOST /html— return the cleaned HTML of a pagePOST /screenshot— capture a full-page screenshotPOST /pdf— render a page to PDFGET /playground— a small built-in developer console for trying requests interactively (behind the token gate)GET /health— the crawler's own health endpoint
Crawl configuration (cache mode, extraction strategy, JavaScript to execute on the page, and more) is passed in the crawler_config object, following Crawl4AI's CrawlerRunConfig schema.
Step 7: Security Model and the SSRF Caveat
This appliance is designed to keep the crawler safe by default, but a crawler is a powerful tool and you remain responsible for the network context you run it in.
- Authentication. Every crawl request needs the per-instance bearer token. The crawler binds to loopback only; nginx on port 80 is the sole entry point. There are no shared or default credentials.
- SSRF protection. Crawl4AI 0.9.2 blocks crawls of loopback, link-local and internal (private) address ranges at the application layer, refusing them with
URL blocked (SSRF protection). In addition, this image enforces IMDSv2, so even if a crawl reached the instance metadata service at169.254.169.254it could not retrieve instance credentials. These are two independent defenses against metadata theft. - Restrict the network. Crawl4AI will fetch any public URL a caller with the token asks for. Run it only in a network context you trust. Restrict inbound ports 80 and 443 in the security group to your own CIDR ranges rather than leaving them open to the whole internet.
- Add TLS. For production, add a domain name and a TLS certificate on port 443 so the token is never sent in clear text. You can front the appliance with a certificate from your own CA, or install one with certbot for your-domain, then point clients at
https://your-domain/crawl.
Step 8: Rotate the API Token
To rotate the token, recreate the container with a new value and record it. On the instance (after ssh ubuntu@<public-ip>):
# rotate the per-instance API token (run on the instance at <public-ip>)
NEW_TOKEN=$(openssl rand -hex 32)
sudo docker rm -f crawl4ai
sudo docker run -d --name crawl4ai --restart unless-stopped --shm-size=1g --network host \
  -e CRAWL4AI_API_TOKEN="$NEW_TOKEN" -e GUNICORN_BIND=127.0.0.1:11235 unclecode/crawl4ai:0.9.2
Store $NEW_TOKEN securely and update /root/crawl4ai-info.txt. All existing clients must switch to the new token.
Step 9: Updates and Maintenance
The Crawl4AI image is pinned to unclecode/crawl4ai:0.9.2 for reproducibility. To move to a newer release, pull the new tag and recreate the container with your token, following the same docker run shape as above. Both docker.service and nginx.service are managed by systemd and restart automatically; container logs are available with sudo docker logs crawl4ai and service logs with journalctl -u nginx.
Attribution and Credits
This product includes software developed by UncleCode (https://x.com/unclecode) as part of the Crawl4AI project. Crawl4AI is licensed under the Apache License, Version 2.0, with an additional attribution requirement; the full licence and notice ship in the image at /opt/crawl4ai/LICENSE and /opt/crawl4ai/NOTICE.
Support
cloudimg provides 24/7 technical support for this product by email at support@cloudimg.co.uk and via live chat through our support portal. Our engineers help with deployment, reverse proxy and TLS configuration, API token rotation, network and SSRF hardening, crawl tuning, structured extraction configuration, and runtime performance tuning.