
Dify on AWS User Guide
Overview
This image runs Dify, a source-available platform for building and operating LLM applications. Its visual console lets you design AI agents, chat assistants, retrieval augmented generation (RAG) apps and multi-step workflows, connect any model provider, manage prompts and datasets, and publish everything as an API.
Dify is delivered as its complete official Docker Compose stack. A single dify.service systemd unit brings the whole project up from /opt/dify/docker: the web console, the API, background workers, a PostgreSQL database, Redis, a Weaviate vector store, the sandbox, the SSRF proxy, the plugin daemon and Dify's own bundled nginx. Every internal service stays on the private Docker network; only Dify's nginx publishes host ports 80 and 443, so the security group is the network boundary.
The image is secure by default. No administrator account ships in it: Dify's first-run setup endpoint reports not_started, so the console boots straight to the setup screen and the first account you create becomes the workspace owner and administrator. A unique Dify SECRET_KEY (used to sign sessions and tokens) is generated fresh on the first boot of every deployed instance, so no two instances share a signing key, and the stack delta-pulls the newest Dify release images on first boot so every launch runs current software. Dify runs no models itself and ships with no provider key: you add your own after creating your admin account.
Prerequisites
Before you deploy this image you need:
- An Amazon Web Services account where you can launch EC2 instances
- IAM permissions to launch instances, create security groups, and subscribe to AWS Marketplace products
- An EC2 key pair in the target Region for SSH access to the instance
- A VPC and subnet in the target Region, with a security group allowing inbound port 22 from your management network and inbound ports 80 and 443 from the networks your users will reach Dify on
- The AWS CLI (version 2) installed locally if you plan to deploy from the command line
- An API key for at least one model provider (OpenAI, Anthropic, Amazon Bedrock credentials, a local Ollama endpoint, or any OpenAI-compatible endpoint) to actually run your agents and workflows
Instance Sizing
The full Dify stack (PostgreSQL, Redis, Weaviate and several Python workers) is memory hungry. Choose an instance with at least 4 vCPUs and 16 GB of RAM for production use - m5.xlarge or larger is recommended. A smaller instance will run the console but may struggle under concurrent load or when embedding large document sets. Give the root volume ample headroom (60 GB or more) because the Docker images and the vector store grow with use.
Connecting to Your Instance
SSH in as the default login user for your OS variant, using your EC2 key pair. Dify's console does not require an SSH tunnel - it is served on port 80 - but you connect over SSH for administration.
| OS variant | SSH login user | Example |
|---|---|---|
| Ubuntu 24.04 | ubuntu |
ssh -i your-key.pem ubuntu@<instance-public-ip> |
Step 1: Launch the Instance from the AWS Marketplace
Sign in to the AWS Management Console, open the EC2 service, and select Launch instance. Under Application and OS Images choose AWS Marketplace AMIs and search for Dify. Select the cloudimg listing and choose Select, then Continue on the subscription summary.
Pick an instance type of m5.xlarge or larger (see Instance Sizing above). Choose your EC2 key pair under Key pair (login). Under Network settings select your VPC and subnet, and either create or select a security group that allows inbound port 22 from your management network and inbound ports 80 and 443 from the networks your users use. Leave the root volume at 60 GB or larger.
Select Launch instance. First-boot initialisation - rotating the per-instance signing key, delta-pulling the newest Dify images and bringing the stack up - takes a few minutes after the instance state becomes Running and the status checks pass. On a fresh launch the images pull can take longer; allow up to five minutes before the console answers.
Step 2: Launch the Instance from the AWS CLI
The following block launches an instance from the cloudimg Dify Marketplace AMI into an existing subnet and security group. Replace <ami-id> with the AMI ID shown on the Marketplace listing, <key-name> with your EC2 key pair name, <subnet-id> with your subnet ID, and <security-group-id> with a security group that opens ports 22, 80, and 443 as described above.
aws ec2 run-instances \
  --image-id <ami-id> \
  --instance-type m5.xlarge \
  --key-name <key-name> \
  --subnet-id <subnet-id> \
  --security-group-ids <security-group-id> \
  --block-device-mappings '[{"DeviceName":"/dev/sda1","Ebs":{"VolumeSize":60,"VolumeType":"gp3"}}]' \
  --metadata-options 'HttpTokens=required,HttpEndpoint=enabled' \
  --tag-specifications 'ResourceType=instance,Tags=[{Key=Name,Value=dify}]'
The metadata options request IMDSv2; the image's first-boot resolver reads the instance's public IP through IMDSv2 to build the console URL in the info note.
Step 3: Verify the Stack Is Running
SSH to the instance and confirm both systemd units are active:
systemctl is-active docker.service dify.service
Both report active:
active
active
List the Dify containers to see the full stack up and healthy:
cd /opt/dify/docker && sudo docker compose ps --format "table {{.Service}}\t{{.Status}}"
SERVICE         STATUS
agent_backend   Up 9 minutes
api             Up 9 minutes (healthy)
api_websocket   Up 9 minutes
db_postgres     Up 9 minutes (healthy)
local_sandbox   Up 9 minutes (healthy)
nginx           Up 9 minutes
plugin_daemon   Up 9 minutes
redis           Up 9 minutes (healthy)
sandbox         Up 9 minutes (healthy)
ssrf_proxy      Up 9 minutes
weaviate        Up 9 minutes
web             Up 9 minutes
worker          Up 9 minutes
worker_beat     Up 9 minutes
Confirm the console answers through Dify's nginx:
curl -s -o /dev/null -w "console -> HTTP %{http_code}\n" http://localhost/console/api/setup
console -> HTTP 200
Step 4: Retrieve the Instance Info Note
The image writes a root-only note with the resolved console URL. It contains no credential, because no administrator ships in the image:
sudo cat /root/dify-info.txt
# Dify - Per-Instance Info
#
# NO administrator ships in this image (secure by default / no-default-login).
# The FIRST account you register at /install becomes the workspace owner/administrator.
#
DIFY_URL=http://<instance-public-ip>/
DIFY_SETUP_URL=http://<instance-public-ip>/install
Step 5: Create Your Administrator Account
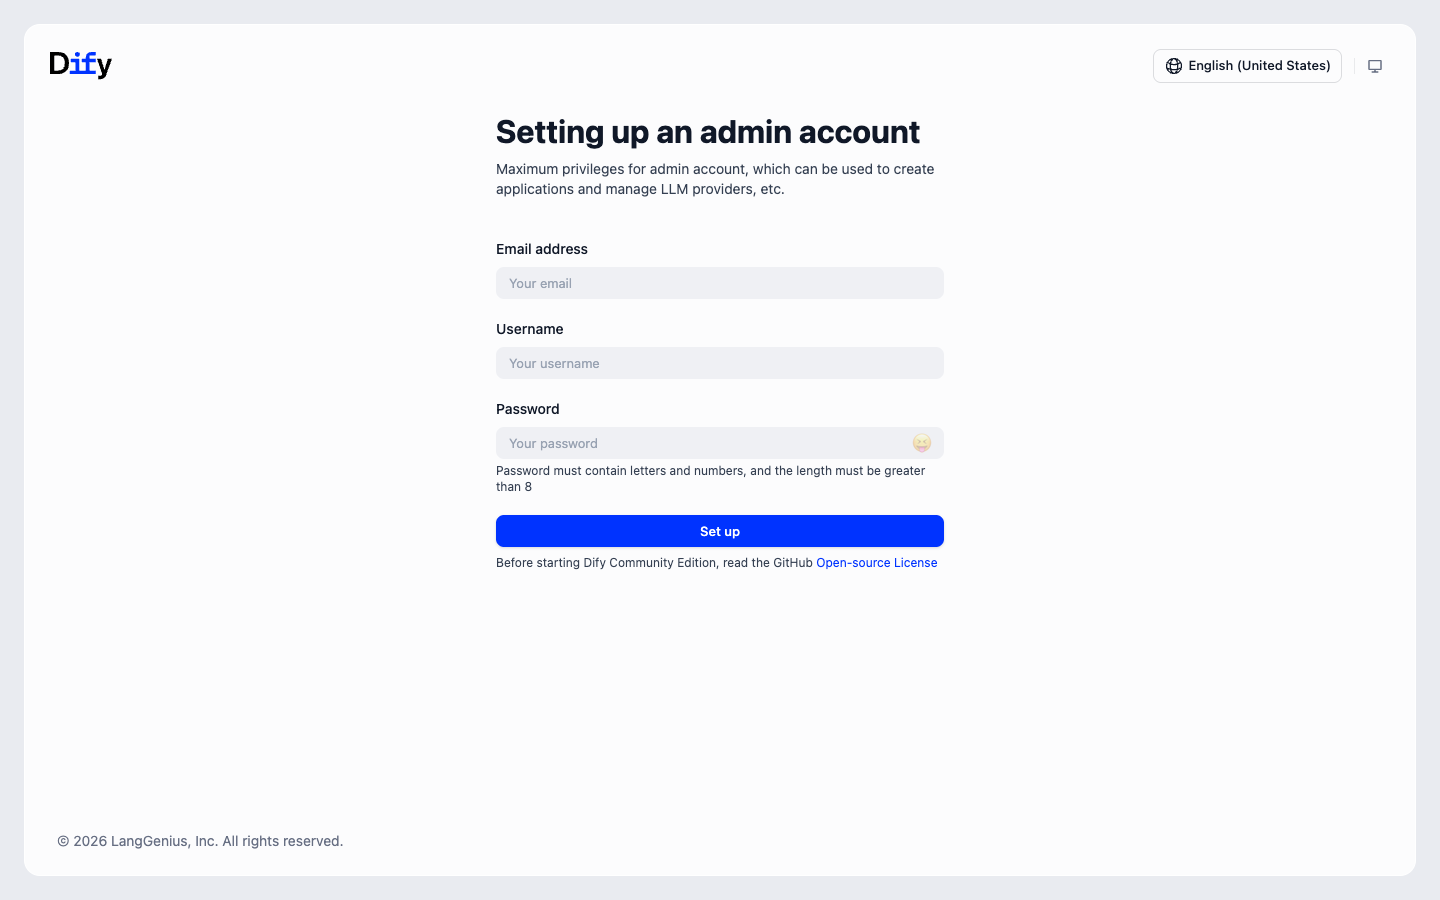
Open http://<instance-public-ip>/install in your browser. Dify shows the first-run setup screen. Enter an email address, a username and a password (the password must contain letters and numbers and be longer than eight characters), then choose Set up. This first account becomes the workspace owner and administrator with maximum privileges.
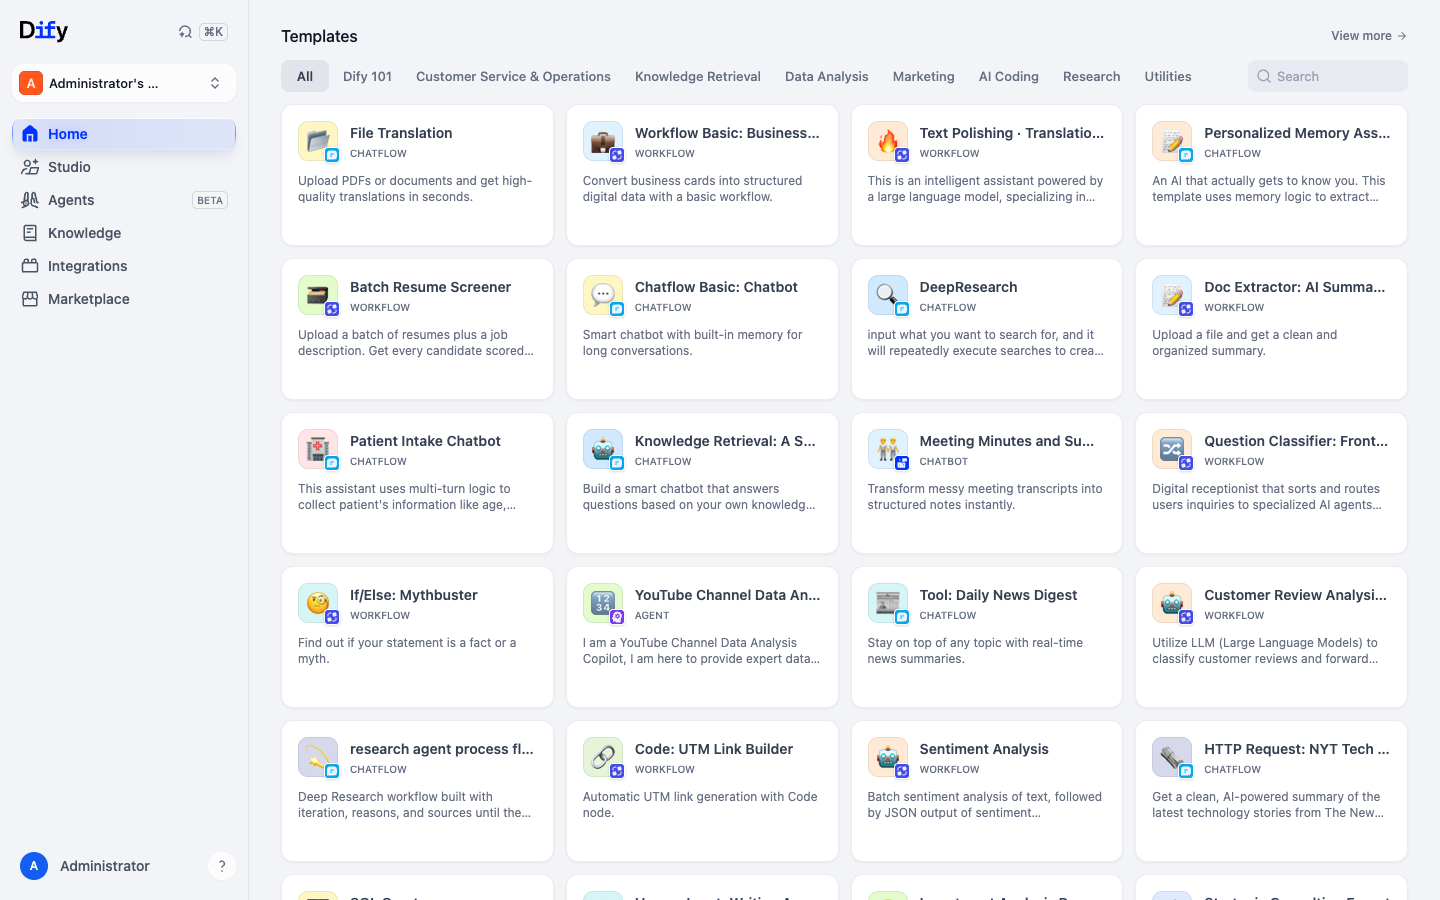
After setup you are signed in to the Dify console home, where you can browse ready-made agent, chatbot, workflow and RAG templates or start a blank app.
Step 6: Connect a Model Provider
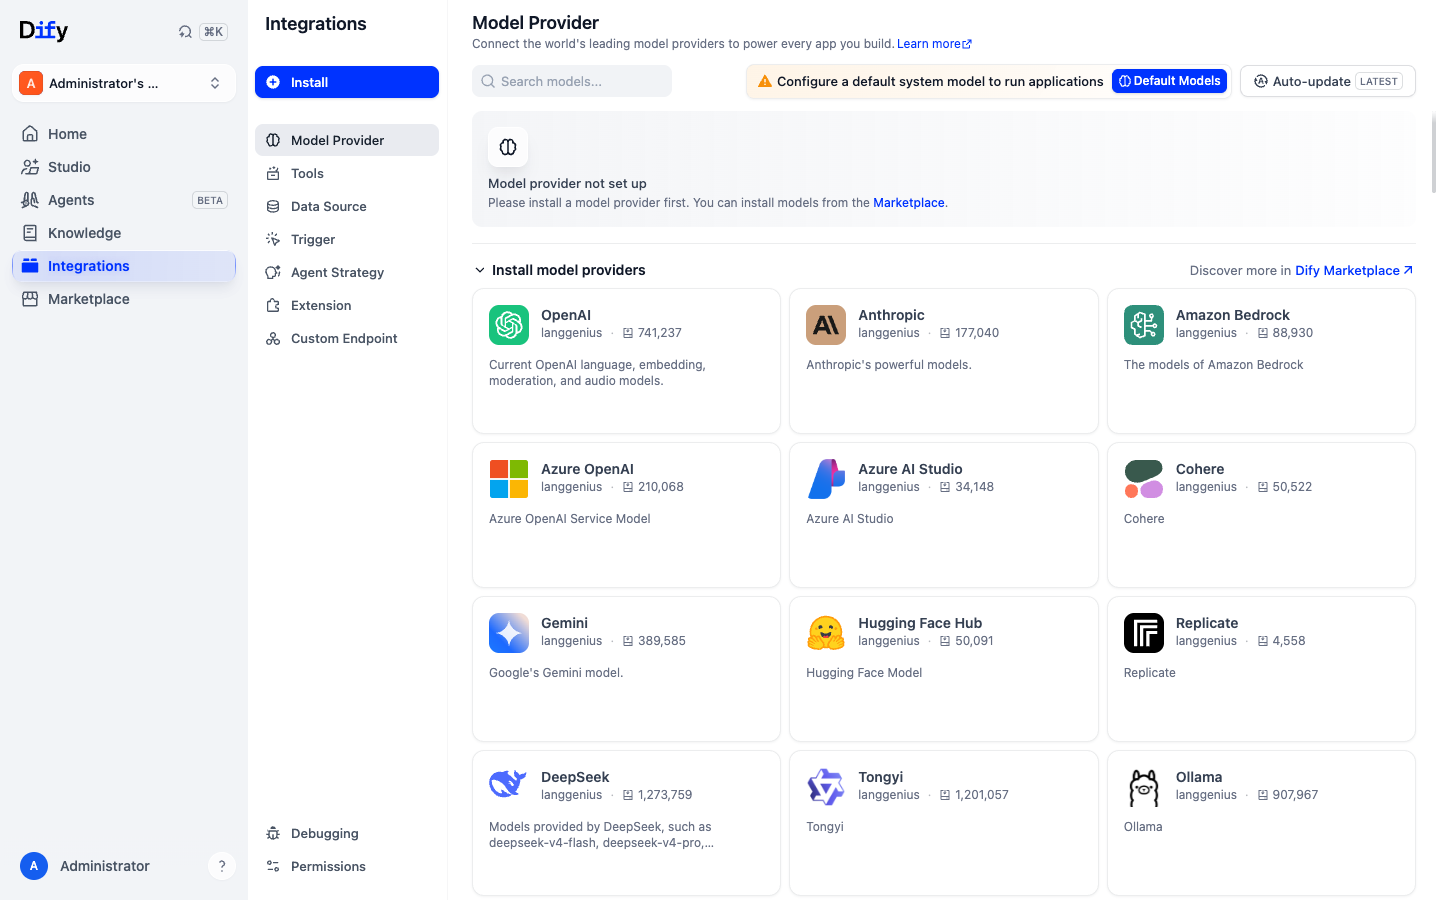
Dify orchestrates external model providers and ships with no key bundled, so before you can run an app you must connect a provider. Open Integrations then Model Provider and install and configure a provider: OpenAI, Anthropic, Amazon Bedrock, Google Gemini, a local Ollama, or any OpenAI-compatible endpoint. Supply your API key (or, for Bedrock, your AWS credentials) and set a default system model.
Step 7: Build Your First App
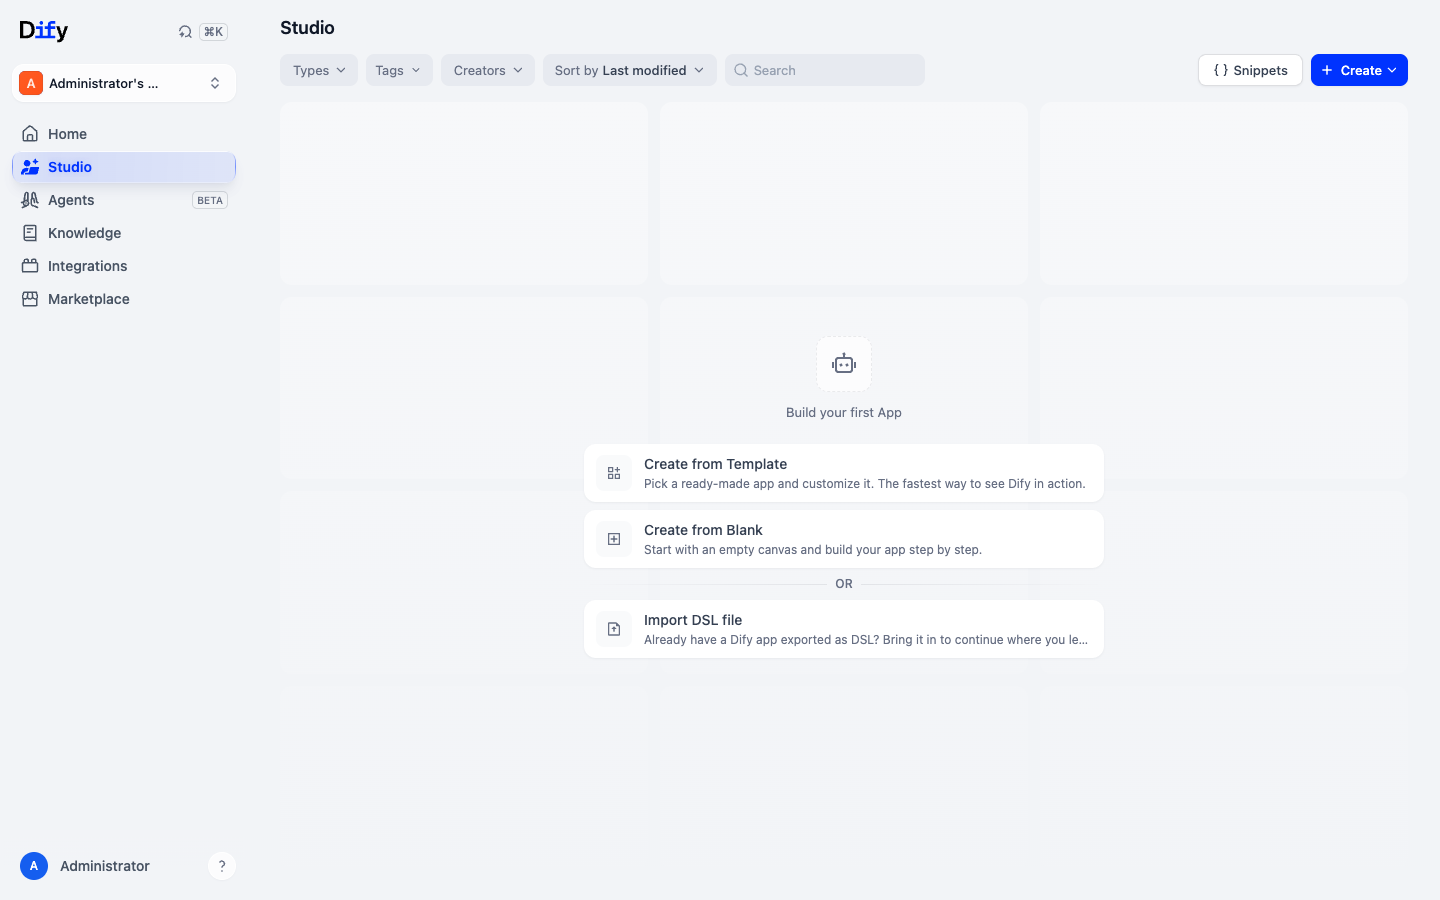
Open Studio and choose Create from Template to start from a ready-made app, Create from Blank to build on an empty canvas, or Import DSL file to bring in an app you exported elsewhere. Dify supports several app types: a simple chatbot or text completion, an agent that can call tools, a chatflow, and a full multi-step workflow. Add a Knowledge base under Knowledge to give your app retrieval augmented generation over your own documents, embedded into the bundled Weaviate vector store.
Once an app is published, Dify exposes it as a web app and as a backend API you can call from your own products, using an API key you generate in the app's settings.
Step 8: Configure HTTPS (Recommended)
Dify's bundled nginx already listens on port 443, ready for your certificate. For a production deployment, point a DNS record at the instance and terminate TLS. The simplest options are to place an AWS Application Load Balancer with an ACM certificate in front of the instance on port 443, or to obtain a certificate with certbot and mount it into the nginx container. Dify leaves CONSOLE_API_URL and APP_WEB_URL empty so the console derives its URLs from the request origin, meaning it works on your hostname with no rebuild once TLS is in front of it.
Managing the Service
The whole stack is controlled by one systemd unit that wraps Docker Compose:
sudo systemctl status dify      # show the stack unit
sudo systemctl restart dify     # restart the whole stack
cd /opt/dify/docker && sudo docker compose ps    # per-container status
cd /opt/dify/docker && sudo docker compose logs -f api    # follow the API logs
The stack is pinned to the release cloned at build time and refreshed to the newest images on first boot. To update later, pull the newest images and recreate the stack:
cd /opt/dify/docker && sudo docker compose pull && sudo systemctl restart dify
Backup and Maintenance
All Dify state lives in bind mounts under /opt/dify/docker/volumes - the PostgreSQL database (db/data), Redis, the Weaviate vector store, and uploaded files under app/storage. Back these up with an EBS snapshot of the root volume, or stop the stack and archive the volumes directory:
sudo systemctl stop dify
sudo tar czf /root/dify-volumes-backup.tgz -C /opt/dify/docker volumes
sudo systemctl start dify
Keep the OS patched with sudo apt-get update && sudo apt-get upgrade, and monitor disk usage as the vector store and uploaded documents grow.
Support
cloudimg provides 24/7 technical support for this product by email at support@cloudimg.co.uk and via live chat through our support portal. Our engineers assist with deployment, the Docker Compose stack, first-run setup, model provider integration, retrieval augmented generation and the vector store, workflow and agent configuration, TLS setup, updates and troubleshooting.