ElasticMQ on AWS User Guide
Overview
This image runs ElasticMQ, an open source message queue with a fully Amazon SQS-compatible REST interface, from the pinned upstream release elasticmq-server-all-1.7.1.jar (SoftwareMill, Apache License 2.0). Point aws-cli, boto3, the AWS SDKs or Spring Cloud AWS at ElasticMQ with a single endpoint override and you get a local, self-hosted SQS: no AWS account, no network egress, and no per-message charges. It is the standard choice for local development, CI and integration testing, demos, and lightweight self-hosted queueing.
ElasticMQ has no authentication of its own, so this appliance is built defensively. The queue engine binds to loopback 127.0.0.1:19324 only and is never directly internet-exposed. An nginx front end owns the two customer-facing ports:
- Port 9324 is the well-known drop-in SQS endpoint that AWS SDK clients point at. It is unauthenticated by design, because SQS clients sign requests with SigV4 and cannot send HTTP Basic Auth. Its security boundary is the network: you restrict it in your security group.
- Port 80 is the same SQS API behind a per-instance HTTP Basic Auth gate (user
admin) for authenticated management access, plus an unauthenticated/healthzfor load balancer probes.
On the first boot of every deployed instance, a one shot service resolves the instance public IP, generates a 24 character random password for the admin user, bcrypt-hashes it into the nginx Basic Auth file, and writes the plaintext to /root/elasticmq-credentials.txt with file mode 0600. Every instance gets its own credentials, so the password is never baked into the image.
ElasticMQ runs with in-memory storage, its canonical mode for development, CI and testing. Queues and messages are held in memory and are lost on service restart or instance reboot. This is intentional and is noted on the instance login banner and in the credentials file. Enabling optional durable persistence is covered in Step 9.
The Apache 2.0 licence is baked into the image at /opt/elasticmq/LICENSE, alongside the upstream NOTICE.
Prerequisites
Before you deploy this image you need:
- An Amazon Web Services account where you can launch EC2 instances
- IAM permissions to launch instances, create security groups, and subscribe to AWS Marketplace products
- An EC2 key pair in the target Region for SSH access to the instance
- A VPC and subnet in the target Region, with a security group allowing inbound port 22 from your management network
- The AWS CLI version 2 installed locally if you plan to deploy from the command line or connect an SQS client
Step 1: Launch the Instance from the AWS Marketplace
Sign in to the AWS Management Console, open the EC2 service, and select Launch instance. Under Application and OS Images choose AWS Marketplace AMIs and search for ElasticMQ. Select the cloudimg listing and choose Select, then Continue on the subscription summary.
Pick an instance type of m5.large or larger as a balanced default. Choose your EC2 key pair under Key pair (login). Under Network settings select your VPC and subnet, and create or select a security group that allows inbound port 22 from your management network. To let SQS clients reach the queue, additionally open inbound TCP 9324 (the drop-in SQS endpoint) restricted to your application subnets, and optionally 80 or 443 for authenticated management access. Leave the root volume at the default size or larger.
Select Launch instance. First boot initialisation takes only a few seconds after the instance state becomes Running and the status checks pass.
Step 2: Launch the Instance from the AWS CLI
The following block launches an instance from the cloudimg ElasticMQ Marketplace AMI into an existing subnet and security group. Replace <ami-id> with the AMI ID shown on the Marketplace listing, <key-name> with your EC2 key pair name, <subnet-id> with your subnet ID, and <security-group-id> with a security group that opens port 22 from your management network.
aws ec2 run-instances \
  --image-id <ami-id> \
  --instance-type m5.large \
  --key-name <key-name> \
  --subnet-id <subnet-id> \
  --security-group-ids <security-group-id> \
  --block-device-mappings '{"DeviceName":"/dev/sda1","Ebs":{"VolumeSize":30,"VolumeType":"gp3"}}' \
  --metadata-options 'HttpTokens=required,HttpEndpoint=enabled' \
  --tag-specifications 'ResourceType=instance,Tags=[{Key=Name,Value=elasticmq}]'
Step 3: Connect to the Instance over SSH
Connect to the instance with SSH as the default login user for the operating system variant you launched. The login user differs by variant:
| Operating system variant | SSH login user |
|---|---|
| Ubuntu 24.04 LTS | ubuntu |
ssh -i /path/to/your-key.pem ubuntu@<public-ip>
Step 4: Confirm ElasticMQ Is Running
ElasticMQ runs under systemd as elasticmq.service, and nginx fronts it. Confirm both are active:
systemctl is-active elasticmq nginx
Expected output:
active
active
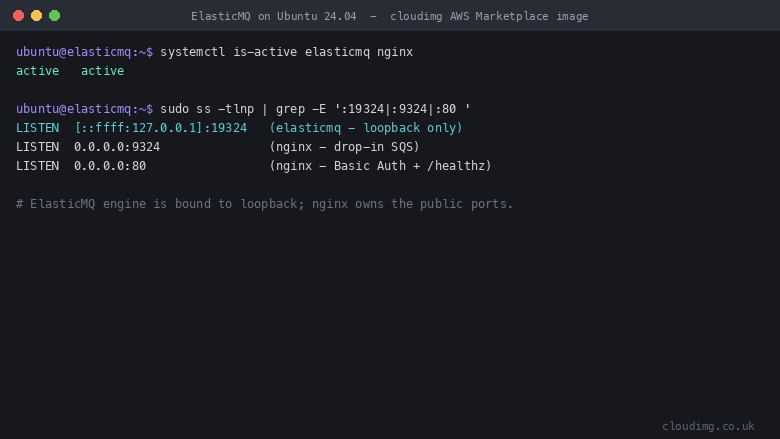
The queue engine is bound to loopback only, while nginx owns the public ports. You can see the split with ss:
sudo ss -tlnp | grep -E ':19324|:9324|:80 '
You will see ElasticMQ listening on 127.0.0.1:19324 and nginx listening on 0.0.0.0:9324 and 0.0.0.0:80.
Step 5: Read the Per-Instance Admin Password
The management password for the admin user is generated uniquely on first boot and written to a root-only file. Read it with sudo:
sudo cat /root/elasticmq-credentials.txt
The file contains ELASTICMQ_SQS_ENDPOINT, ELASTICMQ_ADMIN_URL, ELASTICMQ_USERNAME and ELASTICMQ_PASSWORD. Store the password somewhere safe.
Step 6: Verify the Endpoints
An unauthenticated static health endpoint answers on port 80 for load balancer probes:
curl -s -o /dev/null -w '%{http_code}\n' http://127.0.0.1/healthz
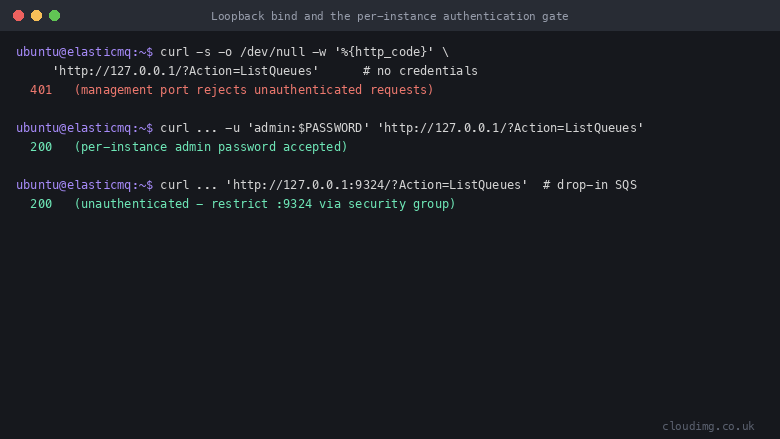
It returns 200. The unauthenticated drop-in SQS endpoint on port 9324 answers the SQS ListQueues action:
curl -s -o /dev/null -w '%{http_code}\n' 'http://127.0.0.1:9324/?Action=ListQueues&Version=2012-11-05'
It returns 200. The authenticated management API on port 80 rejects an unauthenticated request with 401:
curl -s -o /dev/null -w '%{http_code}\n' 'http://127.0.0.1/?Action=ListQueues&Version=2012-11-05'
It returns 401, confirming the management port is password protected.
Step 7: Point an SQS Client at ElasticMQ
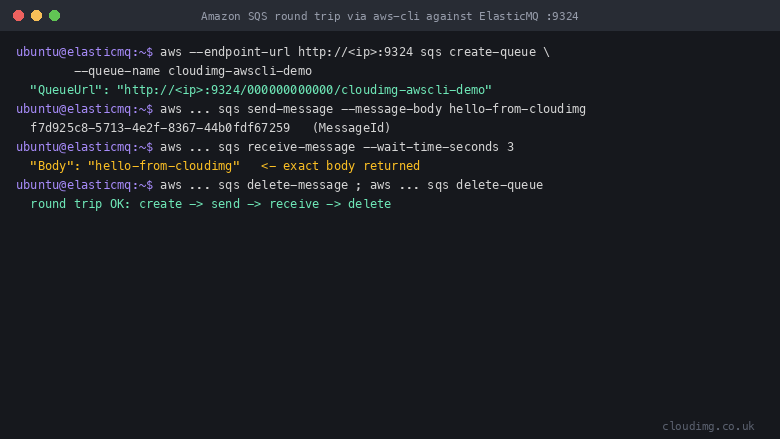
From any machine that can reach the instance on port 9324, point aws-cli (or boto3, or any AWS SDK) at the drop-in endpoint with the --endpoint-url override and any dummy AWS credentials. ElasticMQ accepts a full SQS round trip:
export AWS_ACCESS_KEY_ID=dummy AWS_SECRET_ACCESS_KEY=dummy AWS_DEFAULT_REGION=us-east-1
EP=http://<public-ip>:9324

aws --endpoint-url $EP sqs create-queue --queue-name my-queue
aws --endpoint-url $EP sqs send-message \
  --queue-url $EP/000000000000/my-queue --message-body 'hello from my app'
aws --endpoint-url $EP sqs receive-message --queue-url $EP/000000000000/my-queue
aws --endpoint-url $EP sqs delete-queue --queue-url $EP/000000000000/my-queue
The queue URL returned by create-queue already carries this instance's public IP, so SDK clients receive reachable queue URLs. In boto3, pass the same values to boto3.client('sqs', endpoint_url='http://<public-ip>:9324', aws_access_key_id='dummy', aws_secret_access_key='dummy', region_name='us-east-1').
Step 8: Network Security Model
Because the drop-in SQS port 9324 is unauthenticated by design, network isolation is its security boundary. The shipped default security group opens only port 22, so ports 9324, 80 and 443 are not reachable from off the instance until you open them deliberately. When you do:
- Open 9324 only to the application subnets or CIDR ranges that need to publish and consume messages. Never open it to
0.0.0.0/0. - Use the port 80 Basic Auth gate, or terminate TLS on 443 with your own certificate, for authenticated management access.
- Keep port 22 restricted to your management network.
This keeps the unauthenticated queue endpoint reachable only from the systems you trust.
Step 9: Optional Durable Persistence
The image ships with in-memory storage, so queues and messages are lost on service restart or reboot. If you need durable queues that survive a restart, enable ElasticMQ's optional persistence by editing /etc/elasticmq/custom.conf to add a queues-storage path and a messages-storage database, then restart the service:
sudo systemctl restart elasticmq
Refer to the upstream ElasticMQ documentation for the exact queues-storage and messages-storage configuration keys. For production durability, place the storage path on a dedicated EBS volume and take regular snapshots.
Step 10: Maintenance
Keep the operating system patched with the standard package manager, for example sudo apt-get update && sudo apt-get -y upgrade on Ubuntu, and reboot when a new kernel is installed. Restarting elasticmq.service clears all in-memory queues and messages unless you have enabled persistence. Review the nginx access and error logs under /var/log/nginx/ for client activity. The baked Apache 2.0 licence and upstream notices are at /opt/elasticmq/LICENSE and /opt/elasticmq/NOTICE.
Screenshots
ElasticMQ running under systemd with the queue engine bound to loopback and nginx owning the public ports:
A full Amazon SQS round trip through aws-cli against the ElasticMQ drop-in endpoint, returning the exact message body:
The loopback bind and the per-instance authentication gate: the management port rejects unauthenticated requests with 401 and accepts the per-instance password:
Support
cloudimg provides 24/7 technical support for this product by email at support@cloudimg.co.uk and by live chat. Our engineers can help with deployment, pointing aws-cli, boto3 and the AWS SDKs at the ElasticMQ endpoint, security group and network isolation guidance for the drop-in SQS port, enabling durable persistence, and TLS termination for the management endpoint. For critical issues we target a one hour average response, and general inquiries are handled during the same business day.