Envoy Proxy on Ubuntu 24.04 on Azure User Guide
Overview
Envoy is a high-performance, cloud-native Layer 7 edge and service proxy. Originally built at Lyft and now a graduated CNCF project, it is the data plane behind Istio and many service meshes, and is widely used for API gateways, edge routing, load balancing, observability and zero-trust service-to-service traffic. The cloudimg image installs the official Envoy binary as /usr/local/bin/envoy, runs it under a dedicated envoy system user, and ships a clear ready-to-run sample proxy configuration so the proxy is serving traffic from the moment the VM boots. Backed by 24/7 cloudimg support.
What is included:
- Envoy 1.31.x (Apache-2.0), the official upstream binary, at
/usr/local/bin/envoy - An
envoy.servicesystemd unit, enabled and running on boot, under a dedicatedenvoyuser - A sample proxy configuration at
/etc/envoy/envoy.yamlwith an HTTP listener on0.0.0.0:10000 - An
http_connection_managerthat routes requests through to a sample upstream cluster, demonstrating L7 routing and upstream proxying - The Envoy admin interface on
127.0.0.1:9901(/ready,/stats,/clusters) and stdout access logging - 24/7 cloudimg support
Envoy has no product web UI. The admin interface on port 9901 is a debug and observability surface and is bound to loopback only. The proxy listener uses port 10000, but the cloudimg image does not open 10000 in any network security group - you front the listener with your own TLS and NSG rules, and adapt the sample config to your own routes, clusters, filters and authentication. The proxy ships no per-VM password.
Prerequisites
An active Azure subscription, an SSH key pair, and a VNet + subnet in the target region. Standard_B2s (2 vCPU / 4 GiB RAM) is a good starting point. NSG inbound: allow 22/tcp from your management network. Open 10000/tcp (or front it with your own load balancer / TLS termination) only when you are ready to expose the proxy to clients.
Step 1 - Deploy from the Azure Marketplace
Sign in to the Azure Portal, choose Create a resource, search the Marketplace for Envoy by cloudimg, and select Create. On Basics pick your subscription, resource group, region and size; under Administrator account choose SSH public key and paste your key; under Inbound port rules allow SSH (22). Then Review + create -> Create.
Step 2 - Deploy from the Azure CLI
az vm create \
  --resource-group <your-rg> \
  --name envoy \
  --image <marketplace-image-urn> \
  --size Standard_B2s \
  --admin-username azureuser \
  --ssh-key-values ~/.ssh/id_ed25519.pub \
  --vnet-name <your-vnet> --subnet <your-subnet> \
  --public-ip-sku Standard
Step 3 - Connect to your VM
ssh azureuser@<vm-public-ip>
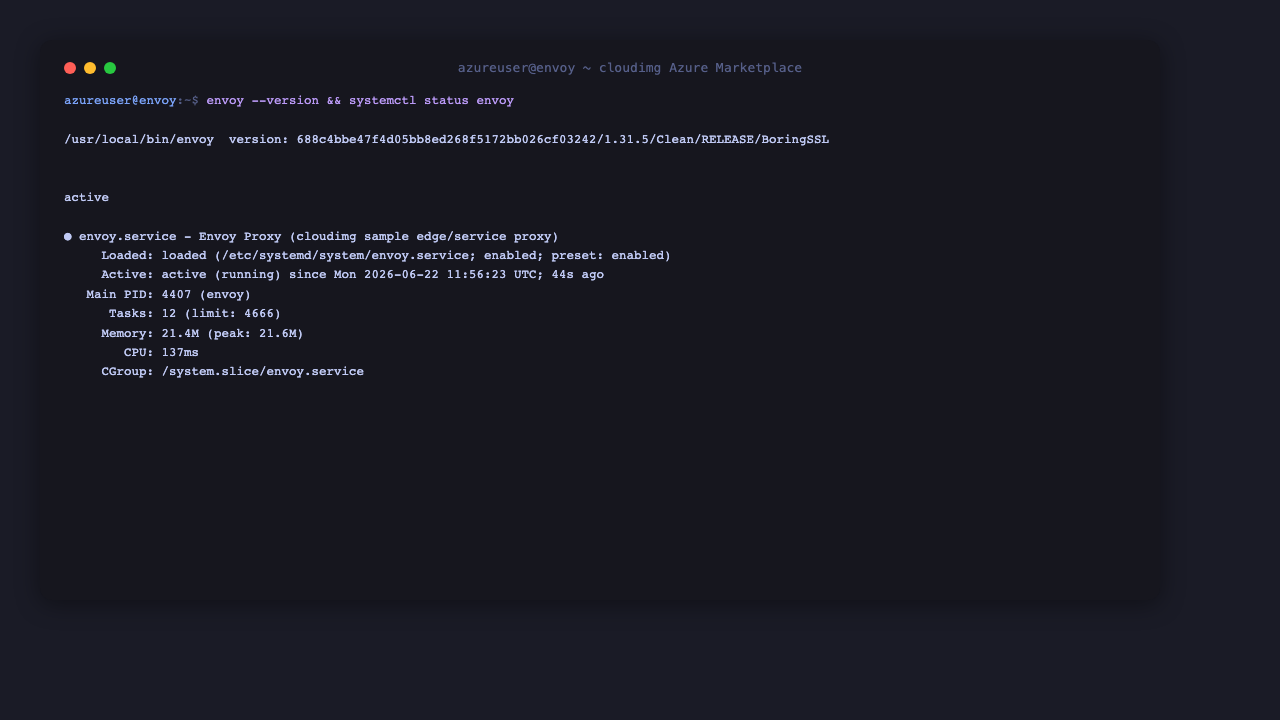
Step 4 - Confirm Envoy is installed and running
Check the version and that the service is active:
envoy --version
systemctl is-active envoy
envoy --version reports the Envoy version and build, and systemctl is-active envoy prints active.
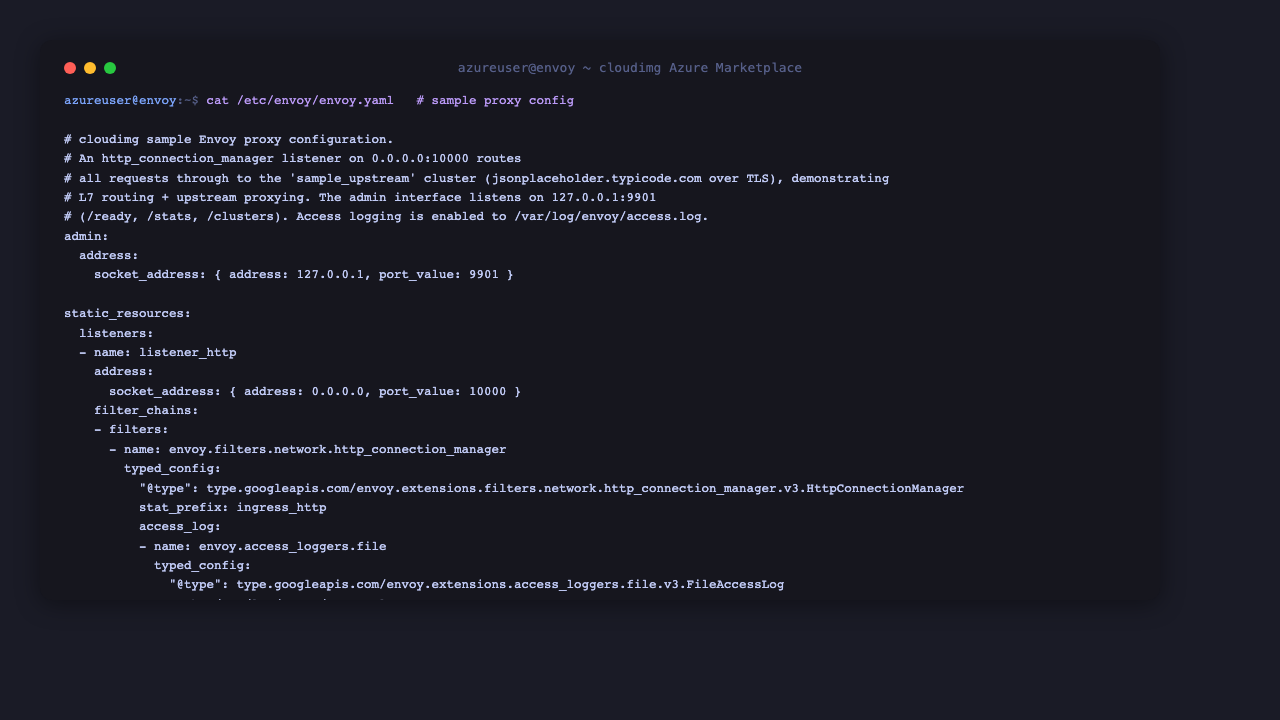
Step 5 - Review and validate the sample configuration
The ready-to-run proxy configuration lives at /etc/envoy/envoy.yaml. It declares the admin interface, an HTTP listener, the routes that map incoming requests onto an upstream cluster, and the upstream cluster definition. View it:
cat /etc/envoy/envoy.yaml
Envoy configuration is declarative - you describe the listeners, routes, clusters and filters you want, and Envoy programs its data plane accordingly. Before the service loads a configuration, validate its syntax and semantics with Envoy's built-in validation mode:
envoy --mode validate -c /etc/envoy/envoy.yaml
A valid configuration prints configuration '/etc/envoy/envoy.yaml' OK. Run this every time you edit envoy.yaml, then sudo systemctl restart envoy to apply your changes.
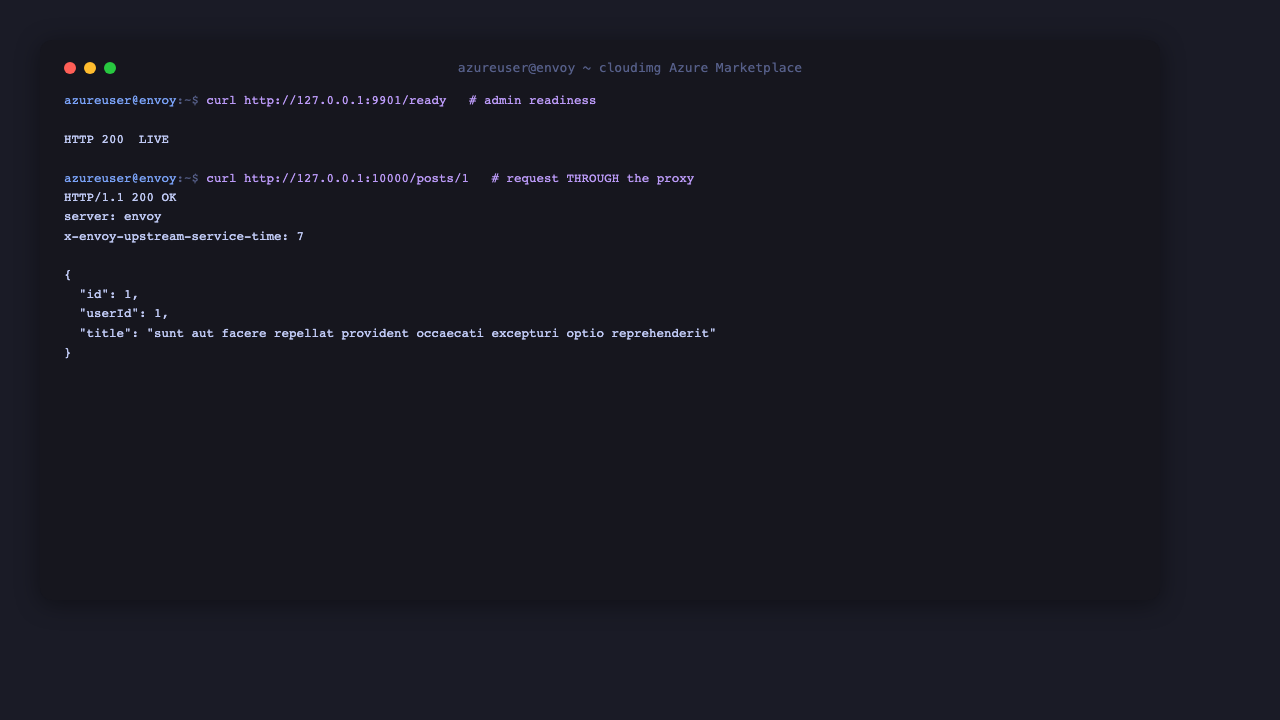
Step 6 - Check the admin readiness endpoint
Envoy exposes an admin interface on 127.0.0.1:9901. The /ready endpoint returns 200 with the body LIVE when the proxy is up and serving:
curl 127.0.0.1:9901/ready
Use this endpoint for your Azure Load Balancer or Application Gateway health probe (proxied appropriately, since the admin interface is loopback-only by design). The admin interface also exposes /stats and /clusters for observability.
Step 7 - Make a request through the proxy
The sample configuration routes every request on the listener through to the upstream cluster. A request to the listener is received by Envoy, routed by the http_connection_manager, and proxied to the upstream, which returns the response back through Envoy to you:
curl -s 127.0.0.1:10000/posts/1
The JSON response is the upstream's reply, returned through Envoy - proving the proxy actually routes traffic end to end.
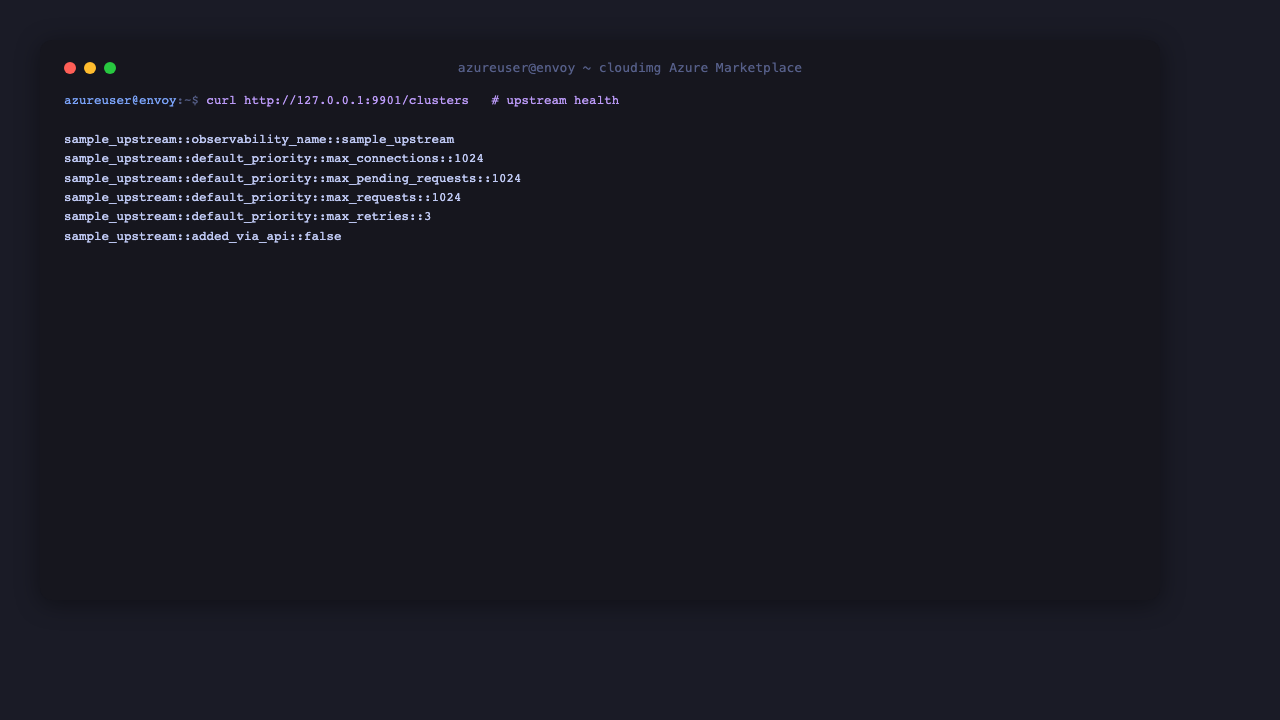
Step 8 - Inspect the upstream cluster health
Envoy continuously tracks the state of every upstream. The admin /clusters endpoint reports each cluster, its endpoints, connection and request counters, and health flags:
curl -s 127.0.0.1:9901/clusters
Look for the sample_upstream cluster - the health_flags::healthy line and active connection counters confirm Envoy considers the upstream reachable and is routing to it. Envoy also writes a stdout access log (captured by journald) for every request it proxies:
sudo journalctl -u envoy -n 20 --no-pager
Step 9 - Build your own proxy
Edit /etc/envoy/envoy.yaml to define your own listeners, routes, clusters and filters. The sample - a single HTTP listener routing to one upstream cluster over TLS - is the foundation for most edge and service-proxy use cases; layer on rate limiting, JWT authentication, CORS, header transformation, retries, circuit breaking and gRPC support from Envoy's filter chain. Always run envoy --mode validate -c /etc/envoy/envoy.yaml before restarting the service. See the Envoy documentation for the full configuration reference.
To expose the proxy to clients, open 10000/tcp (or your chosen listener port) in your NSG, ideally only from a load balancer subnet, or, recommended, place Envoy behind an Azure Application Gateway or terminate TLS directly in Envoy with a TLS transport socket on the listener.
Support
This image is maintained by cloudimg with 24/7 support. Envoy is licensed under the Apache License 2.0. Envoy and Envoy Proxy are trademarks of The Linux Foundation / CNCF; cloudimg is an independent image publisher and is not affiliated with or endorsed by the Envoy project or the CNCF. For help with the image or your deployment, contact support@cloudimg.co.uk.