etcd 3 Distributed Key-Value Store on Ubuntu 24.04 on Azure User Guide
Overview
etcd is the CNCF graduated, strongly-consistent, distributed key-value store that backs Kubernetes, OpenShift, CoreOS Container Linux, M3DB, Patroni and dozens of other distributed systems. It uses the Raft consensus algorithm to replicate state across a cluster of nodes with a guaranteed linearisable read/write ordering, exposes a gRPC + REST API on port 2379, and ships a feature-complete CLI (etcdctl) that talks the same protocol. The cloudimg image installs etcd 3.6.11 from the official GitHub release, runs as the dedicated etcd system user, persists data to /var/lib/etcd, and enables Role-Based Access Control (RBAC) at first boot so the API is never reachable without credentials. The peer port (2380) stays bound to loopback because the image is single-node by design — when you scale to a 3 or 5 node Raft cluster you re-bind the peer URL onto your private VNet.
What is included:
- etcd 3.6.11 (Apache 2.0) from the official GitHub release tarball, installed at
/usr/local/bin/etcd etcdctl3.6.11 CLI bundled at/usr/local/bin/etcdctl- Dedicated
etcdsystem user, data directory at/var/lib/etcd(root:etcd 0700) - Configuration file at
/etc/etcd/etcd.conf - Listen client URL
http://0.0.0.0:2379— clients reach the gRPC + REST API over the network (NSG controls inbound) - Listen peer URL
http://127.0.0.1:2380— loopback only, single-node by design (rebind for HA) - RBAC enabled at first boot — every API call requires a valid user/password
- Per-VM
cloudimguser with thereadwriterole (full read/write on all keys), per-VMrootuser with the admin role - etcdkeeper 0.7.8 web UI at
/opt/etcdkeeper, listening on127.0.0.1:8080, fronted by nginx on:80with HTTP Basic-Auth — browser-based tree view, create/edit/delete keys, role and user inspection - nginx 1.24 reverse proxy with
htpasswdat/etc/nginx/etcdkeeper.htpasswd(cloudimg user, password =ETCD_PASSWORD) etcd.service(User=etcd) — the gateway daemonetcdkeeper.service— runs etcdkeeper with-authso it relays customer credentials through to etcd RBAC at the API leveletcd-firstboot.service(Before=etcd) — IMDS-based IP detection, writes/etc/etcd/etcd.conf, touches/var/lib/cloudimg/etcd-firstboot.doneetcd-postboot.service(After=etcd) — runsetcdctl user add cloudimg,auth enable, generateshtpasswdfor nginx, touches/var/lib/cloudimg/etcd-postboot.done, then self-disables- Per-VM credentials log at
/stage/scripts/etcd-credentials.log(root:root 0600) carryingETCD_VERSION,ETCD_CLIENT_URL,ETCD_HEALTH_URL,ETCD_USER=cloudimg,ETCD_PASSWORD,ETCD_ROOT_PASSWORD - 24/7 cloudimg support
The bundled etcdkeeper UI is the recommended way to browse and edit keys interactively; for scripted access and CI use etcdctl from any host inside the VNet.
Prerequisites
Active Azure subscription, SSH key, VNet + subnet. Standard_B2s (4 GB RAM) is comfortable for a single-node etcd. NSG inbound rules:
22/tcpfrom your management CIDR — SSH80/tcpfrom any client CIDR that needs the etcdkeeper web UI — nginx fronts the UI with HTTP Basic-Auth, so the UI is never exposed without credentials2379/tcpfrom any client CIDR that needs to reach the etcd API directly (Kubernetes, etcdctl, Patroni, custom apps)
Never expose 2380/tcp — that is the Raft peer port and on this single-node image it stays bound to loopback only. The web UI itself listens on 127.0.0.1:8080 and is not directly reachable from outside; nginx is the only public entry point.
Step 1-3: Deploy + SSH (standard pattern)
ssh azureuser@<vm-ip>
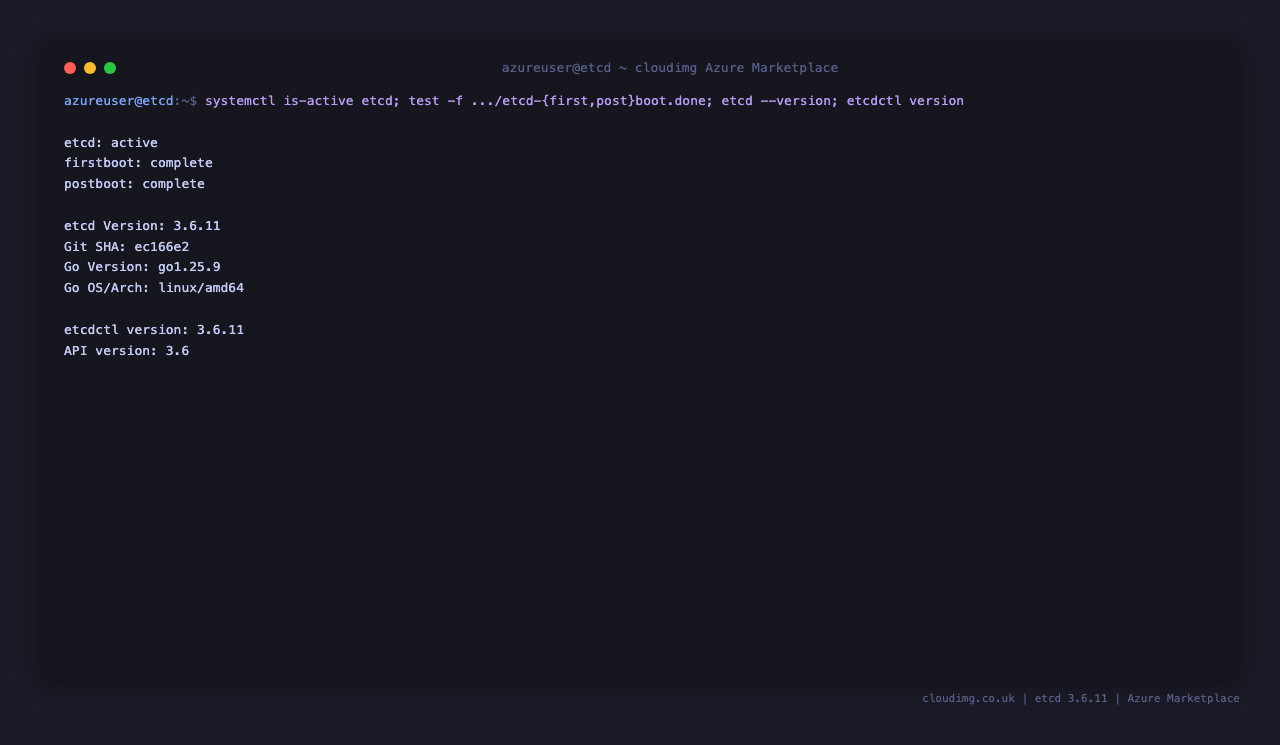
Step 4: Service Status + Versions
sudo systemctl is-active etcd nginx etcdkeeper
sudo test -f /var/lib/cloudimg/etcd-firstboot.done && echo "firstboot: complete" || echo "firstboot: missing"
sudo test -f /var/lib/cloudimg/etcd-postboot.done && echo "postboot: complete" || echo "postboot: missing"
/usr/local/bin/etcd --version | head -1
/usr/local/bin/etcdctl version
etcd, nginx, and etcdkeeper all report active. The two boot oneshots write a sentinel file when they finish and then exit cleanly — etcd-firstboot.done and etcd-postboot.done indicate the per-VM credential generation, RBAC bootstrap, and htpasswd generation completed successfully. The etcd binary reports etcd Version: 3.6.11 and the CLI reports etcdctl version: 3.6.11 with API version: 3.6.
Step 5: Read Per-VM Credentials
sudo cat /stage/scripts/etcd-credentials.log
Pick up ETCD_PASSWORD (the cloudimg user's password — used for the etcdctl CLI, the nginx HTTP Basic-Auth prompt, and the etcdkeeper login form) and ETCD_ROOT_PASSWORD (the root user's password — needed for snapshot save, auth status, user/role management, and the etcdkeeper Authentication dialog when you want full tree visibility). The file is root:root 0600. ETCD_CLIENT_URL is the canonical client endpoint (http://127.0.0.1:2379 from the VM, http://<vm-ip>:2379 from another VM in the VNet) and ETCD_HEALTH_URL is http://127.0.0.1:2379/health.
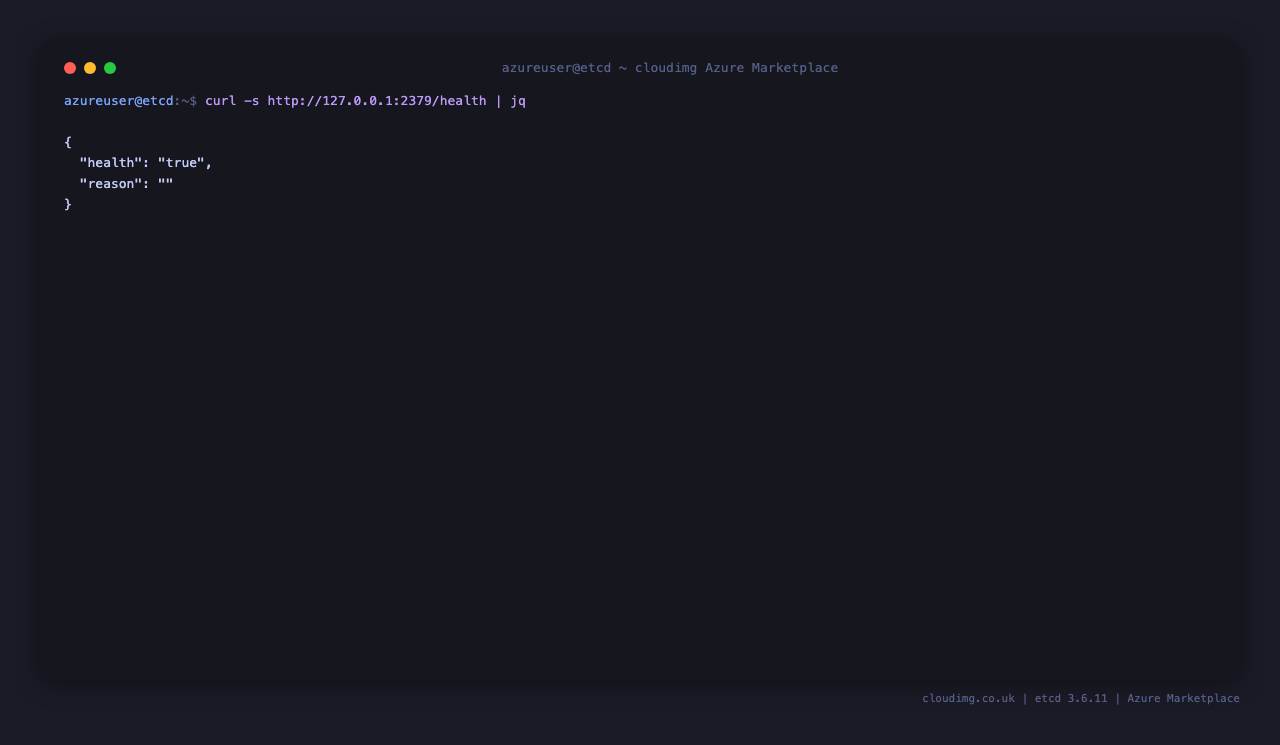
Step 6: API Health Check
curl -s http://127.0.0.1:2379/health | jq
Returns {"health":"true","reason":""} once etcd is fully ready to serve traffic. The /health endpoint is unauthenticated by design — it is what your load balancer and Kubernetes liveness probe hit. Every other endpoint requires credentials.
Step 7: Put + Get a Key from the CLI
PASS=$(sudo grep '^ETCD_PASSWORD=' /stage/scripts/etcd-credentials.log | cut -d= -f2-)
etcdctl --user=cloudimg:$PASS put /cloudimg/example "hello world"
etcdctl --user=cloudimg:$PASS get /cloudimg/example
etcdctl --user=cloudimg:$PASS put /test should-fail 2>&1 | tail -1 || true
The first put returns OK. The get prints the key followed by the value on the next line — /cloudimg/example then hello world. Keys in etcd are arbitrary byte strings (so /-prefixed paths are convention only) and values can be up to 1.5 MB each (the --max-request-bytes cap). The third command would normally succeed, but if you drop the --user= flag etcd returns Error: etcdserver: user name is empty — proof that RBAC is enforced and credentials are the only thing standing between a client and the keyspace.
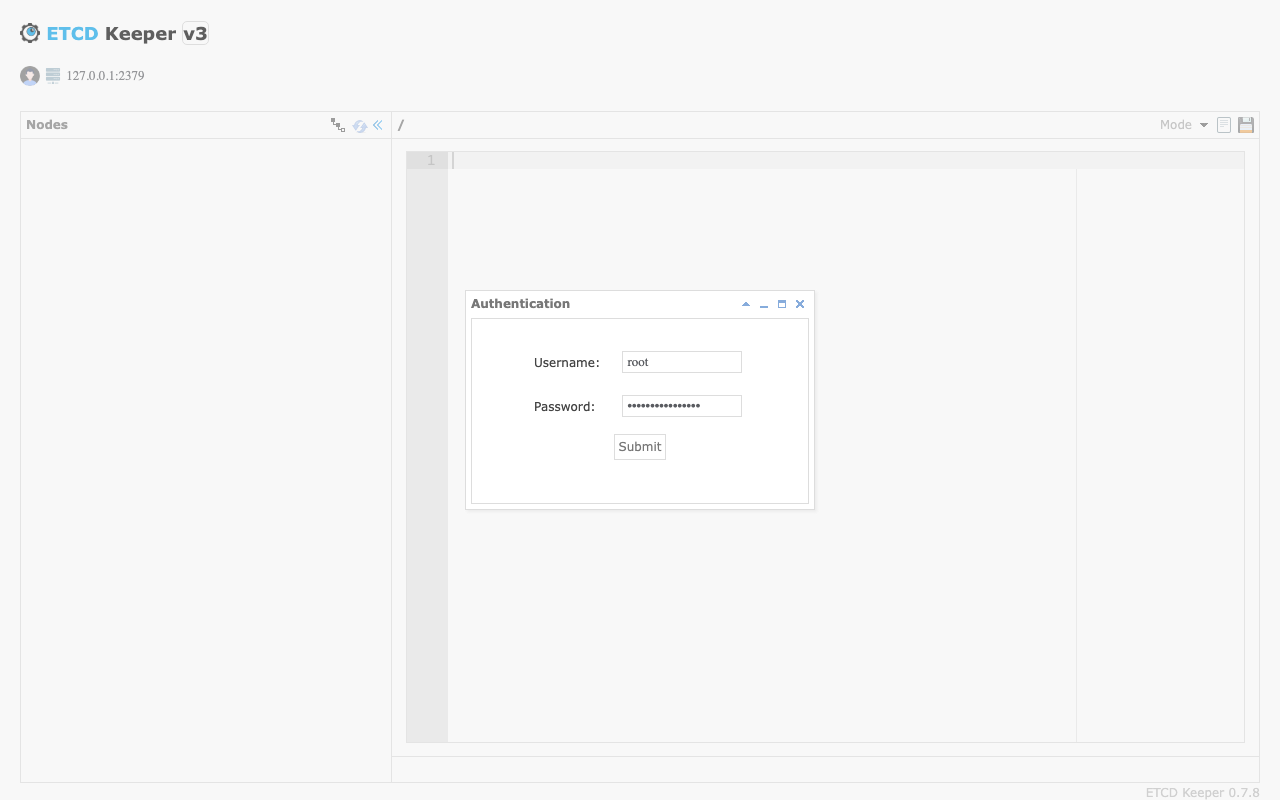
Step 8: Login to the etcdkeeper Web UI
Browse to http://<vm-ip>/ from a workstation inside the allowed CIDR. nginx prompts with an HTTP Basic-Auth dialog: enter cloudimg and the value of ETCD_PASSWORD from Step 5. nginx accepts the credentials and the etcdkeeper landing page loads with its own Authentication dialog on top — this is the application-level login that proves you have access to the etcd RBAC API. Enter root and the value of ETCD_ROOT_PASSWORD from Step 5 here, then click Submit. The customer-facing flow is layered on purpose — see the Security section below.
Step 9: Browse the Key Tree
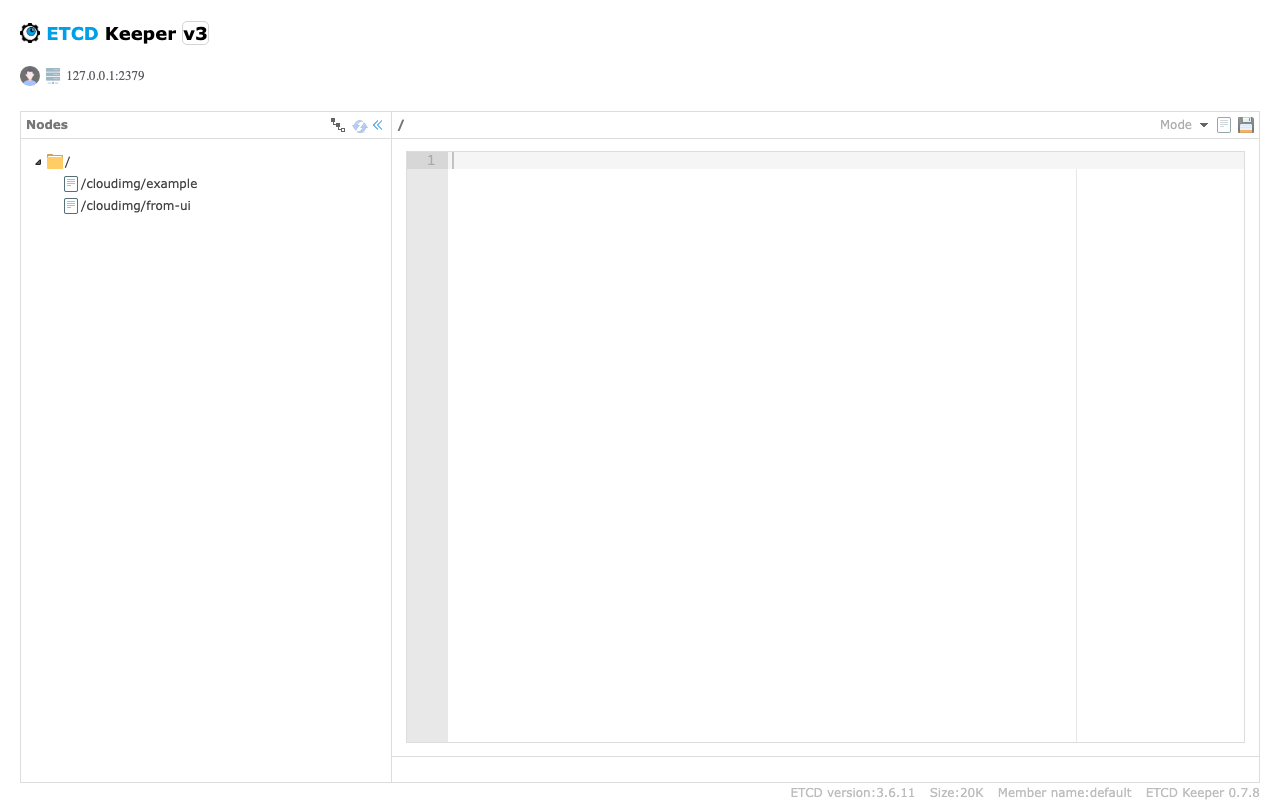
After the Authentication dialog accepts, etcdkeeper renders the key tree in the left pane. The two keys we wrote in Step 7 — /cloudimg/example and /cloudimg/from-ui (added in the next step) — appear under the root folder. Click any key to load its value into the centre editor; click the disk icon top-right to save edits back through the etcd API. The footer reports the etcd version (3.6.11), the live data-store size, and the cluster member name.
Step 10: Add a Key from the UI
Right-click the root folder in the tree pane and pick Create Node. The Create node dialog opens. Set Name to the key path (for example /cloudimg/from-ui), leave Dir as FALSE (a directory node has no value, just children), leave TTL blank for a permanent key (or enter seconds for an ephemeral lease-style key), and put the value in the Value editor. Click Submit and the key is written through to etcd in a single atomic API call — the new entry shows up in the tree pane immediately.

Step 11: Watch a Key
In one SSH session, start a watch on the /cloudimg/ key prefix:
PASS=$(sudo grep '^ETCD_PASSWORD=' /stage/scripts/etcd-credentials.log | cut -d= -f2-)
etcdctl --user=cloudimg:$PASS watch --prefix /cloudimg/ &
WATCH_PID=$!
sleep 1
etcdctl --user=cloudimg:$PASS put /cloudimg/key1 v1
sleep 1
kill $WATCH_PID 2>/dev/null || true
The watcher prints the change event in real time — PUT, key, value, all delivered over a single long-lived gRPC stream. This is the same primitive Kubernetes uses to react to resource changes. Watches survive across leader elections and resume from a known revision.
Step 12: Transactions and Leases
A lease is a TTL attached to one or more keys — when the lease expires, the keys are deleted automatically. This is how etcd implements ephemeral state (service registration, distributed locks).
PASS=$(sudo grep '^ETCD_PASSWORD=' /stage/scripts/etcd-credentials.log | cut -d= -f2-)
LEASE_ID=$(etcdctl --user=cloudimg:$PASS lease grant 60 | awk '{print $2}')
etcdctl --user=cloudimg:$PASS put /cloudimg/ephemeral "expires in 60s" --lease=$LEASE_ID
etcdctl --user=cloudimg:$PASS lease list
lease grant 60 returns a 60-second lease. The put --lease= ties the key to that lease. To keep the key alive, run etcdctl lease keep-alive <lease-id> in a long-running process; stop refreshing or call etcdctl lease revoke <lease-id> and the key disappears at the next TTL boundary. Transactions (etcdctl txn) compose conditional reads and writes — the building block for leader election and distributed locks.
Step 13: Snapshot Backup and Restore
Snapshot is etcd's first-class backup primitive — a consistent point-in-time copy of the entire keyspace.
ROOT_PASS=$(sudo grep '^ETCD_ROOT_PASSWORD=' /stage/scripts/etcd-credentials.log | cut -d= -f2-)
sudo mkdir -p /var/backups/etcd
sudo etcdctl --user=root:$ROOT_PASS snapshot save /var/backups/etcd/etcd-snap-$(date +%F).db
sudo etcdctl --user=root:$ROOT_PASS --write-out=table snapshot status /var/backups/etcd/etcd-snap-$(date +%F).db
snapshot save requires the root user (the admin role). snapshot status prints the hash, revision, total keys, and total size of the snapshot — verify the revision moves forward each backup. Periodically copy /var/backups/etcd off-VM to Azure Blob Storage with az storage blob upload-batch for disaster recovery retention. To restore, stop etcd, run etcdctl snapshot restore <backup-dir>/etcd-snap-DATE.db --data-dir=/var/lib/etcd-restored, swap /var/lib/etcd with the restored directory, chown -R etcd:etcd /var/lib/etcd, and start etcd again. For a multi-node cluster, restore is more involved (each member restores from the same snapshot with cluster-specific flags) — see https://etcd.io/docs/v3.5/op-guide/recovery/.
Step 14: Add a User and Role
Add a read-only role for monitoring or a Kubernetes-style service account:
ROOT_PASS=$(sudo grep '^ETCD_ROOT_PASSWORD=' /stage/scripts/etcd-credentials.log | cut -d= -f2-)
etcdctl --user=root:$ROOT_PASS role add ro
etcdctl --user=root:$ROOT_PASS role grant-permission ro --prefix=true read /
etcdctl --user=root:$ROOT_PASS user list
user list prints cloudimg and root — the two users provisioned at first boot. To add a new monitoring user, run etcdctl --user=root:$ROOT_PASS user add monitoring --new-user-password=<new-password> followed by user grant-role monitoring ro. The new user can read every key (--prefix=true read /) but cannot write. Permissions can be scoped by exact key, key range (--from-key), or prefix.
Step 15: Multi-Node Cluster Setup
This image runs a single-node etcd by design — perfect for development, CI, edge deployments, and any workload that does not need HA. For production HA, you want a 3 or 5 node Raft cluster: an odd number tolerates (N-1)/2 failures (3 nodes tolerate 1 failure, 5 tolerate 2). Stand up the cluster by deploying three of these images, then on each node edit /etc/etcd/etcd.conf to set:
ETCD_INITIAL_CLUSTERto the comma-separated list ofname=http://<peer-ip>:2380triplesETCD_LISTEN_PEER_URLStohttp://<this-node-private-ip>:2380(no longer loopback)ETCD_INITIAL_ADVERTISE_PEER_URLSto the same routable URLETCD_INITIAL_CLUSTER_STATEtonewon first boot,existingthereafter
Restart etcd on all three nodes within a few seconds of each other. Open 2380/tcp between the nodes in your NSG (peer-to-peer Raft traffic) but keep it closed to anyone else. The etcdkeeper UI on each node will show that node's view of the keyspace; once Raft converges, all three views are identical. Full reference: https://etcd.io/docs/v3.5/op-guide/clustering/.
Step 16: Logs and Troubleshooting
ROOT_PASS=$(sudo grep '^ETCD_ROOT_PASSWORD=' /stage/scripts/etcd-credentials.log | cut -d= -f2-)
sudo etcdctl --user=root:$ROOT_PASS --write-out=table endpoint status
sudo etcdctl --user=root:$ROOT_PASS alarm list
endpoint status prints the version, DB size, leader, and Raft index in a tidy table — the first command to run when triaging. alarm list reports any active NOSPACE or CORRUPT alarms — a NOSPACE alarm pins the cluster read-only and clears with alarm disarm once you have compacted and defragmented. Run sudo journalctl -u etcd -n 80 --no-pager for the long-running etcd daemon log, sudo journalctl -u nginx -n 80 --no-pager for the reverse proxy (HTTP 401s for missing Basic-Auth show up here), sudo journalctl -u etcdkeeper -n 80 --no-pager for the web UI process, and sudo journalctl -u etcd-firstboot --no-pager / sudo journalctl -u etcd-postboot --no-pager for the one-shot bootstrap units that ran at first boot.
Security
- Layered authentication for the web UI — three independent gates, each with its own credential. The customer types the cloudimg user +
ETCD_PASSWORDinto the browser's HTTP Basic-Auth prompt (nginx, edge gate); the same credentials again into the etcdkeeper Authentication dialog (orroot+ETCD_ROOT_PASSWORDfor full visibility — application gate); and etcd RBAC enforces per-key permissions on every API call etcdkeeper relays through (data gate). A leaked nginx password alone exposes only the HTML chrome — the keyspace stays locked behind etcd RBAC. - RBAC enabled by default — every API call requires a valid user/password; the default
guest(anonymous) user is not created. - Peer port
2380/tcpbound to127.0.0.1only — single-node by design, never exposed. - etcdkeeper bound to
127.0.0.1:8080only — the only public entry to the UI is nginx on:80. - Client port
2379/tcpcontrolled by NSG inbound rules — restrict to the CIDRs that need to call the API directly. - Per-VM
ETCD_PASSWORD(cloudimg user, readwrite role) andETCD_ROOT_PASSWORD(admin) generated at first boot. - Credentials log
/stage/scripts/etcd-credentials.logisroot:root 0600; nginxhtpasswdat/etc/nginx/etcdkeeper.htpasswdisroot:www-data 0640. - TLS on the client port and on nginx is supported — uncomment the TLS block in
/etc/etcd/etcd.conffor the API, and drop a certificate into/etc/nginx/sites-available/etcdkeeper.conffor HTTPS in front of the UI; supply your own certificates from Azure Key Vault, your internal CA, or Let's Encrypt. - Use a dedicated read-only role (Step 14) for any monitoring or audit consumer; never hand out
rootcredentials to applications.
Support
cloudimg provides 24/7/365 expert technical support. Guaranteed response within 24 hours, one hour average for critical issues. Contact support@cloudimg.co.uk.