
FRRouting on AWS User Guide
Overview
This image runs FRRouting (FRR), the open source IP routing protocol suite for Linux. FRR implements BGP, OSPFv2 and OSPFv3, IS-IS, RIP and RIPng, PIM, LDP, BFD, Babel, PBR, OpenFabric and VRRP. It is the successor to Quagga and a project of the Linux Foundation. The image ships FRR 10.7.0 installed from the official FRR stable APT repository, with the repository signing key pinned by fingerprint, and running under systemd as a hardened routing node.
FRR runs the zebra routing manager together with the bgpd and ospfd daemons, all supervised by watchfrr and managed through the integrated vtysh shell so a single /etc/frr/frr.conf is the source of truth. bgpd ships running and ready for you to add your own BGP neighbours, and ospfd runs a live OSPF instance. Kernel IP forwarding is enabled and persisted so the instance is a correct router.
FRR on an instance is a routing control plane and speaker: it exchanges routes with your peers using standard routing protocols and installs them into the instance's own kernel routing table. It is well suited to a BGP route reflector or route server, a dynamic routing speaker that peers with an on-premises network across a tunnel, or a learning and testing lab. It complements, rather than replaces, the AWS VPC route table for steering traffic between subnets; this guide frames those real use cases below.
The image is secure by default. Every routing daemon binds its telnet VTY to the loopback interface only, so the VTY ports are never reachable off the instance, and the suite is managed locally as root with vtysh over a root only unix socket. No VTY or enable password, and no shared or default routing credential, ships in the image.
Prerequisites
Before you deploy this image you need:
- An AWS account and permission to launch EC2 instances and subscribe to AWS Marketplace products.
- An EC2 key pair in your target region so you can connect over SSH.
- A VPC with a subnet, and a security group that allows inbound SSH from your management network.
- The AWS CLI installed and configured, if you prefer to launch from the command line.
- Familiarity with IP routing concepts and with
vtysh, the FRR shell.
The recommended instance type for this product is m5.large (2 vCPU, 8 GB), which is comfortable for control plane routing. Small labs run happily on a smaller type; production route reflectors handling large tables benefit from more memory.
Launch from the AWS Marketplace
- Open the product page on the AWS Marketplace and choose Continue to Subscribe, then Continue to Configuration.
- Select the software version and your region, then Continue to Launch.
- Choose Launch through EC2 (or Launch from Website), pick the
m5.largeinstance type, your VPC subnet, your key pair, and a security group (see the ports section below). - Launch the instance and wait for the status checks to pass.
Launch from the AWS CLI
Replace the placeholders with your own values. The AMI ID is shown on the product's launch page for your region.
$ aws ec2 run-instances \
    --image-id <ami-id> \
    --instance-type m5.large \
    --key-name <your-key-pair> \
    --security-group-ids <security-group-id> \
    --subnet-id <subnet-id> \
    --associate-public-ip-address \
    --tag-specifications 'ResourceType=instance,Tags=[{Key=Name,Value=frrouting}]'
Security group and protocol ports
FRR is an internal routing node. The image itself opens nothing outward: the only port you must allow to operate it is SSH.
- TCP 22 (SSH) — allow from your management network so you can administer the router.
Open the specific protocol ports your routing design uses only to your own peers, ideally by referencing the peers' security group or private CIDR rather than the whole internet:
- TCP 179 — BGP, to your BGP neighbours.
- IP protocol 89 (OSPF) — to your OSPF neighbours on the same layer 2 or over a tunnel.
- UDP 3784 and 3785 — BFD, if you enable bidirectional forwarding detection.
- TCP/UDP 646 — LDP, if you enable label distribution.
The per daemon telnet VTY ports (2601 to 2616) are bound to 127.0.0.1 only and must never be exposed; manage the router with vtysh over SSH instead.
Connect over SSH
Connect as the ubuntu user with your key pair. FRR is managed with the vtysh shell.
$ ssh -i <your-key.pem> ubuntu@<public-ip>
The per instance node details are written to a root only file on first boot. It contains no secret; there is no routing login. View it with:
$ sudo cat /root/frrouting-credentials.txt
Confirm FRR is running
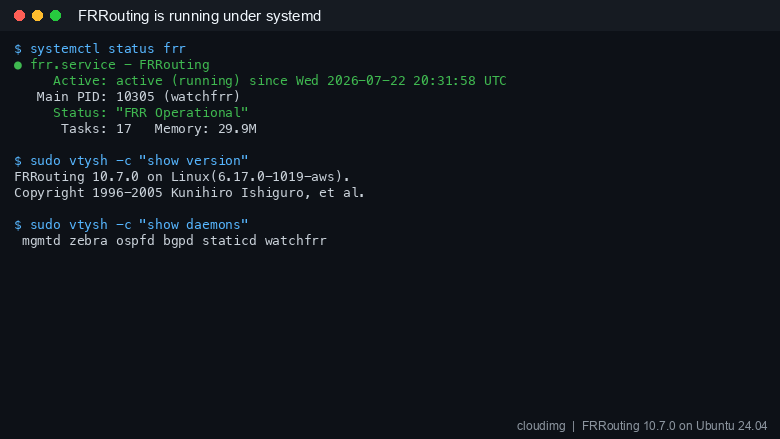
Check that the routing suite is up and read its version. FRR reports itself as operational under systemd, with zebra, ospfd, bgpd and watchfrr all running.
systemctl is-active frr
sudo vtysh -c "show version"
The enabled daemons and configuration
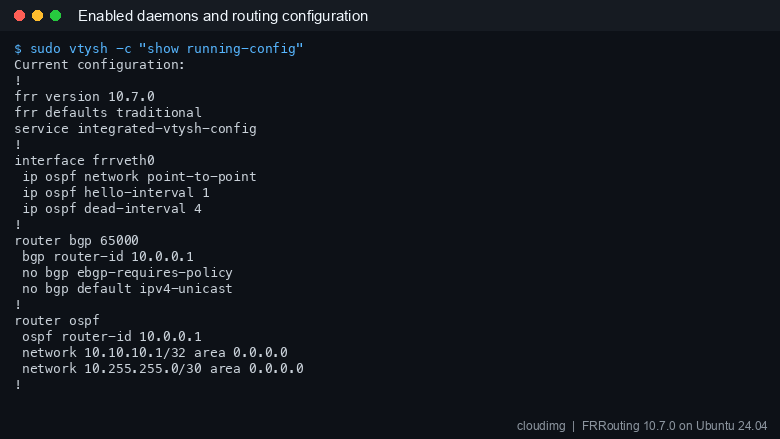
List the running daemons and read the running configuration. zebra, ospfd and bgpd are enabled; the configuration is a single integrated file so show running-config reflects exactly what is loaded.
sudo vtysh -c "show daemons"
sudo vtysh -c "show running-config"
The self-contained OSPF demonstration
The image ships a genuinely functional OSPF demonstration that runs on a single instance with no external peers, so you can see real dynamic routing immediately. A virtual link joins the main router to a lightweight peer router in an isolated network namespace; OSPF area 0 forms a real Full adjacency across the link, and the peer originates 10.20.20.2/32, which the main router learns via OSPF (route code O).
sudo vtysh -c "show ip ospf neighbor"
sudo vtysh -c "show ip route ospf"
sudo vtysh -c "show ip route"
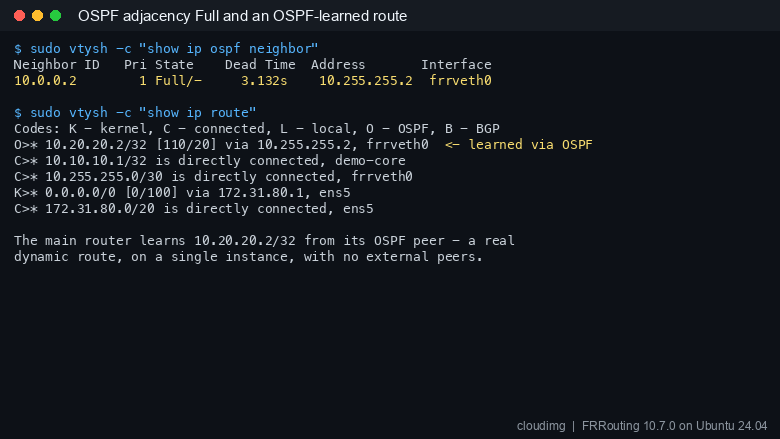
The show ip ospf neighbor output shows the adjacency in state Full, and show ip route shows O>* 10.20.20.2/32 learned from the peer, a real dynamic route rather than a directly connected one. This demonstration is shipped content that survives a systemctl restart frr. When you are ready to run your own topology, replace the demo configuration in /etc/frr/frr.conf and remove the demo units, as shown later.
bgpd is enabled and running as well, ready for you to add your own neighbours:
sudo vtysh -c "show ip bgp summary"
sudo vtysh -c "show version"
Secure by default
Confirm that every daemon VTY is bound to the loopback interface and that IP forwarding is enabled. The listening VTY ports appear only on 127.0.0.1, and net.ipv4.ip_forward is 1.
sudo ss -tln
sudo sysctl net.ipv4.ip_forward net.ipv6.conf.all.forwarding
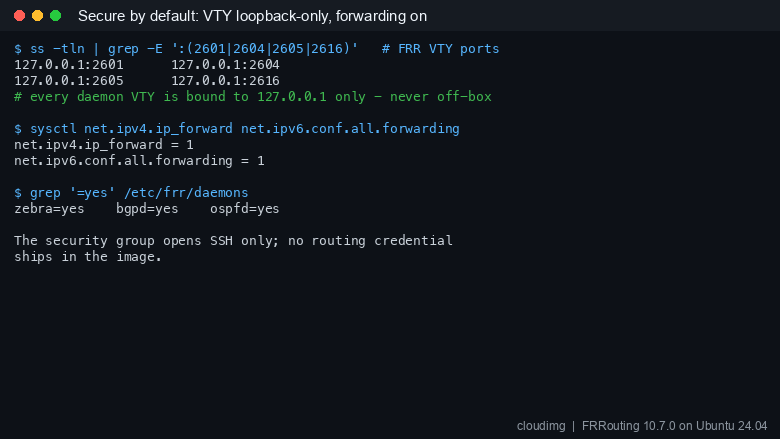
Because the VTY is loopback only there is no network facing management interface to attack and no VTY password to manage. Keep it that way: administer the router through vtysh over SSH.
Configure your own routing
Edit the configuration through vtysh in configuration mode, then write it so it persists. The example below adds a BGP neighbour; adapt the addresses and AS numbers to your design. Because these commands change the running router, run them yourself once you have reviewed them.
sudo vtysh
configure terminal
router bgp 65000
 neighbor 203.0.113.10 remote-as 64512
 address-family ipv4 unicast
  neighbor 203.0.113.10 activate
 exit-address-family
exit
end
write memory
To enable another protocol daemon, set it to yes in /etc/frr/daemons and reload FRR:
sudo sed -i 's/^isisd=no/isisd=yes/' /etc/frr/daemons
sudo systemctl reload frr
When you are ready to retire the shipped OSPF demonstration and run only your own configuration, disable the demo units and clear the demo stanzas from /etc/frr/frr.conf:
sudo systemctl disable --now frr-demo-peer.service frr-demo-topology.service
sudo vtysh -c "configure terminal" -c "no router ospf" -c "end" -c "write memory"
Real world use cases
- BGP route reflector or route server. Peer several routers with this instance so they exchange routes through it instead of a full mesh. The instance runs
bgpdand holds the routing information; it does not itself have to carry the data plane traffic. - Dynamic routing to on-premises. Bring up a VPN or AWS Direct Connect tunnel to your data centre and run BGP or OSPF over it so routes are exchanged automatically as your networks change, rather than being maintained by hand.
- Overlay and software routing. Use FRR as the control plane for GRE, VXLAN or WireGuard overlays, distributing reachability with a routing protocol.
- Learning and testing lab. Study BGP, OSPF, IS-IS and the other protocols against a real, current FRR build. The shipped OSPF demonstration is a working example to build on.
For steering traffic between subnets inside a single VPC, the AWS VPC route table remains the mechanism AWS uses; FRR on an instance complements it as a routing speaker and control plane rather than replacing it.
Updating and maintenance
The image installs FRR from the official FRR stable APT repository and adds that origin to the unattended upgrades allow list, so the instance keeps receiving FRR security updates alongside the base Ubuntu updates. To update manually:
$ sudo apt-get update
$ sudo apt-get upgrade
Back up your routing configuration by copying /etc/frr/frr.conf and /etc/frr/daemons somewhere safe. After a configuration change, write memory in vtysh saves the running configuration back to /etc/frr/frr.conf.
Support
This image is provided by cloudimg with 24/7 technical support by email and chat. We can help with deployment, BGP and OSPF peering design, route reflectors and route servers, connecting dynamic routing to on-premises networks over a tunnel, and upgrade planning. Visit www.cloudimg.co.uk for more information.
FRRouting and FRR are trademarks of their respective holders. This product is not affiliated with, sponsored by, or endorsed by The FRRouting Project or the Linux Foundation.