HAProxy on Ubuntu 24.04 on Azure User Guide
Overview
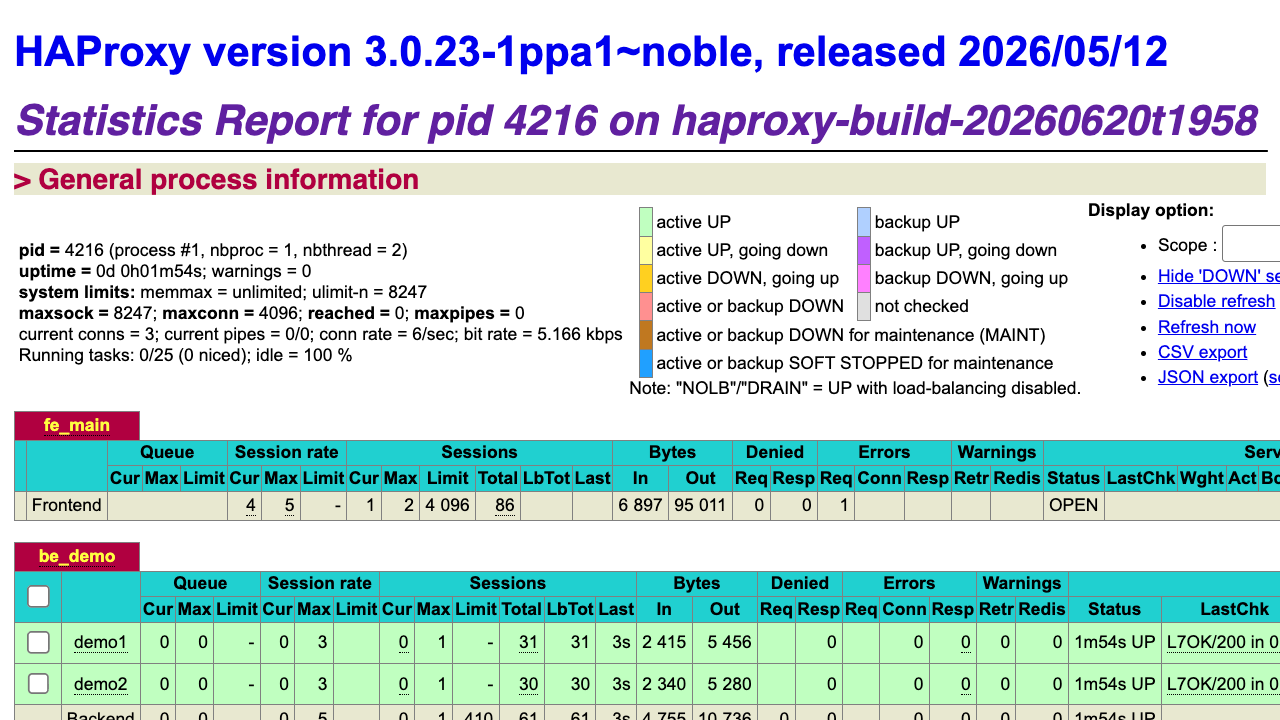
HAProxy is the world's fastest and most widely used open-source software load balancer and reverse proxy, powering high-traffic sites with TCP and HTTP load balancing, health checking, and observability. The cloudimg image installs HAProxy 3.0 LTS, runs it as the packaged haproxy.service, binds the public frontend on port 80, ships a self-contained demo backend so the load balancer and the built-in Statistics Report are live the moment the VM boots, and rotates a unique stats password on the first boot of every VM. Backed by 24/7 cloudimg support.
What is included:
- HAProxy 3.0 LTS bound to
:80as the public frontend (HAProxy is the listener - no nginx) - The built-in HAProxy Statistics Report at
/stats, protected by HTTP Basic auth with a per-VM password - An unauthenticated
/healthendpoint returning200 okfor load balancers and probes - A self-contained demo backend (
be_demo) of two loopback responders so the LB and stats show live traffic with no external dependency - A per-VM stats password generated on first boot and recorded in a root-only file
haproxy.serviceas a systemd unit, enabled and active- 24/7 cloudimg support
Prerequisites
An active Azure subscription, an SSH key pair, and a VNet + subnet in the target region. Standard_B2s (2 vCPU / 4 GiB RAM) is a good starting point. NSG inbound: allow 22/tcp from your management network and 80/tcp.
Step 1 - Deploy from the Azure Marketplace
Sign in to the Azure Portal, choose Create a resource, search the Marketplace for HAProxy by cloudimg, and select Create. On Basics pick your subscription, resource group, region and size; under Administrator account choose SSH public key and paste your key; under Inbound port rules allow SSH (22) and HTTP (80). Then Review + create -> Create.
Step 2 - Deploy from the Azure CLI
az vm create \
  --resource-group <your-rg> \
  --name haproxy \
  --image <marketplace-image-urn> \
  --size Standard_B2s \
  --admin-username azureuser \
  --ssh-key-values ~/.ssh/id_ed25519.pub \
  --vnet-name <your-vnet> --subnet <your-subnet> \
  --public-ip-sku Standard

az vm open-port --resource-group <your-rg> --name haproxy --port 80 --priority 1010
Step 3 - Connect to your VM
ssh azureuser@<vm-public-ip>
Step 4 - Confirm HAProxy is running
systemctl is-active haproxy.service
It reports active. On first boot HAProxy generates its unique stats password and starts serving the frontend on port 80.
Step 5 - Retrieve your stats password
The Statistics Report password is generated uniquely on the first boot of your VM and written to a root-only file:
sudo cat /root/haproxy-credentials.txt
This file contains HAPROXY_STATS_URL, HAPROXY_STATS_USER (admin) and the stats password line haproxy.stats.pass. Store the password somewhere safe.
Step 6 - Open the Statistics Report
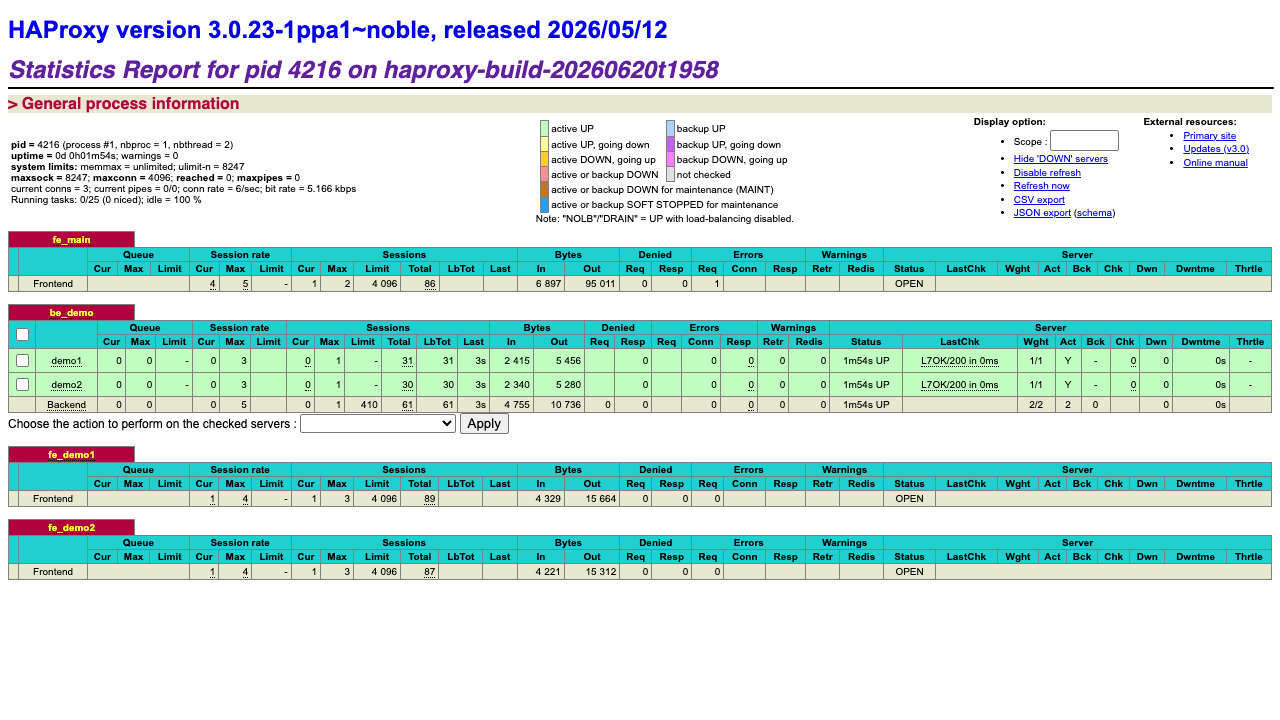
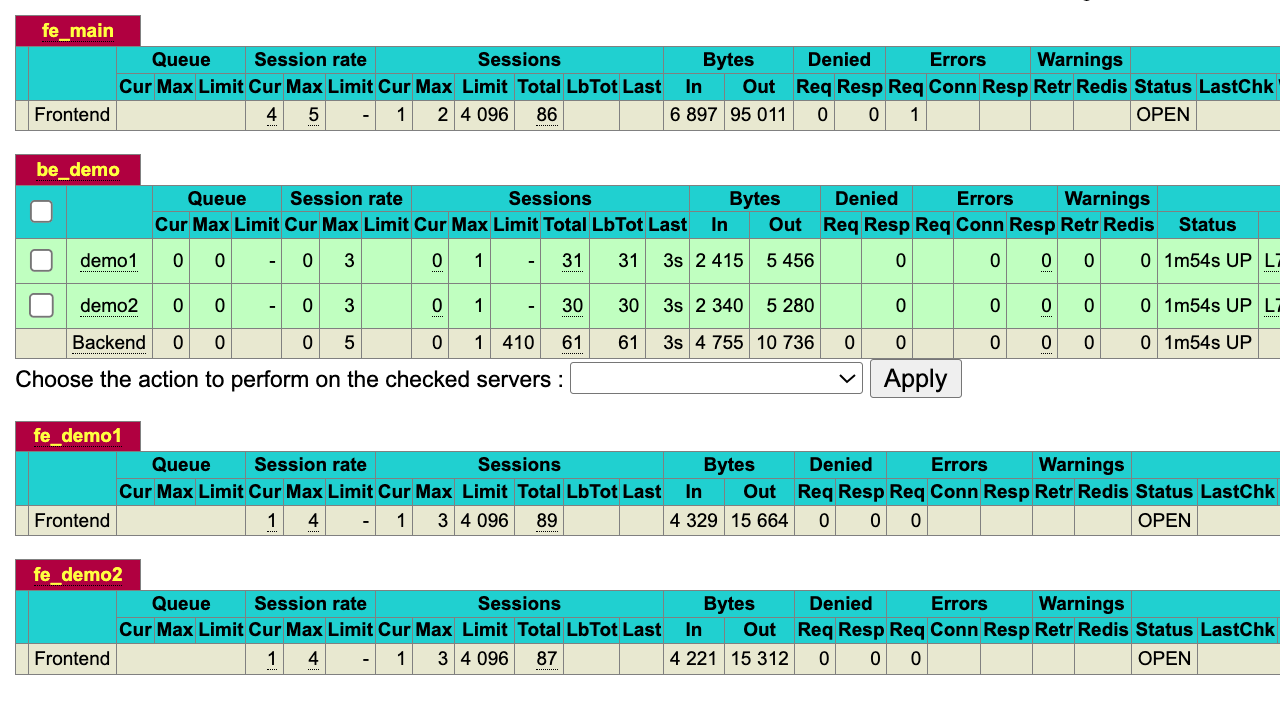
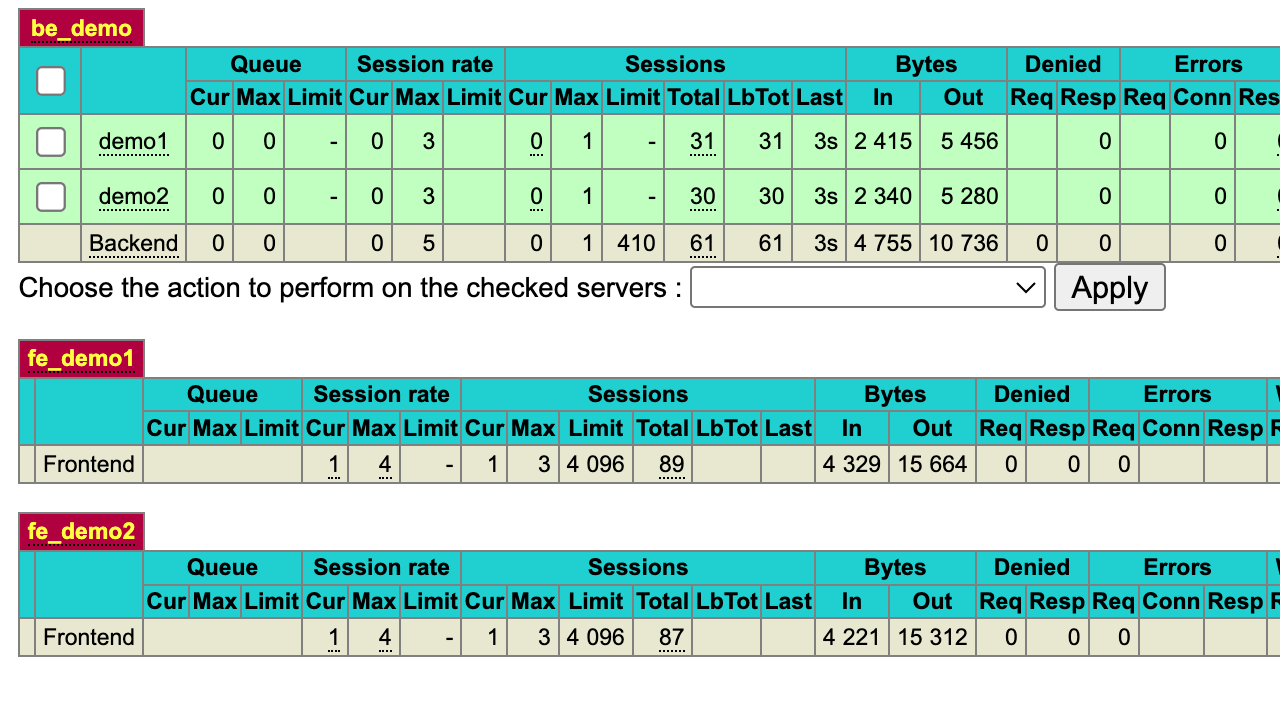
Browse to http://<vm-public-ip>/stats and sign in as admin with the password from Step 5. The HAProxy Statistics Report shows every frontend, backend and server, with live session counters, byte counts, health-check state, and (because stats admin is enabled) controls to enable/disable individual backend servers.
Step 7 - Confirm the health endpoint
HAProxy serves an unauthenticated health endpoint for load balancers and probes:
curl -s http://localhost/health
It returns ok.
Step 8 - Verify the Statistics Report from the command line
The stats page rejects an anonymous request, rejects a wrong password, and accepts the per-VM admin password:
curl -s -o /dev/null -w 'unauth=%{http_code}\n' http://localhost/stats
curl -s -o /dev/null -w 'admin=%{http_code}\n' -u "admin:<HAPROXY_STATS_PASSWORD>" http://localhost/stats
The first returns unauth=401; the second returns admin=200.
Step 9 - See the demo backend load-balancing
Out of the box, the default frontend routes to the demo backend (be_demo), which round-robins between two loopback responders so the Statistics Report has live traffic to show. Hit the root path a few times:
curl -s http://localhost/ | grep -o 'Served by demo[12]'
It alternates between Served by demo1 and Served by demo2 as HAProxy load-balances.
Step 10 - Route to your own app servers
Edit /etc/haproxy/haproxy.cfg and repoint the be_demo backend (or add new backend sections) at your real application servers:
backend be_demo
    balance roundrobin
    option httpchk GET /
    http-check expect status 200
    server app1 10.0.0.11:8080 check
    server app2 10.0.0.12:8080 check
Validate the configuration and reload HAProxy with zero downtime:
sudo haproxy -c -f /etc/haproxy/haproxy.cfg
sudo systemctl reload haproxy
The reload performs a seamless, connection-preserving config swap. Your new backends then appear in the Statistics Report with live health-check state.
Maintenance
- Backends: edit
/etc/haproxy/haproxy.cfg; validate withhaproxy -c -f /etc/haproxy/haproxy.cfg, thensudo systemctl reload haproxy(zero downtime). - Stats password: rotate by editing the
stats auth admin:line in/etc/haproxy/haproxy.cfgand reloading. - Logs: HAProxy logs to the journal -
journalctl -u haproxy. - Runtime API: the admin stats socket lives at
/run/haproxy/admin.sockfor live server enable/disable viasocat. - Upgrades: install a newer HAProxy package from the maintainer PPA and restart the service.
- Security patches: unattended-upgrades remains enabled so the OS continues to receive security updates automatically.
Support
cloudimg provides 24/7 expert support for this image. Contact support@cloudimg.co.uk.