
Homebox on AWS User Guide
Overview
This image runs Homebox, the open source, self-hosted home and asset inventory manager. Track what you own, where it is, what it cost and when it needs maintenance, organised by nested locations, tags and labels, with photo and document attachments, QR and asset labels, CSV import and export, and a clean web interface. It is a privacy-respecting alternative to spreadsheets and SaaS inventory tools, deployable in your own VPC.
The Homebox server is a single Go binary that serves both the REST API and the embedded web app. It runs behind nginx as a reverse proxy. SQLite is the datastore - a single self-contained file with no separate database server to manage. The server listens on 127.0.0.1:7745 and is reached through nginx on port 80 (and 443 once you add TLS). The server and its data bind to the loopback interface only; the SQLite database and all uploaded attachments live on a dedicated EBS data volume mounted at /var/lib/homebox.
Homebox has no built-in administrator and no default password - the first person to register becomes the owner. Every instance therefore boots to the Homebox first-run registration screen on a freshly emptied database, where you create your own administrator account. No shared or default credentials ship in the image.
Prerequisites
Before you deploy this image you need:
- An Amazon Web Services account where you can launch EC2 instances
- IAM permissions to launch instances, create security groups, and subscribe to AWS Marketplace products
- An EC2 key pair in the target Region for SSH access to the instance
- A VPC and subnet in the target Region, with a security group allowing inbound port 22 from your management network and inbound ports 80 and 443 from the networks your users will reach Homebox on
- The AWS CLI (version 2) installed locally if you plan to deploy from the command line
Step 1: Launch the Instance from the AWS Marketplace
Sign in to the AWS Management Console, open the EC2 service, and select Launch instance. Under Application and OS Images choose AWS Marketplace AMIs and search for Homebox. Select the cloudimg listing and choose Select, then Continue on the subscription summary.
Pick an instance type of t3.small or larger - Homebox is lightweight. Choose your EC2 key pair under Key pair (login). Under Network settings select your VPC and subnet, and either create or select a security group that allows inbound port 22 from your management network and inbound ports 80 and 443 from the networks your users use. Leave the root volume and the attached data volume at their default sizes or larger.
Select Launch instance. First boot initialisation takes under a minute after the instance state becomes Running and the status checks pass.
Step 2: Launch the Instance from the AWS CLI
The following block launches an instance from the cloudimg Homebox Marketplace AMI into an existing subnet and security group. Replace <ami-id> with the AMI ID shown on the Marketplace listing, <key-name> with your EC2 key pair name, <subnet-id> with your subnet ID, and <security-group-id> with a security group that opens ports 22, 80, and 443 as described above.
aws ec2 run-instances \
  --image-id <ami-id> \
  --instance-type t3.small \
  --key-name <key-name> \
  --subnet-id <subnet-id> \
  --security-group-ids <security-group-id> \
  --tag-specifications 'ResourceType=instance,Tags=[{Key=Name,Value=homebox-01}]'
The command prints a JSON document on success. Note the instance ID, then retrieve its public address once it is running with aws ec2 describe-instances --instance-ids <instance-id> --query "Reservations[].Instances[].PublicIpAddress" --output text.
Step 3: Connect to the Instance
Connect over SSH with the key pair you selected and the public IP address from step 2. The SSH login user depends on the operating system of the AMI variant you launched:
| AMI variant | SSH login user |
|---|---|
| Homebox 0.25 on Ubuntu 24.04 | ubuntu |
ssh -i /path/to/your-key.pem ubuntu@<instance-public-ip>
The message of the day reminds you of the setup steps and the key paths. A short note documenting the registration-first setup is written to a root-only file:
sudo cat /root/homebox-credentials.txt
You can confirm the service is healthy from the instance at any time - the status endpoint is open and returns JSON:
curl -s http://localhost/api/v1/status
Step 4: Register Your Administrator (First-Run)
Open http://<instance-public-ip>/ in your browser. Because the database ships empty, the first visit shows the Homebox registration screen. Enter a name, an email address and a password, then choose Register. Homebox creates your administrator account and signs you in - this account is the owner of your inventory.
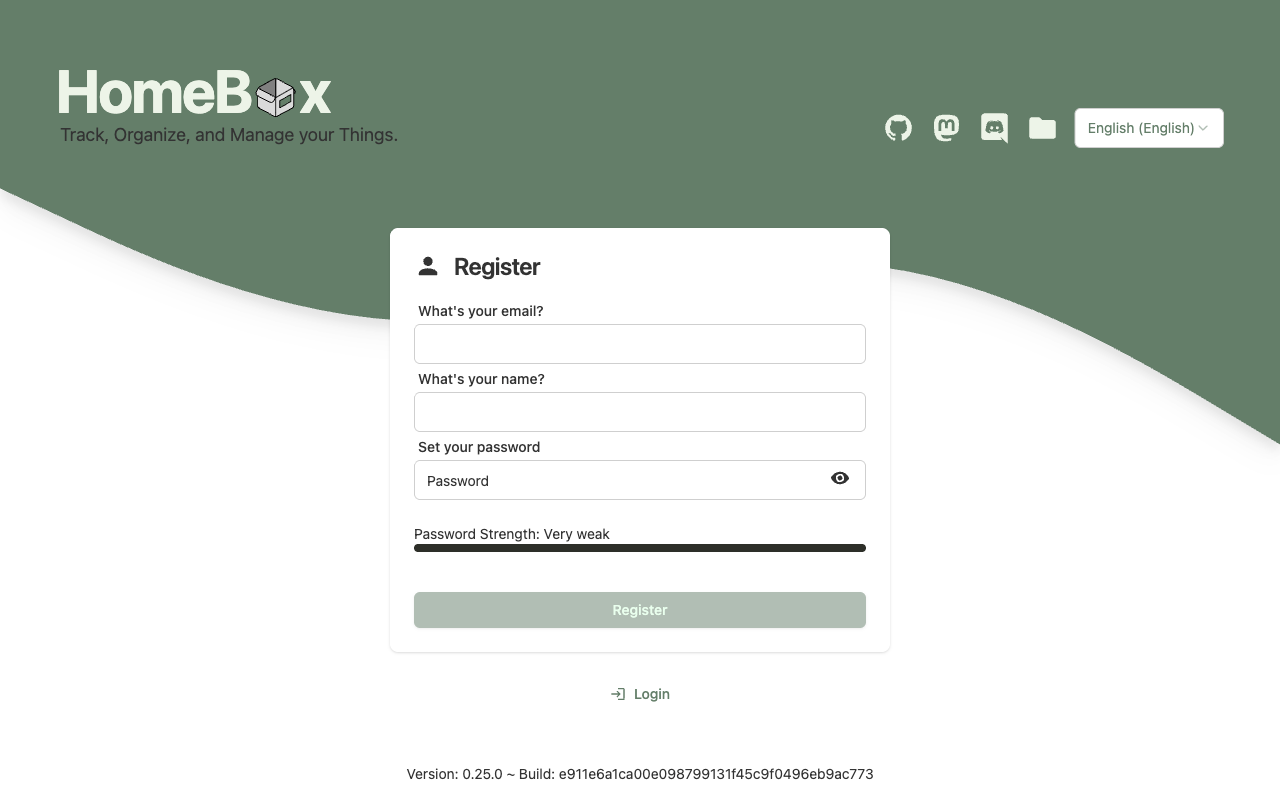
There are no shared or default credentials in this image: the administrator you create here is the only one, and the password is known only to you.
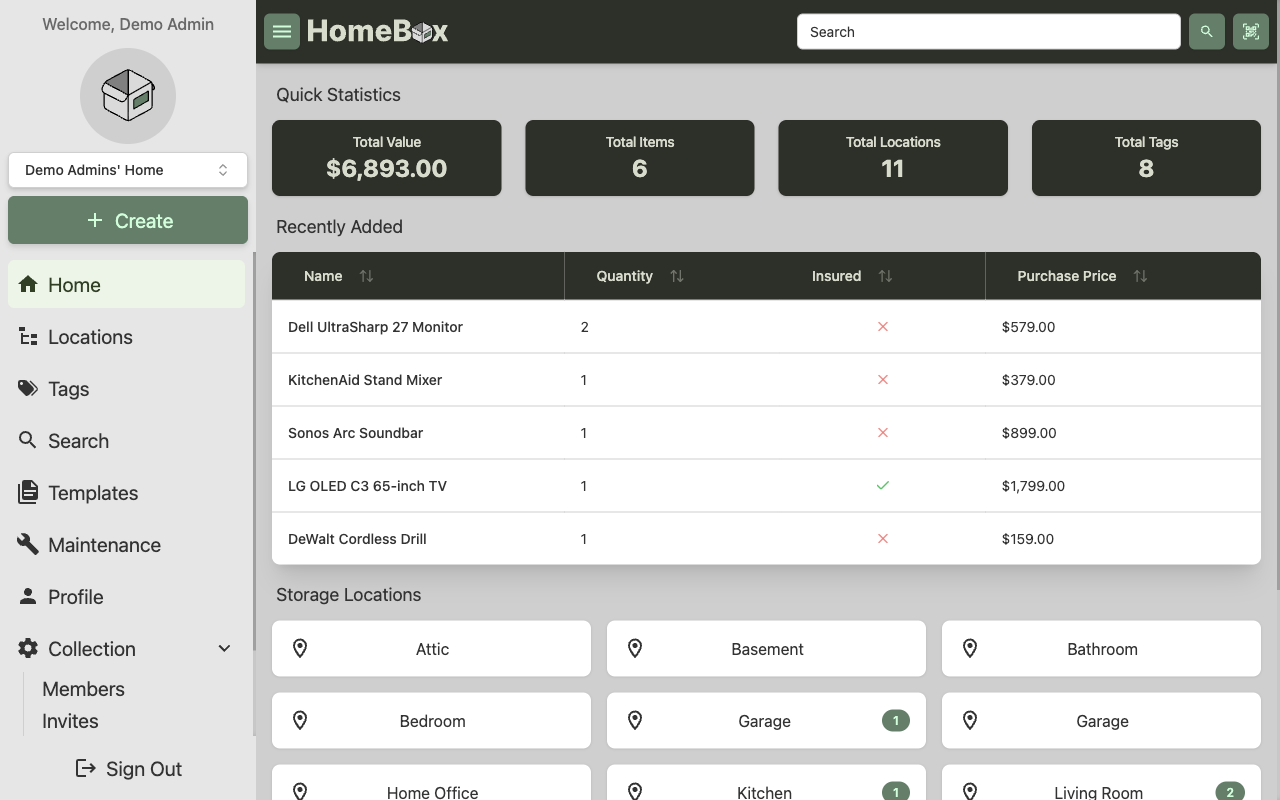
After signing in you land on the Homebox home dashboard, which summarises your total inventory value, item, location and tag counts, your most recently added items, and your storage locations.
Step 5: Create Locations, Tags and Items
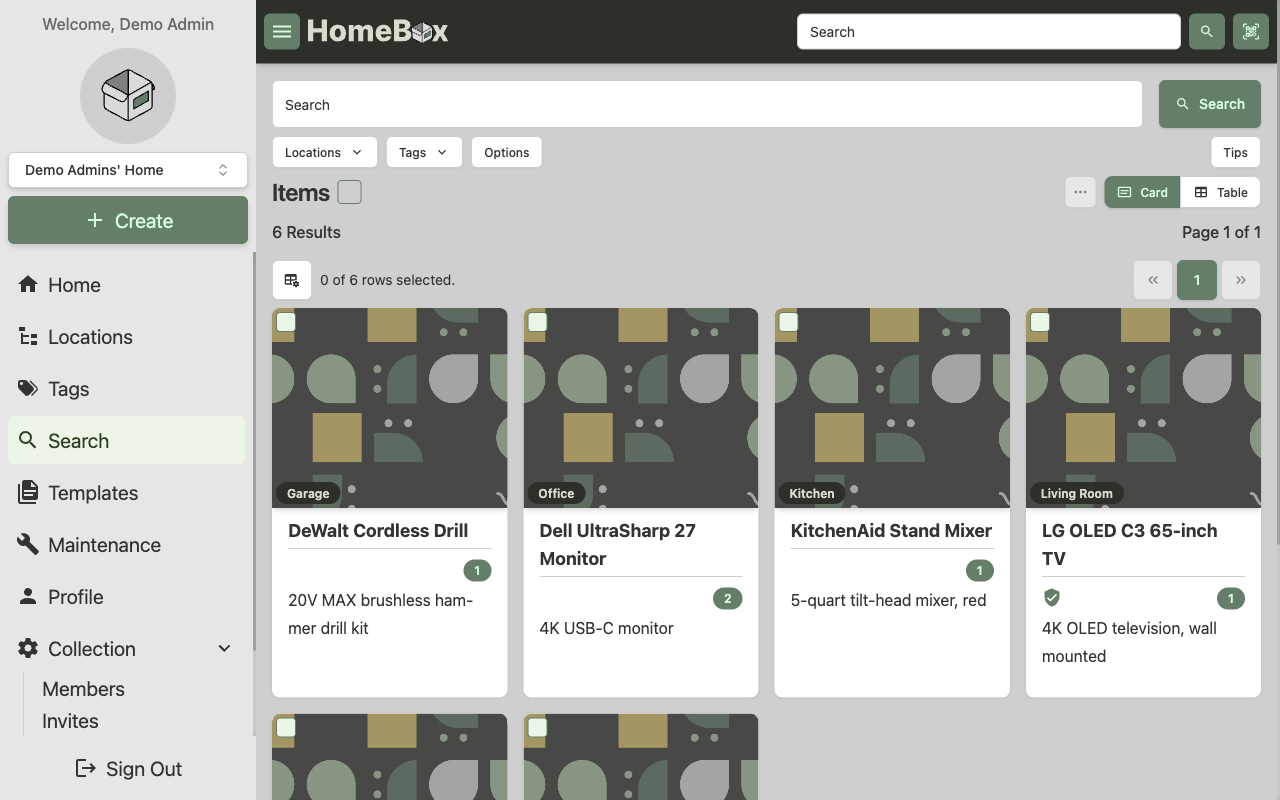
Homebox organises your inventory by locations (where things are kept, which can be nested), tags (cross-cutting labels such as Electronics or Power Tools), and items (the things themselves, each with a value, purchase date, warranty, serial number, photos and more).
Use the Create button in the sidebar to add a location, then add items to it. Each item can carry a manufacturer, model and serial number, a purchase price and date, insurance and warranty details, and attachments. The Search view lists every item as cards or a table, filterable by location and tag.
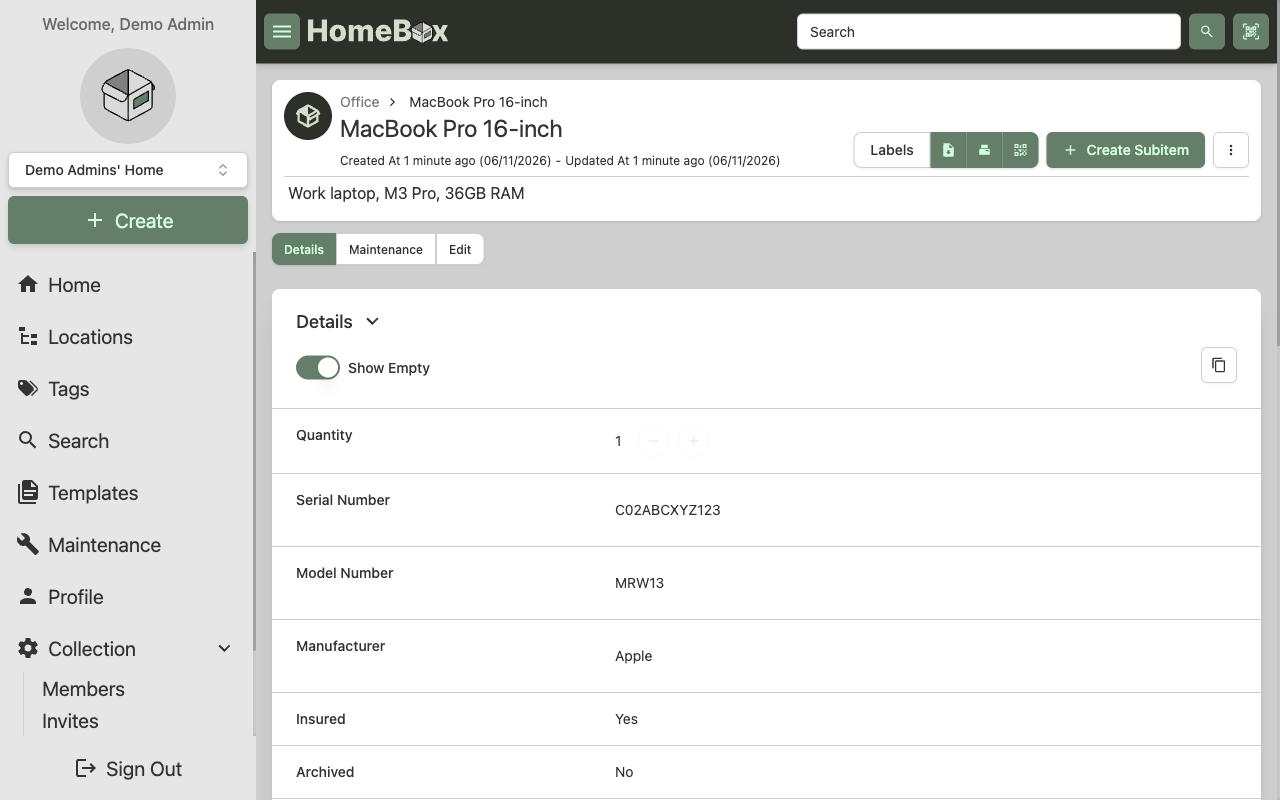
Open any item to see its full detail - its location breadcrumb, quantity, identifiers, purchase and insurance information, maintenance log and attachments.
You can also import an existing inventory from CSV, generate QR or asset labels for printing, and export a bill of materials, all from the web interface.
Step 6: Use the REST API
Everything in the web app is backed by the Homebox REST API under /api/v1. Authenticate by logging in to obtain a bearer token, then call the API with it. The status endpoint needs no authentication:
curl -s http://localhost/api/v1/status
Requests for your data require the token returned by the login endpoint. The following confirms that an unauthenticated request to a protected endpoint is correctly rejected with HTTP 401:
curl -s -o /dev/null -w '%{http_code}\n' http://localhost/api/v1/users/self
To obtain a token, POST your email and password to /api/v1/users/login; the JSON response contains a token field. Pass it as an Authorization header on subsequent requests, for example curl -H "Authorization: <token>" http://localhost/api/v1/items. The full API is documented at the Homebox project's API reference.
Step 7: Disable Further Registration
Registration stays enabled out of the box so that you can create your first administrator. Once you have registered, you can close off further public sign-ups. Edit the environment file and set the registration option to false, then restart the service:
sudo sed -i 's/^HBOX_OPTIONS_ALLOW_REGISTRATION=.*/HBOX_OPTIONS_ALLOW_REGISTRATION=false/' /etc/homebox/homebox.env
sudo systemctl restart homebox
After this, new accounts can only be added by an existing member through the group invitation flow in the web interface.
Step 8: Enable HTTPS with Let's Encrypt
Homebox is served over plain HTTP on port 80 by default so that it works the instant the instance boots. For production use, put it behind TLS. The simplest path is certbot with the nginx plugin. Point a DNS A record at the instance's public IP first, then run certbot for your domain. The certbot command is interactive and prompts for an email and agreement, so run it directly on the instance rather than from a script:
- Install certbot and its nginx plugin:
sudo apt-get update && sudo apt-get install -y certbot python3-certbot-nginx - Obtain and install a certificate for your domain, replacing
your-domain.example.com:sudo certbot --nginx -d your-domain.example.com
Certbot edits the nginx site to add the TLS listener and a HTTP-to-HTTPS redirect, and installs a renewal timer. After it completes, Homebox is reachable over HTTPS on port 443.
Step 9: Backups and Maintenance
All of your data lives under /var/lib/homebox on a dedicated EBS volume - the SQLite database (homebox.db) and every uploaded attachment and generated thumbnail. The simplest durable backup is a point-in-time EBS snapshot of that volume, which you can schedule with Amazon Data Lifecycle Manager.
For a file-level backup, stop the service briefly to ensure the SQLite database is quiesced, archive the data directory, then start it again:
sudo systemctl stop homebox
sudo tar -czf /tmp/homebox-backup.tgz -C /var/lib/homebox .
sudo systemctl start homebox
Copy the resulting archive to Amazon S3 or another durable store. To restore, stop the service, extract the archive back into /var/lib/homebox, fix ownership with sudo chown -R homebox:homebox /var/lib/homebox, and start the service.
The services are ordinary systemd units. Check their state and logs with:
systemctl is-active homebox.service nginx.service
journalctl -u homebox.service --no-pager | tail -n 20
Step 10: Scaling and Operations
Homebox is a single Go binary backed by SQLite, so it scales vertically - a t3.small comfortably serves a household or small team, and you can move to a larger instance type if you add many users and large attachments. Because the database and uploads are on a dedicated EBS volume, you can grow storage independently of the instance by expanding that volume and running sudo resize2fs on its filesystem.
To upgrade Homebox to a newer release, replace the binary at /opt/homebox/homebox with the new version's homebox from the official release tarball and restart the service. Always take an EBS snapshot of /var/lib/homebox first - SQLite migrations run automatically on start and are one-way.
Support
This image is published and supported by cloudimg. Support covers deployment, upgrades, integrations, TLS termination, backups and data migration, 24/7 by email and chat.
Homebox is licensed under the GNU Affero General Public License v3.0. Homebox is a trademark of its respective owner. All product and company names are trademarks or registered trademarks of their respective holders. Use of them does not imply any affiliation with or endorsement by them.