Kanboard on AWS User Guide
Overview
Kanboard is an open source self-hosted kanban board for visual project management. It focuses on simplicity: a clean board of columns and cards that limits work in progress and makes the status of every task obvious at a glance. This image runs Kanboard behind nginx, with PHP FPM 8.3 and OPcache enabled.
Kanboard stores its data in SQLite, so the appliance is fully self-contained: there is no separate database server to install, secure or back up. The SQLite database, uploaded files, cache and logs live under /var/www/kanboard/data on a dedicated, independently resizable EBS volume, so you can grow your project store without touching the operating system disk.
There is no first-run setup wizard to step through. The Kanboard administrator password is generated on the first boot of every deployed instance, so the stock admin / admin password that ships with upstream Kanboard is never used. Two instances launched from the same Amazon Machine Image never share credentials. The initial administrator password is written to /root/kanboard-credentials.txt with mode 0600 so that only the root user can read it.

Prerequisites
Before you deploy this image you need:
- An Amazon Web Services account where you can launch EC2 instances
- IAM permissions to launch instances, create security groups, and subscribe to AWS Marketplace products
- An EC2 key pair in the target Region for SSH access to the instance
- A VPC and subnet in the target Region, with a security group allowing inbound port 22 from your management network and inbound ports 80 and 443 from the networks your users will use
- The AWS CLI (version 2) installed locally if you plan to deploy from the command line
Step 1: Launch the Instance from the AWS Marketplace
Sign in to the AWS Management Console, open the EC2 service, and select Launch instance. Under Application and OS Images choose AWS Marketplace AMIs and search for Kanboard. Select the cloudimg listing and choose Select, then Continue on the subscription summary.
Pick an instance type of m5.large or larger. Choose your EC2 key pair under Key pair (login). Under Network settings select your VPC and subnet, and either create or select a security group that allows inbound port 22 from your management network and inbound ports 80 and 443 from the networks your users will use. Leave the root and data volumes at their default sizes or larger.
Select Launch instance. First boot initialisation takes approximately one minute after the instance state becomes Running and the status checks pass.
Step 2: Launch the Instance from the AWS CLI
The following block launches an instance from the cloudimg Kanboard Marketplace AMI into an existing subnet and security group. Replace <ami-id> with the AMI ID shown on the Marketplace listing, <key-name> with your EC2 key pair name, <subnet-id> with your subnet ID, and <security-group-id> with a security group that opens ports 22, 80, and 443 as described above.
aws ec2 run-instances \
  --image-id <ami-id> \
  --instance-type m5.large \
  --key-name <key-name> \
  --subnet-id <subnet-id> \
  --security-group-ids <security-group-id> \
  --block-device-mappings '[{"DeviceName":"/dev/sda1","Ebs":{"VolumeSize":20,"VolumeType":"gp3"}}]' \
  --tag-specifications 'ResourceType=instance,Tags=[{Key=Name,Value=kanboard-01}]'
The command prints a JSON document on success. Note the instance ID, then retrieve its public address once it is running with aws ec2 describe-instances --instance-ids <instance-id> --query "Reservations[].Instances[].PublicIpAddress" --output text.
Step 3: Connect and Retrieve Initial Credentials
Connect over SSH with the key pair you selected and the public IP address from step 2. The SSH login user depends on the operating system of the AMI variant you launched:
| AMI variant | SSH login user |
|---|---|
| Kanboard 1.2.52 on Ubuntu 24.04 | ubuntu |
For the Ubuntu 24.04 variant, connect with ssh -i <path-to-key.pem> ubuntu@<instance-public-ip>.
The administrator credentials generated on first boot are stored in a root only file. Retrieve them with the following command, which prints the Kanboard administrator user name and password for this specific instance:
sudo cat /root/kanboard-credentials.txt
The file lists the application URL, the JSON-RPC API URL, the administrator user name (admin), and the per instance administrator password. Keep this password somewhere safe and treat the file as sensitive.
Step 4: Verify the Service is Running
Confirm that the web server, the PHP FPM pool and the first boot service are all active:
systemctl is-active nginx php8.3-fpm kanboard-firstboot
All three report active. You can confirm the installed Kanboard version with the bundled console:
cd /var/www/kanboard && sudo php cli version
This prints 1.2.52. Confirm the web application answers on the loopback interface (an unauthenticated request is redirected to the sign-in page, which is the expected behaviour):
curl -s -o /dev/null -w '%{http_code}\n' http://127.0.0.1/
This returns 302, the redirect to /login.
Step 5: Confirm the Data Volume
The SQLite database, uploaded files and cache are kept on a dedicated EBS volume mounted at /var/www/kanboard/data. Confirm it is a separate filesystem:
findmnt -no SOURCE,FSTYPE /var/www/kanboard/data
This shows the data device and ext4. Because the data tier is a distinct volume, you can grow it with the AWS console or CLI and then expand the filesystem online, without resizing the operating system disk.
Step 6: First Login
Open a web browser and browse to http://<instance-public-ip>/. Sign in as the user admin with the per instance password from /root/kanboard-credentials.txt.
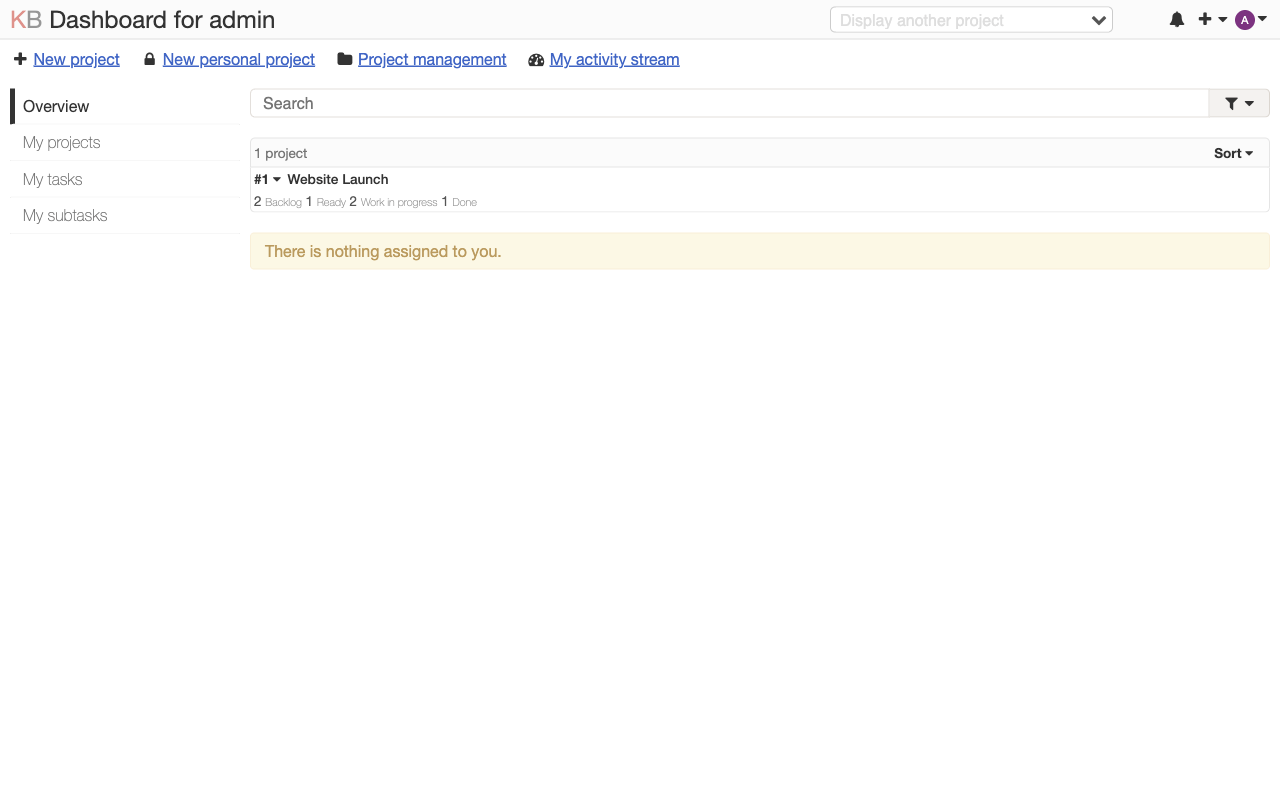
After signing in you reach the dashboard, which lists your projects, the tasks assigned to you, and a project activity stream.
We strongly recommend that you change the administrator password to one of your own choosing after first login. Open the user menu in the top right, choose My profile, then Change password.
Step 7: Create a Project and Build a Board
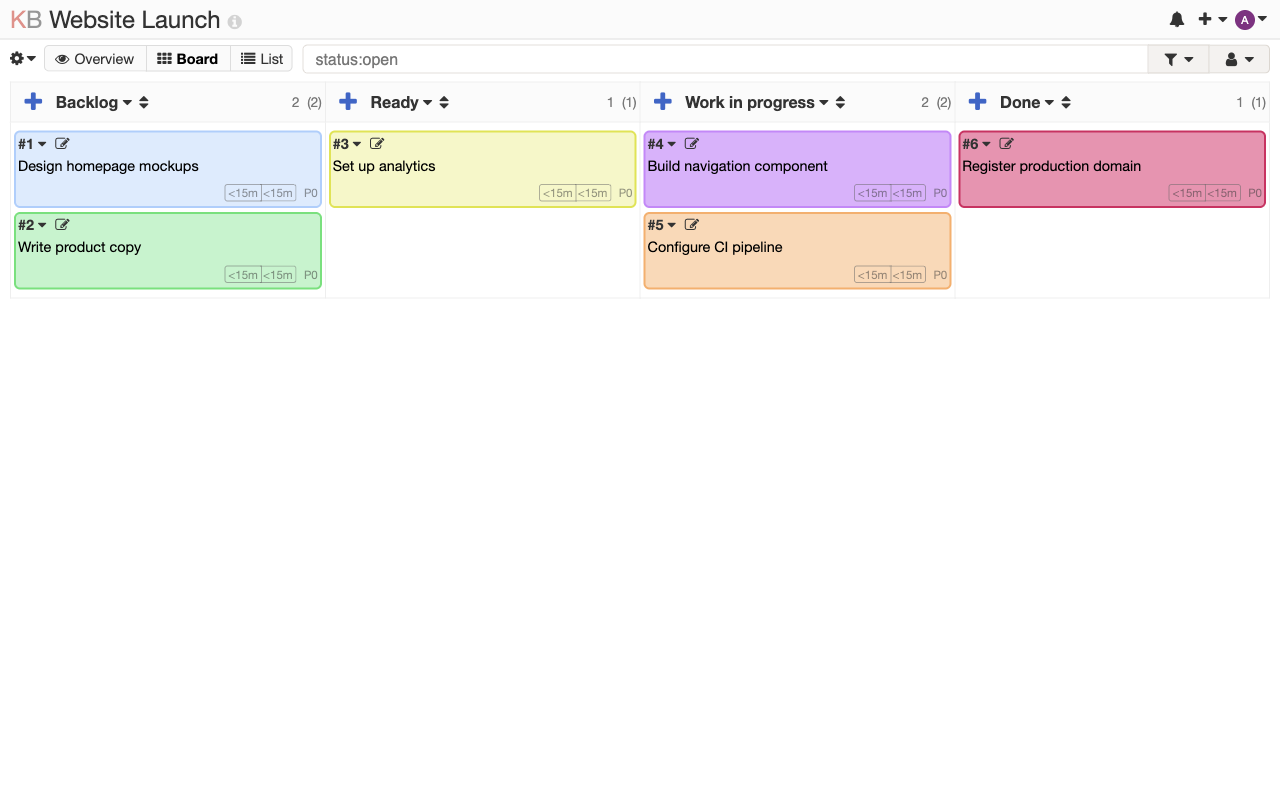
From the dashboard choose New project, give the project a name, and open it. Kanboard creates a board with the default columns Backlog, Ready, Work in progress and Done. Select the blue + icon at the head of a column to add a task card, give it a title, optionally assign a colour, an owner, a due date and a description, then save. Drag cards between columns as work progresses. You can rename, add or remove columns from the project Settings, set work-in-progress limits per column, add swimlanes, and define automated actions that fire when a card moves.
Step 8: Use the JSON-RPC API
Kanboard exposes a JSON-RPC API at /jsonrpc.php for integration and automation. User level calls authenticate with HTTP Basic using the administrator user name and the per instance password. The following call returns the signed-in user's profile and confirms the API is reachable. Run it on the instance:
PASS=$(sudo grep '^kanboard.admin.pass=' /root/kanboard-credentials.txt | cut -d= -f2-)
curl -s -u "admin:${PASS}" -H 'Content-Type: application/json' \
  -d '{"jsonrpc":"2.0","method":"getMe","id":1}' http://127.0.0.1/jsonrpc.php
The response is a JSON document whose result object contains the admin user. The full API reference is published in the Kanboard documentation; common procedures include createProject, createTask, getAllTasks and getBoard.
Step 9: Enable HTTPS (Recommended)
The image serves Kanboard over plain HTTP on port 80 so that it works immediately behind a load balancer or for evaluation. For production use you should terminate TLS. The simplest approach is to obtain a free certificate from Let's Encrypt once you have pointed a DNS name at the instance.
Install Certbot and its nginx plugin, then request a certificate for your domain. Because this step needs your own domain name and prompts for an email address, run the Certbot command yourself at an interactive shell rather than from a script:
- Install the client:
sudo apt-get update && sudo apt-get install -y certbot python3-certbot-nginx - Request and install the certificate: run
sudo certbot --nginx -d your-domain.example.comand follow the prompts. Certbot edits the nginx server block to add the TLS listener and sets up automatic renewal.
After Certbot completes, browse to https://your-domain.example.com/ and sign in over the encrypted connection.
Step 10: Backup and Maintenance
Because all state lives on the data volume, backing up Kanboard is straightforward. The recommended approach is an EBS snapshot of the data volume, which captures the SQLite database, uploaded files and configuration atomically. You can also copy the SQLite database file directly:
sudo cp /var/www/kanboard/data/db.sqlite /var/www/kanboard/data/db.sqlite.backup
Apply operating system security updates with sudo apt-get update && sudo apt-get upgrade. To upgrade Kanboard itself, follow the upstream upgrade notes for your target version; always snapshot the data volume first.
Support
This image is published and supported by cloudimg. Support covers deployment, Kanboard configuration, plugin and API integration, upgrades, performance tuning, and storage administration, by email and chat. Kanboard is open source software licensed under the MIT License; the application itself is developed by the Kanboard project.
All product and company names are trademarks or registered trademarks of their respective holders. Use of them does not imply any affiliation with or endorsement by them.