
Mailpit on AWS User Guide
Overview
This image runs Mailpit, the self-hosted email and SMTP testing tool for developers. Mailpit runs a fake SMTP server that catches the mail your applications send, then shows every captured message in a fast, searchable web interface: rendered HTML, plain text and raw source, attachments, headers, and spam and link checks. Because Mailpit never delivers mail to real recipients, you can safely point a development or staging environment at it and inspect exactly what your application would have sent.
Mailpit is a single static Go binary that runs as the dedicated mailpit system user under systemd. It listens for SMTP on port 25 and serves its web UI and REST API on the loopback interface at 127.0.0.1:8025, fronted by nginx as a reverse proxy on port 80 (and 443 once you add TLS), with the WebSocket upgrade its live-updating message list needs already configured. Every captured message is stored in a SQLite database on a dedicated EBS data volume mounted at /var/lib/mailpit, independently resizable and separate from the operating system disk.
On the first boot of every deployed instance, a one-shot service generates a UI password unique to that instance, applies it to Mailpit as an htpasswd bcrypt credential, and records it in /root/mailpit-credentials.txt with mode 0600. No shared or default credentials ship in the image, and the health endpoints used by load balancers stay open while the web UI and API require the generated password.
Prerequisites
Before you deploy this image you need:
- An Amazon Web Services account where you can launch EC2 instances
- IAM permissions to launch instances, create security groups, and subscribe to AWS Marketplace products
- An EC2 key pair in the target Region for SSH access to the instance
- A VPC and subnet in the target Region, with a security group allowing inbound port 22 from your management network, inbound ports 80 and 443 from the networks your operators will reach the Mailpit UI on, and inbound port 25 from the application hosts that will send test mail
- The AWS CLI (version 2) installed locally if you plan to deploy from the command line
Step 1: Launch the Instance from the AWS Marketplace
Sign in to the AWS Management Console, open the EC2 service, and select Launch instance. Under Application and OS Images choose AWS Marketplace AMIs and search for Mailpit. Select the cloudimg listing and choose Select, then Continue on the subscription summary.
Pick an instance type of t3.small or larger. Choose your EC2 key pair under Key pair (login). Under Network settings select your VPC and subnet, and either create or select a security group that allows inbound port 22 from your management network, inbound ports 80 and 443 from the networks your users use, and inbound port 25 from the application hosts that will send mail. Leave the root volume at the default size or larger; the image adds a separate data volume for the message database automatically.
Select Launch instance. First boot initialisation takes under a minute after the instance state becomes Running and the status checks pass.
Step 2: Launch the Instance from the AWS CLI
The following block launches an instance from the cloudimg Mailpit Marketplace AMI into an existing subnet and security group. Replace <ami-id> with the AMI ID shown on the Marketplace listing, <key-name> with your EC2 key pair name, <subnet-id> with your subnet ID, and <security-group-id> with a security group that opens ports 22, 80, 443 and 25 as described above.
aws ec2 run-instances \
  --image-id <ami-id> \
  --instance-type t3.small \
  --key-name <key-name> \
  --subnet-id <subnet-id> \
  --security-group-ids <security-group-id> \
  --block-device-mappings '[{"DeviceName":"/dev/sda1","Ebs":{"VolumeSize":30,"VolumeType":"gp3"}}]' \
  --tag-specifications 'ResourceType=instance,Tags=[{Key=Name,Value=mailpit-01}]'
The command prints a JSON document on success. Note the instance ID, then retrieve its public address once it is running with aws ec2 describe-instances --instance-ids <instance-id> --query "Reservations[].Instances[].PublicIpAddress" --output text.
Step 3: Connect and Retrieve the UI Password
Connect over SSH with the key pair you selected and the public IP address from step 2. The SSH login user depends on the operating system of the AMI variant you launched:
| AMI variant | SSH login user |
|---|---|
| Mailpit 1.30 on Ubuntu 24.04 | ubuntu |
The first boot service runs before the SSH daemon becomes ready, so the credentials file is always in place when you log in for the first time.
ssh <login-user>@<public-ip>
sudo cat /root/mailpit-credentials.txt
You will see a plain text file containing the Mailpit URL, the username admin, and the per-instance UI password. From the same SSH session you can confirm the deployment is healthy; the health endpoint is open and served by nginx:
curl -fsS http://127.0.0.1/healthz
ok
An ok response confirms nginx is fronting the application. You can also confirm the services that make up the stack are running, and the Mailpit version:
systemctl is-active mailpit nginx mailpit-firstboot
/usr/local/bin/mailpit version
active
active
active
/usr/local/bin/mailpit v1.30.3 compiled with go1.26.4 on linux/amd64
Mailpit listens for SMTP on port 25 on all interfaces and serves its UI and API on the loopback interface, which you can confirm with:
sudo ss -tlnp | grep -E ':25 |:8025 '
LISTEN 0 1024 *:25          *:* users:(("mailpit",pid=1742,fd=8))
LISTEN 0 1024 127.0.0.1:8025 *:* users:(("mailpit",pid=1742,fd=9))
Step 4: First Sign-in
Open a web browser and navigate to http://<public-ip>/. Mailpit protects its web UI with HTTP Basic authentication, so your browser prompts for a username and password. Enter the username admin and the per-instance password from /root/mailpit-credentials.txt.
Mailpit opens on the inbox, which lists every message it has captured, newest first, with the sender, recipient, subject, size and time received. As new mail arrives the list updates live over the WebSocket.
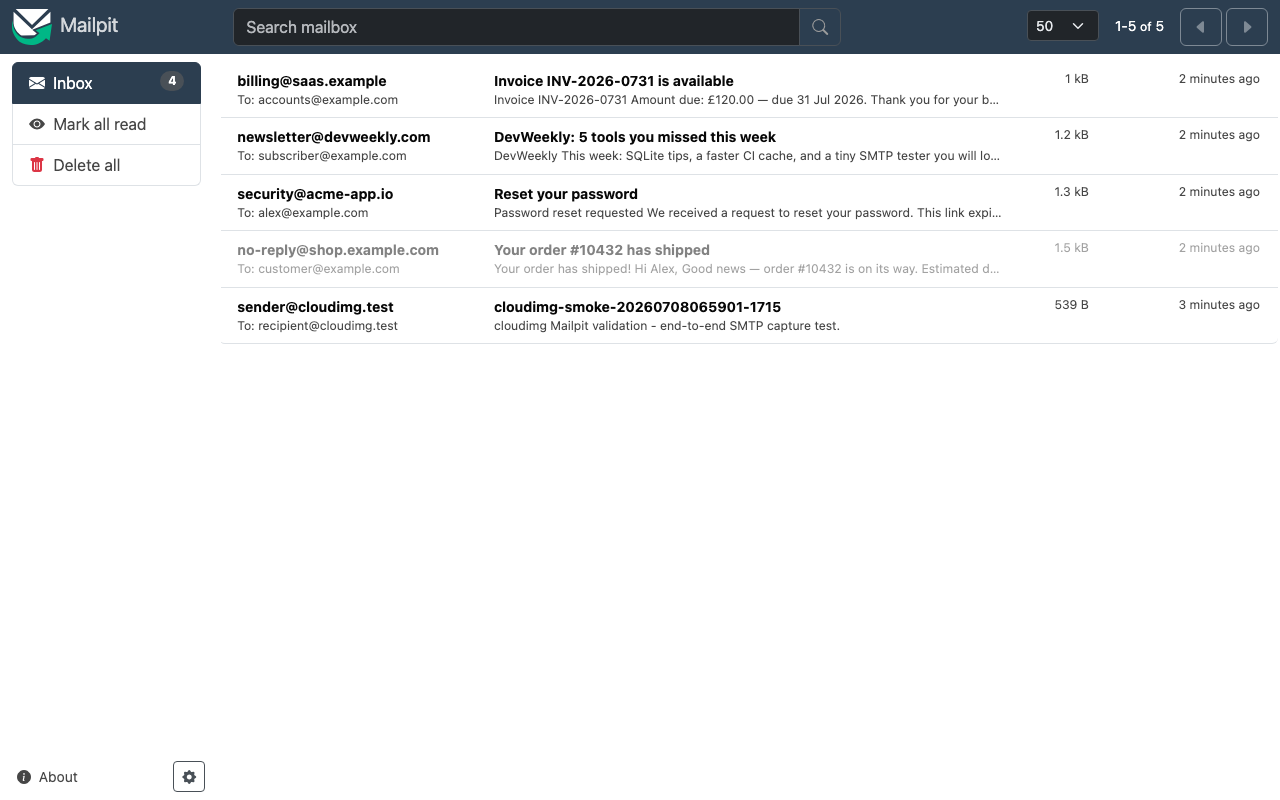
The Mailpit inbox, listing captured messages with sender, recipient, subject, size and time received, and a search box to filter the mailbox.
Step 5: Point Your Application at the SMTP Port
Configure your application's SMTP settings to send through this instance: host <public-ip>, port 25, with no authentication and no TLS required by default. Every message your application sends is then captured by Mailpit instead of being delivered to a real mail server.
To prove the capture path end to end from the instance itself, send a test message to the SMTP port and confirm it appears through the authenticated API. The following sends one message with the standard library:
python3 -c "import smtplib; from email.message import EmailMessage; m=EmailMessage(); m['From']='app@example.com'; m['To']='inbox@example.com'; m['Subject']='Hello from my app'; m.set_content('This message was captured by Mailpit.'); s=smtplib.SMTP('127.0.0.1',25,timeout=10); s.send_message(m); s.quit(); print('sent')"
sent
Now read the mailbox back through Mailpit's REST API, authenticating with the per-instance password. The total field is the number of captured messages:
PW=$(sudo grep '^MAILPIT_PASSWORD=' /root/mailpit-credentials.txt | cut -d= -f2-)
curl -s -u "admin:$PW" http://127.0.0.1/api/v1/messages | jq '.total'
1
A non-zero count confirms the message was captured. The same message now appears at the top of the inbox in the web UI.
Step 6: Inspect a Captured Message
Select any message in the inbox to open it. Mailpit shows the envelope (From, To, Subject, Date and size) above a set of tabs. The default HTML tab renders the message exactly as an email client would, so you can check layout, images and links. The Text tab shows the plain-text alternative and the Raw tab shows the complete raw source. You can download the message or any attachment with the Download control.
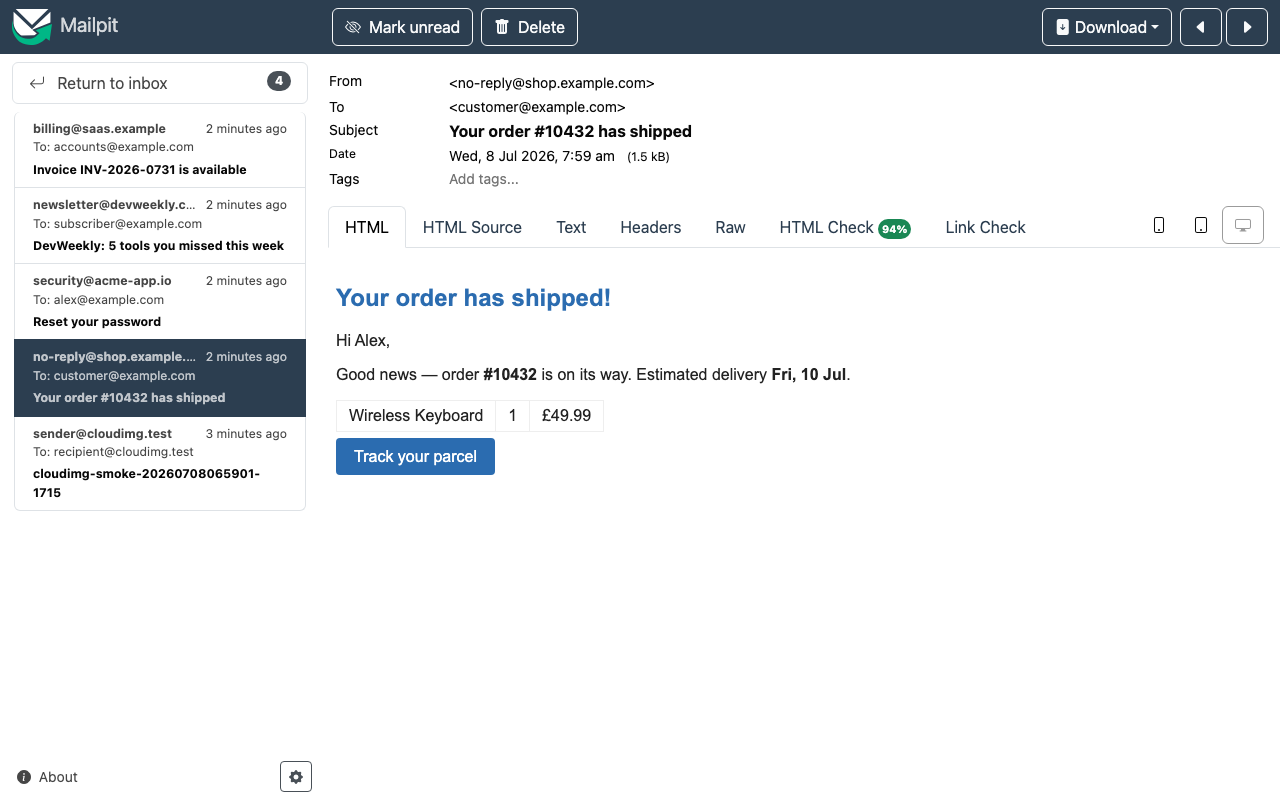
A captured message opened on the HTML tab, rendering the email as a mail client would, with the HTML Source, Text, Headers, Raw, HTML Check and Link Check tabs above it.
Step 7: Read the Headers
Switch to the Headers tab to see every header on the message, with a filter box to jump to a specific one. This is where you confirm details such as Content-Type, Message-Id, Return-Path and the Received trace that Mailpit added when it accepted the message over SMTP.
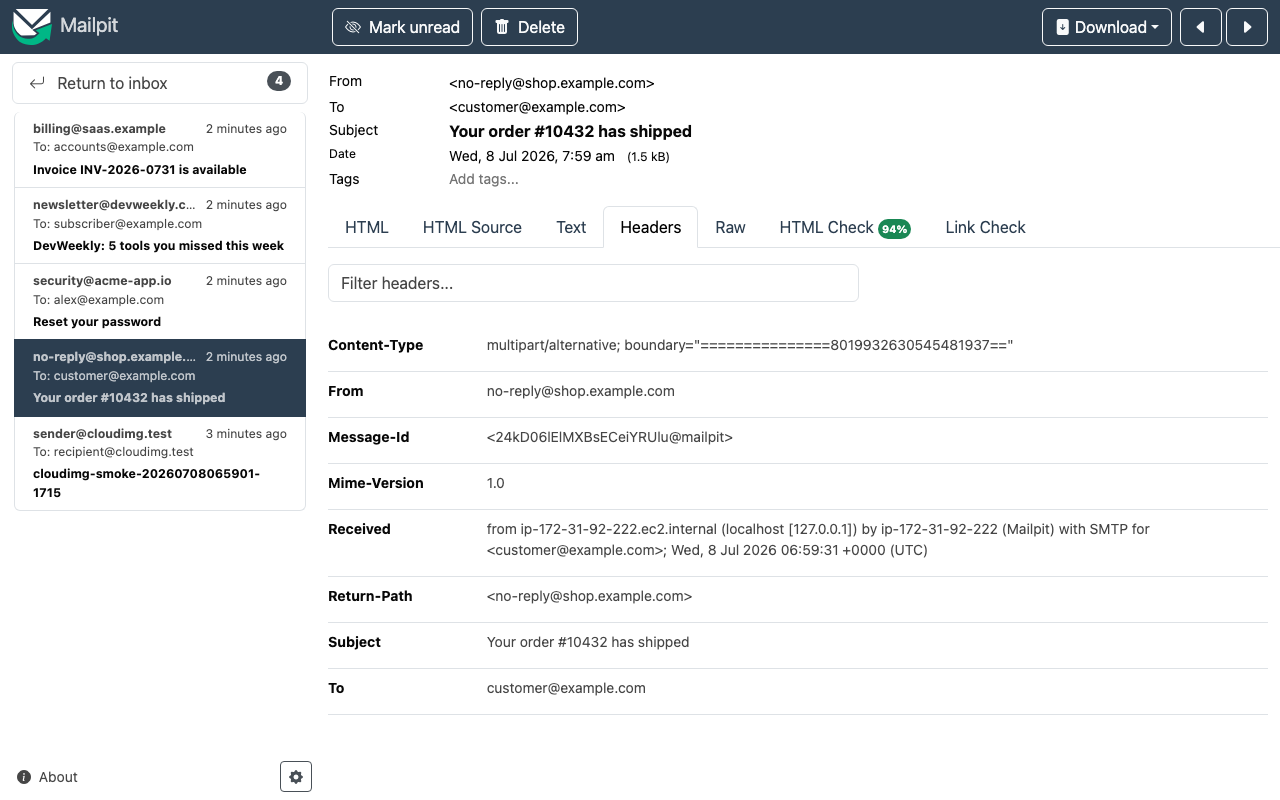
The Headers tab, listing every header on the message including Content-Type, Message-Id, the SMTP Received trace, Return-Path and the addressing headers.
Step 8: Run the HTML and Link Checks
Mailpit can analyse an HTML message for email-client compatibility and for broken links. Open the HTML Check tab to see an overall support score, a breakdown across email clients and platforms such as Outlook, macOS, iOS, Android and webmail, and a list of the HTML and CSS features in the message that are only partially supported. The Link Check tab validates every link and image URL in the message and reports any that fail.
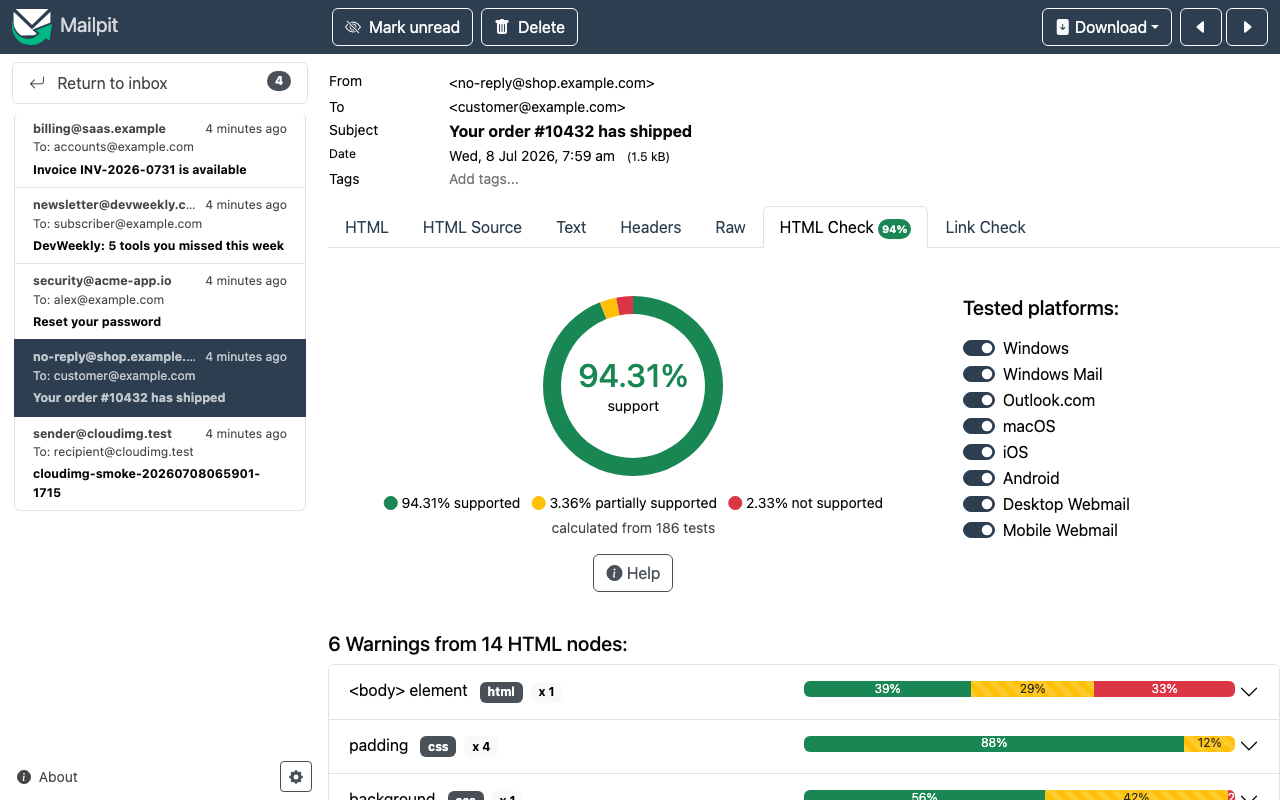
The HTML Check tab, scoring the message for email-client support across Windows, Outlook, macOS, iOS, Android and webmail, with a per-feature warning breakdown.
Step 9: Enable HTTPS with Let's Encrypt
For any deployment reachable beyond a trusted network, serve Mailpit over HTTPS so the Basic-auth credentials and the WebSocket the live message list uses cannot be intercepted. The image ships with nginx, which certbot can configure automatically.
The following assumes you have a DNS record pointing your fully qualified domain name at the instance's public IP address.
sudo apt-get update && sudo apt-get install -y certbot python3-certbot-nginx
sudo certbot --nginx -d mailpit.your-domain.example \
  --non-interactive --agree-tos -m you@your-domain.example \
  --redirect
certbot obtains a certificate and rewrites the nginx server block to serve HTTPS and redirect HTTP; the WebSocket upgrade headers already in the site are preserved. Renewal is handled automatically by the certbot systemd timer. Keep the SMTP port reachable only from the application hosts that need to send mail by scoping the security group rule for port 25 to those sources.
Step 10: Change the UI Password
The UI password is stored as an htpasswd bcrypt credential in /etc/mailpit/ui-auth. To set your own password, write a new bcrypt entry for the admin user and restart Mailpit. Replace <new-password> with the password you want:
sudo htpasswd -bB /etc/mailpit/ui-auth admin '<new-password>'
sudo systemctl restart mailpit
The -B flag stores the password as a bcrypt hash and -b takes it from the command line so the update is scriptable. Mailpit reads the file at startup, so the new password takes effect as soon as the service restarts. Omit -b and the password argument if you prefer htpasswd to prompt for it interactively.
Step 11: Backups and Maintenance
Mailpit keeps its SQLite message store under /var/lib/mailpit on the dedicated data volume, confirmed here on its own disk:
df -h /var/lib/mailpit | tail -1
/dev/nvme1n1 20G 724K 19G 1% /var/lib/mailpit
Because that is a separate EBS volume you can take a coordinated EBS snapshot of it for point-in-time backups, or archive the store to object storage:
sudo systemctl stop mailpit
sudo tar czf <backup-dir>/mailpit-$(date +%F).tgz -C /var/lib mailpit
sudo systemctl start mailpit
Ship the archive to an Amazon S3 bucket or another object store. Mailpit runs under systemd with a restart policy, so you can check its state or clear the captured mailbox at any time; the mailbox can be emptied from the UI or by deleting the store while the service is stopped:
systemctl is-active mailpit nginx
active
active
Step 12: Scaling and Operations
- Increase the instance size for a busy shared inbox; Mailpit stays responsive because it stores mail in SQLite and streams new messages over the WebSocket
- Scope the port 25 security group rule to only the application hosts that need to send mail, and keep the UI on 80/443 behind your management network or a load balancer
- Put the web tier behind an Application Load Balancer and terminate TLS there; forward the WebSocket upgrade so the live message list connects, and use the open
/livezand/readyzendpoints for target health checks - Grow the data volume by extending the EBS data volume and running
sudo resize2fson/var/lib/mailpit - Wire the REST API on
/api/v1/messagesinto your automated integration tests to assert that a message was sent, then delete it between test runs - Pin the Mailpit version for a fleet by controlling which AMI version you launch
The official Mailpit documentation is available at https://mailpit.axllent.org/docs/.
Support
cloudimg provides 24/7/365 expert technical support for this image. Guaranteed response within 24 hours, one hour average for critical issues. Contact support@cloudimg.co.uk.
For general Mailpit questions consult the documentation at https://mailpit.axllent.org/docs/. Mailpit is a trademark of its respective owner; use here is nominative and does not imply affiliation or endorsement.