
Manticore Search on AWS User Guide
Overview
Manticore Search is an open source search database. It indexes documents in real time and answers full text, vector and hybrid queries with relevance ranking, faceting and a SQL interface, and it began life as a fork of Sphinx. It is built for the work a general purpose database does badly: relevance ranked text retrieval over a product catalogue or a document corpus, log and event search, and semantic retrieval over embeddings.
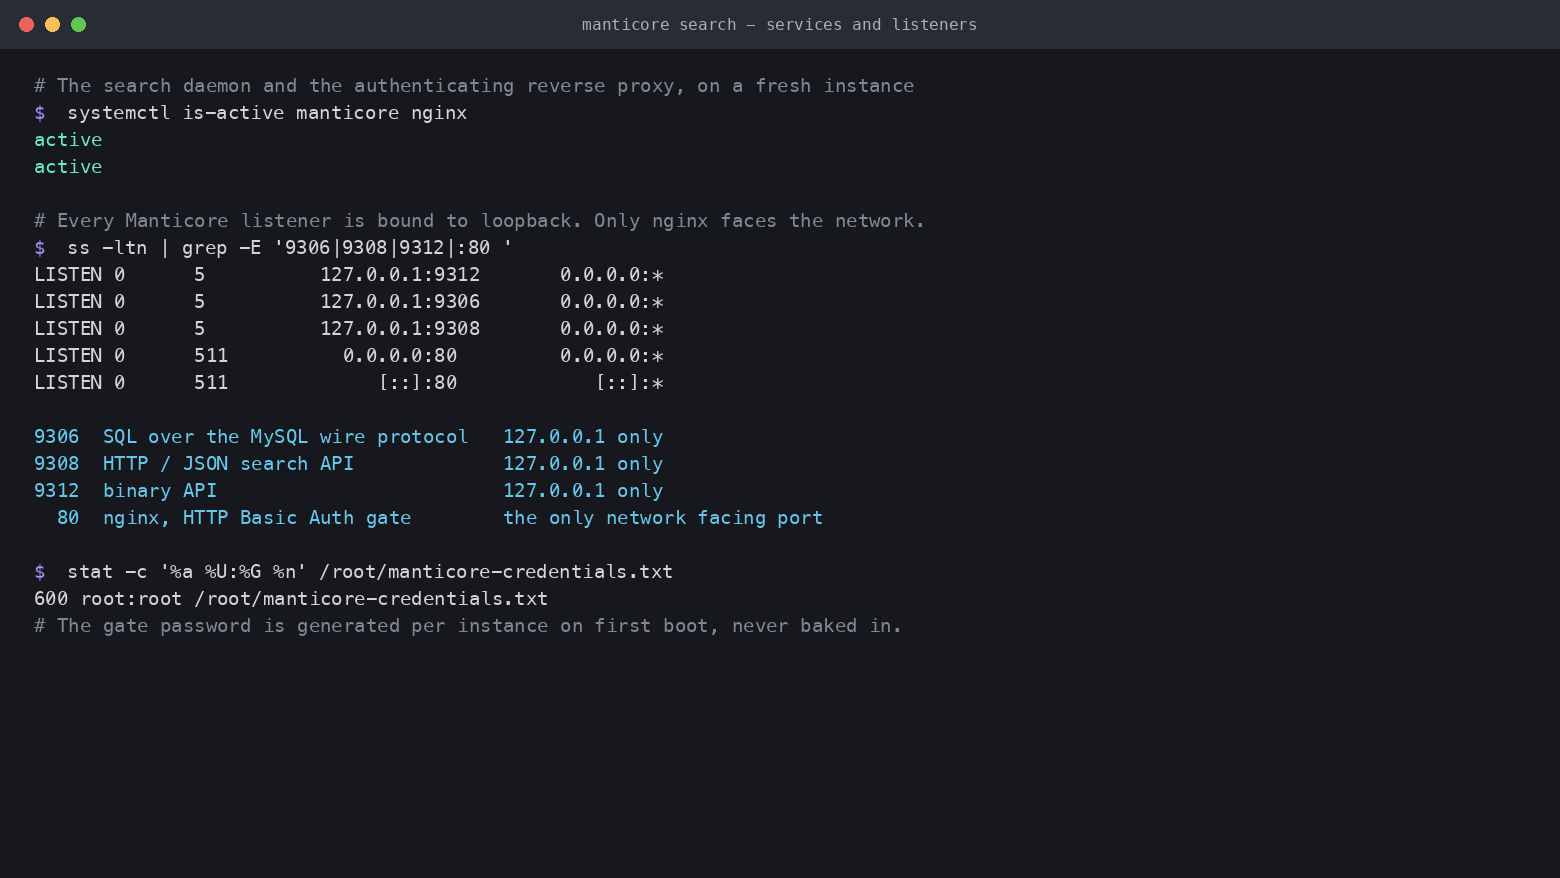
The cloudimg image installs Manticore Search from the project's own signed package repository, pinned to an exact version whose published checksum is verified before installation. The important difference from a stock installation is what is exposed. Manticore performs no authentication of its own, because upstream expects it to sit on a trusted network, so this image never puts it on one that is not: the SQL port, the HTTP port and the binary API port are all bound to 127.0.0.1, and nginx on port 80 is the only network facing surface. nginx enforces HTTP basic authentication with a 24 character password generated uniquely on each instance's first boot, so no credential is baked into the image and no two instances share one. A separate unauthenticated health endpoint is provided for load balancer probes.
What is included:
- Manticore Search 28.4.4, installed from the official signed upstream apt repository with the package checksum verified at build time and the version held so it cannot drift
- The complete bundle: the
searchddaemon, the Manticore Columnar Library, secondary indexes, KNN vector indexing, the embeddings component, Manticore Buddy and the command line tools manticore.servicerunning as the dedicated non rootmanticoreuser with every listener bound to127.0.0.1nginx.servicepublishing the HTTP search API on port 80 behind HTTP basic authenticationmanticoresearch-firstboot.servicegenerating a unique 24 character basic authentication password on first boot, stored bcrypt hashed- A demo table (
demo_articles) indexed in the image, so a relevance ranked query works on the first boot - A dedicated EBS volume mounted at
/var/lib/manticoreby filesystem identifier, holding every table, index and the binary transaction log - An unauthenticated
/healthzendpoint for load balancer and liveness probes - Ubuntu 24.04 LTS base, latest patches, unattended security upgrades enabled
- 24/7 cloudimg support
Prerequisites
Before you deploy this image you need:
- An Amazon Web Services account where you can launch EC2 instances
- IAM permissions to launch instances, create security groups, and subscribe to AWS Marketplace products
- An EC2 key pair in the target Region for SSH access to the instance
- A VPC and subnet in the target Region, with a security group allowing inbound port 22 from your management network and inbound port 80 from the networks that will query the search API
- The AWS CLI (version 2) installed locally if you plan to deploy from the command line
Connecting to your instance
Connect over SSH on port 22 as the default login user for the operating system variant you launched. This listing currently ships the following variant:
| OS variant | SSH login user |
|---|---|
| Ubuntu 24.04 LTS | ubuntu |
The search API is served on port 80 through nginx. Manticore itself listens only on 127.0.0.1 ports 9306 (SQL), 9308 (HTTP) and 9312 (binary API).
Step 1: Launch the Instance from the AWS Marketplace
Sign in to the AWS Management Console, open the EC2 service, and select Launch instance. Under Application and OS Images choose AWS Marketplace AMIs and search for Manticore Search. Select the cloudimg listing and choose Select, then Continue on the subscription summary.
Pick an instance type of m5.large or larger. Search is memory sensitive, so the more of your working set that fits in RAM the fewer disk reads each query needs; size up as your corpus grows. Choose your EC2 key pair under Key pair (login). Under Network settings select your VPC and subnet, and either create or select a security group that allows inbound port 22 from your management network and inbound port 80 from the networks that will query the search API. Leave the root volume at the default size or larger; the search index lives on its own separate volume, which you can size independently at launch.
Select Launch instance. First boot initialisation takes under a minute after the instance state becomes Running and the status checks pass.
Step 2: Launch the Instance from the AWS CLI
The following block launches an instance from the cloudimg Manticore Search Marketplace AMI into an existing subnet and security group. Replace <ami-id> with the AMI ID shown on the Marketplace listing, <key-name> with your EC2 key pair name, <subnet-id> with your subnet ID, and <security-group-id> with a security group that opens ports 22 and 80 as described above.
aws ec2 run-instances \
  --image-id <ami-id> \
  --instance-type m5.large \
  --key-name <key-name> \
  --subnet-id <subnet-id> \
  --security-group-ids <security-group-id> \
  --metadata-options "HttpTokens=required,HttpEndpoint=enabled" \
  --tag-specifications 'ResourceType=instance,Tags=[{Key=Name,Value=manticore-search}]'
The image resolves this instance's public address on first boot using the EC2 Instance Metadata Service (IMDSv2), so it works with HttpTokens=required enabled. That address is written into the credentials note as the endpoint you query.
Step 3: Connect via SSH
Connect as the ubuntu user (see the Connecting to your instance table above for other variants).
ssh ubuntu@<public-ip>
The message of the day prints the endpoint and the key operational commands as soon as you log in.
Step 4: Retrieve the per instance credentials
First boot generates a unique basic authentication password for this instance and writes it, with the resolved endpoint URL, to a root only file. Nothing secret ships inside the image, so this file is the only place the credential exists.
sudo cat /root/manticore-credentials.txt
Real output from a running instance, with the password redacted:
# Manticore Search - generated on first boot by manticoresearch-firstboot.service.
# These credentials are unique to this instance. Store them somewhere safe.

MANTICORE_URL=http://<public-ip>/
MANTICORE_USERNAME=admin
MANTICORE_PASSWORD=<MANTICORE_PASSWORD>
The file is readable by root only:
sudo stat -c '%a %U:%G %n' /root/manticore-credentials.txt
Real output from a running instance:
600 root:root /root/manticore-credentials.txt
Step 5: Confirm the services are running
Manticore and nginx start automatically after the first boot service has generated the per instance password. Confirm both are active:
systemctl is-active manticore nginx
Real output from a running instance:
active
active
Step 6: Confirm the search database is bound to loopback only
This is the security property that matters most on this image. Manticore has no authentication of its own, so it must never be reachable from the network directly. Confirm every Manticore port is on 127.0.0.1 and that only nginx is listening on the public interface:
ss -ltn | grep -E '9306|9308|9312|:80 '
Real output from a running instance:
LISTEN 0      5          127.0.0.1:9312       0.0.0.0:*
LISTEN 0      5          127.0.0.1:9306       0.0.0.0:*
LISTEN 0      5          127.0.0.1:9308       0.0.0.0:*
LISTEN 0      511          0.0.0.0:80         0.0.0.0:*
LISTEN 0      511             [::]:80            [::]:*
Port 9306 is the SQL interface over the MySQL wire protocol, 9308 is the HTTP and JSON search API and 9312 is the binary API. All three are loopback only. Port 80 is nginx.
Step 7: Confirm the search API refuses unauthenticated requests
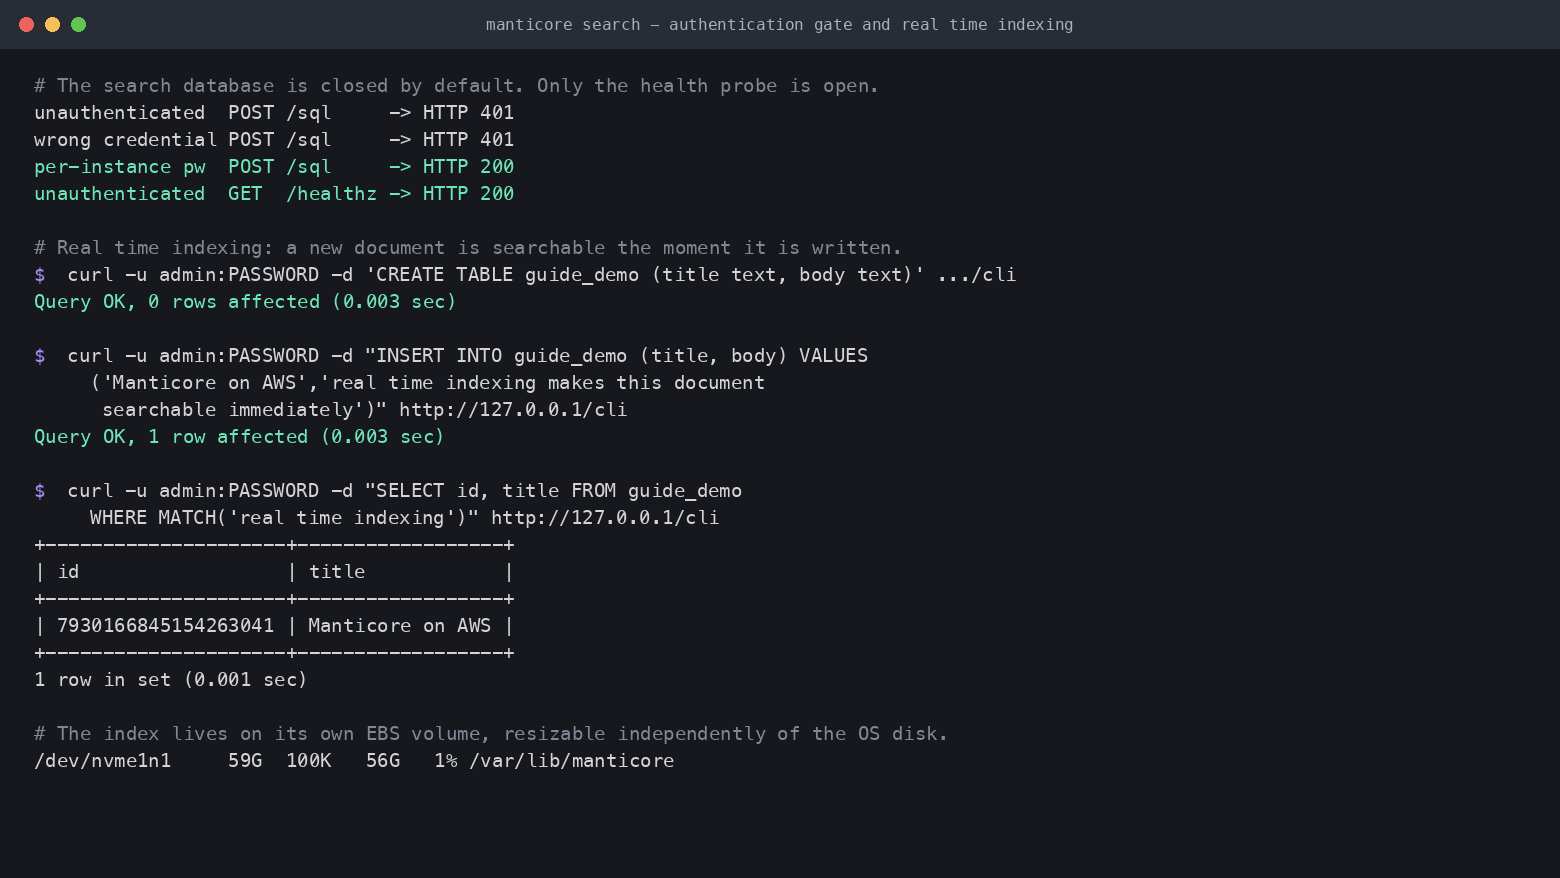
An unauthenticated request to the search API must be rejected. The following check succeeds when the request is correctly refused:
if curl -s --fail -o /dev/null -m 10 -X POST 'http://127.0.0.1/sql?mode=raw' --data-urlencode 'query=SHOW TABLES'; then
  echo "UNEXPECTED: the search API answered without a credential"
  exit 1
else
  echo "refused - correct, the search API requires the per instance credential"
fi
A request carrying the wrong password is refused the same way:
if curl -s --fail -o /dev/null -m 10 -u 'admin:definitely-wrong-pw' -X POST 'http://127.0.0.1/sql?mode=raw' --data-urlencode 'query=SHOW TABLES'; then
  echo "UNEXPECTED: a wrong password was accepted"
  exit 1
else
  echo "refused - correct, only this instance's generated password is accepted"
fi
The unauthenticated health endpoint, which exists for load balancers, is served:
curl -s -o /dev/null -w 'GET /healthz -> HTTP %{http_code}\n' http://127.0.0.1/healthz
Real output from a running instance:
GET /healthz -> HTTP 200
Step 8: Run your first query
Manticore exposes SQL over HTTP at two endpoints. /cli returns the familiar table formatting, which is ideal from a terminal, and /sql?mode=raw returns JSON, which is what an application uses. Both sit behind the same basic authentication gate.
The examples below read the password straight from the root only file into a shell variable, so it is never typed or echoed.
P=$(sudo grep '^MANTICORE_PASSWORD=' /root/manticore-credentials.txt | cut -d= -f2-)
OUT=$(curl -s -u "admin:$P" -d 'SHOW TABLES' http://127.0.0.1/cli)
echo "$OUT"
echo "$OUT" | grep -q 'demo_articles' || { echo "the search API did not return the demo table"; exit 1; }
Real output from a running instance:
+---------------+------+
| Table         | Type |
+---------------+------+
| demo_articles | rt   |
+---------------+------+
1 row in set (0.003 sec)
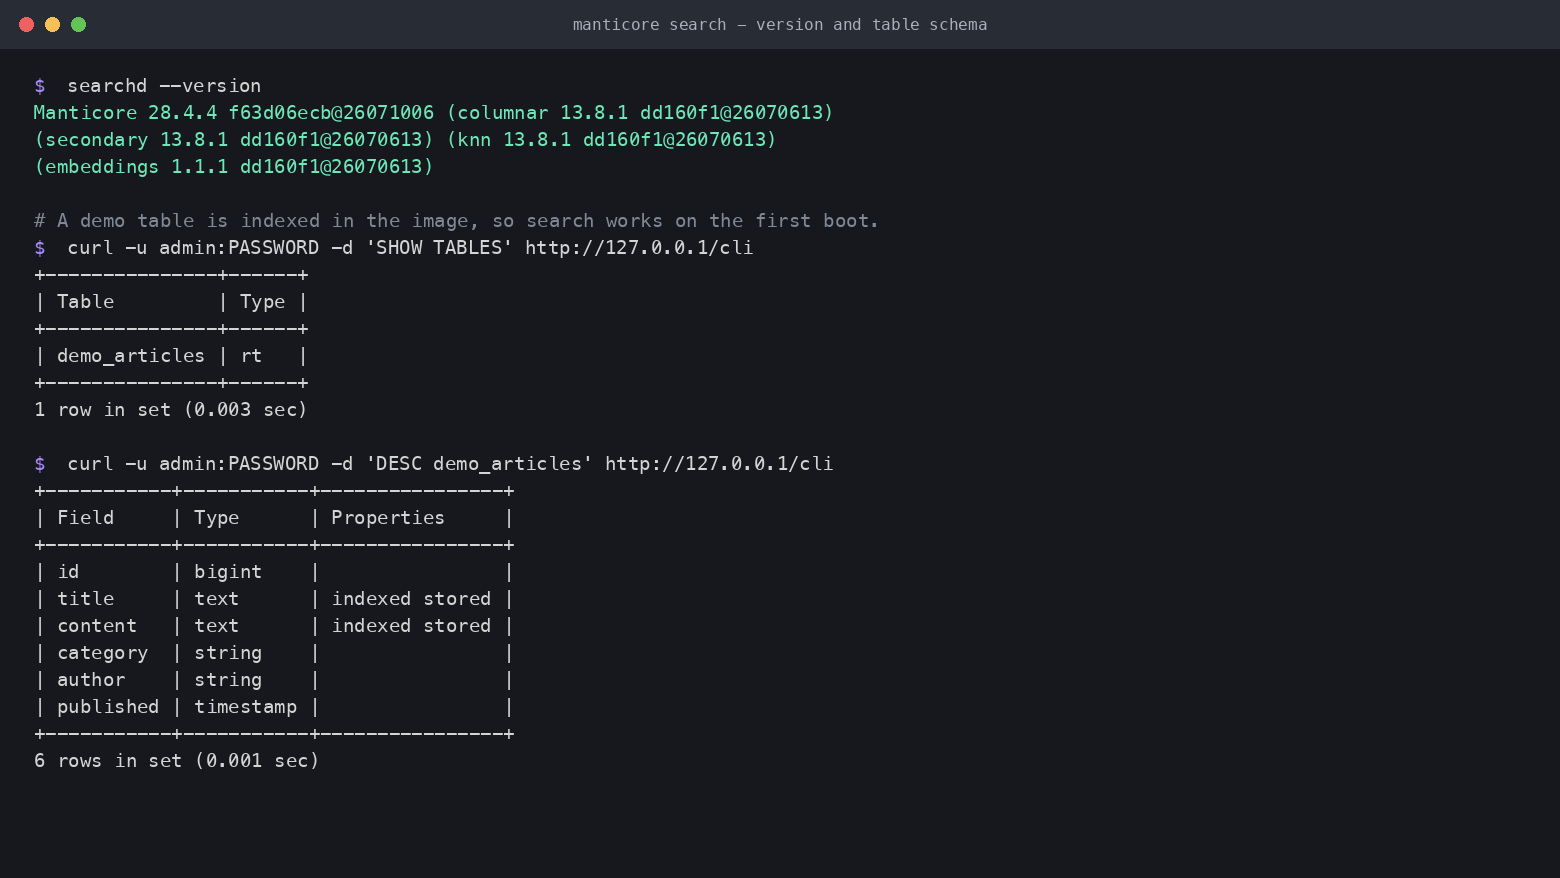
demo_articles is a demo table indexed into the image so that search works before you load any data of your own. Inspect its schema:
P=$(sudo grep '^MANTICORE_PASSWORD=' /root/manticore-credentials.txt | cut -d= -f2-)
curl -s -u "admin:$P" -d 'DESC demo_articles' http://127.0.0.1/cli
Real output from a running instance:
+-----------+-----------+----------------+
| Field     | Type      | Properties     |
+-----------+-----------+----------------+
| id        | bigint    |                |
| title     | text      | indexed stored |
| content   | text      | indexed stored |
| category  | string    |                |
| author    | string    |                |
| published | timestamp |                |
+-----------+-----------+----------------+
6 rows in set (0.001 sec)
title and content are full text fields, so they are tokenised and indexed for MATCH(). category, author and published are attributes, so they are available for filtering, grouping and sorting.
Step 9: Relevance ranked full text search
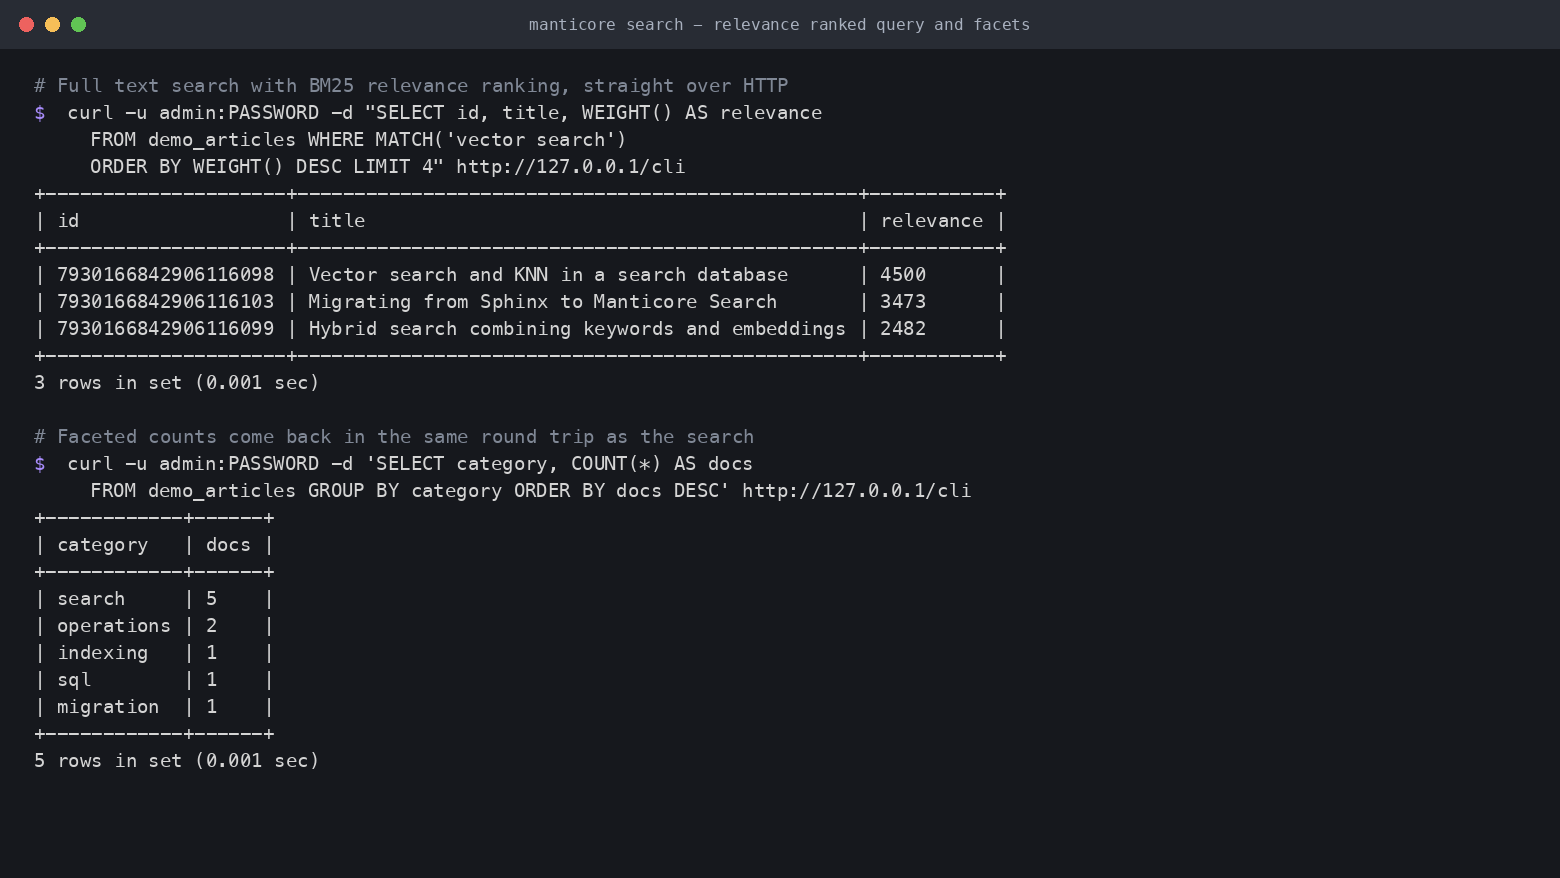
MATCH() runs the full text query and WEIGHT() exposes the relevance score, so you can order by it:
P=$(sudo grep '^MANTICORE_PASSWORD=' /root/manticore-credentials.txt | cut -d= -f2-)
HITS=$(curl -s -u "admin:$P" -d "SELECT id, title, WEIGHT() AS relevance FROM demo_articles WHERE MATCH('vector search') ORDER BY WEIGHT() DESC LIMIT 4" http://127.0.0.1/cli)
echo "$HITS"
echo "$HITS" | grep -qi 'vector' || { echo "the full text query returned no matching document"; exit 1; }
Real output from a running instance:
+---------------------+-------------------------------------------------+-----------+
| id                  | title                                           | relevance |
+---------------------+-------------------------------------------------+-----------+
| 7930166842906116098 | Vector search and KNN in a search database      | 4500      |
| 7930166842906116103 | Migrating from Sphinx to Manticore Search       | 3473      |
| 7930166842906116099 | Hybrid search combining keywords and embeddings | 2482      |
+---------------------+-------------------------------------------------+-----------+
3 rows in set (0.001 sec)
The documents come back ranked, not merely matched. The full text query language supports phrases ("vector search"), proximity ("vector search"~5), field limits (@title vector), boolean operators and wildcards.
Faceted counts are computed in the same round trip as the search, which is how a storefront renders its filter sidebar without extra queries:
P=$(sudo grep '^MANTICORE_PASSWORD=' /root/manticore-credentials.txt | cut -d= -f2-)
curl -s -u "admin:$P" -d 'SELECT category, COUNT(*) AS docs FROM demo_articles GROUP BY category ORDER BY docs DESC' http://127.0.0.1/cli
Real output from a running instance:
+------------+------+
| category   | docs |
+------------+------+
| search     | 5    |
| operations | 2    |
| indexing   | 1    |
| sql        | 1    |
| migration  | 1    |
+------------+------+
5 rows in set (0.001 sec)
Step 10: Create your own table and index in real time
A real time table accepts writes and makes them searchable immediately. There is no offline build step and no rebuild window. The following creates a table, indexes a document into it and searches it back:
P=$(sudo grep '^MANTICORE_PASSWORD=' /root/manticore-credentials.txt | cut -d= -f2-)
curl -s -u "admin:$P" -d 'DROP TABLE IF EXISTS quickstart' http://127.0.0.1/cli
curl -s -u "admin:$P" -d 'CREATE TABLE quickstart (title text, body text, tag string)' http://127.0.0.1/cli
curl -s -u "admin:$P" -d "INSERT INTO quickstart (title, body, tag) VALUES ('Manticore on AWS','real time indexing makes this document searchable immediately','guide')" http://127.0.0.1/cli
FOUND=$(curl -s -u "admin:$P" -d "SELECT id, title FROM quickstart WHERE MATCH('real time indexing')" http://127.0.0.1/cli)
echo "$FOUND"
echo "$FOUND" | grep -q 'Manticore on AWS' || { echo "the document was not searchable after the insert"; exit 1; }
Real output from a running instance:
Query OK, 0 rows affected (0.001 sec)

Query OK, 0 rows affected (0.003 sec)

Query OK, 1 row affected (0.003 sec)

+---------------------+------------------+
| id                  | title            |
+---------------------+------------------+
| 7930166845154263041 | Manticore on AWS |
+---------------------+------------------+
1 row in set (0.001 sec)
The document was searchable on the query immediately after the insert. Remove the scratch table when you have finished experimenting:
P=$(sudo grep '^MANTICORE_PASSWORD=' /root/manticore-credentials.txt | cut -d= -f2-)
curl -s -u "admin:$P" -d 'DROP TABLE IF EXISTS quickstart' http://127.0.0.1/cli
curl -s -u "admin:$P" -d 'SHOW TABLES' http://127.0.0.1/cli
Real output from a running instance:
Query OK, 0 rows affected (0.005 sec)

+---------------+------+
| Table         | Type |
+---------------+------+
| demo_articles | rt   |
+---------------+------+
1 row in set (0.001 sec)
Step 11: Query the search API from your application
From outside the instance, point your application at port 80 with the generated credential. The JSON endpoint is /sql?mode=raw, which returns the result set as JSON rather than a formatted table. Replace <password> with the value from Step 4.
curl -u 'admin:<password>' \
  --data-urlencode "query=SELECT id, title FROM demo_articles WHERE MATCH('hybrid search')" \
  'http://<public-ip>/sql?mode=raw'
Manticore also exposes a JSON search API for applications that prefer a document oriented request body, at /search, /insert, /replace, /update, /delete and /bulk, and an Elasticsearch compatible surface at the root path. All of them are behind the same basic authentication gate on port 80.
Because Manticore itself performs no authentication, treat the basic authentication credential as the only thing between the internet and your index. Restrict port 80 to the networks that need it in your security group, and put TLS in front of the endpoint before serving real traffic.
Step 12: Reach the MySQL protocol port over an SSH tunnel
Port 9306 speaks the MySQL wire protocol, so any MySQL client or driver can query the search database directly. It is deliberately bound to loopback and is not exposed to the network. Forward it over your SSH session instead, from your workstation:
ssh -N -L 9306:127.0.0.1:9306 ubuntu@<public-ip>
With the tunnel open, connect from a second terminal on your workstation with any MySQL client. Manticore does not use MySQL user accounts, so no username or password is required on this port; the SSH tunnel is the access control.
mysql -h 127.0.0.1 -P 9306
Then issue ordinary SQL, for example SHOW TABLES; or SELECT id, title FROM demo_articles WHERE MATCH('faceted search');. The same interface is what MySQL compatible drivers, ORMs and BI tools use to talk to Manticore.
Where your data lives
Every table, its index files, the document store and the binary transaction log live in /var/lib/manticore, which is a dedicated EBS volume mounted by filesystem identifier. Keeping the index off the operating system disk means it can be resized on its own as the corpus grows.
df -h /var/lib/manticore /
Real output from a running instance:
Filesystem      Size  Used Avail Use% Mounted on
/dev/nvme1n1     59G  100K   56G   1% /var/lib/manticore
/dev/root        38G  3.5G   35G  10% /
To grow the index volume, modify the EBS volume in the EC2 console or with aws ec2 modify-volume, then extend the filesystem on the instance with sudo resize2fs against the device shown in the Filesystem column above. No downtime is required and the fstab entry needs no change, because it references the filesystem identifier rather than a device name.
Putting TLS in front of the search API
The image publishes the search API over plain HTTP on port 80 so that it works the moment the instance boots, with no certificate to obtain first. For production, terminate TLS in front of it. Two common approaches:
- Put the instance behind an Application Load Balancer with an AWS Certificate Manager certificate, and restrict the instance security group so port 80 accepts traffic only from the load balancer's security group.
- Obtain a certificate for a DNS name you control and terminate TLS on the instance itself in the nginx server block at
/etc/nginx/sites-available/cloudimg-manticore, adding alisten 443 ssl;server and redirecting port 80 to it.
Validate any nginx change before applying it:
sudo nginx -t
Real output from a running instance:
nginx: the configuration file /etc/nginx/nginx.conf syntax is ok
nginx: configuration file /etc/nginx/nginx.conf test is successful
If the configuration test passes, apply it with sudo systemctl reload nginx.
Changing the search API password
The per instance credential lives in an nginx htpasswd file as a bcrypt hash. To rotate it, generate a new entry and reload nginx. Replace <new-password> with your own value.
sudo htpasswd -B -c /etc/nginx/.manticore.htpasswd admin
sudo chown root:www-data /etc/nginx/.manticore.htpasswd
sudo chmod 0640 /etc/nginx/.manticore.htpasswd
sudo systemctl reload nginx
htpasswd prompts for the new password rather than taking it on the command line, so it is never written to your shell history. Remember to update /root/manticore-credentials.txt afterwards so the note stays accurate.
Maintenance
Check the installed version:
searchd --version
Real output from a running instance:
Manticore 28.4.4 f63d06ecb@26071006 (columnar 13.8.1 dd160f1@26070613) (secondary 13.8.1 dd160f1@26070613) (knn 13.8.1 dd160f1@26070613) (embeddings 1.1.1 dd160f1@26070613)
Check the daemon's own view of its state:
P=$(sudo grep '^MANTICORE_PASSWORD=' /root/manticore-credentials.txt | cut -d= -f2-)
curl -s -u "admin:$P" -d "SHOW STATUS LIKE 'uptime'" http://127.0.0.1/cli
Read the daemon log if a query behaves unexpectedly:
sudo tail -5 /var/log/manticore/searchd.log
The Manticore package is held at the shipped version so an unattended upgrade cannot move you off it unexpectedly. To upgrade deliberately, release the hold, upgrade and re-apply it:
sudo apt-mark unhold manticore
sudo apt-get update && sudo apt-get install --only-upgrade manticore
sudo apt-mark hold manticore
sudo systemctl restart manticore
Operating system security updates are applied automatically by unattended upgrades.
Manticore ships a backup tool that takes a consistent copy of your tables while the daemon is running:
sudo manticore-backup --backup-dir=/var/backups --all
Support
cloudimg provides 24/7 technical support for this image via email and live chat.
- Email: support@cloudimg.co.uk
- Live chat: available 24/7 on cloudimg.co.uk
We help with deployment, schema and index design, relevance tuning, vector and hybrid search setup, bulk loading, replication, backup, TLS termination, storage planning and upgrades.