
MariaDB on AWS User Guide
Overview
This image runs MariaDB Community Server, the popular open source relational database, a community developed fork of the original MySQL codebase with full MySQL wire protocol compatibility. The current long term support series of MariaDB is provided, version 10.11, installed from the official MariaDB Foundation package repository.
The image ships with secure first boot enabled. On the first boot of your instance a one shot service rotates the database root password to a fresh, strong, per instance value, drops anonymous users, removes the test database, disables remote root login and creates a dedicated cloudimg administrative user with its own rotated password. Credentials are written to /root/mariadb-credentials.txt, a file that only the root user can read. No shared or default database password ships in the image.
MariaDB data, binary logs and InnoDB tablespaces live on a dedicated storage volume mounted at /var/lib/mysql. Keeping database files on their own volume means storage can be grown, snapshotted and backed up independently of the operating system disk.
This is a headless image. MariaDB has no web interface; you administer it over SSH with the mariadb command line client, covered below. The image also runs a small static nginx page on port 80 purely as a health check for the AWS Marketplace automated scan; the operator facing database service is MariaDB on port 3306.
Prerequisites
Before you deploy this image you need:
- An Amazon Web Services account where you can launch EC2 instances
- IAM permissions to launch instances, create security groups, and subscribe to AWS Marketplace products
- An EC2 key pair in the target Region for SSH access to the instance
- A VPC and subnet in the target Region, with a security group allowing inbound port 22 from your management network
- The AWS CLI version 2 installed locally if you plan to deploy from the command line
Recommended instance type: m5.large (2 vCPU, 8 GB RAM) or larger. MariaDB benefits from additional CPU and RAM for production workloads.
Step 1: Launch the Instance from the AWS Marketplace
Sign in to the AWS Management Console, open the EC2 service, and select Launch instance. Under Application and OS Images choose AWS Marketplace AMIs and search for MariaDB. Select the cloudimg listing and choose Select, then Continue on the subscription summary.
Pick an instance type of m5.large or larger. Choose your EC2 key pair under Key pair (login). Under Network settings select your VPC and subnet, and either create or select a security group that allows inbound port 22 from your management network. To allow database clients on peer instances to connect, also allow inbound TCP 3306 from your application security group. Leave the root volume at the default size or larger; the MariaDB data volume is attached automatically from the image.
Select Launch instance. First boot initialisation, which generates the root password and starts MariaDB, takes a minute or two after the instance state becomes Running and the status checks pass.
Step 2: Launch the Instance from the AWS CLI
The following block launches an instance from the cloudimg MariaDB Marketplace AMI into an existing subnet and security group. Replace <ami-id> with the AMI ID shown on the Marketplace listing, <key-name> with your EC2 key pair name, <subnet-id> with your subnet ID, and <security-group-id> with a security group that opens inbound port 22.
aws ec2 run-instances \
  --image-id <ami-id> \
  --instance-type m5.large \
  --key-name <key-name> \
  --subnet-id <subnet-id> \
  --security-group-ids <security-group-id> \
  --metadata-options HttpTokens=required \
  --block-device-mappings '[{"DeviceName":"/dev/sda1","Ebs":{"VolumeSize":20,"VolumeType":"gp3"}}]' \
  --tag-specifications 'ResourceType=instance,Tags=[{Key=Name,Value=mariadb-01}]'
The command prints a JSON document on success. Note the instance ID, then retrieve its public address once it is running with aws ec2 describe-instances --instance-ids <instance-id> --query "Reservations[].Instances[].PublicIpAddress" --output text.
Step 3: Connect over SSH
Connect over SSH with the key pair you selected and the public IP address from step 2. The SSH login user depends on the operating system of the AMI variant you launched:
| AMI variant | SSH login user |
|---|---|
| MariaDB 10.11 on Ubuntu 24.04 | ubuntu |
ssh <login-user>@<public-ip>
Wait until the instance has passed both EC2 status checks before connecting. The first boot service runs before the SSH daemon is ready, so MariaDB is initialised by the time you can log in.
Step 4: Retrieve the Generated Credentials
The first boot service generates a fresh root password and a separate cloudimg administrative user password for this instance and writes them, with the connection details, to /root/mariadb-credentials.txt. The file is readable only by the root user. Display it from your SSH session:
sudo cat /root/mariadb-credentials.txt
The file looks like this, with unique passwords on your instance:
# MariaDB — Per-Instance Credentials
# Generated: Sat May 24 14:57:08 UTC 2026
#
ROOT_USER=root
ROOT_PASSWORD=<ROOT_PASSWORD>
CLOUDIMG_USER=cloudimg
CLOUDIMG_PASSWORD=<CLOUDIMG_PASSWORD>
CLOUDIMG_DATABASE=cloudimg
PORT=3306
Note the ROOT_PASSWORD value; you need it for the database administration steps below.
Step 5: Confirm MariaDB Is Running
Confirm the database engine is running and which version is installed:
sudo systemctl is-active mariadb
sudo mariadb -V
The first command should return active and the second should report the installed MariaDB version. Confirm the database is listening on the standard MySQL wire protocol port on all interfaces:
sudo ss -tln | grep ':3306'
You should see a row with 0.0.0.0:3306 showing the database accepting connections from any interface.
Step 6: Open the mariadb Command Line Client
Open a MariaDB command line session as the root user. Use the password from the credentials file:
sudo mariadb -u root -p
When prompted, paste the ROOT_PASSWORD value from /root/mariadb-credentials.txt. You see a MariaDB [(none)]> prompt. Confirm the server version with the VERSION() function:
SELECT VERSION();
You see the installed 10.11.x-MariaDB version. Exit the client with EXIT;.
Step 7: Use the cloudimg Database and Administrative User
The first boot service also creates a dedicated cloudimg database and a cloudimg administrative user with its own rotated password and ALL PRIVILEGES on that database. The user is allowed to connect from any host so application instances inside your VPC can use it.
Open a session as the cloudimg user using the CLOUDIMG_PASSWORD from the credentials file:
mariadb -u cloudimg -p -h 127.0.0.1 cloudimg
Create a table, insert rows and read them back:
CREATE TABLE notes (id INT PRIMARY KEY AUTO_INCREMENT, body VARCHAR(255));
INSERT INTO notes (body) VALUES ('first note'), ('second note');
SELECT * FROM notes;
You see two rows returned. Exit the client with EXIT;.
Step 8: Create Application Databases and Users
For production deployments create one database and one application user per application, with the smallest privilege set the application needs. Open a root session:
sudo mariadb -u root -p
Then create a new database, a new user and grant the application its privileges, replacing the placeholders with values you choose:
CREATE DATABASE myapp CHARACTER SET utf8mb4 COLLATE utf8mb4_unicode_ci;
CREATE USER 'myapp'@'%' IDENTIFIED BY 'a-strong-password';
GRANT ALL PRIVILEGES ON myapp.* TO 'myapp'@'%';
FLUSH PRIVILEGES;
The @'%' host pattern allows the application to connect from any network address. Restrict the host pattern, the security group inbound rules, or both, as your deployment requires.
Step 9: The Data Volume
MariaDB data, the binary logs and InnoDB tablespaces live on a dedicated EBS volume mounted at /var/lib/mysql. Confirm the mount and inspect free space:
df -h /var/lib/mysql
You see a row reporting the mount point on its own ext4 filesystem, separate from the root filesystem. The fstab entry for the mount uses the filesystem UUID so the layout survives reboots and image relaunches.
To grow the data volume, modify the underlying EBS volume in the AWS console or with the AWS CLI, then on the instance:
sudo growpart /dev/nvme1n1 1 || true
sudo resize2fs $(findmnt -no SOURCE /var/lib/mysql)
The first command is a no operation on a raw volume formatted directly (no partition); resize2fs grows the filesystem to fill the resized volume.
Step 10: Service Management
MariaDB runs under a single systemd unit, mariadb.service. The standard systemctl commands manage the service:
sudo systemctl status mariadb
sudo systemctl restart mariadb
sudo systemctl stop mariadb
Journal logs for the database are visible with:
sudo journalctl -u mariadb --since '15 min ago'
Step 11: Back Up Databases with mysqldump
Use mysqldump to back up a single database to a file. The following block dumps the cloudimg database to a timestamped file in /var/backups:
sudo install -d -o root -g root -m 0700 /var/backups
sudo mysqldump -u root -p cloudimg > /var/backups/cloudimg-$(date -u +%Y%m%dT%H%M%S).sql
Restore the database from a dump file with:
sudo mariadb -u root -p cloudimg < /var/backups/cloudimg-20260524T120000.sql
For production deployments schedule a periodic dump with cron or a systemd timer, and ship the dump files to a long term store such as Amazon S3.
Step 12: Health Check
The image runs a small static nginx page on port 80 purely as a health check endpoint for the AWS Marketplace automated scan. Confirm it from the instance:
curl -fsS http://127.0.0.1/
You see OK on its own line. This endpoint is not part of the MariaDB administrative surface; database administration uses the mariadb client over SSH as described above.
Troubleshooting
Cannot connect with the credentials in /root/mariadb-credentials.txt. Check that the first boot service completed; the credentials file is rewritten with the rotated values when the service finishes. Inspect:
sudo systemctl status mariadb-firstboot.service
sudo tail -n 50 /var/log/mariadb-firstboot.log
MariaDB does not start. Inspect the journal for the MariaDB unit:
sudo journalctl -u mariadb --since '15 min ago'
If the MariaDB error log file is present, it also gives a focused view of the database's startup messages:
sudo tail -n 80 /var/log/mysql/error.log
Client on a peer instance cannot reach the database. Confirm the AWS security group on the database instance allows inbound TCP 3306 from the source security group, and confirm the effective bind-address on the database. The cloudimg override file pins bind-address = 0.0.0.0:
sudo cat /etc/mysql/mariadb.conf.d/60-cloudimg.cnf
You see the override block. Confirm the running database is in fact listening on all interfaces with ss:
sudo ss -tln | grep ':3306'
Screenshots
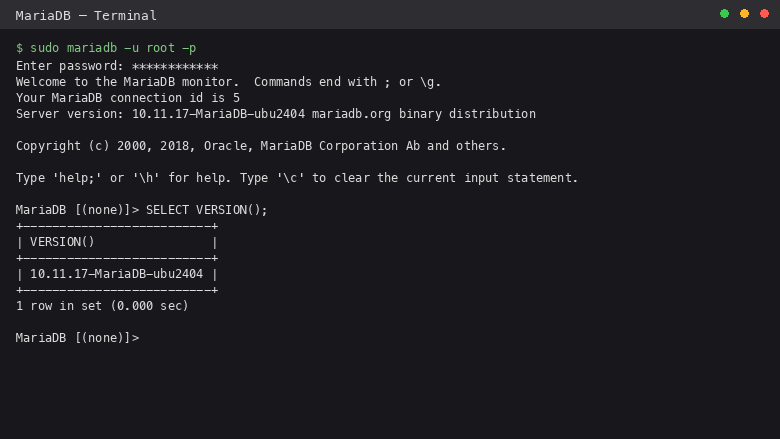
The mariadb client reporting the installed MariaDB version on the running database node.
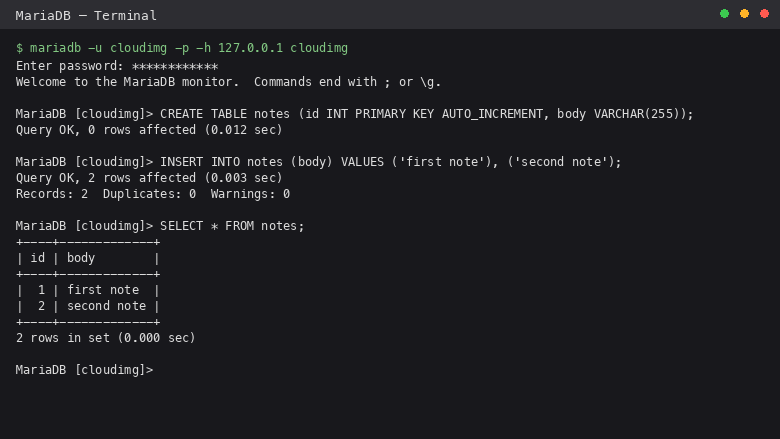
A mariadb session creating a table, inserting rows and reading them back on the running database node.
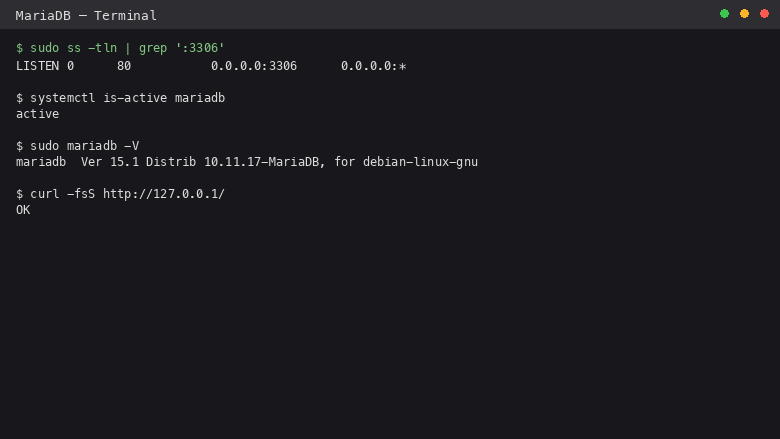
The ss command confirming the database is listening on the standard MySQL wire protocol port on all interfaces.
Support
For questions about this image, including database deployment, schema design, performance tuning and database administration, contact cloudimg support by email at support@cloudimg.co.uk.