Milvus on Ubuntu 24.04 on Azure User Guide
Overview
This image runs Milvus on Ubuntu 24.04 on Azure, the high performance open source cloud native vector database built for similarity search and AI applications. Milvus stores, indexes and searches embedding vectors with low latency, powering retrieval augmented generation, semantic search, recommendation, image and video search and anomaly detection. The image is delivered as the official Milvus standalone stack: three containers, the etcd metadata store, the MinIO object backend and the Milvus standalone server, orchestrated by Docker Compose and run by a systemd service that starts on boot.
This is a headless vector database. There is no web login interface. The Milvus server listens for SDK clients on the gRPC port 19530 and serves the built-in WebUI, metrics and health endpoints on port 9091. Authentication is enabled out of the box, and on the first boot of your virtual machine a one shot service rotates the database root password to a value unique to that VM, then writes it to a root only file. The deployment Network Security Group opens port 22 only; you open port 19530 (and optionally 9091) in your own NSG to reach the database from your application.
The etcd metadata store, the MinIO object data and the Milvus segment data all live on a dedicated, independently resizable Azure data disk mounted at /var/lib/milvus, so the stateful tier sits on durable storage rather than the operating system disk and can be grown or snapshotted independently.
What is included:
- Milvus standalone 2.6.18 from the official pinned
milvusdb/milvusimage, plus the etcd and MinIO backends - Docker Engine and the Docker Compose plugin from the official
download.docker.comAPT repository milvus.servicesystemd unit auto-starting the Compose stack on bootmilvus-firstboot.servicesystemd oneshot that rotates the root password and MinIO secret per VM- A
pymilvus2.6 client in a virtual environment at/opt/milvus/venv - Listeners: gRPC
19530(SDK), HTTP9091(metrics, health and WebUI); internal etcd on loopback only - Dedicated Azure data disk mounted at
/var/lib/milvusholding the etcd, MinIO and Milvus data - Ubuntu 24.04 LTS base with latest security patches applied at build time
- Azure Linux Agent for seamless cloud integration and SSH key injection
- 24/7 cloudimg support
Prerequisites
Before you deploy this image you need:
- An active Azure subscription where you can create virtual machines
- Permissions to create VMs, NSGs and data disks in the target resource group and region
- An SSH key pair for access to the virtual machine
- A virtual network and subnet in the target region, with an NSG allowing inbound port 22 from your management network
- The Azure CLI installed locally if you plan to deploy from the command line
Step 1 - Deploy from the Azure Marketplace
Sign in to the Azure Portal, choose Create a resource, search the Marketplace for Milvus by cloudimg, and select Create. On Basics pick your subscription, resource group, region and size (Standard_B4ms or larger, since the vector index build is memory intensive); under Administrator account choose SSH public key and paste your key; under Inbound port rules allow SSH (22) only. Review the dedicated data disk on the Disks tab, then Review + create -> Create.
First boot initialisation brings the stack up once to rotate the root password and the object store secret, then starts the database for normal use; this takes a few minutes after the VM is created.
Step 2 - Deploy from the Azure CLI
The following block creates a VM from the cloudimg Milvus Marketplace image into an existing virtual network and subnet. Replace the angle-bracket placeholders with your own values.
az vm create \
  --resource-group <your-rg> \
  --name milvus \
  --image <marketplace-image-urn> \
  --size Standard_B4ms \
  --admin-username azureuser \
  --ssh-key-values ~/.ssh/id_rsa.pub \
  --vnet-name <your-vnet> --subnet <your-subnet> \
  --public-ip-sku Standard
When the VM is running, note its public IP address from the Portal or with az vm show -d -g <your-rg> -n milvus --query publicIps -o tsv.
Step 3 - Connect to your VM
Connect over SSH as the azureuser administrator with your key:
ssh -i ~/.ssh/id_rsa azureuser@<vm-ip>
A welcome banner prints the most useful commands. The per VM credentials live in a root only file, described in Step 5.
Step 4 - Verify the Stack
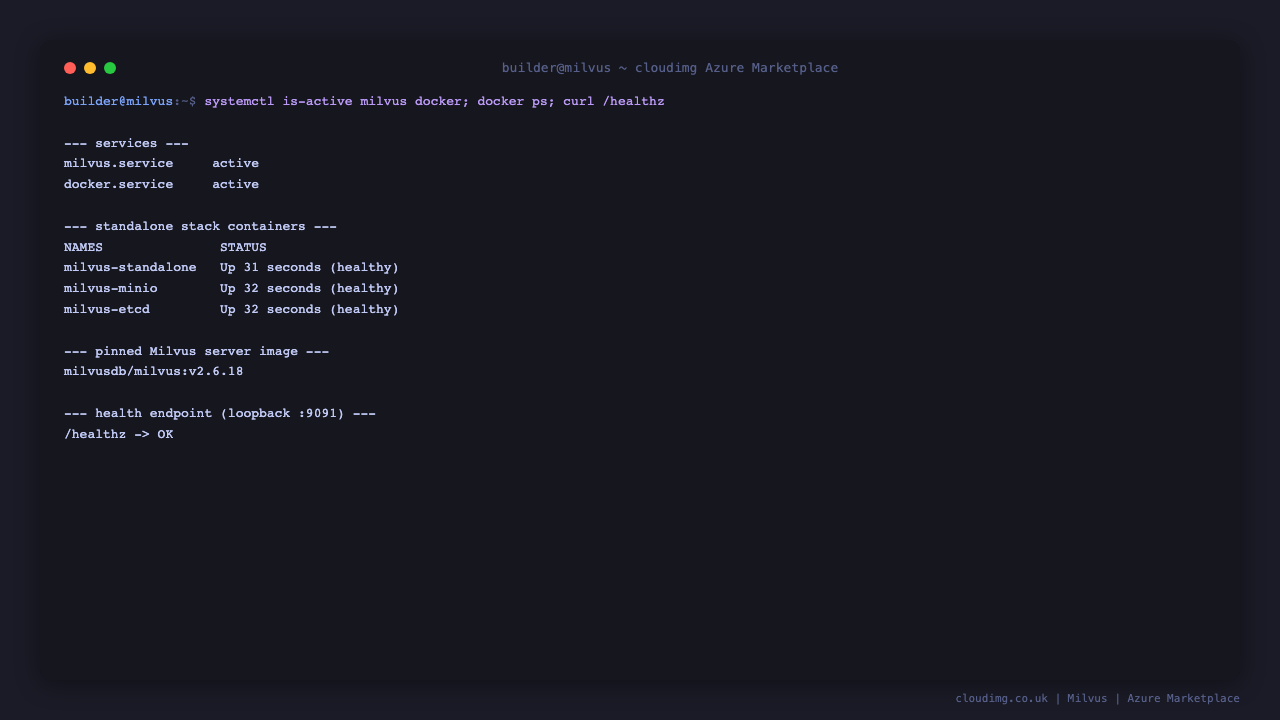
Milvus runs as a system service that brings the Docker Compose stack up on boot. Confirm the service and the Docker engine are active:
systemctl is-active milvus docker
Both print active. List the three running containers and confirm each is healthy:
sudo docker ps --format 'table {{.Names}}\t{{.Status}}'
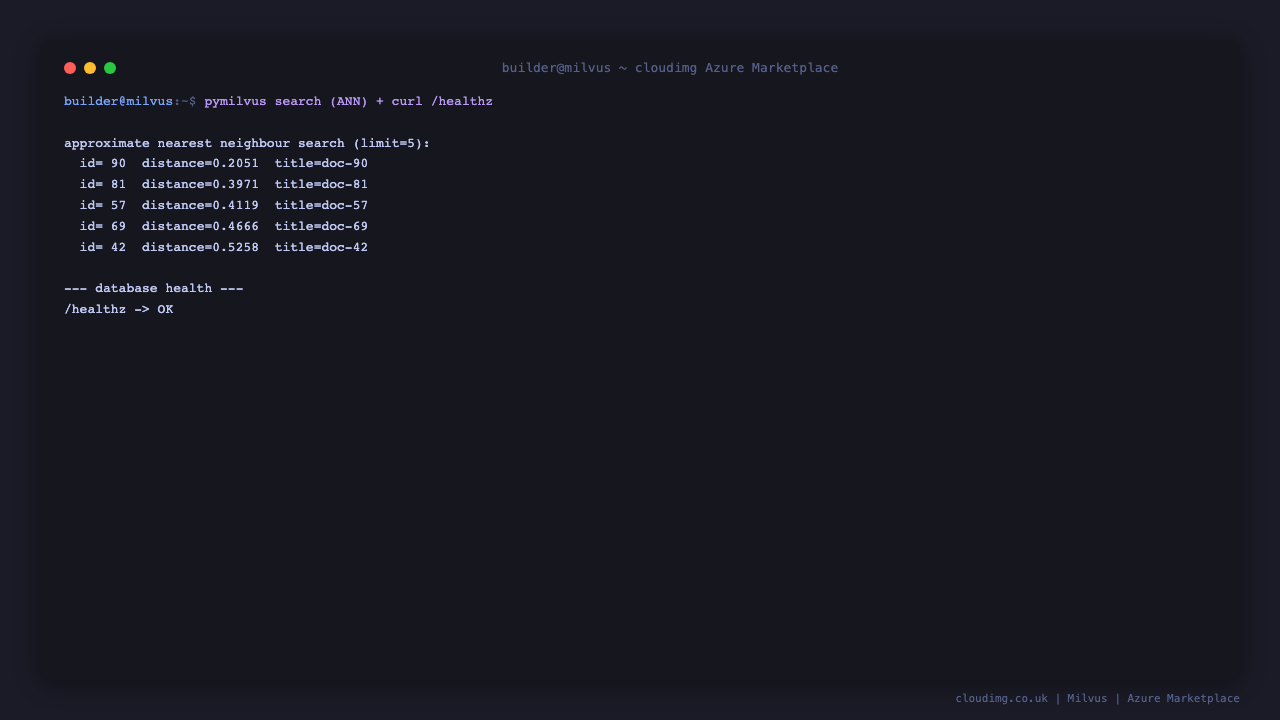
You should see milvus-standalone, milvus-minio and milvus-etcd, each reporting (healthy). The Milvus server exposes a built-in HTTP health endpoint on loopback port 9091; it returns OK when the database is ready to serve:
curl -s http://127.0.0.1:9091/healthz
Confirm the pinned server image version:
sudo docker image inspect milvusdb/milvus:v2.6.18 --format '{{index .RepoTags 0}}'
This reports milvusdb/milvus:v2.6.18, the version shipped on this image.
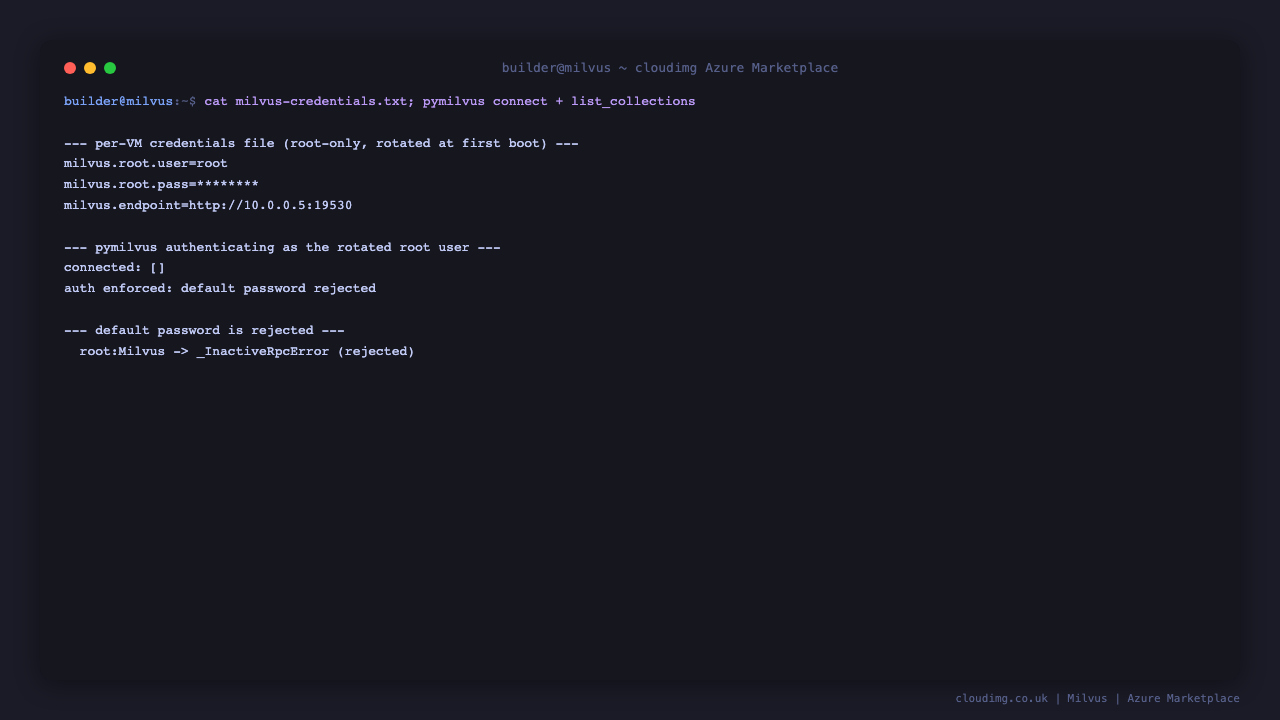
Step 5 - Retrieve the Rotated Root Credentials
Authentication is enabled, and the database root password was rotated to a value unique to this VM on first boot. Read the credentials file, which only the root user can read:
sudo cat /root/milvus-credentials.txt
The file lists the root user, the rotated milvus.root.pass, the SDK endpoint on port 19530 and the WebUI URL on port 9091. Keep this password safe: it is the administrator credential for your vector database. No shared or default credentials ship in the image.
Step 6 - Connect with pymilvus
The image ships a Python virtual environment with the pymilvus client at /opt/milvus/venv, which you can use directly on the VM, and you can install pymilvus into your own application environment the same way. The following self test reads the rotated root password from the credentials file and lists the collections over the authenticated gRPC API, printing OK on success:
PASS=$(sudo grep '^milvus.root.pass=' /root/milvus-credentials.txt | cut -d= -f2-)
sudo /opt/milvus/venv/bin/python -c "from pymilvus import MilvusClient; print(MilvusClient(uri='http://127.0.0.1:19530', token='root:'+'$PASS').list_collections()); print('OK')"
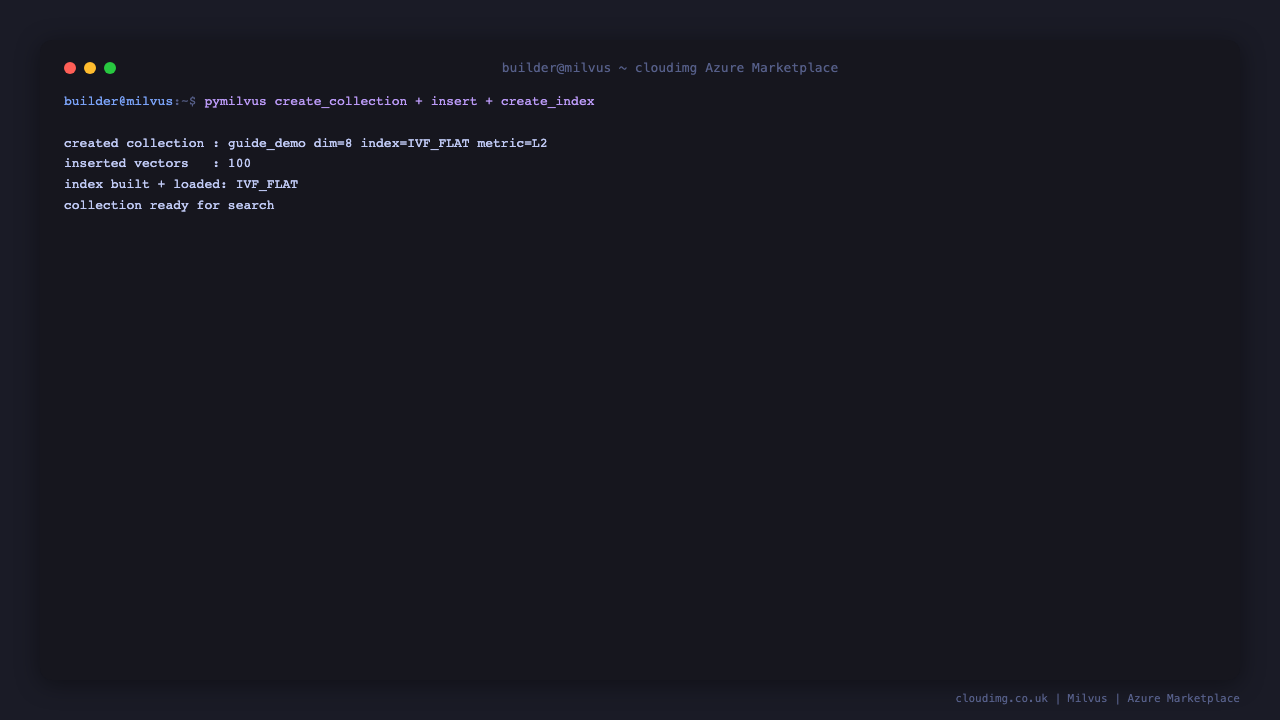
From your own application, connect to the gRPC endpoint with the root user and the rotated password. Open port 19530 in the VM's NSG first (see Step 9), then point your client at the VM public IP. A typical pymilvus session that creates a collection, inserts embedding vectors, builds an index and runs an approximate nearest neighbour search looks like this:
from pymilvus import MilvusClient, DataType

client = MilvusClient(
    uri="http://<vm-ip>:19530",
    token="root:<password>",          # from /root/milvus-credentials.txt
)

schema = client.create_schema(auto_id=False, enable_dynamic_field=True)
schema.add_field("id", DataType.INT64, is_primary=True)
schema.add_field("vector", DataType.FLOAT_VECTOR, dim=8)

index_params = client.prepare_index_params()
index_params.add_index(field_name="vector", index_type="IVF_FLAT",
                       metric_type="L2", params={"nlist": 128})

client.create_collection("documents", schema=schema, index_params=index_params)
client.insert("documents", [
    {"id": 1, "vector": [0.1, 0.2, 0.3, 0.4, 0.5, 0.6, 0.7, 0.8], "title": "hello"},
])
client.load_collection("documents")

hits = client.search("documents", data=[[0.1, 0.2, 0.3, 0.4, 0.5, 0.6, 0.7, 0.8]],
                     anns_field="vector", limit=5, output_fields=["title"])
print(hits)
Milvus supports dense and sparse vectors, hybrid search, scalar metadata filtering and a rich set of index and metric types (IVF, HNSW, DiskANN and more), so you can tune for recall, latency and cost.
Step 7 - The WebUI
Milvus serves a built-in WebUI on the HTTP port 9091 at /webui/ for inspecting collections, segments, queries and database health. It is bound to all interfaces inside the VM; to reach it from your browser, open port 9091 in the VM's NSG and browse to http://<vm-ip>:9091/webui/. The WebUI is read oriented and complements the SDK; all data operations go through the gRPC API on port 19530.
Step 8 - The Data Disk
The etcd metadata store, the MinIO object data and the Milvus segment data all live on a dedicated Azure data disk mounted at /var/lib/milvus. This keeps the stateful tier off the operating system disk and lets you resize or snapshot the disk independently. Confirm the mount and its layout:
df -h /var/lib/milvus
ls /var/lib/milvus
You will see the etcd, minio and milvus subdirectories that hold the metadata, object and segment data. To grow the disk, expand the data disk in the Azure Portal, then grow the filesystem on the VM with sudo resize2fs on the underlying device. The whole stack is managed by the milvus.service systemd unit; restart it with sudo systemctl restart milvus after any maintenance.
Step 9 - Open the SDK Port to your Application
The deployment NSG opens port 22 only. To reach Milvus from your application, open the gRPC SDK port 19530 (and optionally 9091 for the WebUI and metrics) to your trusted application subnet. Never expose the internal etcd port 2379 — it is bound to loopback inside the VM and must stay private.
az vm open-port --resource-group <your-rg> --name milvus --port 19530 --priority 1010
Restrict the source of the rule to your application subnet rather than the public internet, and prefer a private NIC with TLS termination for any production exposure.
Step 10 - Maintenance
Restart the stack or tail the server logs:
sudo systemctl restart milvus.service
sudo docker logs milvus-standalone --tail 50
Ubuntu's unattended-upgrades remains enabled in the image, so OS security updates continue to be applied automatically on your VM.
Support
This image is published and supported by cloudimg with 24/7 support. Support covers deployment, collection and index design, embedding ingestion, search tuning, metadata filtering, scaling, backups, client integration and upgrade planning. Contact cloudimg through the support channel listed on the Azure Marketplace listing.
Milvus is a trademark of LF Projects, LLC. All other product and company names are trademarks or registered trademarks of their respective holders. Use of them does not imply any affiliation with or endorsement by them.