Neo4j Community Edition on AWS User Guide
Overview
This image runs Neo4j Community Edition, the leading open source native graph database, on a single node. Neo4j stores connected data as nodes and relationships, exposes the Cypher query language over the Bolt protocol, and ships with the Neo4j Browser web interface for ad hoc query, visualisation and schema exploration. Neo4j 5 runs on the OpenJDK 21 Java virtual machine, which is also installed on the image.
The Neo4j daemon serves three ports out of the box: the HTTP REST API and the Neo4j Browser web interface both live on port 7474, the Bolt protocol used by every Neo4j driver and the cypher-shell command line lives on port 7687, and the optional HTTPS endpoint sits on port 7473 (disabled in the default configuration). The image also runs nginx as a reverse proxy on port 80, fronting the Neo4j Browser so it is reachable on the standard HTTP port; the nginx configuration forwards WebSocket upgrade headers so the Bolt over WebSocket path that the Browser uses also passes cleanly through the proxy.
The neo4j superuser password is generated on the first boot of every deployed instance. Two instances launched from the same Amazon Machine Image never share a password. The image ships without an active credential, so the database is never left on the default neo4j / neo4j credentials that vanilla Neo4j installations carry by default. A first boot systemd service generates a fresh password, applies it with neo4j-admin dbms set-initial-password before Neo4j first starts, and writes the plain text value to /root/neo4j-credentials.txt with mode 0600 so that only the root user can read it.
Neo4j's database files live under /var/lib/neo4j/data on the root EBS volume captured into the AMI; you can resize the root volume up after launch if your graph outgrows the initial allocation, or attach a dedicated EBS volume and move the data directory.
Prerequisites
Before you deploy this image you need:
- An Amazon Web Services account where you can launch EC2 instances
- IAM permissions to launch instances, create security groups, and subscribe to AWS Marketplace products
- An EC2 key pair in the target Region for SSH access to the instance
- A VPC and subnet in the target Region, with a security group allowing inbound port 22 from your management network and inbound ports 80, 7474 and 7687 from the trusted networks that host the applications which will talk to Neo4j
- The AWS CLI (version 2) installed locally if you plan to deploy from the command line
Step 1: Launch the Instance from the AWS Marketplace
Sign in to the AWS Management Console, open the EC2 service, and select Launch instance. Under Application and OS Images choose AWS Marketplace AMIs and search for Neo4j Community. Select the cloudimg listing and choose Select, then Continue on the subscription summary.
Pick an instance type of m5.large or larger; Neo4j 5 needs at least 4 GiB of memory to leave headroom for the Java heap and the page cache. Choose your EC2 key pair under Key pair (login). Under Network settings select your VPC and subnet, and either create or select a security group that allows inbound port 22 from your management network and inbound ports 80, 7474 and 7687 from the trusted networks that will reach Neo4j. Do not open these ports to the public internet because the Bolt protocol and the Neo4j Browser interface both expose database access. Leave the root volume at the default size or larger.
Select Launch instance. First boot initialisation takes approximately one minute after the instance state becomes Running and the status checks pass.
Step 2: Launch the Instance from the AWS CLI
The following block launches an instance from the cloudimg Neo4j Community Edition Marketplace AMI into an existing subnet and security group. Replace <ami-id> with the AMI ID shown on the Marketplace listing, <key-name> with your EC2 key pair name, <subnet-id> with your subnet ID, and <security-group-id> with a security group that opens ports 22, 80, 7474 and 7687 as described above.
aws ec2 run-instances \
  --image-id <ami-id> \
  --instance-type m5.large \
  --key-name <key-name> \
  --subnet-id <subnet-id> \
  --security-group-ids <security-group-id> \
  --block-device-mappings '[{"DeviceName":"/dev/sda1","Ebs":{"VolumeSize":20,"VolumeType":"gp3"}}]' \
  --tag-specifications 'ResourceType=instance,Tags=[{Key=Name,Value=neo4j-01}]'
The command prints a JSON document on success. Note the instance ID, then retrieve its public address once it is running with aws ec2 describe-instances --instance-ids <instance-id> --query "Reservations[].Instances[].PublicIpAddress" --output text.
Step 3: Connect and Retrieve the Neo4j Password
Connect over SSH with the key pair you selected and the public IP address from step 2. The SSH login user depends on the operating system of the AMI variant you launched:
| AMI variant | SSH login user |
|---|---|
| Neo4j Community 5 on Ubuntu 24.04 | ubuntu |
The first boot service runs before the SSH daemon becomes ready, so the credentials file is always in place when you log in for the first time.
ssh <login-user>@<public-ip>
sudo cat /root/neo4j-credentials.txt
You will see a plain text file containing the Neo4j Browser URL, the HTTP API URL, the Bolt URL, the superuser username (neo4j), and the generated password:
# Neo4j Community Edition 5 — generated on first boot by neo4j-firstboot.service.
# This neo4j superuser password is unique to this instance. Store it somewhere safe;
# it is shown in plain text only here.

neo4j.browser.url=http://<your-instance-public-ip>/
neo4j.http.url=http://<your-instance-public-ip>:7474/
neo4j.bolt.url=bolt://<your-instance-public-ip>:7687
neo4j.admin.user=neo4j
neo4j.admin.pass=<NEO4J_PASSWORD>
Copy these values somewhere secure such as a password manager or an encrypted vault, and do not commit them to source control.
Each command block in this guide that talks to Neo4j begins by reading the password from the credentials file into a shell variable, so every block is self contained:
NEO4J_PASS="$(sudo awk -F= '/^neo4j.admin.pass=/ {print $2}' /root/neo4j-credentials.txt)"
echo "neo4j password length: ${#NEO4J_PASS}"
Step 4: Verify the Server is Healthy
Three checks confirm the server is running: the systemd unit state, the listening ports, and a Cypher round trip over the Bolt protocol.
sudo systemctl is-active neo4j.service nginx.service
sudo ss -tln | grep -E ':80 |:7474 |:7687 '
The systemd command reports active for both services. The ss output shows nginx listening on :80, Neo4j Browser and HTTP API on :7474, and the Bolt protocol on :7687:
active
active
LISTEN 0      511          0.0.0.0:80        0.0.0.0:*
LISTEN 0      511             [::]:80           [::]:*
LISTEN 0      50                 *:7474            *:*
LISTEN 0      4096               *:7687            *:*
Run a Cypher round trip with the bundled cypher-shell command line client to confirm the daemon is answering Bolt and the password works:
NEO4J_PASS="$(sudo awk -F= '/^neo4j.admin.pass=/ {print $2}' /root/neo4j-credentials.txt)"
echo "CALL dbms.components() YIELD name, versions, edition RETURN name, versions[0] AS version, edition;" \
  | cypher-shell -a bolt://localhost:7687 -u neo4j -p "$NEO4J_PASS" --format verbose
The response reports the installed Neo4j version and edition:
+------------------------------------------+
| name           | version   | edition     |
+------------------------------------------+
| "Neo4j Kernel" | "5.26.26" | "community" |
+------------------------------------------+

1 row
ready to start consuming query after 59 ms, results consumed after another 2 ms
Step 5: Server Components
| Component | Version | Source |
|---|---|---|
| Neo4j Community | 5.26.26 | Official Neo4j APT repository at debian.neo4j.com (stable / 5 component) |
| OpenJDK | 21.0.10 (headless) | Ubuntu 24.04 distribution package openjdk-21-jre-headless |
| nginx | 1.24.0 | Ubuntu 24.04 distribution package nginx |
| Ubuntu | 24.04 LTS (Noble Numbat) | AWS Marketplace Canonical AMI, fully apt dist-upgraded at build time |
Step 6: Open the Neo4j Browser
The Neo4j Browser is the official web client for Neo4j. It runs entirely inside your browser, talks to the database over Bolt (via the WebSocket transport), and lets you sign in, run Cypher queries, visualise the result as a graph, browse the database information panel and inspect the schema. The cloudimg image exposes it on port 80 via the nginx reverse proxy, so any modern browser reaches it without a port suffix:
http://<your-instance-public-ip>/
The first request returns an HTTP 302 redirect to /browser/, where the React application loads. After a moment you see the Connect to instance dialog:
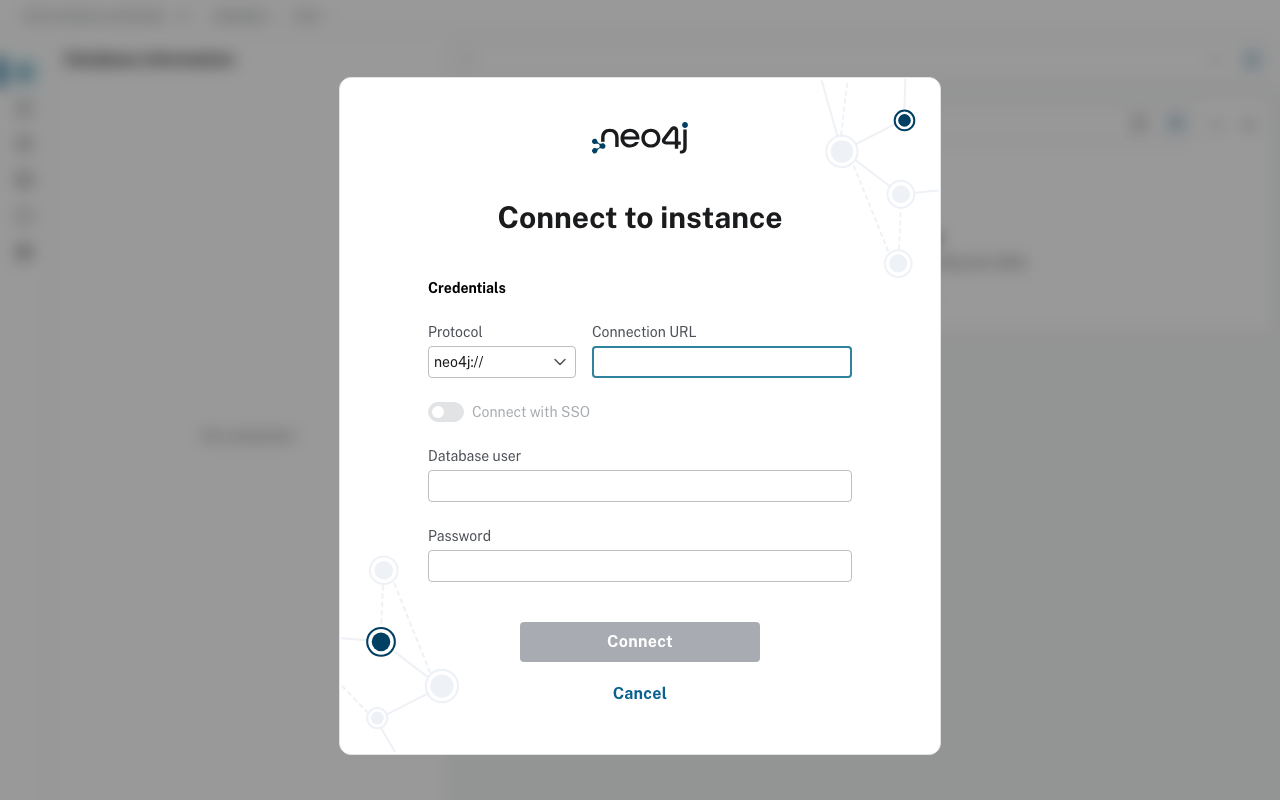
Fill in the Connection URL with the Bolt URL of your instance (bolt://<your-instance-public-ip>:7687), the Database user with neo4j, and the Password with the value from /root/neo4j-credentials.txt. Click Connect. The Browser establishes a Bolt over WebSocket session and shows the workspace:
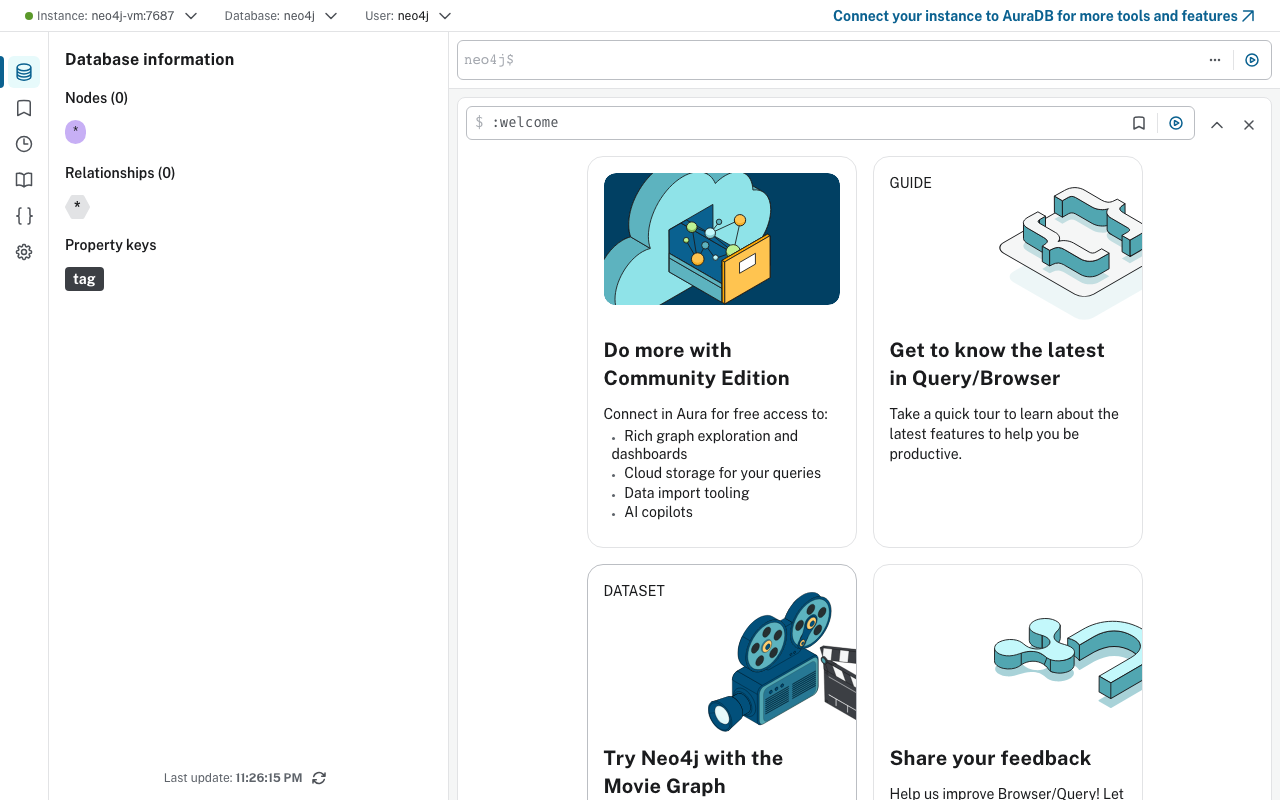
The left rail carries the Database information panel (the database, schema, node count, relationship count and property keys), the top bar is the Cypher query editor, and the centre pane is where each query renders its result. The "Connect your instance to AuraDB" banner in the top right links to Neo4j's managed service and is informational only — it does not change the local instance.
Step 7: Run Your First Cypher Query
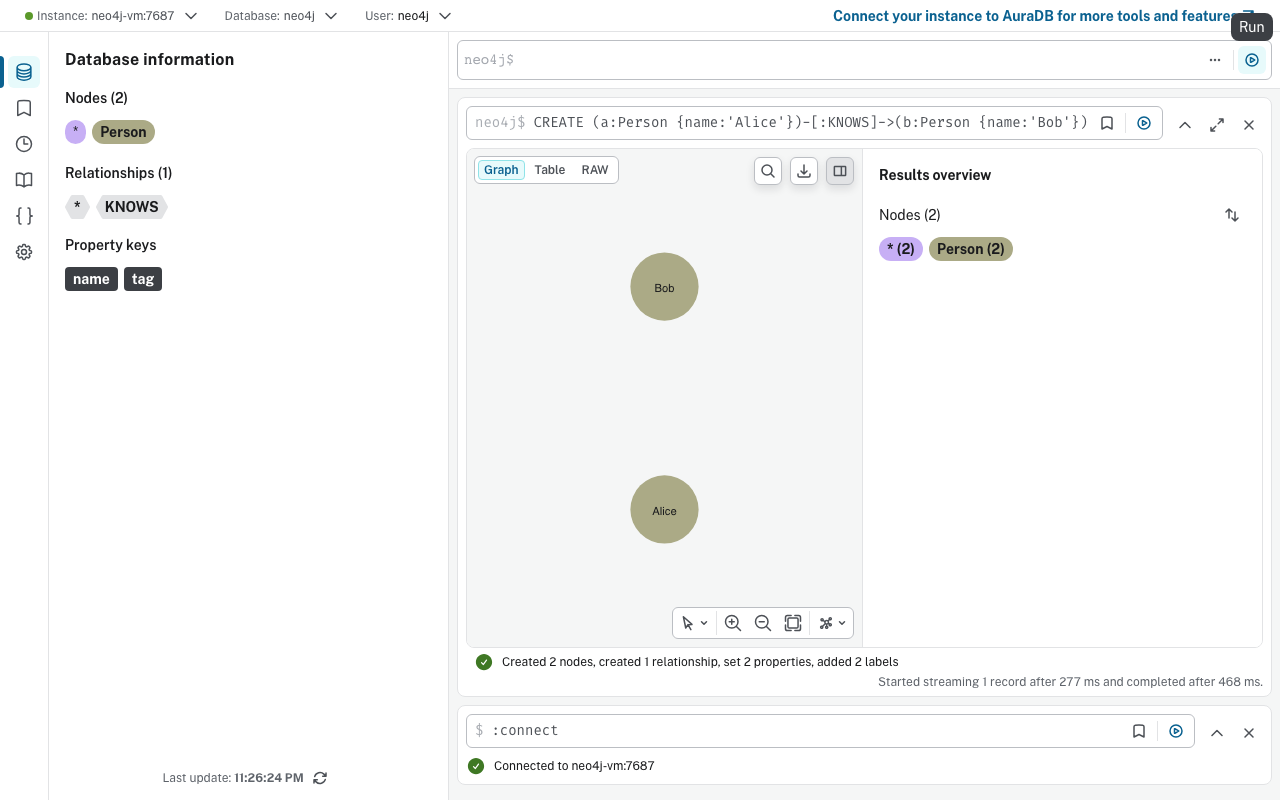
Cypher is Neo4j's declarative query language for graphs. Type a small query into the editor at the top of the workspace and press the Run button or Ctrl+Enter. The following one liner creates a tiny graph of two people who know each other and returns both nodes:
CREATE (a:Person {name:'Alice'})-[:KNOWS]->(b:Person {name:'Bob'}) RETURN a, b
Neo4j Browser draws the result as a graph in the Graph tab of the result frame. Switch to the Table or RAW tabs to see the same result as JSON rows. The left panel updates immediately with the new node and relationship counts:
You can also drive Cypher from the shell with cypher-shell. The same query runs end to end like this:
NEO4J_PASS="$(sudo awk -F= '/^neo4j.admin.pass=/ {print $2}' /root/neo4j-credentials.txt)"
echo "MATCH (n:Person) RETURN n.name AS person ORDER BY person;" \
  | cypher-shell -a bolt://localhost:7687 -u neo4j -p "$NEO4J_PASS" --format verbose
+----------+
| person   |
+----------+
| "Alice"  |
| "Bob"    |
+----------+

2 rows
Clean up the two probe nodes when you are done exploring:
NEO4J_PASS="$(sudo awk -F= '/^neo4j.admin.pass=/ {print $2}' /root/neo4j-credentials.txt)"
echo "MATCH (n:Person) DETACH DELETE n;" \
  | cypher-shell -a bolt://localhost:7687 -u neo4j -p "$NEO4J_PASS"
Step 8: Inspect the Database from the Browser
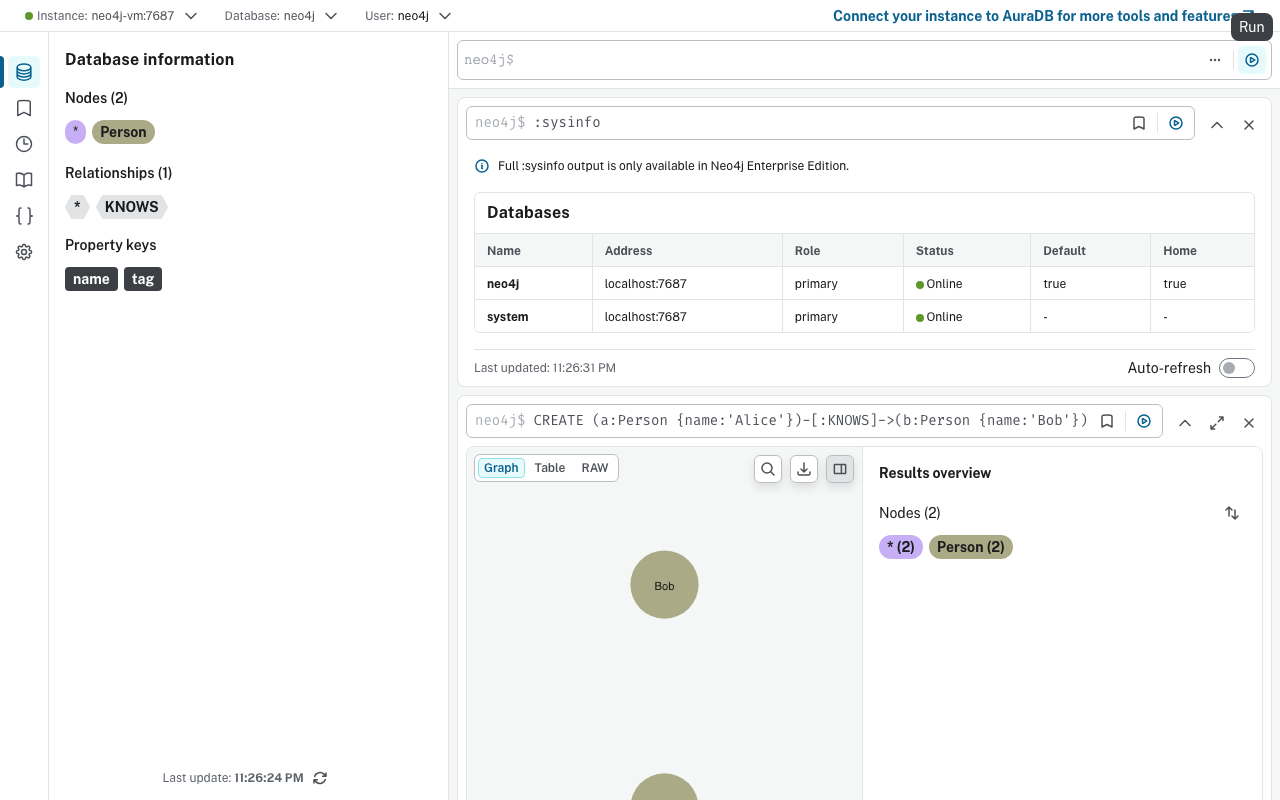
The Browser ships with a set of : commands that drive the workspace from the editor bar. Two are worth knowing on day one:
:sysinfoopens the System information panel — it lists the databases on the server, their addresses, role, online state, and last update timestamp. Community Edition only shows the core overview; the Enterprise edition adds memory pool, transaction and store metrics.:server statusprints the connection record (the URL, the user, the connection age).
Run :sysinfo from the editor bar. The result frame splits in two: the top frame shows the System information table, and the previous query result is still pinned below:
Step 9: Modelling Data — Indexes and Constraints
A unique constraint is the single most useful schema object on a fresh Neo4j database. It guarantees that no two nodes of a given label share a value for a property, and Neo4j automatically backs it with an index, so lookups by that property become point reads instead of label scans.
NEO4J_PASS="$(sudo awk -F= '/^neo4j.admin.pass=/ {print $2}' /root/neo4j-credentials.txt)"
cypher-shell -a bolt://localhost:7687 -u neo4j -p "$NEO4J_PASS" <<'CYPHER'
CREATE CONSTRAINT person_email_unique IF NOT EXISTS
FOR (p:Person) REQUIRE p.email IS UNIQUE;

SHOW CONSTRAINTS;
CYPHER
SHOW CONSTRAINTS lists the constraint and the index it created. You can list every index separately with SHOW INDEXES. Drop a constraint or index with DROP CONSTRAINT <name> or DROP INDEX <name>.
For larger graphs add a range index on properties you filter by and a text index on properties you do prefix or substring matches against:
CREATE INDEX person_name_range IF NOT EXISTS FOR (p:Person) ON (p.name);
CREATE TEXT INDEX person_name_text IF NOT EXISTS FOR (p:Person) ON (p.name);
Step 10: Backup and Restore
Community Edition does not include the online neo4j-admin database backup command (that is an Enterprise feature). The supported offline path is neo4j-admin database dump. Stop the daemon, dump the named database to a .dump archive on the data volume, then restart:
sudo install -d -o neo4j -g neo4j -m 0750 /var/lib/neo4j/backups
sudo systemctl stop neo4j
sudo -u neo4j neo4j-admin database dump neo4j --to-path=/var/lib/neo4j/backups
sudo systemctl start neo4j
sudo ls -la /var/lib/neo4j/backups/
Restore on a fresh instance with neo4j-admin database load, again with the daemon stopped, then start the daemon and verify:
sudo systemctl stop neo4j
sudo -u neo4j neo4j-admin database load neo4j --from-path=/var/lib/neo4j/backups --overwrite-destination=true
sudo systemctl start neo4j
NEO4J_PASS="$(sudo awk -F= '/^neo4j.admin.pass=/ {print $2}' /root/neo4j-credentials.txt)"
echo "MATCH (n) RETURN count(n) AS nodes;" \
  | cypher-shell -a bolt://localhost:7687 -u neo4j -p "$NEO4J_PASS" --format verbose
Copy the .dump archive off the instance with aws s3 cp or scp to keep the backup separate from the instance.
Step 11: HTTPS Termination
The default nginx site terminates plain HTTP only. For production traffic add a TLS certificate (Let's Encrypt via certbot, or AWS Certificate Manager behind an Application Load Balancer) and switch the nginx server block to listen 443 ssl;. A minimal TLS server block, with paths to a fullchain certificate and a private key, looks like this:
server {
    listen 443 ssl default_server;
    server_name your-domain.example.com;

    ssl_certificate /etc/letsencrypt/live/your-domain.example.com/fullchain.pem;
    ssl_certificate_key /etc/letsencrypt/live/your-domain.example.com/privkey.pem;

    location = / { return 302 /browser/; }

    location / {
        proxy_pass http://127.0.0.1:7474;
        proxy_http_version 1.1;
        proxy_set_header Host              $host;
        proxy_set_header X-Real-IP         $remote_addr;
        proxy_set_header X-Forwarded-For   $proxy_add_x_forwarded_for;
        proxy_set_header X-Forwarded-Proto $scheme;
        proxy_set_header Upgrade           $http_upgrade;
        proxy_set_header Connection        $connection_upgrade;
        proxy_read_timeout 86400;
    }
}
Open port 443 on the security group, run sudo nginx -t && sudo systemctl reload nginx, and the Neo4j Browser is now reachable over HTTPS on the same hostname. For Bolt over TLS, generate a certificate for the bolt:// port and enable dbms.connector.bolt.tls_level=REQUIRED in /etc/neo4j/neo4j.conf.
Step 12: Security Posture
- Restrict ports 80, 7474 and 7687 in the AWS security group to the application subnets that actually need them. Do not open them to
0.0.0.0/0. - Rotate the neo4j superuser password regularly with
ALTER USER neo4j SET PASSWORD '<new>';. Update/root/neo4j-credentials.txtafterwards. - Create application users with
CREATE USER, grant the minimum role they need (reader,editor,publisher,admin), and never use theneo4jsuperuser for application traffic. - Front Neo4j with a reverse proxy that terminates TLS as covered in step 11, so credentials never travel in clear text.
- Take regular dumps as in step 10 and copy them to S3 with object lock if the graph is the source of truth.
Reference: Where Things Live on the Instance
| Path | Purpose |
|---|---|
/usr/bin/neo4j |
The Neo4j daemon launcher script |
/usr/bin/neo4j-admin |
Administrative command line (dump, load, set-initial-password) |
/usr/bin/cypher-shell |
The bundled Cypher shell client |
/etc/neo4j/neo4j.conf |
Main Neo4j configuration file |
/var/lib/neo4j/data/ |
Database files (system DB and any user-created DBs) |
/var/lib/neo4j/data/dbms/auth |
The auth file written by neo4j-admin dbms set-initial-password |
/var/log/neo4j/ |
Neo4j log files (neo4j.log, query.log, security.log) |
/root/neo4j-credentials.txt |
The plain text per-instance neo4j superuser password (mode 0600 root) |
/etc/nginx/sites-available/neo4j-browser |
The cloudimg nginx reverse proxy site for the Browser |
/etc/systemd/system/neo4j-firstboot.service |
The first boot password rotation unit |
/usr/local/sbin/neo4j-firstboot.sh |
The first boot rotation script the unit runs |
/var/lib/cloudimg/neo4j-firstboot.done |
The sentinel that disables the first boot service after its first successful run |
Reference: Useful Commands
# Check service state
sudo systemctl status neo4j
sudo journalctl -u neo4j -n 50

# Tail Neo4j's main log
sudo tail -f /var/log/neo4j/neo4j.log

# Stop, start, restart
sudo systemctl stop neo4j
sudo systemctl start neo4j
sudo systemctl restart neo4j

# Re-read configuration after editing /etc/neo4j/neo4j.conf
sudo systemctl restart neo4j

# Connect with cypher-shell over Bolt
cypher-shell -a bolt://localhost:7687 -u neo4j

# List databases (Community has neo4j and system)
echo "SHOW DATABASES;" | cypher-shell -a bolt://localhost:7687 -u neo4j -p "$NEO4J_PASS"

# Take an offline dump and put it on S3
sudo systemctl stop neo4j
sudo -u neo4j neo4j-admin database dump neo4j --to-path=/var/lib/neo4j/backups
sudo systemctl start neo4j
aws s3 cp /var/lib/neo4j/backups/neo4j.dump s3://your-bucket/neo4j/$(date +%Y-%m-%d).dump
Screenshots
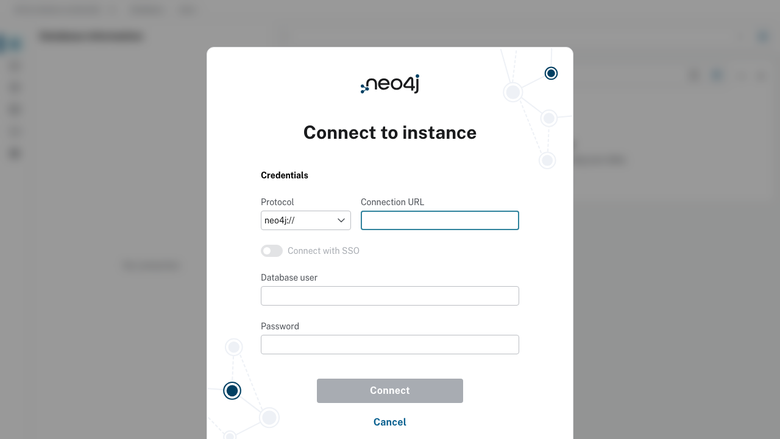
The Neo4j Browser sign-in page served on first boot with no manual setup.
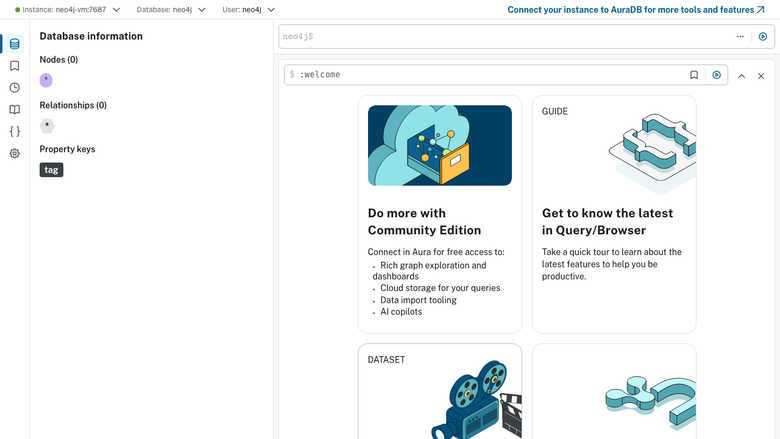
The Neo4j Browser welcome panel after signing in as the rotated neo4j user.
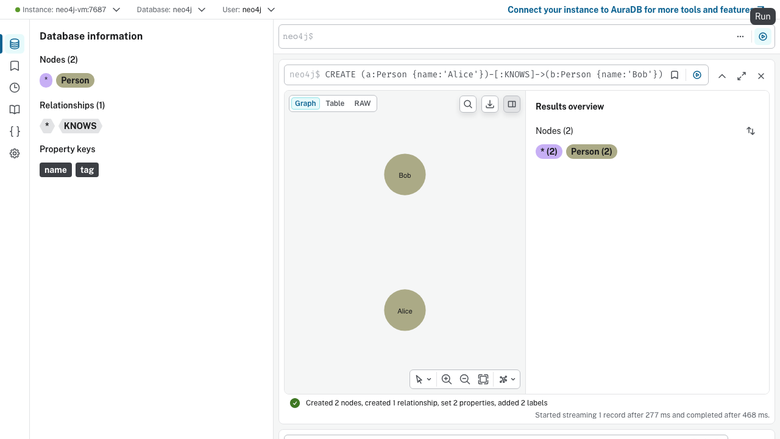
A small Cypher query rendered as a graph in the Neo4j Browser.
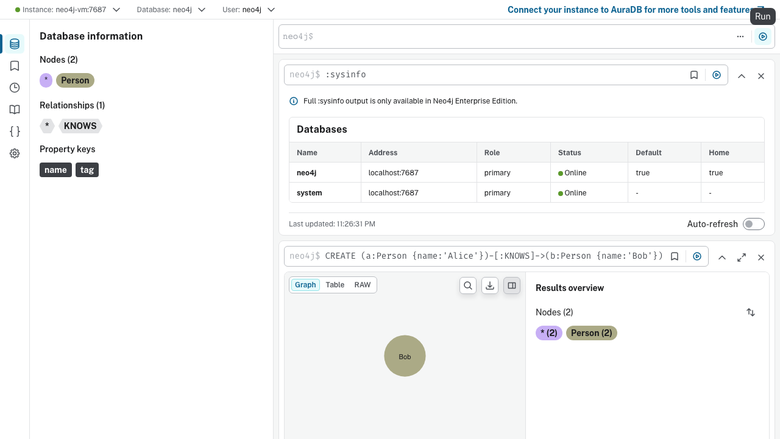
The Neo4j Browser database information panel showing the running Neo4j 5 instance.
Support
For help with deployment, upgrades, Cypher tuning, indexing strategy, graph data modelling or any other Neo4j question, contact cloudimg support at support@cloudimg.co.uk. 24/7 cover is included with every Marketplace subscription.