OpenBao on AWS User Guide
Overview
This image runs OpenBao, the open source, community driven secrets management platform. OpenBao is a Linux Foundation project and the MPL-2.0 licensed fork of Vault. It centrally stores, accesses and tightly controls access to tokens, passwords, certificates, API keys and other secrets, and provides encryption as a service so your applications never have to handle raw keys. You drive it from the built in web UI, the bao command line interface, or the HTTP API.
The single static bao server binary is installed under /usr/local/bin and runs as a dedicated unprivileged openbao system account under a systemd service that starts it on boot and restarts it on failure. The encrypted secret store uses OpenBao's integrated raft storage at /var/lib/openbao, which is a dedicated, independently resizable EBS data volume. The built in web UI and the full HTTP API are published on port 8200.
OpenBao starts sealed and uninitialized. On the first boot of every deployed instance a one shot service initializes the store, captures the single unseal key and the initial root token unique to that instance, unseals the server, and writes both to /root/openbao-credentials.txt with mode 0600 so that only the root user can read it. No shared or default credentials, no pre initialized store and no preset unseal key ship in the image, so two instances launched from the same Amazon Machine Image never share a root token or unseal key. A second service re-unseals the server automatically after every reboot so the appliance returns to a healthy, ready state unattended.
Prerequisites
Before you deploy this image you need:
- An Amazon Web Services account where you can launch EC2 instances
- IAM permissions to launch instances, create security groups, and subscribe to AWS Marketplace products
- An EC2 key pair in the target Region for SSH access to the instance
- A VPC and subnet in the target Region, with a security group allowing inbound port 22 from your management network and port 8200 for the web UI and the HTTP API
- The AWS CLI (version 2) installed locally if you plan to deploy from the command line
Step 1: Launch the Instance from the AWS Marketplace
Sign in to the AWS Management Console, open the EC2 service, and select Launch instance. Under Application and OS Images choose AWS Marketplace AMIs and search for OpenBao. Select the cloudimg listing and choose Select, then Continue on the subscription summary.
Pick an instance type of t3.medium or larger. Choose your EC2 key pair under Key pair (login). Under Network settings select your VPC and subnet, and either create or select a security group that opens port 22 from your management network and port 8200 for the web UI and the HTTP API. Leave the root volume at the default size or larger.
Select Launch instance. First boot initialisation runs once after the instance state becomes Running and the status checks pass: it initializes and unseals OpenBao, which takes a short moment before the web UI accepts a sign in.
Step 2: Launch the Instance from the AWS CLI
The following block launches an instance from the cloudimg OpenBao Marketplace AMI into an existing subnet and security group. Replace <ami-id> with the AMI ID shown on the Marketplace listing, <key-name> with your EC2 key pair name, <subnet-id> with your subnet ID, and <security-group-id> with a security group that opens ports 22 and 8200 as described above.
aws ec2 run-instances \
  --image-id <ami-id> \
  --instance-type t3.medium \
  --key-name <key-name> \
  --subnet-id <subnet-id> \
  --security-group-ids <security-group-id> \
  --tag-specifications 'ResourceType=instance,Tags=[{Key=Name,Value=openbao}]'
When the instance reaches the Running state and its status checks pass, note its public IP address or DNS name from the EC2 console or with aws ec2 describe-instances.
Step 3: Connect to Your Instance
Connect over SSH using your key pair and the login user for your operating system variant.
| OS variant | SSH login user |
|---|---|
| Ubuntu 24.04 | ubuntu |
ssh -i <key-name>.pem ubuntu@<public-ip>
Step 4: Retrieve the Root Token and Unseal Key
The initial root token and the single unseal key are unique to your instance and were generated on first boot. Read the credentials file as root:
sudo cat /root/openbao-credentials.txt
The file lists the web UI URL, the initial root token (openbao.root.token) and the single unseal key (openbao.unseal.key). The same unseal key is used by the auto unseal service to bring the server back up after a reboot. Keep both values somewhere safe. The root token is the most privileged credential in OpenBao, so treat it as you would a master password. Step 11 explains how to replace it with your own admin credentials.
Step 5: Confirm OpenBao Is Running and Unsealed
Over SSH, confirm the service is active and that the server reports healthy. The health endpoint returns HTTP 200 only when OpenBao is both initialized and unsealed:
sudo systemctl is-active openbao
curl -s http://127.0.0.1:8200/v1/sys/health | head -c 200; echo
A healthy server reports "initialized":true and "sealed":false in the JSON. You can also check the installed version:
bao version
Step 6: Sign In to the Web UI
The built in web UI is served on port 8200. In a browser, go to:
http://<instance-public-ip>:8200/ui/
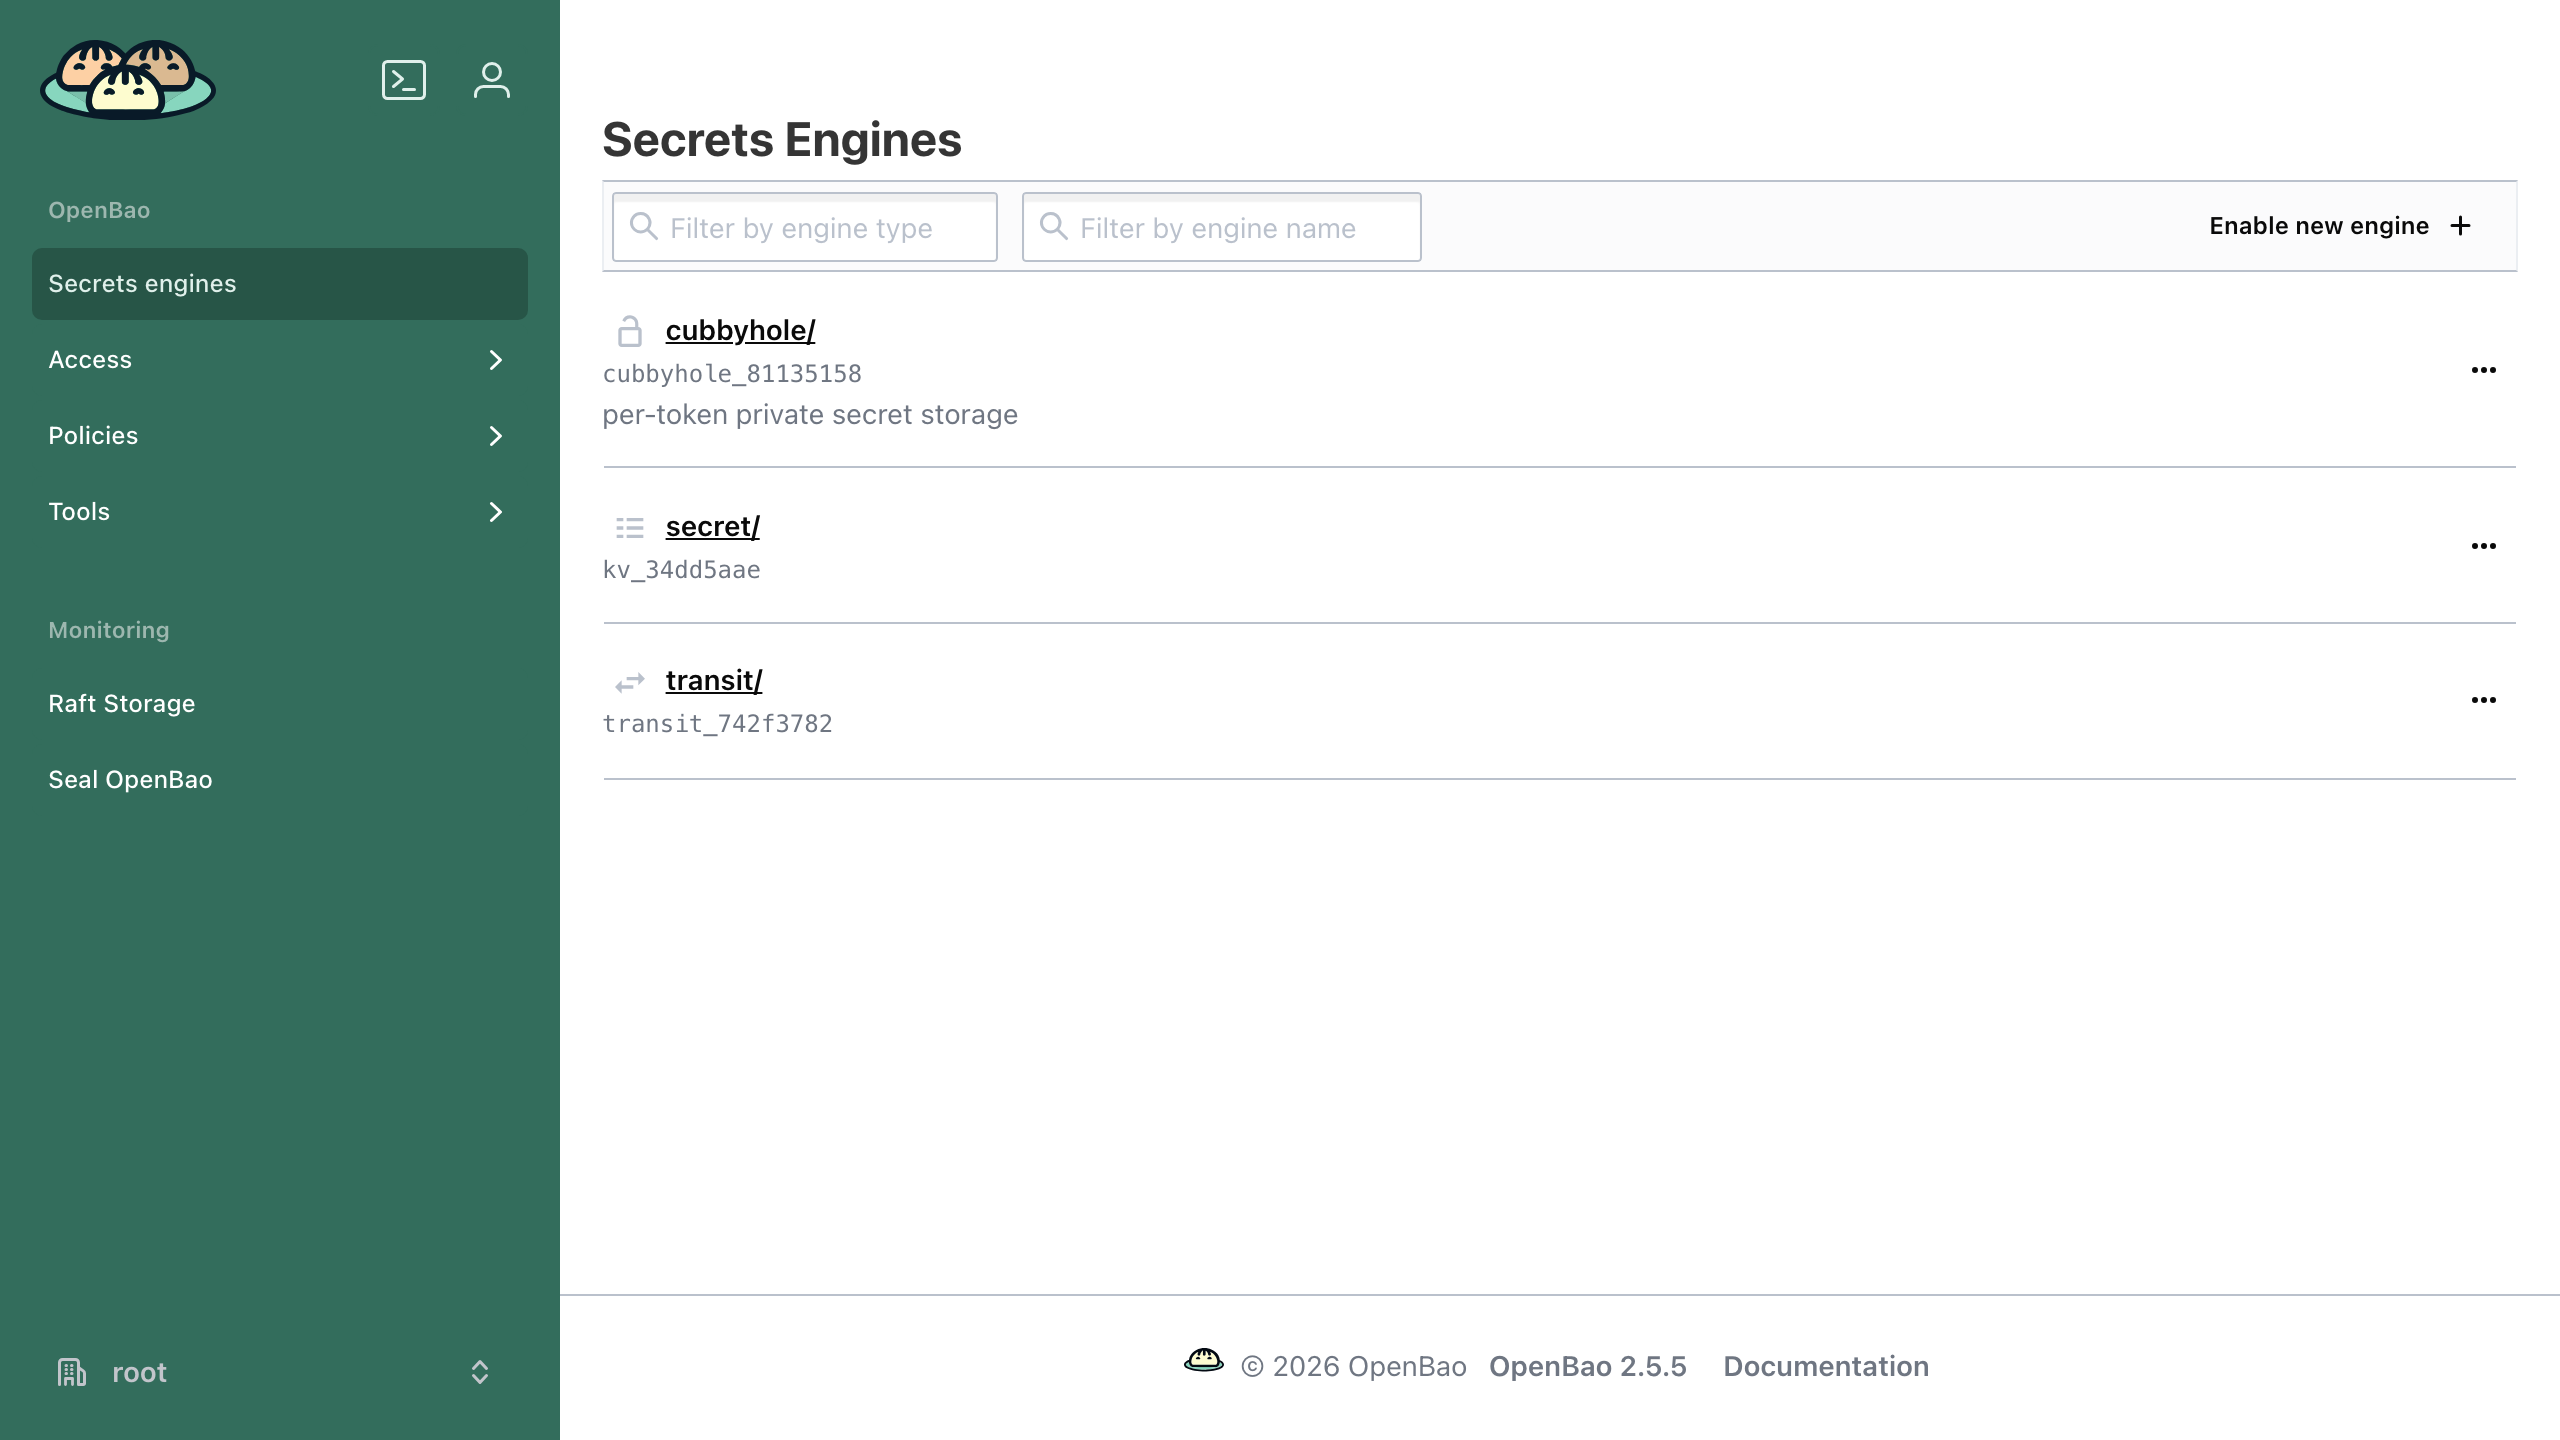
The sign in page offers a Method selector. Leave it set to Token, paste your initial root token into the Token field, and choose Sign In. After signing in you land on the Secrets Engines list, the main dashboard for the store.
Because you signed in with a root token, OpenBao reminds you that the token is held in your browser only for this session and is not persisted; you re-authenticate after closing or refreshing the window. This is expected behaviour for the initial root token.
Step 7: Enable a Secrets Engine and Store a Secret
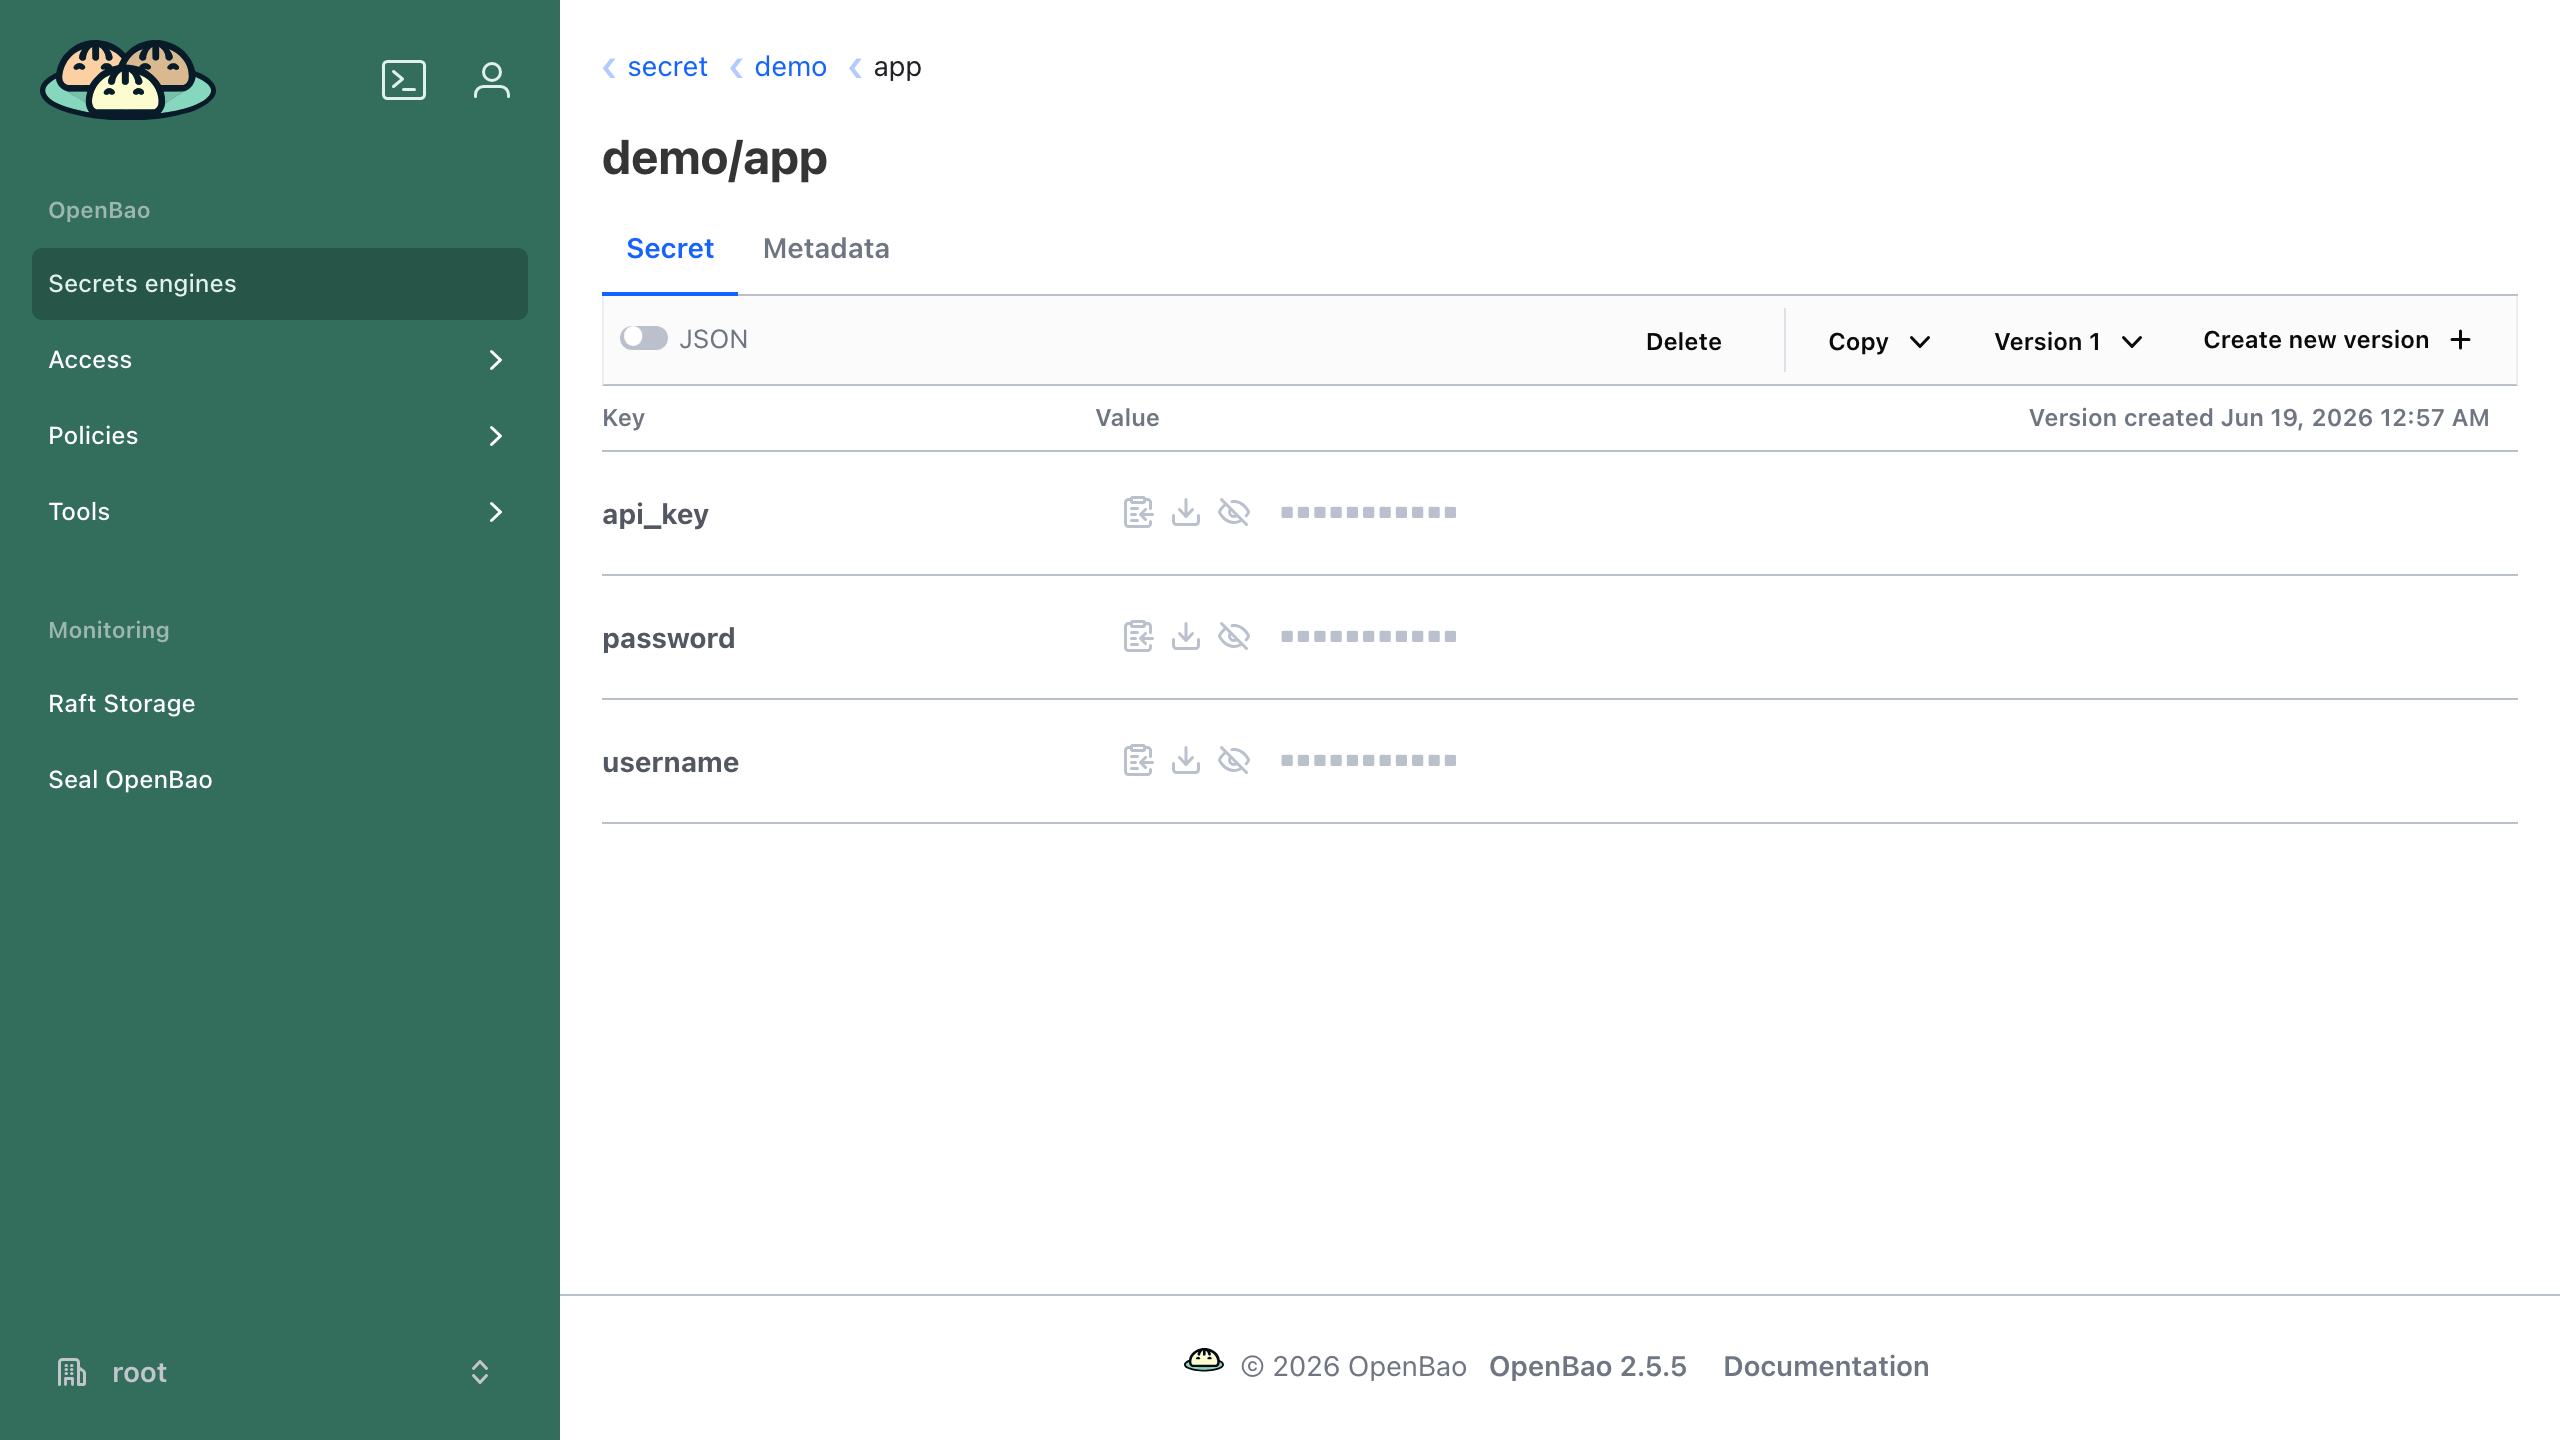
From the Secrets Engines list choose Enable new engine to mount an engine such as KV (key/value), PKI, SSH, Database or Transit (encryption as a service). After enabling a KV version 2 engine you can write a secret at a path and read it back through the UI. The screenshot below shows a key/value secret with several fields stored in the KV engine; the values are masked until you reveal them.
You can do the same from the command line. On the instance, point the CLI at the local server and authenticate with your root token, then enable an engine and write a secret. Replace <your-token> with the initial root token from the credentials file:
export BAO_ADDR=http://127.0.0.1:8200
export BAO_TOKEN=<your-token>
bao secrets enable -path=secret kv-v2
bao kv put secret/myapp/config username=app password=example
bao kv get secret/myapp/config
You can also run bao login interactively and paste the token when prompted instead of exporting BAO_TOKEN.
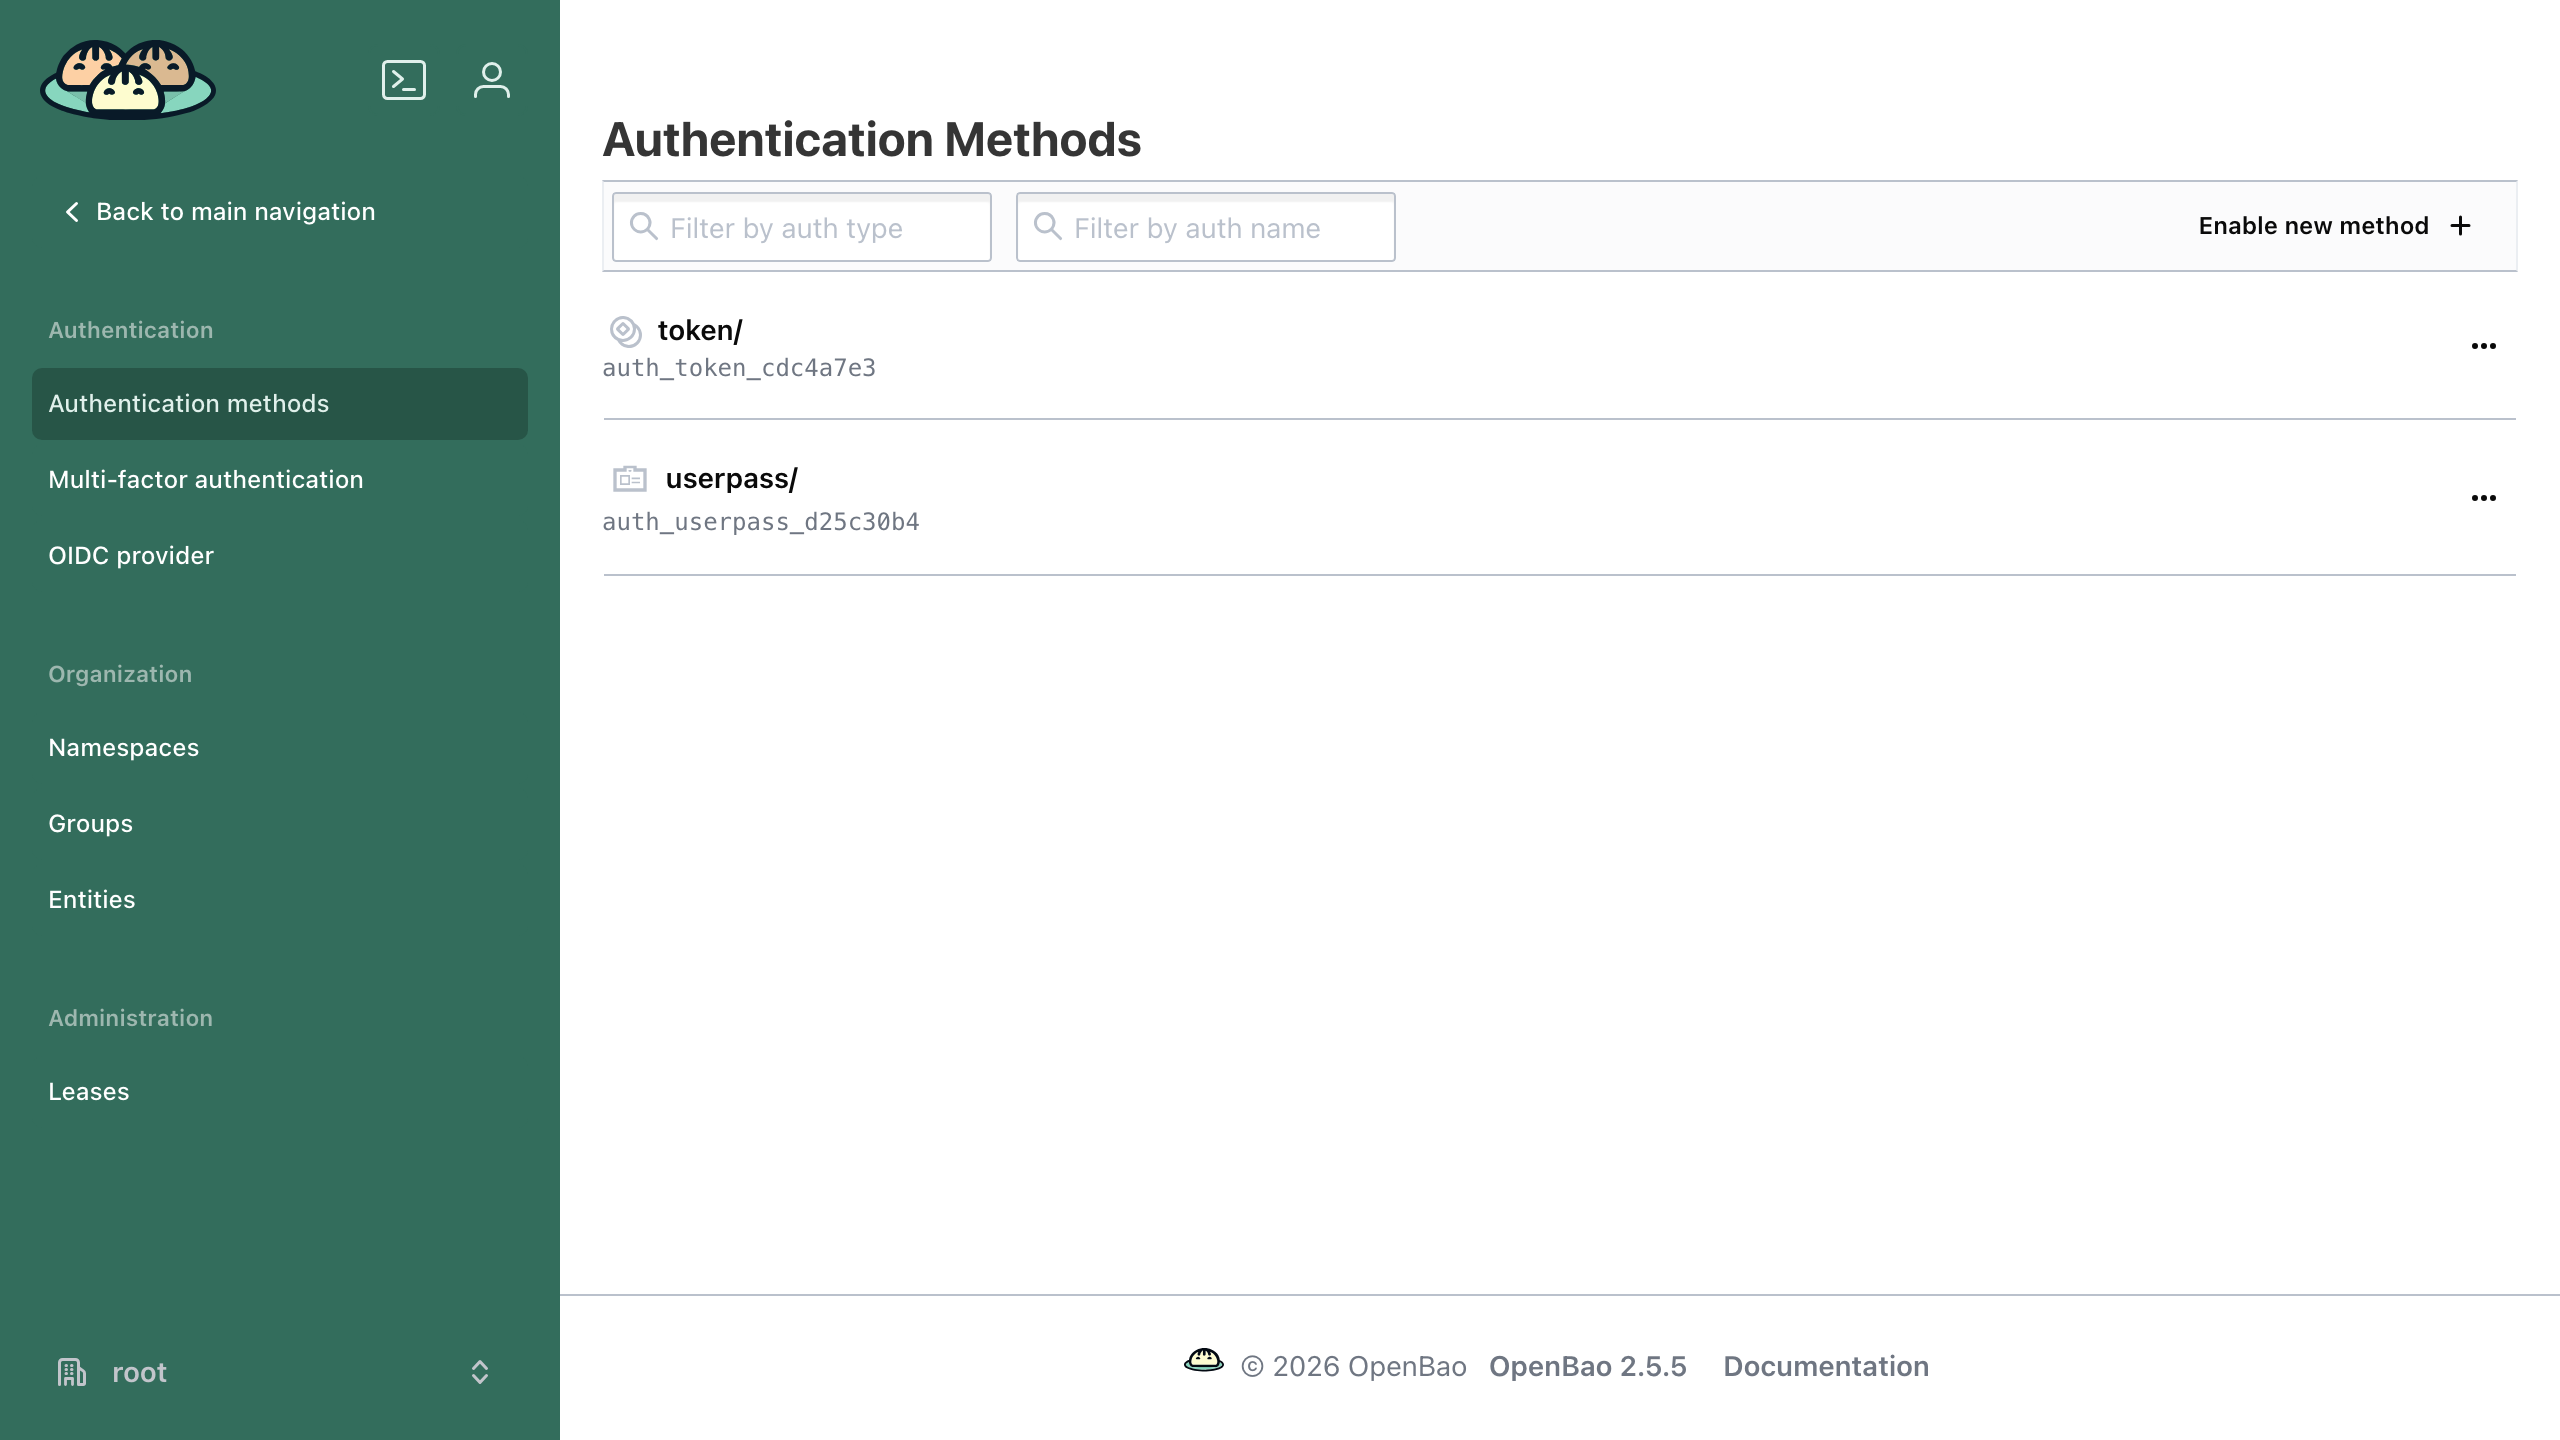
Step 8: Configure Authentication Methods
Real users and applications should not use the root token. Open the Access section of the UI to manage Authentication Methods. The screenshot below shows the token method (always present) alongside a userpass method enabled on the server.
Enable an auth method that suits your environment — userpass, AppRole for machines, or JWT/OIDC for single sign on — and attach policies that scope each identity to only the paths it needs. From the CLI, for example (replace <your-token> with your root token):
export BAO_ADDR=http://127.0.0.1:8200
export BAO_TOKEN=<your-token>
bao auth enable userpass
bao write auth/userpass/users/alice password=changeme policies=default
Step 9: The Data Volume
The encrypted secret store, the init and seal state, and the raft logs all live on a dedicated EBS volume mounted at /var/lib/openbao using OpenBao's integrated raft storage. This keeps the store off the operating system disk and lets you resize or snapshot it independently. Confirm the mount with:
df -h /var/lib/openbao
To grow the store, expand the EBS volume in the AWS console, then grow the filesystem on the instance with sudo resize2fs on the underlying device.
Step 10: Auto Unseal Across Reboots and Switching to AWS KMS
After any reboot OpenBao comes back sealed, and the health endpoint would return 503 until it is unsealed. This image ships a small auto unseal service that, on every boot, reads the stored unseal key from the credentials file and unseals the server so the appliance returns to a healthy state unattended.
Storing the unseal key on the instance is a single node convenience: it lets the appliance survive reboots without an operator, but it weakens the seal guarantee, because anyone with root and disk access to the instance can unseal the server. For production you should switch to AWS KMS auto unseal, which keeps the unseal material in AWS Key Management Service rather than on the instance. Add a seal "awskms" stanza to /etc/openbao/config.hcl referencing a KMS key your instance role can use, give the instance an IAM role with kms:Encrypt, kms:Decrypt and kms:DescribeKey on that key, migrate the existing Shamir seal to KMS, then disable the bundled openbao-unseal.service and remove the stored unseal key from /root/openbao-credentials.txt. With KMS auto unseal in place OpenBao unseals itself from KMS on every boot with no key on disk.
Step 11: Enable TLS and Harden the Initial Root Token
OpenBao is served over plain HTTP on port 8200 by default in this appliance so it is ready to use immediately. For production use you should:
- Enable TLS. Obtain a certificate for your domain, then add a
tls_cert_fileandtls_key_fileto thelistener "tcp"stanza in/etc/openbao/config.hcland removetls_disable = true, so the API and UI are served over HTTPS. Updateapi_addrandcluster_addrto thehttps://scheme and restrict the security group so port 8200 is reachable only from the networks that use OpenBao. - Replace the initial root token. The root token written on first boot is the initial root token. Create your own admin auth method and policies (Steps 7 and 8), confirm you can administer the server with them, and then revoke the initial root token so it can no longer be used:
export BAO_ADDR=http://127.0.0.1:8200
export BAO_TOKEN=<your-token>
bao token revoke <your-token>
If you ever need a new root token after revoking it, generate one with bao operator generate-root using a quorum of unseal key holders.
Step 12: Backup and Maintenance
Back up the secret store by snapshotting the /var/lib/openbao EBS volume, which captures the entire raft store, or take a consistent raft snapshot with bao operator raft snapshot save. Keep the snapshot and your unseal or recovery keys somewhere safe, because the store is encrypted and useless without them. Apply operating system security updates with sudo apt-get update && sudo apt-get upgrade and reboot when a new kernel is installed; OpenBao starts and auto unseals automatically on boot.
Support
This image is published and supported by cloudimg. Support covers deployment, secrets engine and auth method configuration, policies, PKI, transit encryption, AWS KMS auto unseal, TLS, raft storage and backup. Contact cloudimg through the support channel listed on the AWS Marketplace listing.
All product and company names are trademarks or registered trademarks of their respective holders. Use of them does not imply any affiliation with or endorsement by them.