OpenTofu on AWS User Guide
Overview
This image runs OpenTofu, the open source Infrastructure-as-Code engine: a community-driven, MPL-2.0 licensed fork of Terraform that lets you declare your cloud and on-premises infrastructure in HCL configuration files and apply it predictably with a plan-and-apply workflow. The image is delivered as a ready-to-use Infrastructure-as-Code workstation, so an engineer can connect over SSH and start managing infrastructure with the tofu command line immediately, with no setup.
This is a headless command-line image. There is no web interface, no service to log into and no credentials: you run the tofu CLI against your own infrastructure-as-code configurations. The tofu binary is installed on the system path at /usr/local/bin/tofu and was verified against the official OpenTofu release checksum at build time.
The provider plugin cache is placed on a dedicated, independently resizable EBS data volume mounted at /var/lib/tofu. The login profile exports TF_PLUGIN_CACHE_DIR=/var/lib/tofu/plugin-cache for every login shell, so provider plugins download once and are shared across all your workspaces, and they persist on durable storage rather than the operating system disk. A self-contained offline demo configuration ships read-only at /opt/opentofu/demo so you can exercise the toolchain end to end with no cloud credentials the moment you log in.
Prerequisites
Before you deploy this image you need:
- An Amazon Web Services account where you can launch EC2 instances
- IAM permissions to launch instances, create security groups, and subscribe to AWS Marketplace products
- An EC2 key pair in the target Region for SSH access to the instance
- A VPC and subnet in the target Region, with a security group allowing inbound port 22 from your management network
- The AWS CLI (version 2) installed locally if you plan to deploy from the command line
Step 1: Launch the Instance from the AWS Marketplace
Sign in to the AWS Management Console, open the EC2 service, and select Launch instance. Under Application and OS Images choose AWS Marketplace AMIs and search for OpenTofu. Select the cloudimg listing and choose Select, then Continue on the subscription summary.
Pick an instance type of t3.small or larger. Choose your EC2 key pair under Key pair (login). Under Network settings select your VPC and subnet, and either create or select a security group that opens port 22 from your management network. Leave the root volume at the default size or larger.
Select Launch instance. First boot initialisation takes a few seconds after the instance state becomes Running and the status checks pass.
Step 2: Launch the Instance from the AWS CLI
The following block launches an instance from the cloudimg OpenTofu Marketplace AMI into an existing subnet and security group. Replace <ami-id> with the AMI ID shown on the Marketplace listing, <key-name> with your EC2 key pair name, <subnet-id> with your subnet ID, and <security-group-id> with a security group that opens port 22 from your management network.
aws ec2 run-instances \
  --image-id <ami-id> \
  --instance-type t3.small \
  --key-name <key-name> \
  --subnet-id <subnet-id> \
  --security-group-ids <security-group-id> \
  --tag-specifications 'ResourceType=instance,Tags=[{Key=Name,Value=opentofu}]'
When the instance reaches the Running state and its status checks pass, note its public IP address or DNS name from the EC2 console or with aws ec2 describe-instances.
Step 3: Connect to Your Instance
Connect over SSH using your key pair and the login user for your operating system variant.
| OS variant | SSH login user |
|---|---|
| Ubuntu 24.04 | ubuntu |
ssh -i <key-name>.pem ubuntu@<public-ip>
Step 4: Verify the Install
Confirm the toolchain is installed and on the system path by printing the OpenTofu version:
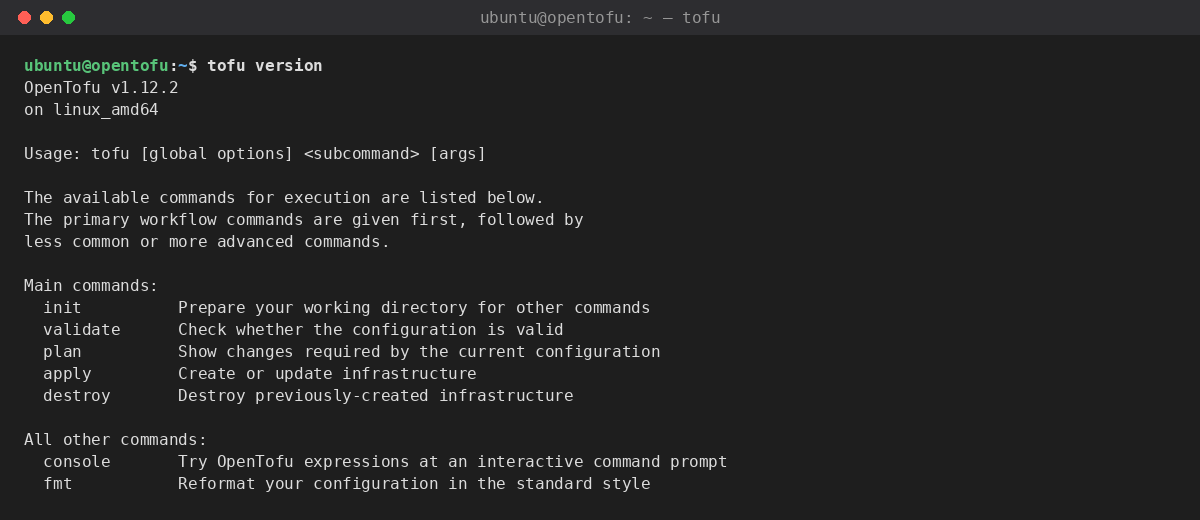
tofu version
You should see OpenTofu v1.12.2 reported, running on linux_amd64. The same tofu command exposes the full Infrastructure-as-Code workflow — run tofu -help to list the subcommands, the most important of which are init, validate, plan and apply.
Step 5: Run the Demo Configuration
A self-contained offline demo configuration ships read-only at /opt/opentofu/demo. It uses only the null and local providers, so tofu init, tofu validate, tofu plan and tofu apply all work offline with no cloud credentials. The demo writes a hello file with a local_file resource and runs a trivial null_resource, so you can confirm the toolchain works end to end before pointing it at your own providers.
Copy the demo somewhere writable and initialise it. The first tofu init downloads the null and local providers into the shared plugin cache on the data disk:
cp -r /opt/opentofu/demo /tmp/opentofu-demo
cd /tmp/opentofu-demo
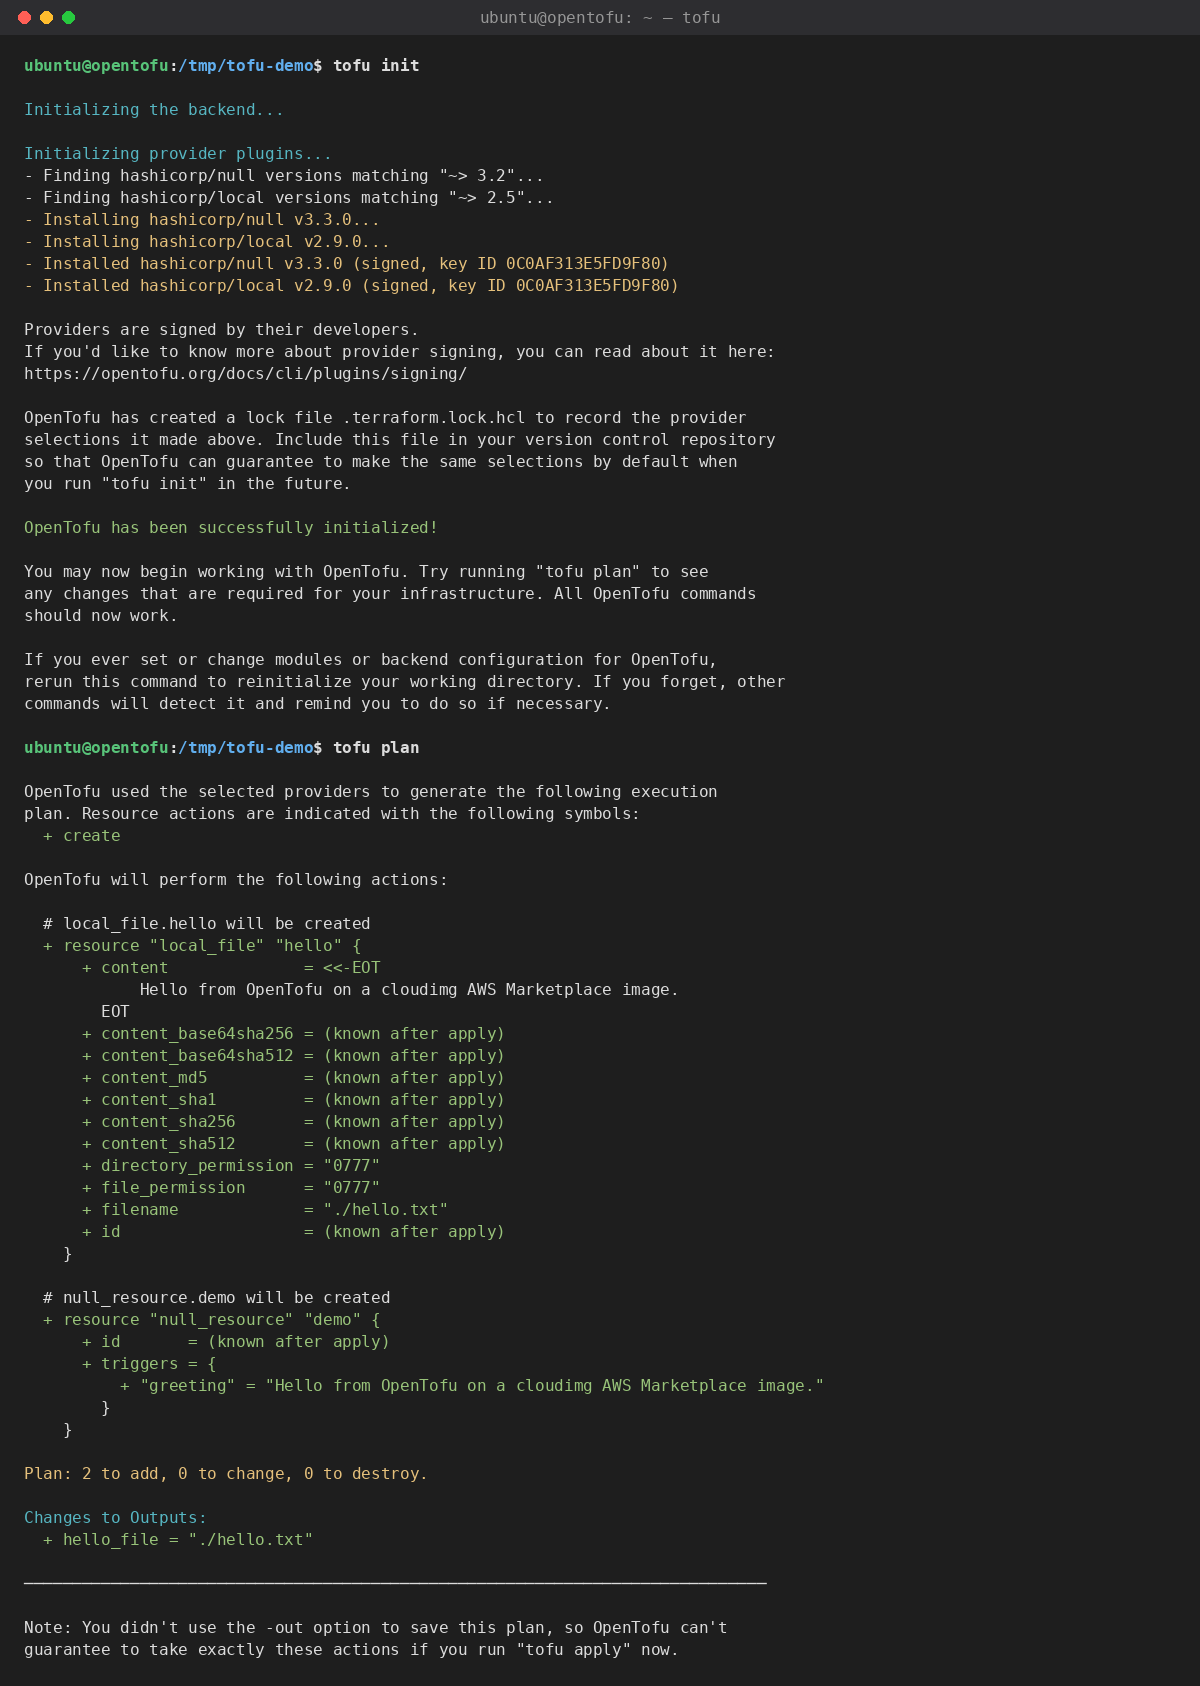
tofu init
OpenTofu reports the providers it installed and finishes with OpenTofu has been successfully initialized!. Now preview the changes the configuration would make. tofu plan describes the local_file and null_resource it will create without making any change:
cd /tmp/opentofu-demo
tofu plan
The plan ends with Plan: 2 to add, 0 to change, 0 to destroy., confirming the toolchain reads the configuration, talks to the providers and computes a change set correctly.
To converge the configuration, apply it. This writes the demo hello.txt and runs the null_resource, with no cloud credentials needed:
cd /tmp/opentofu-demo
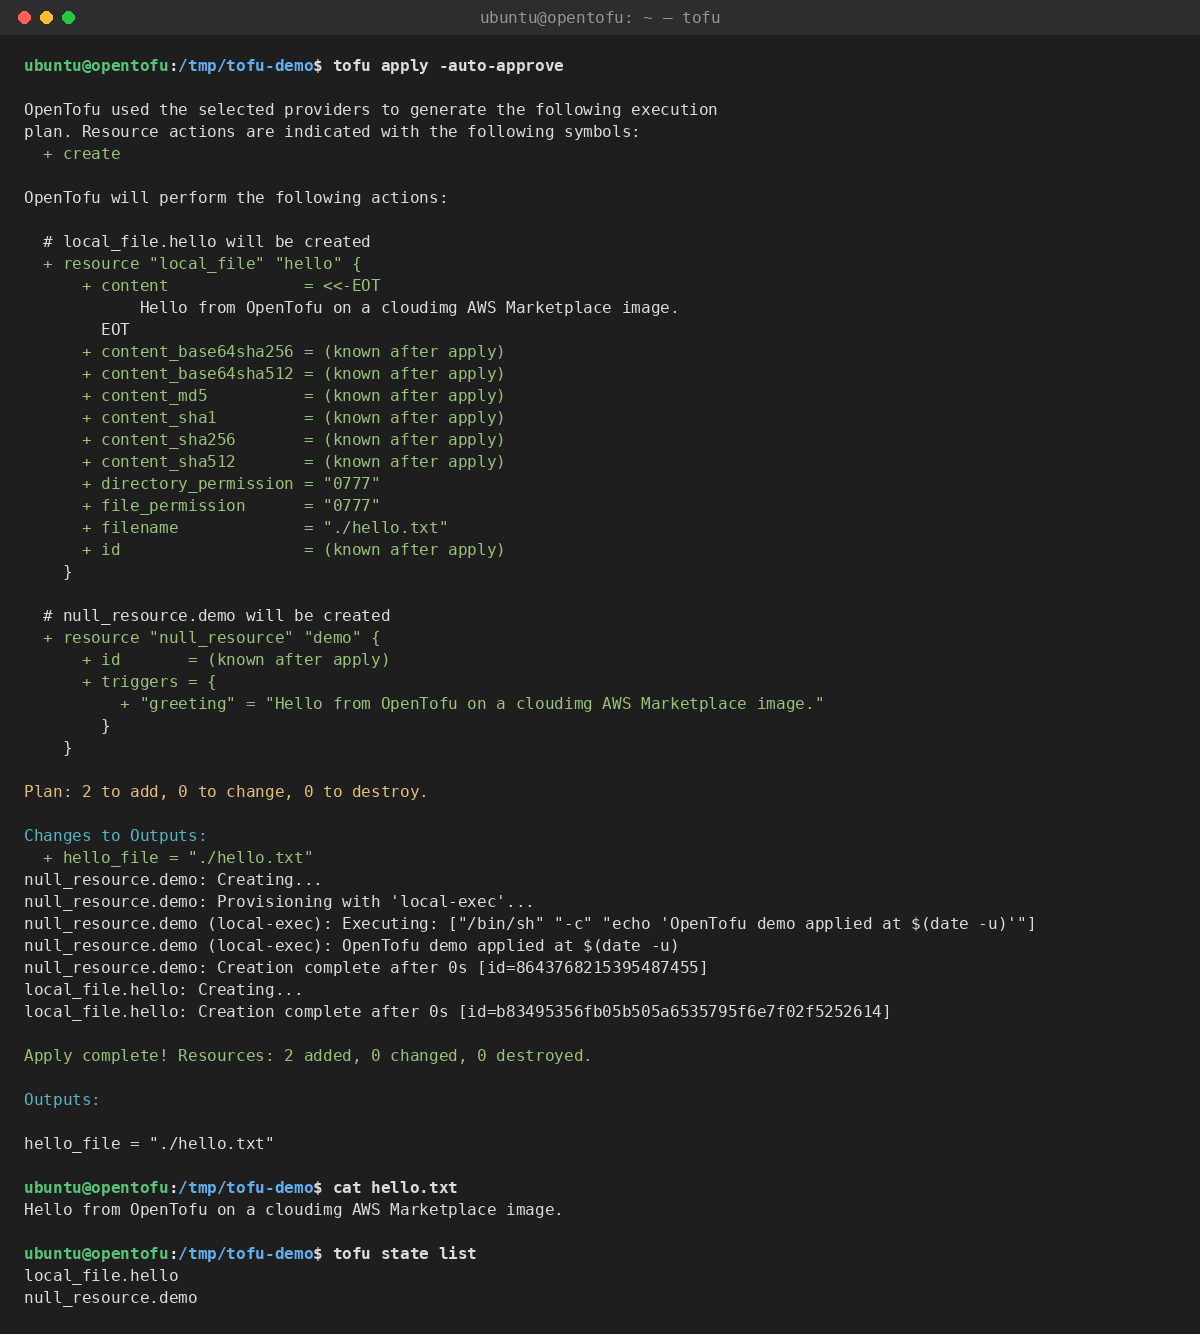
tofu apply -auto-approve
cat hello.txt
tofu state list
tofu apply ends with Apply complete! Resources: 2 added, 0 changed, 0 destroyed., the cat prints the greeting the demo wrote, and tofu state list shows the two resources now tracked in state.
Step 6: Use Your Own Configuration
To manage your own infrastructure, create a working directory and write your HCL configuration there, then run the same tofu init, tofu plan and tofu apply workflow pointed at your real providers (for example the aws provider). Configure provider credentials the way you would anywhere else: attach an IAM instance role to this EC2 instance, set the standard AWS_* environment variables, or use a shared credentials file. OpenTofu speaks the same provider and module ecosystem engineers already know and supports remote state backends, including the native S3 backend with state locking, so you can wire this workstation into CI and pull-request automation.
The provider plugin cache lives on the dedicated data volume at /var/lib/tofu/plugin-cache and is exported as TF_PLUGIN_CACHE_DIR for every login shell. Because the cache is shared, the first tofu init in any workspace downloads each provider once and every later workspace reuses the cached copy, which makes repeated initialisation fast and keeps the providers on durable, resizable storage rather than the operating system disk.
Step 7: The Data Volume
The provider plugin cache and your workspace scratch space live on a dedicated EBS volume mounted at /var/lib/tofu. This keeps the cache and state off the operating system disk and lets you resize or snapshot it independently. Confirm the mount with:
df -h /var/lib/tofu
To grow the volume, expand the EBS volume in the AWS console, then grow the filesystem on the instance with sudo resize2fs on the underlying device. The plugin cache directory is group-writable by the ubuntu login user, so providers downloaded by any workspace are shared across the whole instance.
Support
This image is published and supported by cloudimg. Support covers deployment, provider and backend configuration, remote state and native S3 state locking, module structure, migrating from Terraform to OpenTofu, CI integration and upgrade planning. Contact cloudimg through the support channel listed on the AWS Marketplace listing.
All product and company names are trademarks or registered trademarks of their respective holders. Use of them does not imply any affiliation with or endorsement by them.