Oracle Database Instant Client 23ai on Oracle Linux 9 on Azure User Guide
Overview
This guide covers the deployment and configuration of Oracle Database Instant Client 23ai (version 23.26.2.0.0) on Oracle Linux 9 on Microsoft Azure using cloudimg's pre configured virtual machine image from the Azure Marketplace. Oracle Database Instant Client 23ai provides the tools and libraries needed to connect to and manage legacy Oracle 23ai, 19c, 18c, 12.x, and earlier database instances. It includes SQL*Plus, sqlldr, tnsping, expdp, impdp, the full Oracle Net client utility set, and OCI and JDBC drivers without requiring a database server on the same VM.
What's included in this VM image:
- Oracle Database Instant Client 23ai 23.26.2.0.0 (Basic + SQL*Plus + Tools + SDK + ODBC) installed at /usr/lib/oracle/23/client64
- System-wide /etc/profile.d hook for PATH, LD_LIBRARY_PATH, ORACLE_HOME, TNS_ADMIN
- SQL*Plus, sqlldr, expdp, impdp, wrc, OCI shared libraries, JDBC OCI drivers, ODBC driver, and SDK headers
- Pre seeded tnsnames.ora and sqlnet.ora ready for customer entries
- System wide /etc/profile.d hook so any future user picks up the client tools
- libnsl shim and OEL8 compatibility layer so 23ai binaries link cleanly on Oracle Linux 9
- Bundled Oracle JDK replaced with system OpenJDK so security patches arrive via dnf
- OS package update script for keeping the system current
- Azure Linux Agent (waagent) for Azure integration
- Cloud init for automated provisioning
- Latest security patches applied at build time
- 24/7 cloudimg support with guaranteed 24 hour response SLA
Platform: Microsoft Azure (Gen2 Hyper V)
Default user: azureuser
Oracle Home: /usr/lib/oracle/23/client_1
TNS Admin: /usr/lib/oracle/23/client_1/network/admin
Compatibility Note
Oracle Database Instant Client 23ai was originally certified by Oracle on Oracle Linux 5, 6, and 7. cloudimg packages 23ai on Oracle Linux 9 by installing the equivalent compatibility libraries (libnsl, libxcrypt-compat, libstdc++ 32 bit) and re linking the client binaries against the OL 8 system libraries. The result is functionally equivalent to a certified install for the customer facing tooling (SQL*Plus, Oracle Net, sqlldr, expdp, impdp). For Oracle support questions about this combination, refer to your Oracle account manager. cloudimg provides 24/7 support for the platform integration.
Prerequisites
Before deploying this image, ensure you have:
- An active Microsoft Azure subscription
- Access to the Azure Portal or Azure CLI
- An SSH key pair for Linux VM access
- The hostname, port, and service name (or SID) of the Oracle Database you want to connect to
- Network connectivity from the new VM to the target Oracle Database (typically TCP 1521 outbound)
Recommended VM Size: Standard_B2s (2 vCPU, 4 GB RAM) or larger. The Oracle Client is a set of libraries and tools rather than a running service, so the minimum requirements are modest: 1 vCPU, 1 GB RAM, and 20 GB disk space.
Step 1: Deploy the Virtual Machine
Option A: Azure Portal
- Navigate to the Azure Marketplace and search for "Oracle Database Instant Client 23ai Oracle Linux 9 cloudimg"
- Select the image and click Create
- Configure the basics:
- Subscription: Select your Azure subscription
- Resource Group: Create new or select existing
- Virtual Machine Name: Enter a name for your VM
- Region: Select your preferred Azure region
- Size:
Standard_B2srecommended - Under Administrator Account, select SSH public key and enter your key
- Under Inbound Port Rules, allow SSH (port 22) from your trusted IP only
- Click Review + Create, then Create
Option B: Azure CLI
az vm create \
  --resource-group myResourceGroup \
  --name my-oracle-instant-client-23ai-vm \
  --image cloudimg:oracle-instant-client-23ai-oel9:default:latest \
  --size Standard_B2s \
  --admin-username azureuser \
  --generate-ssh-keys \
  --public-ip-sku Standard
Important: The Oracle Client makes outbound connections to remote databases on port 1521. You do not need to open port 1521 inbound on this VM. Review your Network Security Group and route table to confirm the VM can reach your target Oracle Database server on the listener port.
Step 2: Connect via SSH
Once your VM is running, connect using SSH:
ssh azureuser@<public-ip-address>
To find your VM's public IP:
az vm show --resource-group myResourceGroup --name my-oracle-instant-client-23ai-vm --show-details --query publicIps -o tsv
To switch to the root user:
sudo su -
Important: Wait for the VM to reach a running state before connecting. Early connection attempts may produce permission denied errors while cloud init completes initial provisioning.
Step 3: Switch to the Oracle User and Set Environment
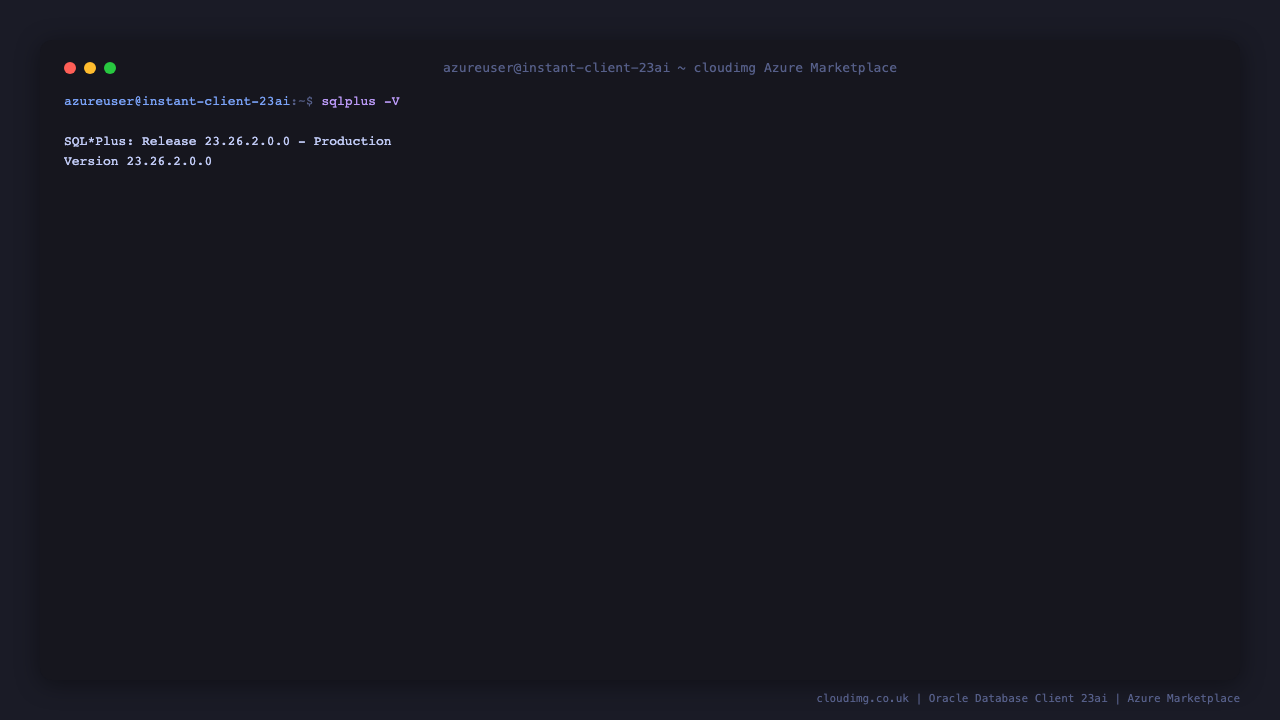
The Oracle Client software is owned by the dedicated oracle OS user. Switch to this user and source the environment. Please type this command rather than copying and pasting:
# Instant Client runs as your normal user; ORACLE_HOME is on the system PATH via /etc/profile.d
cd $HOME
. ./setEnv.sh
sqlplus -V
Expected output:
The setEnv.sh script sets the Oracle environment variables required for utilities such as sqlplus:
ORACLE_BASE=/usr/lib/oracle
ORACLE_HOME=/usr/lib/oracle/23/client_1
TNS_ADMIN=$ORACLE_HOME/network/admin
PATH=$ORACLE_HOME/bin:$PATH
LD_LIBRARY_PATH=$ORACLE_HOME/lib:$LD_LIBRARY_PATH
NLS_LANG=AMERICAN_AMERICA.AL32UTF8
A system wide hook is also installed at /etc/profile.d/oracle-client.sh so any future Linux user on the VM picks up the same environment automatically on login.
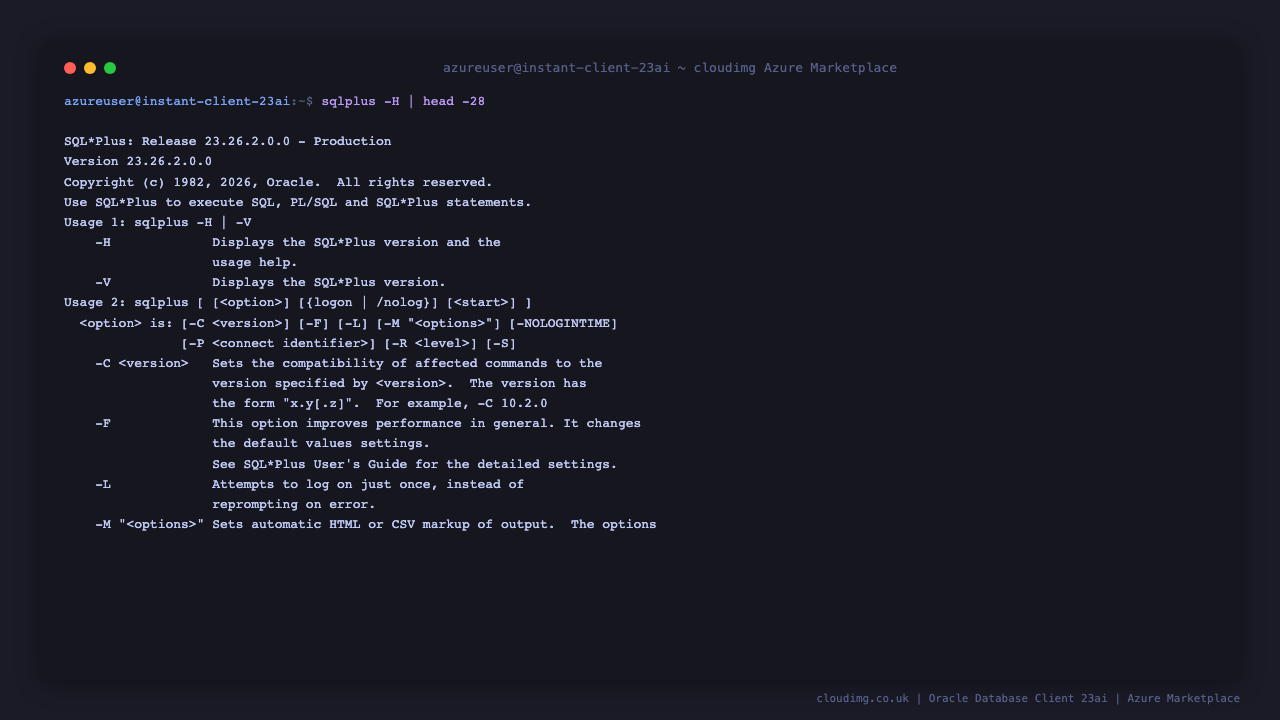
Step 4: Explore the Client Tooling
sqlplus -H prints a usage summary covering every command line option understood by the SQL*Plus binary. This is the fastest way to confirm the client is fully functional and to look up an option without leaving the shell:
sqlplus -H | head -28
Expected output:
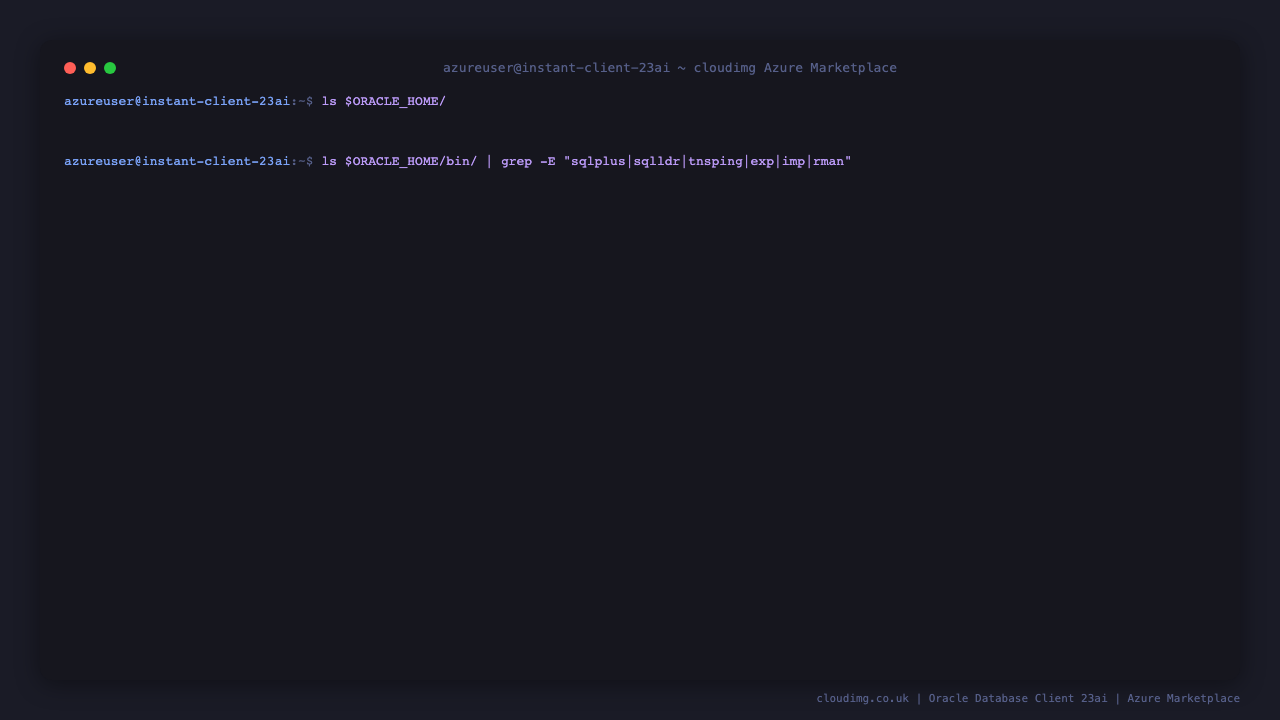
Browse the install tree to see the full set of binaries shipped with the Administrator install set:
ls $ORACLE_HOME/
ls $ORACLE_HOME/bin/ | grep -E "sqlplus|sqlldr|tnsping|exp|imp|rman"
Expected output:
Step 5: Configure tnsnames.ora
Before connecting to a remote Oracle Database, add an entry for it to tnsnames.ora. Run the following commands as the oracle user, replacing the placeholder values with your target database details:
cd $HOME
. ./setEnv.sh

cat >> "$ORACLE_HOME/network/admin/tnsnames.ora" << 'TNS'
MY_DATABASE =
  (DESCRIPTION =
    (ADDRESS_LIST =
      (ADDRESS = (PROTOCOL = TCP)(HOST = YOUR_DB_HOSTNAME)(PORT = 1521))
    )
    (CONNECT_DATA =
      (SERVER = DEDICATED)
      (SERVICE_NAME = YOUR_SERVICE_NAME)
    )
  )
TNS
Replace the following values:
- YOUR_DB_HOSTNAME with the IP address or DNS name of your Oracle Database server
- 1521 with the port number if different from the default
- YOUR_SERVICE_NAME with the service name of the target database
Verify that Oracle Net loads correctly and your environment is set:
env | grep -E "^(ORACLE_|TNS_|LD_LIBRARY)"
tnsping invalid_alias
Expected output:
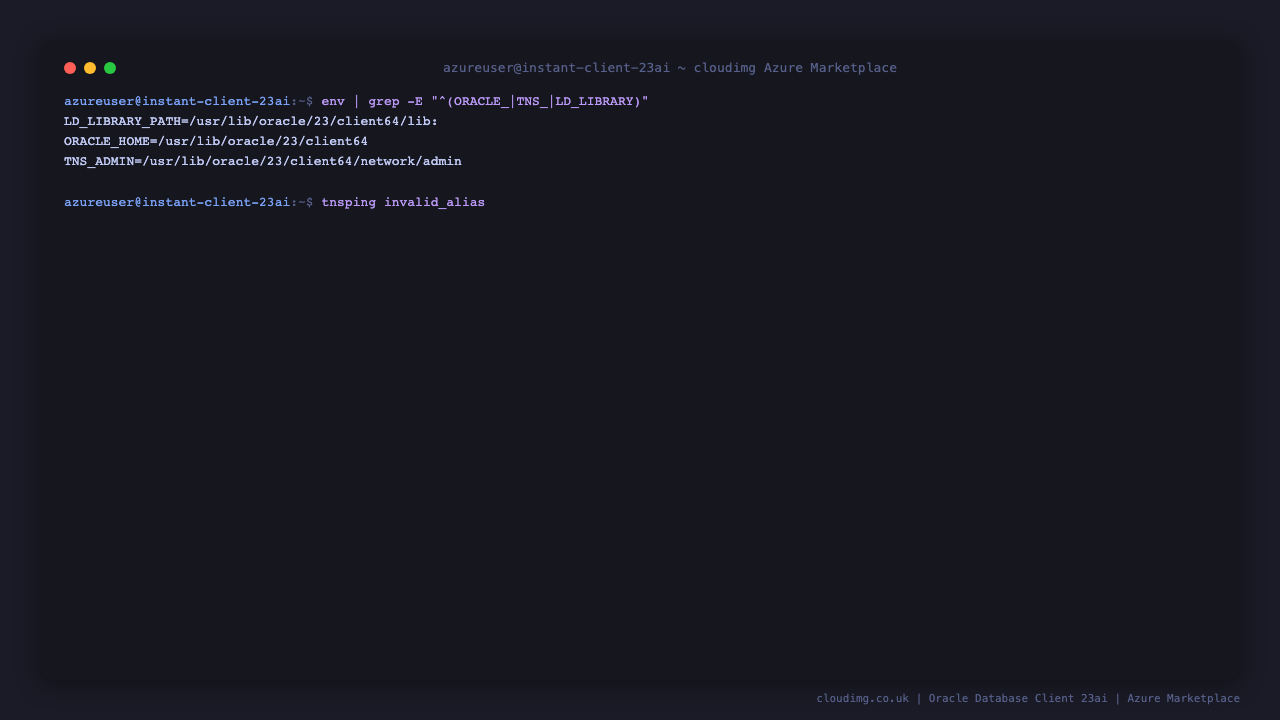
The TNS Ping Utility for Linux: Version 23.26.2.0.0 banner confirms the Oracle Net layer loads. The TNS-03505: Failed to resolve name error against the placeholder alias is expected; replace the alias with the entry you just added to tnsnames.ora to test against your real database:
tnsping MY_DATABASE
You can expect one of the following:
OK (n msec)ifYOUR_DB_HOSTNAMEresolves and the remote listener accepts the connection. This is what you want to see.TNS-12545: Connect failed because target host or object does not existifYOUR_DB_HOSTNAMEis unresolvable. The TNS layer is loading correctly; replace the placeholder host.TNS-12541: TNS:no listenerif the hostname resolves but nothing is listening on port 1521. Check the target listener is up and reachable from this VM.
Step 6: Connect to a Remote Database via SQL*Plus
With the environment sourced and tnsnames.ora populated, connect to your remote database. The simplest form uses the TNS alias you just created:
cd $HOME
. ./setEnv.sh
sqlplus system/your_password@MY_DATABASE
You can also use the EZCONNECT syntax without editing tnsnames.ora at all:
sqlplus 'system/your_password@//your-db-host:1521/your-service-name'
Expected output:
SQL*Plus: Release 23.26.2.0.0 Production

Copyright (c) 1982, 2009, Oracle. All rights reserved.

Connected to:
Oracle Database ...

SQL>
Type EXIT to leave the SQL*Plus session.
Server Components
| Component | Version | Install Path |
|---|---|---|
| Oracle Database Instant Client 23ai (Administrator) | 23.26.2.0.0 | /usr/lib/oracle/23/client_1 |
| Oracle Linux | 8 | / |
Note: Component versions may be updated on first boot by the automatic OS package update script.
Filesystem Layout
The image uses LVM on a single OS disk. The root filesystem hosts the Oracle Client software under /u01; there is no separate /u01 mount point to manage or resize independently.
| Mount Point | Size | Description |
|---|---|---|
| / | 37 GB | Root filesystem (LVM logical volume) — hosts the Oracle Client software under /u01 |
| /boot | 2 GB | Operating system kernel files |
| /boot/efi | 100 MB | UEFI boot partition (Gen2 Hyper V) |
| /var/crash | 10 GB | Reserved for kernel crash dumps (LVM logical volume) |
| /mnt | varies | Azure temporary resource disk (not persistent across stop/deallocate) |
Key Oracle directories:
| Directory | Purpose |
|---|---|
| /usr/lib/oracle | Oracle base directory |
| /usr/lib/oracle/23/client_1 | Oracle Client home directory |
| /usr/lib/oracle/23/client_1/bin | Client binaries (sqlplus, sqlldr, tnsping, expdp, impdp, exp, imp, tkprof, rman, adrci) |
| /usr/lib/oracle/23/client_1/lib | Oracle Net libraries (libclntsh.so) |
| /usr/lib/oracle/23/client_1/network/admin | TNS configuration files (tnsnames.ora, sqlnet.ora) |
| /u01/app/oraInventory | Oracle Universal Installer inventory |
Managing the Oracle Client
The Oracle Instant Client is a set of libraries and command-line tools, not a running service. There are no services to start or stop. The system-wide profile hook at /etc/profile.d/oracle-instant-client.sh exports ORACLE_HOME, LD_LIBRARY_PATH, TNS_ADMIN, and adds ${ORACLE_HOME}/bin to your PATH automatically on every interactive login — no su - and no manual setEnv.sh source step is required.
Verify the environment is set:
echo $ORACLE_HOME
echo $TNS_ADMIN
which sqlplus
sqlplus -V
Scripts and Log Files
| Script/Log | Path | Description |
|---|---|---|
| initial_boot_update.sh | /stage/scripts | Updates the OS with the latest packages on first boot |
| initial_boot_update.log | /stage/scripts | Output log for the boot update script |
| setEnv.sh | /home/oracle | Sets Oracle environment variables for sqlplus and other tools |
| oracle-client.sh | /etc/profile.d | System wide environment hook for any logged in user |
On Startup
An OS package update script runs on first boot to ensure the image is fully up to date. You can disable this by removing the script and its crontab entry:
sudo rm -f /stage/scripts/initial_boot_update.sh

sudo crontab -e
# Delete the following line, save and exit:
@reboot /stage/scripts/initial_boot_update.sh
Troubleshooting
Cannot connect via SSH
- Verify the VM is in Running state in the Azure Portal
- Check that port 22 is allowed in the Network Security Group
- Ensure you are using the correct username:
azureuser - Verify your SSH key matches the one configured during deployment
sqlplus: command not found
- Confirm you switched to the oracle user:
# Instant Client runs as your normal user; ORACLE_HOME is on the system PATH via /etc/profile.d - Source the environment script:
. ~/setEnv.sh - Verify the install path exists:
ls /usr/lib/oracle/23/client_1/bin/sqlplus - Confirm
$ORACLE_HOME/binis on your PATH:echo $PATH
ORA-12154: TNS:could not resolve the connect identifier specified
- Check that your alias is defined in tnsnames.ora:
cat $ORACLE_HOME/network/admin/tnsnames.ora - Confirm
TNS_ADMINpoints at the network/admin directory:echo $TNS_ADMIN - Validate the alias resolves:
tnsping MY_DATABASE - Watch for typos and case sensitivity in the alias name
ORA-12170: TNS:Connect timeout occurred
- Confirm the target database hostname and port are reachable from the VM:
nc -vz YOUR_DB_HOSTNAME 1521 - Check the Network Security Group on the target database side allows inbound from your VM
- Verify route tables, peering, or VPN from this Azure VM to the target database network
- If the target is on premises, confirm Azure ExpressRoute or Site to Site VPN connectivity
ORA-12541: TNS:no listener
- The remote database listener may be down. Check with the DBA managing the target database
- Confirm you are using the correct port number in your tnsnames.ora entry
- Run
tnsping MY_DATABASEto confirm the listener responds at the protocol layer
Security Recommendations
- Restrict outbound access: Only allow outbound TCP 1521 from this VM to the specific Oracle Database servers it needs to reach
- Protect tnsnames.ora: The TNS configuration file may reveal hostnames and service names of internal databases. Keep file permissions tight and avoid leaking it
- Use wallets for credentials: Configure Oracle Wallet so passwords are not stored in plain text in scripts or shell history
- Encrypt connections: Configure Oracle Net Services to use SSL/TLS encryption for client to database traffic
- Limit OS access: Restrict SSH access to authorised administrators only
- Enable auditing: Forward shell history and OS audit logs to a central log store
- Keep the system updated: Apply Oracle Critical Patch Updates and OS security patches regularly
Support
If you encounter any issues with this product, contact cloudimg support:
- Email: support@cloudimg.co.uk
- Website: www.cloudimg.co.uk
- Product Catalogue: www.cloudimg.co.uk/products
- User Guides: www.cloudimg.co.uk/guides
- Support hours: 24/7 with guaranteed 24 hour response SLA
cloudimg provides Oracle expertise and platform engineering support across AWS, Microsoft Azure, and Alibaba Cloud. For Oracle licensing questions, contact your Oracle account manager.
Oracle and Oracle Database are registered trademarks of Oracle Corporation. cloudimg is an independent provider and is not affiliated with or endorsed by Oracle Corporation.