Oracle Database 21c EE with ASM on AWS User Guide
Overview
This image runs Oracle Database 21c Enterprise Edition on Oracle Linux 8 with its datafiles on Oracle Automatic Storage Management (ASM) rather than on a conventional filesystem. ASM is the storage layer that Oracle recommends for the database, and it is what most enterprises standardise on for production Oracle estates on premises. Shipping an image whose storage already mirrors that layout gives you operational parity with your existing ASM deployments: the same asmcmd tooling, the same disk group model, and the same Grid Infrastructure stack that your DBAs already operate.
Oracle Database 21c is an Innovation Release. It is where Oracle first shipped many of the features that were later consolidated into the long term 23ai release — blockchain tables, native JSON, immutable tables, in database JavaScript, and automatic in memory enhancements among them — so it is the right choice when you want to evaluate or build on the newest Oracle capabilities. 21c is also a fully multitenant release: the traditional non container architecture is desupported, so the database is always a container database (CDB) with one or more pluggable databases (PDBs) inside it. This image is preconfigured with a CDB named ORCL and a single user pluggable database named ORCLPDB. Your applications connect to the ORCLPDB service and see an ordinary database; the CDB root (ORCL) is the administrative container that holds the Oracle supplied metadata and the shared background processes. The PDB$SEED template is also present — Oracle uses it to clone new PDBs.
ASM is delivered here through single instance Grid Infrastructure, also known as Oracle Restart. The Grid Infrastructure stack (ohasd, Cluster Synchronization Services, and the ASM instance +ASM) is installed in its own home, mounts the ASM disk groups at boot, and then automatically starts the ASM instance, the TNS listener, and the ORCL database — no systemd database unit is needed, because Oracle Restart itself is the high availability framework that brings the database up and keeps it up. The pluggable database ORCLPDB has its own Oracle Restart resource and is configured to open automatically every time the CDB starts.
Two ASM disk groups are configured. +DATA holds the datafiles, the current control file, the online redo logs, and the server parameter file. +RECO is the Fast Recovery Area: it holds the archived redo logs, the multiplexed copy of the control file, and the second members of the redo log groups. Both disk groups use EXTERNAL redundancy. This is deliberate: every EBS volume is already synchronously replicated across the storage fleet within its Availability Zone, so layering ASM mirroring on top would double or triple the storage cost for no additional durability. The value ASM adds on AWS is multi volume IOPS aggregation, online storage management, and parity with your on premises tooling — not extra copies of already replicated blocks.
This image ships Oracle Database 21c at the base 21.3.0.0.0 release. Oracle publishes Release Updates for 21c on My Oracle Support, and the security section at the end of this guide explains how to apply the latest one with OPatch and datapatch for production use. A starter container database named ORCL with the pluggable database ORCLPDB is preconfigured, the SQLPlus command line client is available in the Oracle home, and the Oracle listener is bound to port 1521* on all interfaces so SQL Developer and JDBC clients can connect remotely. The Grid Infrastructure home and the Database home live on a dedicated 50 GiB EBS gp3 volume mounted at /u01, separate from the operating system disk, while the datafiles live on raw EBS volumes managed directly by ASM.
The image ships with no shared credentials. On the first boot of every launched instance, a one shot service named oracle-db-21c-firstboot.service generates strong random passwords for the database SYSTEM and SYS accounts and for the ASM SYS account, applies them inside the running instances, and writes them to /root/oracle-db-credentials.txt with mode 0600 so that only the root user can read them. Two instances launched from the same image never share credentials.
Prerequisites
Before you deploy this image you need:
- An Amazon Web Services account where you can launch EC2 instances
- IAM permissions to launch instances, create security groups, and subscribe to AWS Marketplace products
- An EC2 key pair in the target Region for SSH access to the instance
- A VPC and subnet in the target Region, with a security group allowing inbound port 22 from your management network and inbound port 1521 from the trusted networks that will reach Oracle
- The AWS CLI (version 2) installed locally if you plan to deploy from the command line
Step 1: Launch the Instance from the AWS Marketplace
Sign in to the AWS Management Console, open the EC2 service, and select Launch instance. Under Application and OS Images choose AWS Marketplace AMIs and search for Oracle Database. Select the cloudimg listing for Oracle Database 21c EE with ASM on Oracle Linux 8 and choose Select, then Continue on the subscription summary.
Pick an instance type of m5.xlarge or larger. Enterprise Edition has no socket cap, so any of the M5, M6i, R5, R6i, C5 or C6i families are valid based on workload — m5.xlarge (4 vCPUs / 16 GB RAM) is a sensible baseline for development and test; m5.2xlarge, m5.4xlarge and the memory optimised R5 family are appropriate for production OLTP. Choose your EC2 key pair under Key pair (login). Under Network settings select your VPC and subnet, and either create or select a security group that allows inbound port 22 from your management network and inbound port 1521 from the trusted networks that will reach Oracle. Do not open port 1521 to the public internet.
Leave the root volume at the default size. The image automatically adds three more EBS volumes, and you should keep all three:
| Volume | Device | Size | Filesystem | Holds |
|---|---|---|---|---|
/u01 |
/dev/sdf |
50 GiB | ext4 | Grid Infrastructure home, Database home, Oracle inventory |
+DATA |
/dev/sdg |
40 GiB | raw (ASM) | datafiles, control file, online redo, spfile |
+RECO |
/dev/sdh |
20 GiB | raw (ASM) | Fast Recovery Area, archive logs, control file copy |
The two ASM volumes are presented to the instance as raw block devices — they are not formatted with a filesystem, because ASM manages them directly. A udev rule in the image re applies the correct grid:asmadmin ownership to those devices on every boot, matched by their block device mapping position rather than by volume id, so ASM finds its disks again even though AWS Nitro renumbers the underlying /dev/nvmeXn1 names on each launch.
Select Launch instance. First boot initialisation takes approximately three to four minutes after the instance state becomes Running and the status checks pass, because the firstboot service waits for Oracle Restart to open the database and the pluggable database before rotating credentials.
Step 2: Launch the Instance from the AWS CLI
The following block launches an instance from the cloudimg Marketplace AMI into an existing subnet and security group. Replace <ami-id> with the AMI ID shown on the Marketplace listing, <key-name> with your EC2 key pair name, <subnet-id> with your subnet ID, and <security-group-id> with a security group that opens ports 22 and 1521 as described above. Note that the block device mapping recreates all four volumes — the root disk, the ext4 /u01 binaries disk, and the two raw ASM disks.
aws ec2 run-instances \
  --image-id <ami-id> \
  --instance-type m5.xlarge \
  --key-name <key-name> \
  --subnet-id <subnet-id> \
  --security-group-ids <security-group-id> \
  --block-device-mappings '[
    {"DeviceName":"/dev/sda1","Ebs":{"VolumeSize":50,"VolumeType":"gp3"}},
    {"DeviceName":"/dev/sdf","Ebs":{"VolumeSize":50,"VolumeType":"gp3"}},
    {"DeviceName":"/dev/sdg","Ebs":{"VolumeSize":40,"VolumeType":"gp3"}},
    {"DeviceName":"/dev/sdh","Ebs":{"VolumeSize":20,"VolumeType":"gp3"}}]' \
  --tag-specifications 'ResourceType=instance,Tags=[{Key=Name,Value=oracle-db-21c-ee-asm-01}]'
The command prints a JSON document on success. Note the instance ID, then retrieve its public address once it is running with aws ec2 describe-instances --instance-ids <instance-id> --query "Reservations[].Instances[].PublicIpAddress" --output text.
Step 3: Connect over SSH and Retrieve the Credentials
Wait for the EC2 instance to reach 2/2 status checks and for first boot to complete. Connect over SSH with the key pair you selected, using the ec2-user login name:
ssh -i <your-key.pem> ec2-user@<public-ip>
Once you are on the instance, read the credentials file with sudo:
sudo cat /root/oracle-db-credentials.txt
The file contains the per instance database and ASM passwords, the Oracle SID (ORCL), the pluggable database name (ORCLPDB), and the listener port (1521). Sample contents (the passwords on your instance are unique):
Oracle Database 21c Enterprise Edition with ASM - Per-Instance Credentials
==========================================================================
Generated: Sun 31 May 19:56:28 UTC 2026
Instance:  i-0123456789abcdef0

Database (ORCL):
SYS_PASSWORD=EhYrkP1QmW9XnZA8tLpV
SYSTEM_PASSWORD=TmKwQ8YzBnA9hSdF2pXR
ASM (+ASM, Grid Infrastructure / Oracle Restart):
ASM_PASSWORD=QpZ4nR8vChM2wLtB6kDy

ORACLE_SID=  ORCL   (CDB; pluggable DB ORCLPDB; datafiles on +DATA, FRA on +RECO)
Listener:    port 1521 (TCP)

Connect (DB):
  ssh ec2-user@<instance-ip>
  sudo cat /root/oracle-db-credentials.txt
  sudo su - oracle ; . ~/setEnv.sh
  sqlplus system/<SYSTEM_PASSWORD>@localhost:1521/ORCL       # CDB root
  sqlplus system/<SYSTEM_PASSWORD>@localhost:1521/ORCLPDB    # pluggable DB (application schemas)
Inspect storage (ASM):
  sudo su - grid ; . ~/setEnv.sh ; asmcmd lsdg

IMPORTANT: These passwords are unique to this instance.
==========================================================================
Copy these values somewhere secure such as a password manager or an encrypted vault, and do not commit them to source control. Every command block in this guide that connects as SYSTEM reads the password from this file into a SYSPWD shell variable, so every block is self contained.
The image provisions two Oracle operating system users: oracle owns the database home and runs the ORCL instance, and grid owns the Grid Infrastructure home and runs the +ASM instance. Each has a setEnv.sh helper in its home directory that exports the correct ORACLE_HOME, ORACLE_SID, and library path, so you do not have to remember them.
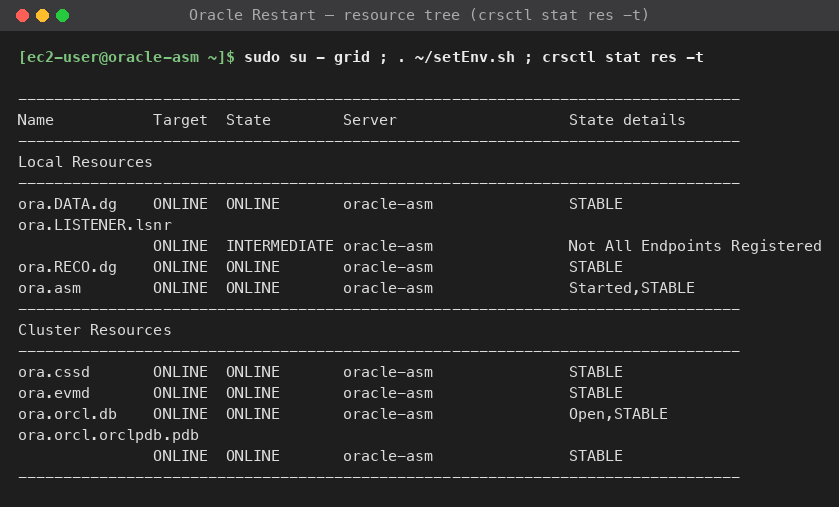
Step 4: Verify Oracle Restart is Running
Oracle Restart (single instance Grid Infrastructure) is the framework that mounts the ASM disk groups and starts the ASM instance, the listener, the ORCL container database, and the ORCLPDB pluggable database at boot. Confirm the High Availability Services daemon is online and inspect the resource tree as the grid user:
sudo -u grid bash <<'OUTER'
. ~/setEnv.sh
crsctl check has
crsctl stat res -t
OUTER
The expected response confirms the stack is online and every resource — the two disk groups, the ASM instance, the listener, the ORCL database, and the orclpdb pluggable database — is in service:
CRS-4638: Oracle High Availability Services is online
--------------------------------------------------------------------------------
Name           Target  State        Server                   State details
--------------------------------------------------------------------------------
Local Resources
--------------------------------------------------------------------------------
ora.DATA.dg
               ONLINE  ONLINE       oracle-asm               STABLE
ora.LISTENER.lsnr
               ONLINE  INTERMEDIATE oracle-asm               Not All Endpoints Re
                                                             gistered,STABLE
ora.RECO.dg
               ONLINE  ONLINE       oracle-asm               STABLE
ora.asm
               ONLINE  ONLINE       oracle-asm               Started,STABLE
ora.ons
               OFFLINE OFFLINE      oracle-asm               STABLE
--------------------------------------------------------------------------------
Cluster Resources
--------------------------------------------------------------------------------
ora.cssd
      1        ONLINE  ONLINE       oracle-asm               STABLE
ora.diskmon
      1        OFFLINE OFFLINE                               STABLE
ora.evmd
      1        ONLINE  ONLINE       oracle-asm               STABLE
ora.orcl.db
      1        ONLINE  ONLINE       oracle-asm               Open,HOME=/u01/app/o
                                                             racle/product/21.0.0
                                                             /dbhome_1,STABLE
ora.orcl.orclpdb.pdb
      1        ONLINE  ONLINE       oracle-asm               STABLE
--------------------------------------------------------------------------------
Three of these states are normal and expected and do not indicate a problem:
ora.orcl.orclpdb.pdbisONLINE— the pluggable databaseORCLPDBhas its own Oracle Restart resource, separate from theora.orcl.dbcontainer resource. It opens automatically whenever the CDB starts, because its open state is saved (confirmed in Step 14).ora.LISTENER.lsnrisONLINE / INTERMEDIATEwith "Not All Endpoints Registered" — the listener in this image is deliberately bound to all interfaces (0.0.0.0:1521) so that it accepts connections no matter what private IP address AWS assigns the instance at launch. Grid Infrastructure flags a wildcard bind asINTERMEDIATErather thanONLINEbecause it cannot match the wildcard against a specific host endpoint, but the listener is fully functional: Step 6 confirms it is listening on port 1521 and serving every database service, and remote clients connect normally.ora.onsandora.diskmonareOFFLINE— Oracle Notification Service and the disk monitor are only used in a full RAC cluster (and on Exadata fordiskmon). They are inactive by design on a single instance Oracle Restart configuration and their state does not affect the database.
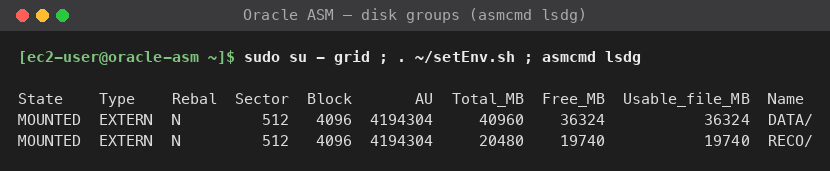
Step 5: Verify the ASM Disk Groups
The ASM disk groups are the storage that the database sits on. List them with asmcmd as the grid user:
sudo -u grid bash <<'OUTER'
. ~/setEnv.sh
asmcmd lsdg
OUTER
The expected response shows both disk groups MOUNTED with EXTERN (external) redundancy and reports the free space in each:
State    Type    Rebal  Sector  Logical_Sector  Block       AU  Total_MB  Free_MB  Req_mir_free_MB  Usable_file_MB  Offline_disks  Voting_files  Name
MOUNTED  EXTERN  N         512             512   4096  4194304     40960    36324                0           36324              0             N  DATA/
MOUNTED  EXTERN  N         512             512   4096  4194304     20480    19740                0           19740              0             N  RECO/
Usable_file_MB equals Free_MB because external redundancy keeps no mirror reserve — every free megabyte is usable for data. You can also see the raw devices that back the disk groups; the image symlinks them under /dev/oracleasm/ with stable names, owned by grid:asmadmin:
ls -l /dev/oracleasm/
Returns the two ASM disks, each pointing at the underlying NVMe device that AWS attached this boot:
total 0
lrwxrwxrwx 1 root root 10 May 31 15:56 DATA1 -> ../nvme2n1
lrwxrwxrwx 1 root root 10 May 31 15:56 RECO1 -> ../nvme3n1
Step 6: Verify the Listener is Running
Oracle's TNS listener is the network endpoint for all client connections. It is owned by the Grid Infrastructure home and managed by Oracle Restart. Confirm it is up and serving the database services as the oracle user:
sudo -u oracle bash <<'OUTER'
. ~/setEnv.sh
lsnrctl status
OUTER
The expected response confirms the listener is listening on TCP port 1521 and that the ORCL container service, the orclpdb pluggable database service, and the +ASM services have registered with it:
LSNRCTL for Linux: Version 21.0.0.0.0 - Production on 31-MAY-2026 15:58:33

Copyright (c) 1991, 2021, Oracle.  All rights reserved.

Connecting to (ADDRESS=(PROTOCOL=tcp)(HOST=)(PORT=1521))
STATUS of the LISTENER
------------------------
Alias                     LISTENER
Version                   TNSLSNR for Linux: Version 21.0.0.0.0 - Production
Start Date                31-MAY-2026 15:26:51
Uptime                    0 days 0 hr. 31 min. 42 sec
Trace Level               off
Security                  ON: Local OS Authentication
SNMP                      OFF
Listener Parameter File   /u01/app/21.0.0/grid/network/admin/listener.ora
Listener Log File         /u01/app/grid/diag/tnslsnr/oracle-asm/listener/alert/log.xml
Listening Endpoints Summary...
  (DESCRIPTION=(ADDRESS=(PROTOCOL=tcp)(HOST=0.0.0.0)(PORT=1521)))
  (DESCRIPTION=(ADDRESS=(PROTOCOL=ipc)(KEY=EXTPROC1521)))
Services Summary...
Service "+ASM" has 1 instance(s).
  Instance "+ASM", status READY, has 1 handler(s) for this service...
Service "+ASM_DATA" has 1 instance(s).
  Instance "+ASM", status READY, has 1 handler(s) for this service...
Service "+ASM_RECO" has 1 instance(s).
  Instance "+ASM", status READY, has 1 handler(s) for this service...
Service "ORCL" has 1 instance(s).
  Instance "ORCL", status READY, has 1 handler(s) for this service...
Service "ORCLXDB" has 1 instance(s).
  Instance "ORCL", status READY, has 1 handler(s) for this service...
Service "orclpdb" has 1 instance(s).
  Instance "ORCL", status READY, has 1 handler(s) for this service...
The command completed successfully
The orclpdb service is the one your applications use — it routes connections into the pluggable database. ORCL is the CDB root service, used for administration. The kernel level confirmation that port 1521 is open on all interfaces:
sudo ss -tlnp | grep 1521
Returns:
LISTEN 0 128 0.0.0.0:1521 0.0.0.0:* users:(("tnslsnr",pid=36293,fd=9))
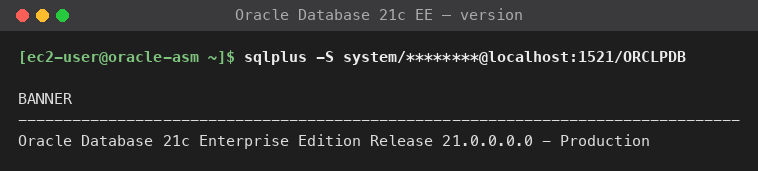
Step 7: Connect Locally with SQL*Plus
The simplest way to talk to the database from the instance is the SQL*Plus client that ships with the Oracle Database installation. In 21c your application schemas live inside the pluggable database, so connect to the ORCLPDB service. Read the SYSTEM password from the credentials file, then connect over the listener:
SYSPWD=$(sudo awk -F= '/^SYSTEM_PASSWORD=/{print $2}' /root/oracle-db-credentials.txt | head -1)
sudo -u oracle env SYSPWD="$SYSPWD" bash <<'OUTER'
. ~/setEnv.sh
sqlplus -S system/"$SYSPWD"@localhost:1521/ORCLPDB <<'SQL'
SET PAGESIZE 50 LINESIZE 200
SELECT banner FROM v$version WHERE banner LIKE 'Oracle%';
EXIT;
SQL
OUTER
The expected response confirms the installed Oracle Database release:
BANNER
--------------------------------------------------------------------------------
Oracle Database 21c Enterprise Edition Release 21.0.0.0.0 - Production
You can also connect interactively with operating system authentication, which needs no password. Switch to the oracle OS user, source its environment, and run sqlplus. Operating system authentication lands you in the CDB root; switch into the pluggable database with ALTER SESSION SET CONTAINER:
sudo su - oracle
. ~/setEnv.sh
sqlplus / as sysdba
ALTER SESSION SET CONTAINER = ORCLPDB;
In an interactive session, type EXIT; to leave SQL*Plus.
Step 8: Run a Sample Query
Create a small table in the pluggable database, insert two rows, read them back, then drop the table. This exercise confirms that the database is writable on ASM and that the SYSTEM user has the standard DDL grants inside ORCLPDB:
SYSPWD=$(sudo awk -F= '/^SYSTEM_PASSWORD=/{print $2}' /root/oracle-db-credentials.txt | head -1)
sudo -u oracle env SYSPWD="$SYSPWD" bash <<'OUTER'
. ~/setEnv.sh
sqlplus -S system/"$SYSPWD"@localhost:1521/ORCLPDB <<'SQL'
SET PAGESIZE 50 LINESIZE 200
CREATE TABLE demo_users (id NUMBER, name VARCHAR2(50), created_at DATE);
INSERT INTO demo_users VALUES (1, 'Alice', SYSDATE);
INSERT INTO demo_users VALUES (2, 'Bob',   SYSDATE);
COMMIT;
SELECT id, name, TO_CHAR(created_at,'YYYY-MM-DD') AS created_at FROM demo_users ORDER BY id;
DROP TABLE demo_users;
EXIT;
SQL
OUTER
Expected response:
Table created.

1 row created.

1 row created.

Commit complete.

        ID NAME                                               CREATED_AT
---------- -------------------------------------------------- ----------
         1 Alice                                              2026-05-31
         2 Bob                                                2026-05-31

Table dropped.
Step 9: Connect from a Remote Machine
The listener accepts remote connections on port 1521 over TCP. From a host with sqlplus installed (the Oracle Instant Client tarball contains it) and with port 1521 reachable through your security group, supply the SYSTEM password from /root/oracle-db-credentials.txt and connect to the pluggable database using Oracle's "Easy Connect" syntax:
sqlplus system/<SYSTEM_PASSWORD>@<public-ip>:1521/ORCLPDB
The connection string <public-ip>:1521/ORCLPDB is equivalent to the following TNS descriptor, which you would use from an application that reads a tnsnames.ora file:
ORCLPDB =
  (DESCRIPTION =
    (ADDRESS = (PROTOCOL = TCP)(HOST = <public-ip>)(PORT = 1521))
    (CONNECT_DATA =
      (SERVER = DEDICATED)
      (SERVICE_NAME = ORCLPDB)
    )
  )
To perform CDB level administration instead, connect to the ORCL service in the same way. Day to day application traffic should always target ORCLPDB.
Or use SQL Developer
Oracle SQL Developer is a free graphical client published by Oracle. After downloading and launching SQL Developer locally, create a new connection with the values below:
| Setting | Value |
|---|---|
| Connection Name | cloudimg-oracle-21c-ee-asm (or any name you choose) |
| Authentication | Default |
| Username | SYSTEM |
| Password | Value of SYSTEM_PASSWORD from /root/oracle-db-credentials.txt |
| Connection Type | Basic |
| Role | default |
| Hostname | Your instance public IP address |
| Port | 1521 |
| Service Name | ORCLPDB |
Click Test, and if the configured security group allows inbound 1521 from your IP, the status bar reports Success. Click Connect to open a SQL Worksheet. Set the Service Name to ORCLPDB for application work, or to ORCL for CDB administration.
Step 10: Manage the Database with Oracle Restart
Because ASM is managed by Grid Infrastructure, the database is not controlled by a systemd unit. Instead, Oracle Restart starts and stops the database, and you manage it with the srvctl utility as the oracle user. Check its registration and current status:
sudo -u oracle bash <<'OUTER'
. ~/setEnv.sh
srvctl status database -d ORCL
srvctl config database -d ORCL
OUTER
The expected response confirms the database is running, that Oracle Restart will start it automatically (Management policy: AUTOMATIC), and that it depends on both disk groups:
Database is running.
Database unique name: ORCL
Database name: ORCL
Oracle home: /u01/app/oracle/product/21.0.0/dbhome_1
Oracle user: oracle
Spfile: +DATA/ORCL/PARAMETERFILE/spfile.270.1234711423
Password file:
Domain:
Start options: open
Stop options: immediate
Database role: PRIMARY
Management policy: AUTOMATIC
Disk Groups: DATA,RECO
Services:
Database instance: ORCL
srvctl manages the container database ORCL. When the CDB opens, the pluggable database ORCLPDB opens with it automatically because its open state is saved (Step 14 verifies this). To stop the database cleanly (the ASM instance and listener stay up):
sudo -u oracle bash -c '. ~/setEnv.sh; srvctl stop database -d ORCL'
To start it again:
sudo -u oracle bash -c '. ~/setEnv.sh; srvctl start database -d ORCL'
To stop or start the entire Grid Infrastructure stack — ASM, listener, and database together — use crsctl as root: crsctl stop has and crsctl start has. The High Availability Services daemon is itself started at boot by the systemd unit oracle-ohasd.service, which is the only Oracle related systemd unit on the image besides the one shot firstboot service.
There is also a one shot unit oracle-db-21c-firstboot.service whose only job is to rotate credentials on the very first boot. It is gated on its sentinel file /var/lib/cloudimg/oracle-db-21c-firstboot.done and exits immediately on every subsequent boot.
Step 11: Storage Layout
The binaries live on the ext4 /u01 volume; the database data lives on the ASM disk groups. Confirm the binaries volume:
df -h /u01
Returns the dedicated 50 GiB gp3 volume that holds both Oracle homes and the inventory:
Filesystem      Size  Used Avail Use% Mounted on
/dev/nvme1n1     49G   19G   31G  38% /u01
The main directories on /u01:
/u01/app/21.0.0/grid— the Grid Infrastructure (Oracle Restart / ASM) home, owned by thegriduser/u01/app/oracle/product/21.0.0/dbhome_1— the Oracle Database 21c home, owned by theoracleuser/u01/app/oracle— the databaseORACLE_BASEwith the diagnostic repository under/u01/app/oracle/diag/u01/app/oraInventory— the Oracle Universal Installer inventory/root/oracle-db-credentials.txt— per instance passwords, mode 0600 root only
The datafiles themselves are not on /u01 — they are inside ASM. Confirm where each file lives by querying the data dictionary as SYSDBA. Run this from the CDB root so you see the datafiles for every container at once:
sudo -u oracle bash <<'OUTER'
. ~/setEnv.sh
sqlplus -S / as sysdba <<'SQL'
SET PAGESIZE 100 LINESIZE 200
COLUMN name FORMAT A80
COLUMN member FORMAT A80
SELECT name FROM v$datafile ORDER BY file#;
SELECT name FROM v$controlfile;
SELECT member FROM v$logfile ORDER BY group#, member;
EXIT;
SQL
OUTER
Every datafile is on +DATA, the control file is multiplexed across +DATA and +RECO, and each online redo log group has one member on +DATA and one on +RECO — so the loss of a single disk group does not lose both copies of the control file or the redo. In a 21c multitenant database the datafiles are grouped by container: the files directly under +DATA/ORCL/DATAFILE/ belong to the CDB root, and each pluggable database (the PDB$SEED template and your ORCLPDB) gets its own GUID named subdirectory:
NAME
--------------------------------------------------------------------------------
+DATA/ORCL/DATAFILE/system.257.1234711125
+DATA/ORCL/DATAFILE/sysaux.258.1234711171
+DATA/ORCL/DATAFILE/undotbs1.259.1234711195
+DATA/ORCL/C8209F27C6B26005E053362EE80AE60E/DATAFILE/system.266.1234711223
+DATA/ORCL/C8209F27C6B26005E053362EE80AE60E/DATAFILE/sysaux.267.1234711223
+DATA/ORCL/DATAFILE/users.260.1234711197
+DATA/ORCL/C8209F27C6B26005E053362EE80AE60E/DATAFILE/undotbs1.268.1234711223
+DATA/ORCL/53230A5D054484F0E06312521FAC83D9/DATAFILE/system.272.1234711529
+DATA/ORCL/53230A5D054484F0E06312521FAC83D9/DATAFILE/sysaux.273.1234711529
+DATA/ORCL/53230A5D054484F0E06312521FAC83D9/DATAFILE/undotbs1.271.1234711529
+DATA/ORCL/53230A5D054484F0E06312521FAC83D9/DATAFILE/users.275.1234711551

11 rows selected.

NAME
--------------------------------------------------------------------------------
+DATA/ORCL/CONTROLFILE/current.261.1234711205
+RECO/ORCL/CONTROLFILE/current.256.1234711205

MEMBER
--------------------------------------------------------------------------------
+DATA/ORCL/ONLINELOG/group_1.262.1234711207
+RECO/ORCL/ONLINELOG/group_1.257.1234711211
+DATA/ORCL/ONLINELOG/group_2.263.1234711207
+RECO/ORCL/ONLINELOG/group_2.259.1234711211
+DATA/ORCL/ONLINELOG/group_3.264.1234711207
+RECO/ORCL/ONLINELOG/group_3.258.1234711211

6 rows selected.
You can browse the same files from the ASM side with asmcmd as the grid user:
sudo -u grid bash <<'OUTER'
. ~/setEnv.sh
echo "--- +DATA/ORCL/DATAFILE/ (CDB root) ---"
asmcmd ls +DATA/ORCL/DATAFILE/
echo "--- +DATA/ORCL/ (containers + structure) ---"
asmcmd ls +DATA/ORCL/
OUTER
The CDB root datafiles appear directly under DATAFILE/, and the container GUID directories (one per pluggable database) sit alongside the CONTROLFILE, ONLINELOG, PARAMETERFILE and TEMPFILE directories:
--- +DATA/ORCL/DATAFILE/ (CDB root) ---
SYSAUX.258.1234711171
SYSTEM.257.1234711125
UNDOTBS1.259.1234711195
USERS.260.1234711197
--- +DATA/ORCL/ (containers + structure) ---
5322F931C6987D1BE06312521FACA5A9/
53230A5D054484F0E06312521FAC83D9/
C8209F27C6B26005E053362EE80AE60E/
CONTROLFILE/
DATAFILE/
ONLINELOG/
PARAMETERFILE/
TEMPFILE/
Step 12: Enterprise Edition Options
Enterprise Edition unlocks the full Oracle option catalogue. The licensable options shipped with this image are:
| Option | Status | Purpose |
|---|---|---|
| Partitioning | enabled | Range, list, hash, and composite partitioning on tables and indexes |
| Advanced Compression | enabled | Compress tablespaces, LOBs, backups, and Data Pump exports |
| Advanced Security | enabled | Transparent Data Encryption, Network Encryption, Data Redaction |
| Diagnostics Pack | enabled | AWR snapshots, ASH reports, SQL Monitor, Real Time SQL Monitoring |
| Tuning Pack | enabled | SQL Tuning Advisor, SQL Access Advisor, SQL Profiles |
| Data Guard | enabled | Active Standby, Far Sync, role transitions |
| Database Vault | available | Realms, command rules, factor based access control |
| Label Security | available | Row level labels and mediation policies |
| Real Application Testing | available | Database Replay, SQL Performance Analyzer |
| Spatial | available | SDO_GEOMETRY, network and property graph |
| OLAP | available | Multidimensional analytic workspaces |
Confirm that Enterprise Edition options are visible in the running database by querying V$OPTION:
sudo -u oracle bash <<'OUTER'
. ~/setEnv.sh
sqlplus -S / as sysdba <<'SQL'
SET PAGESIZE 100 LINESIZE 200
COLUMN parameter FORMAT A40
SELECT parameter, value FROM v$option
WHERE parameter IN ('Partitioning','Advanced Compression','Advanced replication','Real Application Clusters','Data Mining')
ORDER BY parameter;
EXIT;
SQL
OUTER
Returns:
PARAMETER                                VALUE
---------------------------------------- ----------------------------------------
Advanced Compression                     TRUE
Advanced replication                     TRUE
Data Mining                              TRUE
Partitioning                             TRUE
Real Application Clusters                FALSE
TRUE means the option is linked into the running binary and licensed under Enterprise Edition. Real Application Clusters reports FALSE because this is a single instance Oracle Restart configuration — ASM and Oracle Restart give you the production storage stack without the multi node RAC option, which is the right shape for a single EC2 instance. Note that licensing of paid options (Advanced Compression, Diagnostics + Tuning Packs, Advanced Security, Partitioning) is separate from technical availability in the binary, and you must hold appropriate Oracle licensing before using a chargeable option in production.
Step 13: Use Partitioning
Partitioning is an Enterprise Edition option. Create a range partitioned table in the pluggable database, insert rows that land in different partitions, and count the rows in each:
SYSPWD=$(sudo awk -F= '/^SYSTEM_PASSWORD=/{print $2}' /root/oracle-db-credentials.txt | head -1)
sudo -u oracle env SYSPWD="$SYSPWD" bash <<'OUTER'
. ~/setEnv.sh
sqlplus -S system/"$SYSPWD"@localhost:1521/ORCLPDB <<'SQL'
SET PAGESIZE 100 LINESIZE 200
CREATE TABLE sales_by_year (id NUMBER, region VARCHAR2(20), amount NUMBER, sale_date DATE)
PARTITION BY RANGE (sale_date) (
  PARTITION p2024 VALUES LESS THAN (TO_DATE('2025-01-01','YYYY-MM-DD')),
  PARTITION p2025 VALUES LESS THAN (TO_DATE('2026-01-01','YYYY-MM-DD')),
  PARTITION p2026 VALUES LESS THAN (MAXVALUE)
);
INSERT INTO sales_by_year VALUES (1,'EU',100,TO_DATE('2024-06-01','YYYY-MM-DD'));
INSERT INTO sales_by_year VALUES (2,'NA',200,TO_DATE('2025-06-01','YYYY-MM-DD'));
INSERT INTO sales_by_year VALUES (3,'AP',300,TO_DATE('2026-06-01','YYYY-MM-DD'));
COMMIT;
SELECT 'p2024' AS partition_name, COUNT(*) AS rows_in_part FROM sales_by_year PARTITION (p2024)
UNION ALL SELECT 'p2025', COUNT(*) FROM sales_by_year PARTITION (p2025)
UNION ALL SELECT 'p2026', COUNT(*) FROM sales_by_year PARTITION (p2026);
DROP TABLE sales_by_year PURGE;
EXIT;
SQL
OUTER
Expected response shows each of the three partitions holding the one row that falls in its date range:
PARTI ROWS_IN_PART
----- ------------
p2024            1
p2025            1
p2026            1
Step 14: Confirm the Release and the Pluggable Database
This image ships Oracle Database 21c at the base 21.3.0.0.0 release. List the interim patches applied to the Oracle home with the OPatch utility:
sudo -u oracle bash <<'OUTER'
. ~/setEnv.sh
$ORACLE_HOME/OPatch/opatch lspatches
OUTER
A base release reports no interim patches:
There are no Interim patches installed in this Oracle Home "/u01/app/oracle/product/21.0.0/dbhome_1".

OPatch succeeded.
The running instance reports its release through V$INSTANCE:
sudo -u oracle bash <<'OUTER'
. ~/setEnv.sh
sqlplus -S / as sysdba <<'SQL'
SET HEADING OFF FEEDBACK OFF PAGESIZE 0
SELECT version_full FROM v$instance;
EXIT;
SQL
OUTER
Returns the base 21c release identifier:
21.3.0.0.0
Oracle publishes quarterly Release Updates for 21c on My Oracle Support; the security section below explains how to apply the latest one for a production deployment. Finally, confirm the multitenant layout — that the pluggable database is open and that its open state is saved, which is what makes it re open automatically every time the CDB restarts:
sudo -u oracle bash <<'OUTER'
. ~/setEnv.sh
sqlplus -S / as sysdba <<'SQL'
SET PAGESIZE 100 LINESIZE 120
COLUMN name FORMAT A12
COLUMN con_name FORMAT A12
COLUMN state FORMAT A8
SELECT con_id, name, open_mode FROM v$pdbs ORDER BY con_id;
SELECT con_name, state FROM dba_pdb_saved_states;
EXIT;
SQL
OUTER
PDB$SEED is the read only template Oracle clones new PDBs from, and ORCLPDB is your application database, open read write. The saved state row confirms ORCLPDB will auto open on restart:
    CON_ID NAME         OPEN_MODE
---------- ------------ ----------
         2 PDB$SEED     READ ONLY
         3 ORCLPDB      READ WRITE

CON_NAME     STATE
------------ --------
ORCLPDB      OPEN
Step 15: Rotate the SYSTEM and SYS Passwords
For a production deployment, rotate the SYSTEM and SYS passwords that the firstboot service generated. SYSTEM and SYS are common users, so connect as SYSDBA with operating system authentication at the CDB root and issue ALTER USER — the change applies across the container and its PDBs:
sudo -u oracle bash -c '
  . ~/setEnv.sh
  sqlplus -S / as sysdba <<SQL
ALTER USER SYSTEM IDENTIFIED BY "<new-system-password>";
ALTER USER SYS    IDENTIFIED BY "<new-sys-password>";
EXIT;
SQL'
To rotate the ASM SYS password, do the same as the grid user connecting as sysasm. Store the new values in your secrets manager immediately. The file /root/oracle-db-credentials.txt is the per instance bootstrap record and should not be considered your source of truth after the first rotation.
Step 16: Grow ASM Storage Online
One of the operational advantages of ASM is online storage management: you can add capacity to a disk group without downtime. To grow +DATA, attach a new EBS volume to the instance, apply the same grid:asmadmin ownership the image already applies to its ASM disks, and add it to the disk group. ASM automatically rebalances existing data across the new disk.
# 1. Attach a new gp3 volume to the instance from the AWS console or CLI, e.g. as /dev/sdi.
# 2. On the instance, set ASM ownership on the raw device (replace <device> with the new NVMe name):
sudo chown grid:asmadmin /dev/<device>
sudo chmod 0660 /dev/<device>
# 3. Add it to +DATA as the grid user:
sudo -u grid bash -c '. ~/setEnv.sh; asmcmd lsdg'
sudo -u grid bash -c '. ~/setEnv.sh; sqlplus -S / as sysasm <<SQL
ALTER DISKGROUP DATA ADD DISK "/dev/<device>";
SQL'
ASM begins a rebalance as soon as the disk is added; monitor it with asmcmd lsop. To make the new ownership survive reboots, add the device to the image's udev rule. For most workloads it is simpler to grow the existing EBS volume in place from the AWS console and then run ALTER DISKGROUP DATA RESIZE ALL; so ASM picks up the larger device.
Step 17: Server Components
| Component | Version | Source |
|---|---|---|
| Oracle Grid Infrastructure (Oracle Restart + ASM) | 21c (21.3.0.0.0 base release) | Oracle 21.3.0.0.0 GI media |
| Oracle Database | 21c Innovation Release, Enterprise Edition (21.3.0.0.0 base release) | Oracle 21.3.0.0.0 DB media |
| Oracle Linux | 8 | cloudimg golden base image |
| SQL*Plus / asmcmd | 21c | bundled in the Oracle homes |
| Oracle Restart daemon | oracle-ohasd.service |
baked into the image |
| Firstboot unit | oracle-db-21c-firstboot.service |
baked into the image |
Step 18: Backup Recommendations
The key difference from a filesystem based image is that the datafiles are inside ASM, so a single filesystem snapshot of /u01 does not capture your data — /u01 holds only the binaries. Use one of the following:
- Oracle Recovery Manager (RMAN) is the recommended approach, because it understands ASM and the multitenant architecture natively. Put the database in archivelog mode and back up to the
+RECOdisk group or to an external destination. RMAN can back up the whole container database in one command, or an individual pluggable database withBACKUP PLUGGABLE DATABASE ORCLPDB;. It integrates with the Fast Recovery Area already configured on+RECOand supports incremental backups. - Crash consistent EBS snapshots require snapshotting the
+DATAand+RECOvolumes together and at the same moment, because the control file and redo are split across both. The safest way to get a consistent set is to stop the database first, snapshot all data volumes, then start it again:
sudo -u oracle bash -c '. ~/setEnv.sh; srvctl stop database -d ORCL'
# snapshot the +DATA and +RECO EBS volumes (and optionally /u01) here, e.g.:
aws ec2 create-snapshot --volume-id <vol-id-of-+DATA> --description "orcl-data $(date +%F)"
aws ec2 create-snapshot --volume-id <vol-id-of-+RECO> --description "orcl-reco $(date +%F)"
sudo -u oracle bash -c '. ~/setEnv.sh; srvctl start database -d ORCL'
For production, prefer RMAN with archivelog mode so you can take hot backups without stopping the database.
Step 19: Security Recommendations
Oracle Database 21c is an Innovation Release. Apply the following recommendations on a production deployment:
- Restrict port 1521 in the EC2 security group to your application subnets and management network. Never open the listener to the public internet.
- Rotate the SYSTEM, SYS and ASM passwords using the rotation step above, and store the new values in your secrets manager.
- Create per-application schema users inside
ORCLPDBwith only the grants the application needs, instead of usingSYSTEMfor application traffic. Keep application objects in the pluggable database, not the CDB root. - Enable Transparent Data Encryption (TDE) on application tablespaces. TDE is bundled with Enterprise Edition's Advanced Security option and is the recommended path for data at rest encryption; it composes cleanly with ASM and with the multitenant keystore model.
- Apply the latest Oracle Database Release Update for 21c, by downloading the RU bundle from My Oracle Support and applying it with OPatch and datapatch to both the Grid and Database homes. Oracle publishes a new RU on a quarterly cadence; this image ships at the 21.3.0.0.0 base release.
- Enable Oracle Unified Auditing if your compliance regime requires it.
- Configure Oracle Native Network Encryption in
sqlnet.oraif client traffic crosses untrusted networks. - Apply OS security patches by running
sudo dnf update -yon a regular maintenance schedule. Reboot the instance after a kernel update — Oracle Restart re mounts the ASM disk groups, reopens the database, and re opens theORCLPDBpluggable database automatically on the way back up. - Take regular RMAN backups (or consistent EBS snapshots of both ASM volumes) and store them in a separate account or Region.
- Limit SSH access to a small management CIDR; do not leave port 22 open to
0.0.0.0/0in production.
Screenshots
The following screenshots are taken from a running Oracle Database 21c EE with ASM instance launched from this image.
Support
cloudimg provides 24/7/365 expert technical support for this image. Guaranteed response within 24 hours, one hour average for critical issues. Contact support@cloudimg.co.uk.
For general Oracle Database and ASM questions, performance tuning, and migration help, consult the official Oracle Database 21c documentation set at https://docs.oracle.com/en/database/oracle/oracle-database/21/index.html and the Oracle Automatic Storage Management Administrator's Guide.
Oracle, Oracle Database, Oracle ASM, and related marks are trademarks or registered trademarks of Oracle Corporation. Use of them does not imply any affiliation with or endorsement by Oracle Corporation.