Oracle WebLogic 15c on Linux User Guide
Overview
This guide covers the deployment and configuration of Oracle WebLogic Server 15c (15.1.1.0.0) on Linux using cloudimg AMIs from the AWS Marketplace.
What's included in this AMI:
- Oracle WebLogic Server 15c (15.1.1.0.0) with Jakarta EE 9.1 support
- Oracle JDK 21 LTS
- Pre-configured WebLogic domain with Admin Server on port 7001
- Systemd services for automatic startup
- NodeManager for server lifecycle management
- AWS CLI v2, Systems Manager Agent, and CloudWatch Agent
Supported Operating Systems: Oracle Linux 9, Oracle Linux 8, AlmaLinux 9, AlmaLinux 8, Rocky Linux 9, Rocky Linux 8
Important change in WebLogic 15c: The traditional web-based Administration Console has been removed in WebLogic Server 15.1.1. Server administration is now performed using the WebLogic Remote Console (a desktop application) or the REST Management API. See the Administration section below for details.
Prerequisites
Before launching this AMI, ensure you have:
- An active AWS account
- An active subscription to the Oracle WebLogic 15c on Linux listing on AWS Marketplace
- Familiarity with EC2 instance management and SSH
Recommended Instance Type: m5.large (2 vCPU, 8 GB RAM) or larger for production workloads.
Step 1: Launch the AMI
- Navigate to the AWS Marketplace and search for "Oracle WebLogic 15c cloudimg"
- Click Continue to Subscribe, accept the terms, then Continue to Configuration
- Select your preferred Region and Software Version
- Click Continue to Launch
- Choose Launch through EC2 for full control over instance configuration
- Select your instance type (
m5.largerecommended) - Configure storage: 50 GB gp3 minimum recommended
- Configure your Security Group with the following inbound rules:
| Port | Protocol | Source | Purpose |
|---|---|---|---|
| 22 | TCP | Your IP | SSH access |
| 7001 | TCP | Your IP | WebLogic Server / REST API |
| 7002 | TCP | Your IP | WebLogic Server (SSL) |
| 5556 | TCP | Your IP | NodeManager |
Important: Restrict ports 7001, 7002, and 5556 to your IP address only. Do not open these to 0.0.0.0/0.
Step 2: Connect via SSH
Once your instance is running, connect using SSH:
ssh -i your-key.pem ec2-user@<public-ip-address>
Replace your-key.pem with the path to your EC2 key pair and <public-ip-address> with your instance's public IP.
Step 3: Verify Boot Configuration
The AMI comes with boot.properties pre-configured so WebLogic Server starts automatically in production mode without interactive credential prompts. No manual setup is required.
If you need to recreate boot.properties after a password change:
sudo su - oracle

cat > $DOMAIN_HOME/servers/AdminServer/security/boot.properties << EOF
username=weblogic
password=YourNewPassword
EOF

chmod 600 $DOMAIN_HOME/servers/AdminServer/security/boot.properties
WebLogic encrypts this file automatically on the next startup.
Step 4: Start WebLogic Server
Start the WebLogic Server using the systemd service:
sudo systemctl start weblogic.service
Wait approximately 60 to 90 seconds for the server to fully start. You can monitor the startup progress:
sudo journalctl -u weblogic.service -f
Look for the message Server state changed to RUNNING to confirm the server is ready.
Step 5: Verify the Installation
Verify the WebLogic installation and server status:
# Check JDK version
/u01/java/jdk-21/bin/java -version

# Check WebLogic home exists
ls /u01/app/oracle/product/wlserver/

# Check domain exists
ls /u01/app/oracle/product/user_projects/domains/base_domain/config/config.xml

# Check services are enabled
systemctl is-enabled weblogic.service
systemctl is-enabled nodemanager.service

# Test the REST API
curl -s -u weblogic:<your-password> http://localhost:7001/management/weblogic/latest/serverRuntime?fields=name,state
Step 6: Access the Server
Navigate to http://<public-ip>:7001/console/ in your browser. You will see the Welcome to WebLogic Server 15.1.1 page:
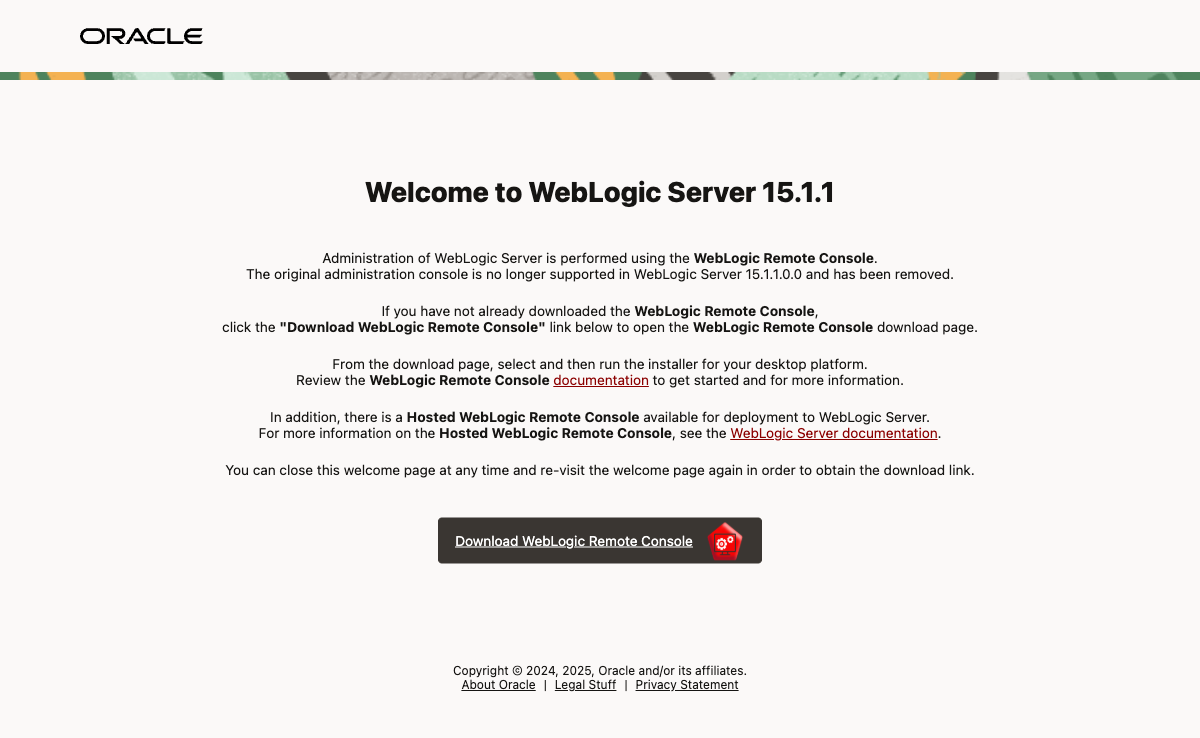
This is the expected landing page. In WebLogic 15c, the traditional web-based Admin Console has been removed and replaced by the WebLogic Remote Console desktop application.
To verify your credentials are working, navigate to the Sign In page:
http://<public-ip>:7001/console/signin/
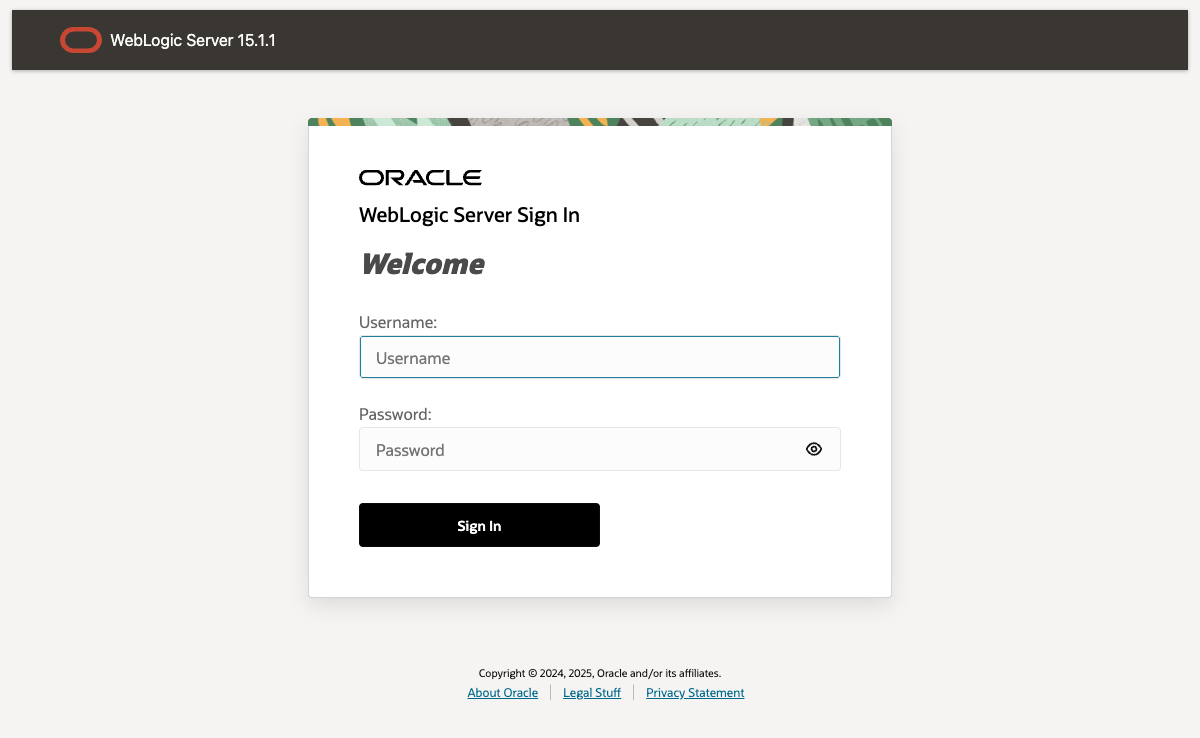
Enter your username and password from CREDENTIALS.txt and click Sign In. A successful login will redirect you back to the Welcome page, confirming your credentials are correct.
You can also verify credentials via the REST API from your terminal:
curl -u weblogic:<your-password> http://<public-ip>:7001/management/weblogic/latest/serverRuntime?fields=name,state
A successful response returns "state": "RUNNING". A 401 Unauthorized means incorrect credentials.
For day-to-day administration, use one of the following options (see Administration section below):
- WebLogic Remote Console — desktop application (recommended)
- REST Management API — for scripting and automation
- WLST — command-line scripting tool
Retrieve your credentials:
Your admin credentials are needed for the Remote Console, REST API, and WLST. The password is unique to each AMI instance. To retrieve it, SSH into your instance and run:
sudo cat /home/oracle/CREDENTIALS.txt
- Username:
weblogic - Password: (unique per instance, see CREDENTIALS.txt)
Important: Change the password after first use and delete the credentials file. See the Security Hardening section below.
Administration with WebLogic Remote Console
WebLogic 15c has replaced the traditional web-based Administration Console with the WebLogic Remote Console, a modern desktop application.
Option 1: WebLogic Remote Console (Desktop Application)
- Download the WebLogic Remote Console from GitHub Releases
- Install the application on your desktop (available for Windows, macOS, and Linux)
- Launch the Remote Console and connect to your WebLogic Server:
- URL:
http://<public-ip>:7001 - Username:
weblogic - Password: Your admin password
The Remote Console provides a full graphical interface for managing domains, servers, deployments, data sources, JMS, and security.
Option 2: REST Management API
WebLogic 15c provides a comprehensive REST API for server management:
# Get server runtime status
curl -s -u weblogic:<your-password> \
  http://localhost:7001/management/weblogic/latest/serverRuntime?fields=name,state

# Get domain configuration
curl -s -u weblogic:<your-password> \
  http://localhost:7001/management/weblogic/latest/domainConfig

# Get deployed applications
curl -s -u weblogic:<your-password> \
  http://localhost:7001/management/weblogic/latest/domainRuntime/serverRuntimes/AdminServer/applicationRuntimes
For full REST API documentation, see the WebLogic REST API Reference.
Option 3: WLST Command Line
The WebLogic Scripting Tool (WLST) remains available for command-line administration:
sudo su - oracle
$WL_HOME/common/bin/wlst.sh

# Connect to running server
connect('weblogic', 'YourPasswordFromCredentials', 't3://localhost:7001')

# Check server status
serverRuntime()
print('Server State: ' + cmo.getState())
Directory Structure
| Path | Description |
|---|---|
/u01/java/jdk-21/ |
Oracle JDK 21 LTS (JAVA_HOME) |
/u01/app/oracle/product/ |
Middleware Home (MW_HOME / ORACLE_HOME) |
/u01/app/oracle/product/wlserver/ |
WebLogic Server Home (WL_HOME) |
/u01/app/oracle/product/oracle_common/ |
Oracle Common Home |
/u01/app/oracle/product/user_projects/domains/base_domain/ |
Default Domain (DOMAIN_HOME) |
/u01/app/oraInventory/ |
Oracle Inventory |
Environment variables are pre-configured in /home/oracle/.bash_profile:
export JAVA_HOME=/u01/java/jdk-21
export MW_HOME=/u01/app/oracle/product
export WL_HOME=/u01/app/oracle/product/wlserver
export DOMAIN_HOME=/u01/app/oracle/product/user_projects/domains/base_domain
To use them, switch to the oracle user:
sudo su - oracle
Managing WebLogic Services
The AMI includes systemd services for WebLogic Server and NodeManager:
# Start WebLogic Server
sudo systemctl start weblogic.service

# Stop WebLogic Server
sudo systemctl stop weblogic.service

# Check WebLogic Server status
sudo systemctl status weblogic.service

# Start NodeManager
sudo systemctl start nodemanager.service

# Check NodeManager status
sudo systemctl status nodemanager.service

# View WebLogic logs
sudo journalctl -u weblogic.service -f
Both services are enabled for automatic startup on boot.
Creating Additional Domains
To create a new WebLogic domain, use the WLST scripting tool:
sudo su - oracle

# Launch WLST
$WL_HOME/common/bin/wlst.sh

# In the WLST shell:
readTemplate('/u01/app/oracle/product/wlserver/common/templates/wls/wls.jar')
cd('Servers/AdminServer')
set('ListenAddress', '')
set('ListenPort', 7001)
cd('/')
cd('Security/base_domain/User/weblogic')
cmo.setPassword('YourSecurePassword')
setOption('ServerStartMode', 'prod')
writeDomain('/u01/app/oracle/product/user_projects/domains/your_domain_name')
closeTemplate()
exit()
Remember to create a boot.properties file for any new domain you create in production mode.
Security Hardening
Change the Default Admin Password
Use WLST to change the admin password:
sudo su - oracle
$WL_HOME/common/bin/wlst.sh

connect('weblogic', 'YourPasswordFromCredentials', 't3://localhost:7001')
cd('/SecurityConfiguration/base_domain/Realms/myrealm/AuthenticationProviders/DefaultAuthenticator')
cd('Users/weblogic')
cmo.setPassword('YourNewSecurePassword')
disconnect()
exit()
After changing the password, update the boot.properties file:
cat > $DOMAIN_HOME/servers/AdminServer/security/boot.properties << EOF
username=weblogic
password=YourNewSecurePassword
EOF
Restart the server for the change to take effect.
Restrict Network Access
Ensure your Security Group only allows access from trusted IP addresses:
- Port 22 (SSH): Your IP only
- Port 7001/7002 (WebLogic Server): Your IP or VPN CIDR only
- Port 5556 (NodeManager): Internal VPC traffic only
Troubleshooting
WebLogic Server fails to start
Check the server log:
cat /u01/app/oracle/product/user_projects/domains/base_domain/servers/AdminServer/logs/AdminServer.log
Common causes:
- Insufficient memory: Use an instance type with at least 4 GB RAM
- Port conflict: Ensure port 7001 is not in use by another process
- Missing boot.properties: In production mode, the server requires a boot.properties file (see Step 3)
- Java heap size: Edit setDomainEnv.sh to increase memory allocation
Cannot connect to WebLogic Server
- Verify the server is running:
sudo systemctl status weblogic.service - Check Security Group allows inbound traffic on port 7001 from your IP
- Verify the instance has a public IP or you are connecting via VPN
- Check if the server is still starting:
sudo journalctl -u weblogic.service -f
SSH connection timeout
- Verify the instance is in a running state in the EC2 console
- Check Security Group allows inbound SSH (port 22) from your IP
- Ensure you are using the correct key pair and username (
ec2-user)
NodeManager connection issues
# Check NodeManager status
sudo systemctl status nodemanager.service

# View NodeManager logs
cat /u01/app/oracle/product/user_projects/domains/base_domain/nodemanager/nodemanager.log
Oracle WebLogic 15c Key Features
- Jakarta EE 9.1 Platform: Full support for the
jakarta.*namespace - JDK 21 LTS: Latest long term support Java runtime
- WebLogic Remote Console: Modern desktop application replacing the traditional web console
- Dynamic Clustering: Elastic server instances for horizontal scaling
- Zero Downtime Patching: Apply patches without service interruption
- Simplified JMS: Streamlined cluster JMS configuration
- XA Transactions: Without transaction TLog writes for improved performance
- OIDC Support: OpenID Connect token handling
- Certificate Management Service: Technical preview for automated certificate lifecycle
Support
cloudimg provides 24/7/365 support for all AWS Marketplace products.
- Email: support@cloudimg.co.uk
- Response Time: Guaranteed 24 hour response
- Support Plans: View support tiers
- Oracle Documentation: WebLogic 15.1.1 Documentation
- WebLogic Remote Console: Download and Documentation