Pingvin Share on AWS User Guide
Overview
This image runs Pingvin Share, a self-hosted file-sharing platform that lets you upload files and generate secure share links with optional passwords, expiration dates and view limits, so recipients can download them without needing an account. Reverse shares let you invite others to upload files to you. It is a privacy-friendly alternative to public file-transfer services, deployable in your own VPC.
Pingvin Share is built from source as two components: a Next.js frontend and a NestJS backend, both running on Node.js 22. The backend stores its data in an SQLite database managed by Prisma. An nginx reverse proxy on port 80 serves the platform, routing /api requests to the backend and everything else to the frontend, mirroring the upstream reverse-proxy design. Both components run as managed systemd services that start automatically on boot.
The image ships with no users and an empty database. On the first boot of every deployed instance a one-shot service creates the database, generates a fresh application secret unique to that instance, and registers an administrator account with a random password. Two instances launched from the same Amazon Machine Image never share an administrator password or application secret. The administrator credentials are written to /root/pingvin-share-credentials.txt with mode 0600 so that only the root user can read them.
The SQLite database and all uploaded share files live under /data/pingvin, on a dedicated EBS volume separate from the operating system disk, so the data tier can be resized independently.
Prerequisites
Before you deploy this image you need:
- An Amazon Web Services account where you can launch EC2 instances
- IAM permissions to launch instances, create security groups, and subscribe to AWS Marketplace products
- An EC2 key pair in the target Region for SSH access to the instance
- A VPC and subnet in the target Region, with a security group allowing inbound port 22 from your management network and inbound ports 80 and 443 from the networks your users will reach Pingvin Share on
- The AWS CLI (version 2) installed locally if you plan to deploy from the command line
Step 1: Launch the Instance from the AWS Marketplace
Sign in to the AWS Management Console, open the EC2 service, and select Launch instance. Under Application and OS Images choose AWS Marketplace AMIs and search for Pingvin Share. Select the cloudimg listing and choose Select, then Continue on the subscription summary.
Pick an instance type of m5.large or larger. Choose your EC2 key pair under Key pair (login). Under Network settings select your VPC and subnet, and either create or select a security group that allows inbound port 22 from your management network and inbound ports 80 and 443 from the networks your users use. Leave the root volume at the default size or larger.
Select Launch instance. First-boot initialisation takes well under a minute after the instance state becomes Running and the status checks pass.
Step 2: Launch the Instance from the AWS CLI
The following block launches an instance from the cloudimg Pingvin Share Marketplace AMI into an existing subnet and security group. Replace <ami-id> with the AMI ID shown on the Marketplace listing, <key-name> with your EC2 key pair name, <subnet-id> with your subnet ID, and <security-group-id> with a security group that opens ports 22, 80, and 443 as described above.
aws ec2 run-instances \
  --image-id <ami-id> \
  --instance-type m5.large \
  --key-name <key-name> \
  --subnet-id <subnet-id> \
  --security-group-ids <security-group-id> \
  --block-device-mappings '[{"DeviceName":"/dev/sda1","Ebs":{"VolumeSize":20,"VolumeType":"gp3"}}]' \
  --tag-specifications 'ResourceType=instance,Tags=[{Key=Name,Value=pingvin-share-01}]'
The command prints a JSON document on success. Note the instance ID, then retrieve its public address once it is running with aws ec2 describe-instances --instance-ids <instance-id> --query "Reservations[].Instances[].PublicIpAddress" --output text.
Step 3: Connect and Retrieve the Administrator Credentials
Connect over SSH with the key pair you selected and the public IP address of your instance. The SSH login user depends on the operating system of the AMI variant you launched:
| AMI variant | SSH login user |
|---|---|
| Pingvin Share 1.13.0 on Ubuntu 24.04 | ubuntu |
On Ubuntu the login user is ubuntu:
ssh -i <key-name>.pem ubuntu@<instance-public-ip>
The administrator account is generated on first boot and written to a root-only file. Retrieve it with sudo:
sudo cat /root/pingvin-share-credentials.txt
The file contains the instance URL, the administrator username (admin), the administrator email, and the generated administrator password. These credentials are unique to this instance.
Step 4: Verify the Service
Pingvin Share exposes an open health endpoint that returns OK when the backend is ready. Confirm the platform is up from the instance itself:
curl -fsS http://127.0.0.1/api/health && echo
Confirm the two application services and the reverse proxy are running:
systemctl is-active pingvin-share-backend.service pingvin-share-frontend.service nginx.service
You can review the version that is installed straight from the application package metadata:
node -e "console.log(require('/opt/pingvin/app/backend/package.json').version)"
Step 5: First Login
Open http://<instance-public-ip>/ in a browser. You are greeted by the Pingvin Share sign-in page.
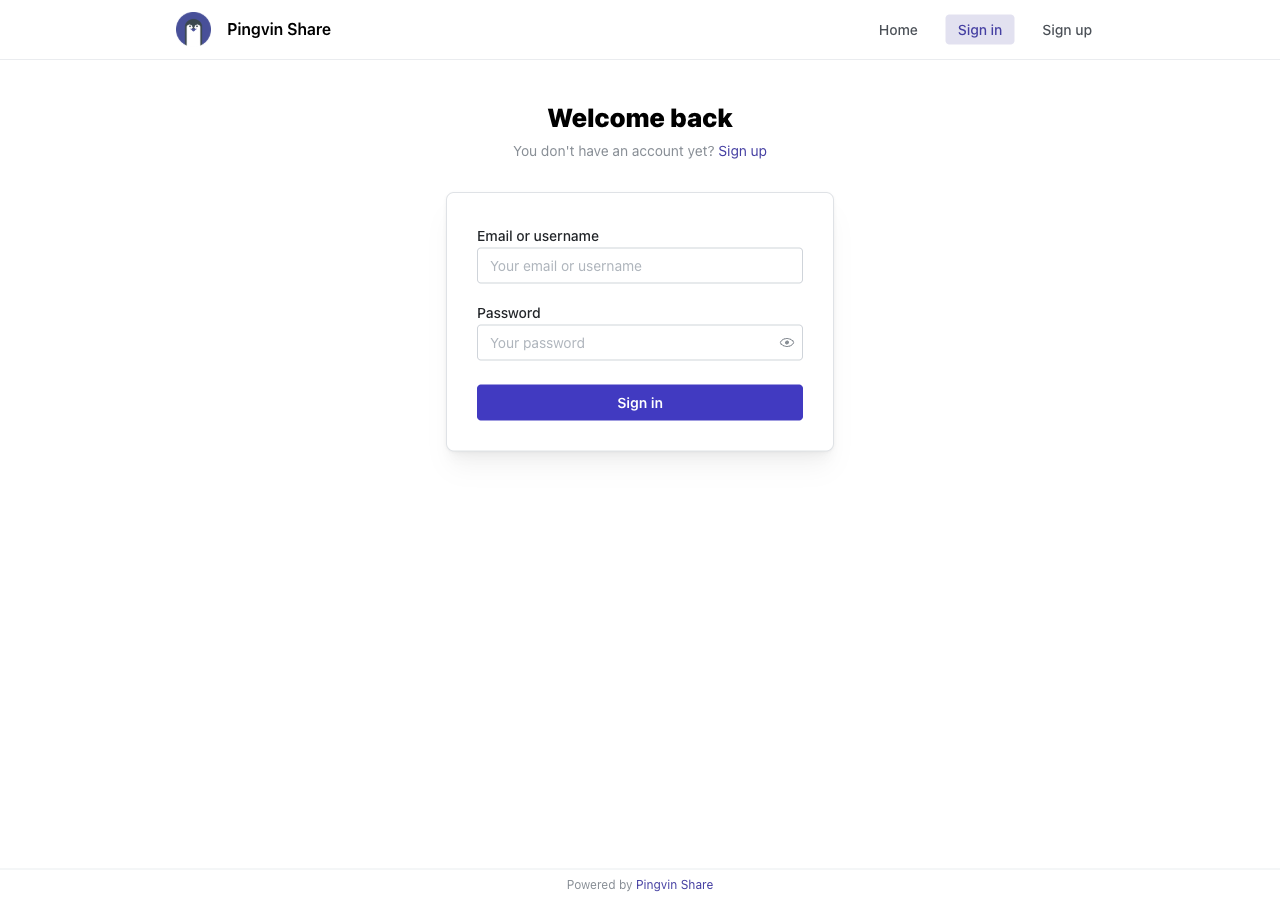
Sign in as the admin user with the password from /root/pingvin-share-credentials.txt. Change the administrator password from My account as soon as you sign in, and store the new password in your own secrets manager.
Step 6: Create and Share Files
After signing in you land on the Upload view. Drag files into the drop zone, or click it to pick files. As soon as a file is staged the Share button is enabled.
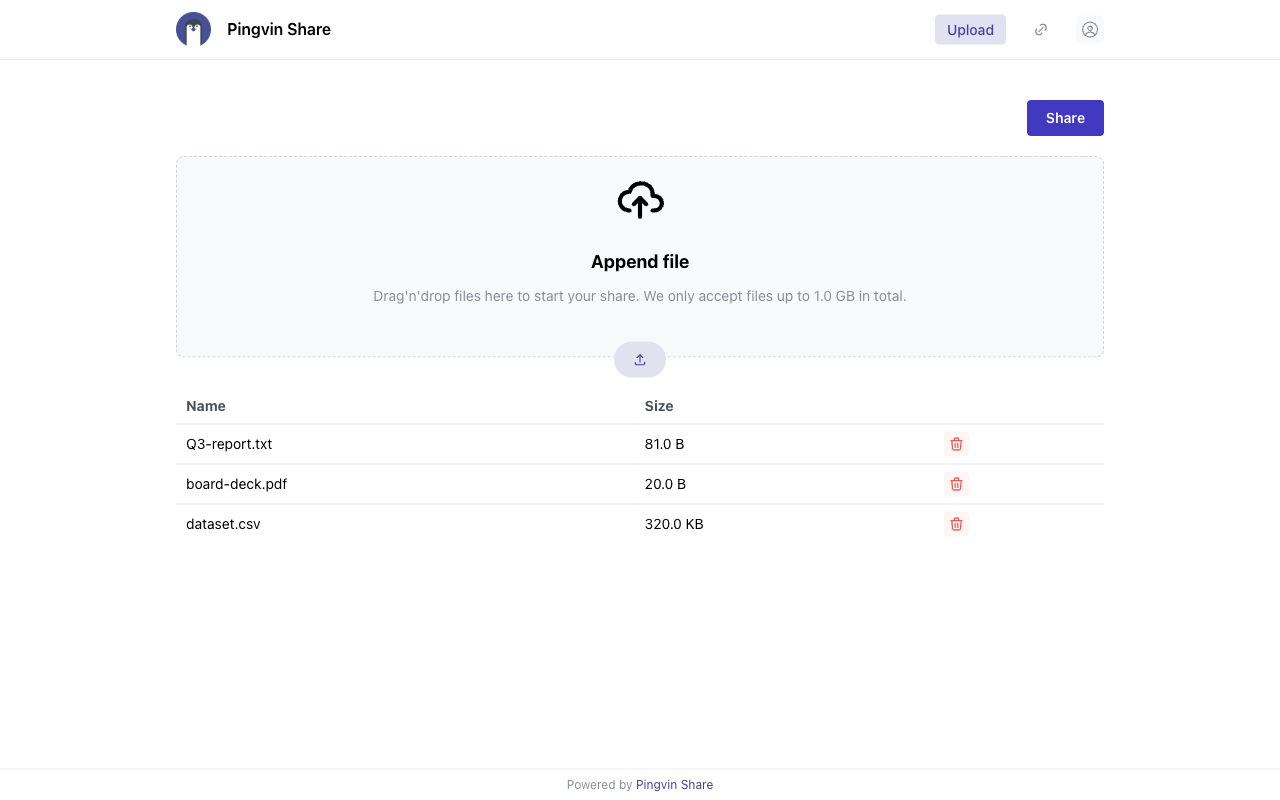
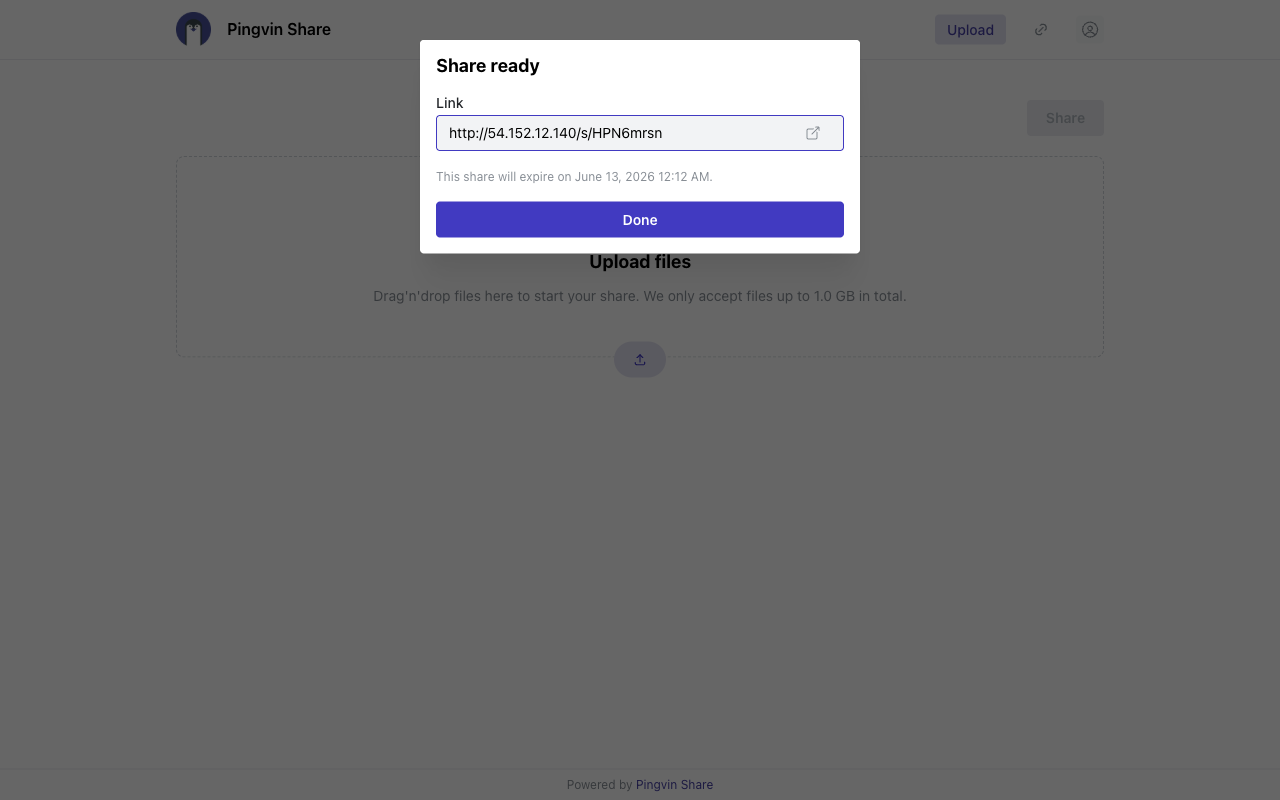
Click Share to open the share-creation dialog. Pingvin Share generates a short, random link ID; you can supply your own, set an expiration (or make the share permanent), and open Security options to add a password or a maximum number of views. Confirm with Share and Pingvin Share returns the ready-to-send link.
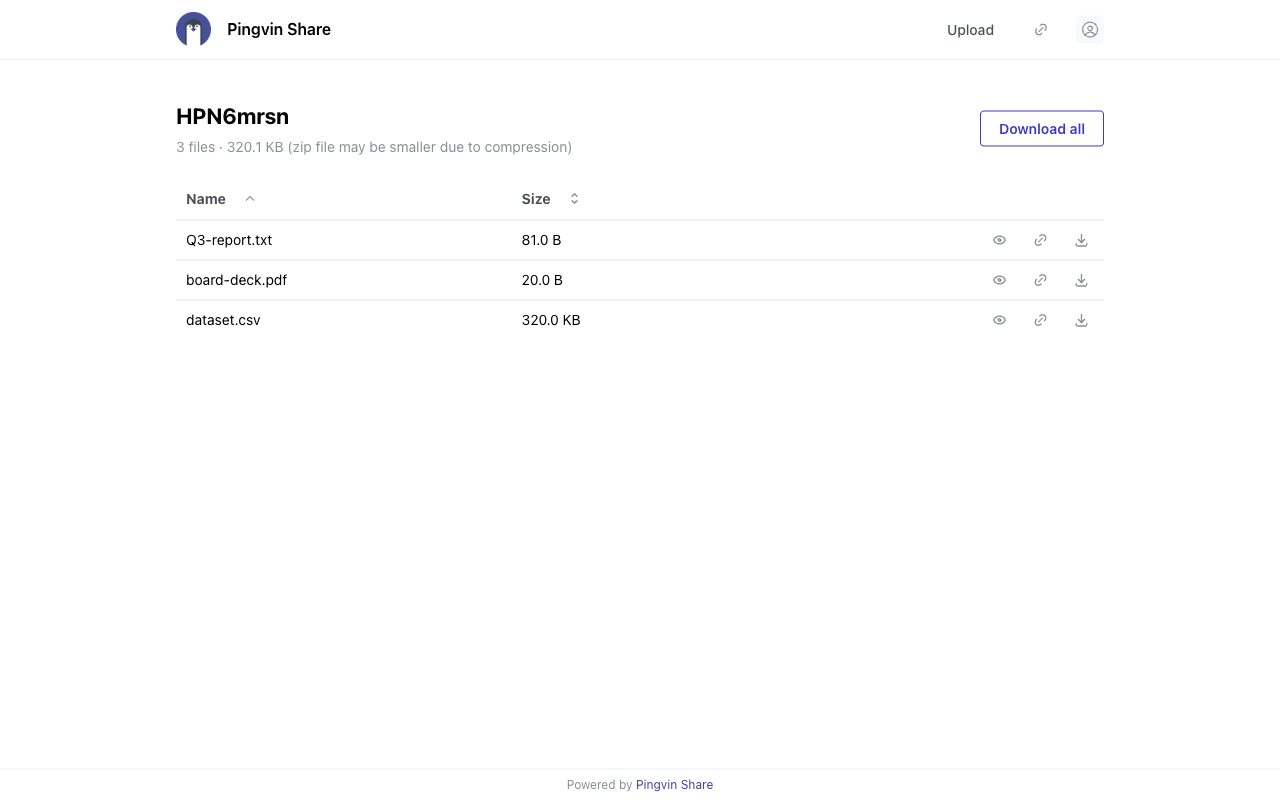
Anyone you give the link to sees the recipient download page, where they can preview, copy or download individual files, or download everything as a single zip. They never need an account.
To collect files from other people, create a reverse share from the link menu in the header: Pingvin Share gives you a link that lets the recipient upload files to you, with the same expiration and view-limit controls.
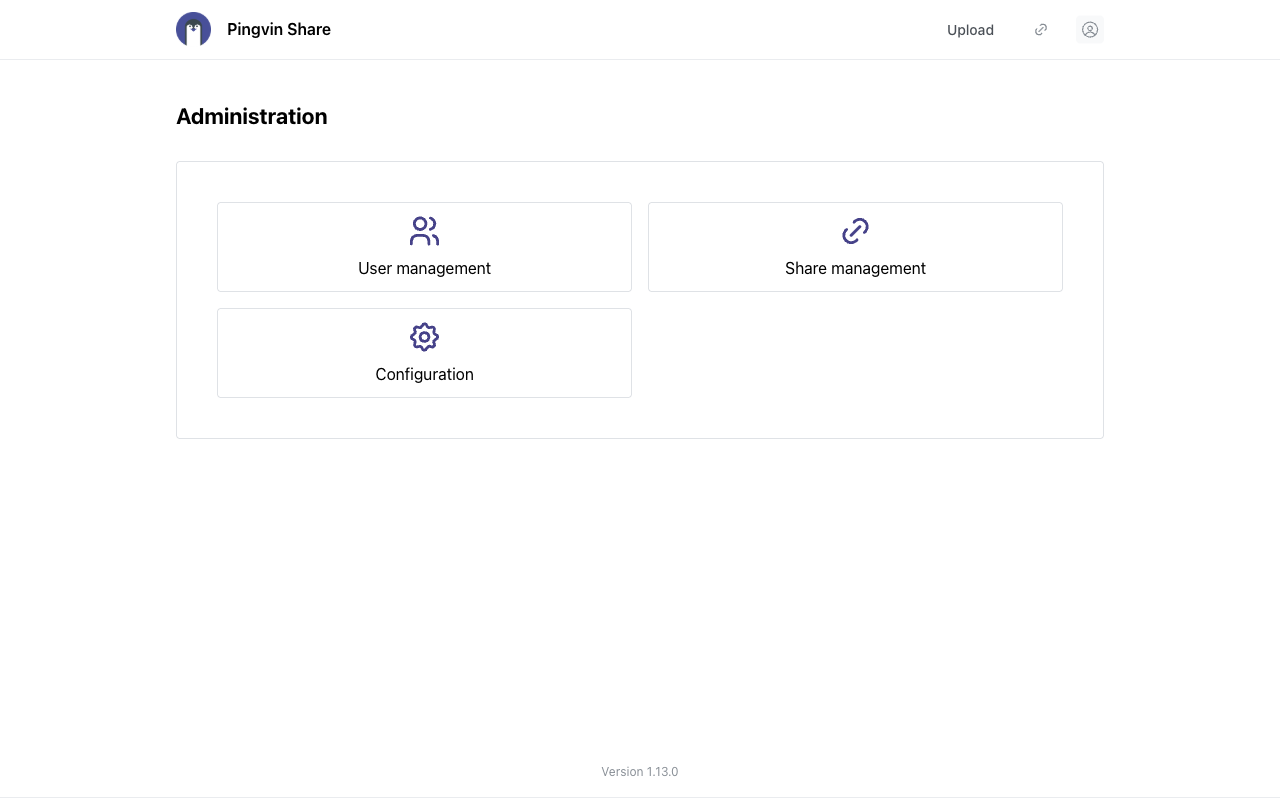
Step 7: Administration
Open the user menu in the top-right corner and choose Administration. From here you manage users, manage shares, and configure the platform. The Administration landing page also shows the running version.
Open Configuration to manage the application settings. The General tab sets the application name and the public URL; further tabs cover Email and SMTP for outbound notifications, Share defaults such as the maximum share size and the default link length, Social Login (GitHub, Google, Microsoft, Discord and generic OpenID Connect), LDAP, S3 storage back ends, Legal pages, and Cache (optional Redis). Settings are stored in the database and are fully editable from this panel.
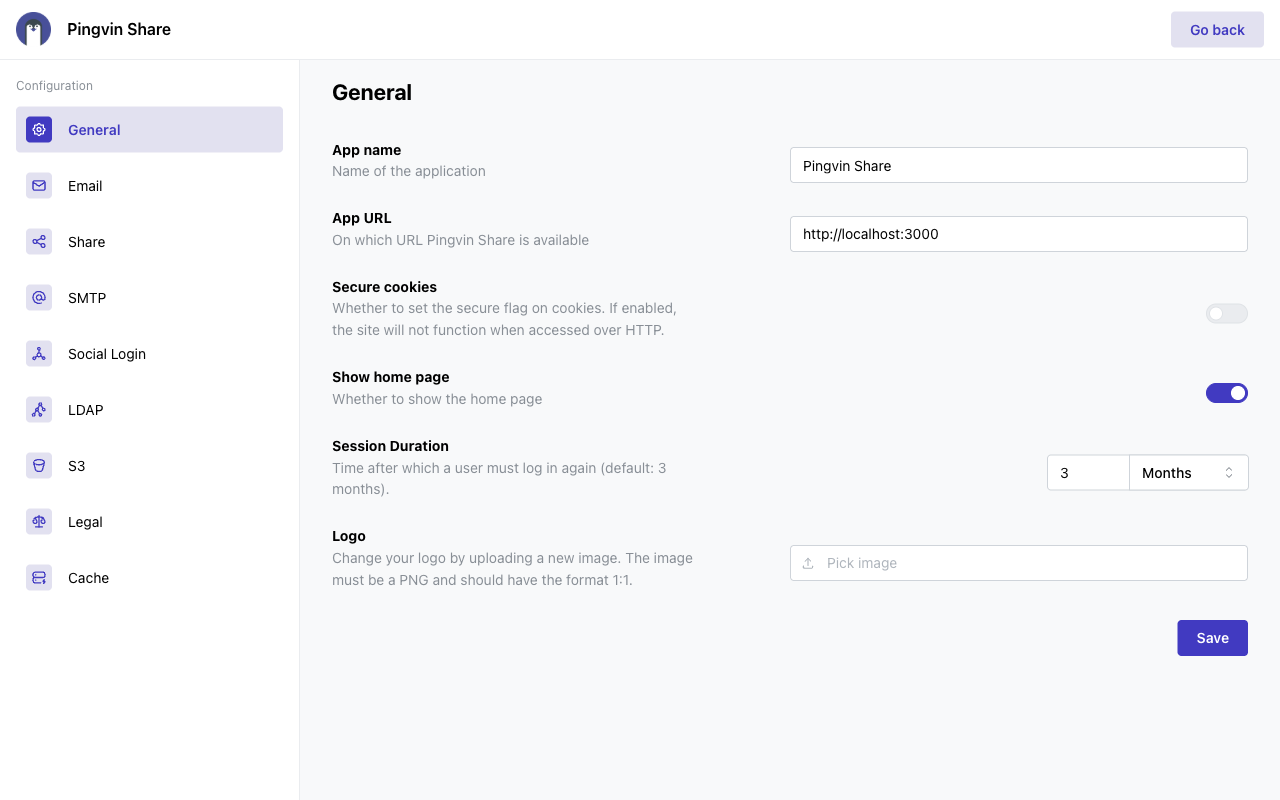
Set the public application URL
So that generated share links and emails use your real address rather than the launch IP, set App URL under Configuration → General to the address (or domain) your users reach the instance on, then Save.
Step 8: Configure Outbound Email (Optional)
Email is used for password resets, share-recipient notifications and admin invites. Under Configuration → SMTP, enable SMTP and enter your provider's host, port, username and password and the sender address, then Save. Under Configuration → Email you can enable share-recipient notifications and customise the message templates.
Step 9: Enable HTTPS (Recommended)
For production use, terminate TLS in front of Pingvin Share. The image installs nginx, so you can obtain a certificate with Certbot once you have a DNS name pointing at the instance and inbound port 443 open.
Install Certbot and the nginx plugin:
sudo apt-get update && sudo apt-get install -y certbot python3-certbot-nginx
Request and install a certificate for your domain, following the interactive prompts:
sudo certbot --nginx -d your-domain.example.com
Certbot edits the nginx site to serve HTTPS and sets up automatic renewal. After enabling HTTPS, set App URL to the https:// address and enable Secure cookies under Configuration → General.
Step 10: Backup and Maintenance
All persistent state lives under /data/pingvin on the dedicated data volume: the SQLite database data/pingvin-share.db and the uploaded files under data/uploads/shares. Back up that directory, or snapshot the EBS data volume, to protect your shares and configuration.
Inspect the data layout (sizes only; the command does not print any file contents):
sudo du -sh /data/pingvin/data 2>/dev/null; sudo ls /data/pingvin/data
The two application services and nginx are managed with systemctl:
systemctl status pingvin-share-backend.service --no-pager | head -5
To restart the platform after a configuration change made outside the admin panel, restart the services:
sudo systemctl restart pingvin-share-backend.service pingvin-share-frontend.service
Support
This image is published by cloudimg with 24/7 technical support by email and chat. Support covers Pingvin Share deployment, upgrades, reverse proxy and TLS termination, SMTP and OAuth configuration, S3 storage back ends and database administration.
Pingvin Share is open source software licensed under the BSD 2-Clause License. All product and company names are trademarks or registered trademarks of their respective holders. Use of them does not imply any affiliation with or endorsement by them.