
Plakar on AWS User Guide
Overview
This image runs Plakar, the open source backup engine that creates versioned backups with compression, encryption and content addressed deduplication. Snapshots land in a Kloset store where identical data is kept exactly once however many snapshots reference it, so a long retention history costs a fraction of repeated full backups.
Plakar is a single static binary that embeds its own web interface. In this image the interface runs as a persistent service bound to the loopback interface on 127.0.0.1:9090, reached through nginx on port 80. The Kloset repository lives at /var/lib/plakar/kloset on a dedicated EBS volume, separate from the operating system disk and independently resizable.
Every deployed instance generates its own repository encryption passphrase and its own web interface access token on first boot. Nothing cryptographic ships inside the image, so no two deployments can read each other's backups.
The repository passphrase never leaves your instance. It is generated on your own machine at first boot and cloudimg holds no copy. It is the only thing that can decrypt your snapshots. If you lose it, those snapshots are unrecoverable by anyone, including us. Record it somewhere safe the first time you log in.
Prerequisites
Before you deploy this image you need:
- An Amazon Web Services account where you can launch EC2 instances
- IAM permissions to launch instances, create security groups, and subscribe to AWS Marketplace products
- An EC2 key pair in the target Region for SSH access to the instance
- A VPC and subnet in the target Region, with a security group allowing inbound port 22 from your management network and inbound port 80 from the networks your operators will reach the web interface on
- The AWS CLI (version 2) installed locally if you plan to deploy from the command line
Step 1: Launch the Instance from the AWS Marketplace
Sign in to the AWS Management Console, open the EC2 service, and select Launch instance. Under Application and OS Images choose AWS Marketplace AMIs and search for Plakar. Select the cloudimg listing and choose Select, then Continue on the subscription summary.
Pick an instance type of m5.large or larger. Choose your EC2 key pair under Key pair (login). Under Network settings select your VPC and subnet, and either create or select a security group that allows inbound port 22 from your management network and inbound port 80 from the networks your operators use. Leave the root volume at the default size or larger, and size the additional repository volume to the amount of backup history you intend to retain.
Select Launch instance. First boot initialisation takes approximately one minute after the instance state becomes Running, while Plakar generates the per instance passphrase and token and initialises a fresh encrypted repository.
Step 2: Launch the Instance from the AWS CLI
The following block launches an instance from the cloudimg Plakar Marketplace AMI into an existing subnet and security group. Replace <ami-id> with the AMI ID shown on the Marketplace listing, <key-name> with your EC2 key pair name, <subnet-id> with your subnet ID, and <security-group-id> with a security group that opens ports 22 and 80 as described above.
aws ec2 run-instances \
  --image-id <ami-id> \
  --instance-type m5.large \
  --key-name <key-name> \
  --subnet-id <subnet-id> \
  --security-group-ids <security-group-id> \
  --tag-specifications 'ResourceType=instance,Tags=[{Key=Name,Value=plakar-01}]'
The command prints a JSON document on success. Note the instance ID, then retrieve its public address once it is running with aws ec2 describe-instances --instance-ids <instance-id> --query "Reservations[].Instances[].PublicIpAddress" --output text.
Step 3: Connect to Your Instance
Connect over SSH with the key pair you selected and the public IP address from step 2. The SSH login user depends on the operating system of the AMI variant you launched:
| AMI variant | SSH login user |
|---|---|
| Plakar 1.1.4 on Ubuntu 24.04 | ubuntu |
Confirm the stack is running and serving. Both units are enabled, so they come back automatically after a reboot.
systemctl is-active plakar-ui.service nginx.service
curl -s -o /dev/null -w 'plakar web interface HTTP %{http_code}\n' -m 15 http://127.0.0.1/
Two active lines and HTTP 200 confirm that Plakar and nginx are both serving.
Step 4: Retrieve the Per Instance Credentials
First boot writes the repository passphrase, the web interface token and a ready made sign in URL to a root only file. Confirm the file is present, correctly permissioned, and carries the expected entries. This block deliberately prints only the entry names, never their values, so your secrets do not end up in a terminal log:
sudo stat -c 'mode=%a owner=%U:%G' /root/plakar-credentials.txt
sudo grep -oE '^plakar\.(host|url|ui\.token|repository\.path|repository\.passphrase)=' /root/plakar-credentials.txt | sed 's/=$//'
You should see mode=600 owner=root:root and the five entry names listed.
To read the actual values, including the web interface URL with the token already embedded, run the following on your instance. Treat the output as sensitive and do not paste it into shared logs or tickets:
sudo cat /root/plakar-credentials.txt
The plakar.url entry is a complete link of the form http://<public-ip>/?plakar_token=<token>. Opening it hands the token to the web interface for you.
Step 5: Verify the API Rejects Unauthenticated Access
Every /api/* route is guarded by a bearer token. The static interface itself is served without authentication, but no data can be read without the token. Prove all three cases in one go. The token is read into a shell variable and never printed:
TOKEN="$(sudo sed -n 's/^plakar.ui.token=//p' /root/plakar-credentials.txt)"
[ -n "$TOKEN" ] || { echo "FAIL: no token in the credentials file"; exit 1; }
printf 'no token      -> '; curl -s -o /dev/null -w '%{http_code}\n' -m 15 http://127.0.0.1/api/info
printf 'wrong token   -> '; curl -s -o /dev/null -w '%{http_code}\n' -m 15 -H "Authorization: Bearer wrong-$TOKEN" http://127.0.0.1/api/info
printf 'correct token -> '; curl -s -o /dev/null -w '%{http_code}\n' -m 15 -H "Authorization: Bearer $TOKEN" http://127.0.0.1/api/info
The expected result is 401, 401, 200. The first two prove that neither an absent nor an incorrect token can read your backup metadata; the third proves your generated token works.
Step 6: Confirm the Repository Is on Its Dedicated Volume
The encrypted repository lives on its own EBS volume so you can grow your backup history without touching the operating system disk. The volume is mounted from /etc/fstab by filesystem UUID, which is stable across reboots and across relaunching the AMI:
findmnt -no SOURCE,TARGET,FSTYPE,OPTIONS /var/lib/plakar
df -h /var/lib/plakar | tail -1
You will see an ext4 filesystem mounted at /var/lib/plakar. To grow it later, expand the EBS volume in the AWS console, then run sudo resize2fs against the device shown by the command above.
Step 7: Open the Web Interface
Open a web browser and navigate to the plakar.url value from step 4, which is http://<public-ip>/?plakar_token=<token>. The token is handed to the interface by that link, and the dashboard loads directly.
The dashboard summarises your repository: how many snapshots it holds, the logical size of the protected data against the actual storage consumed after deduplication and compression, and the repository's cryptographic parameters.
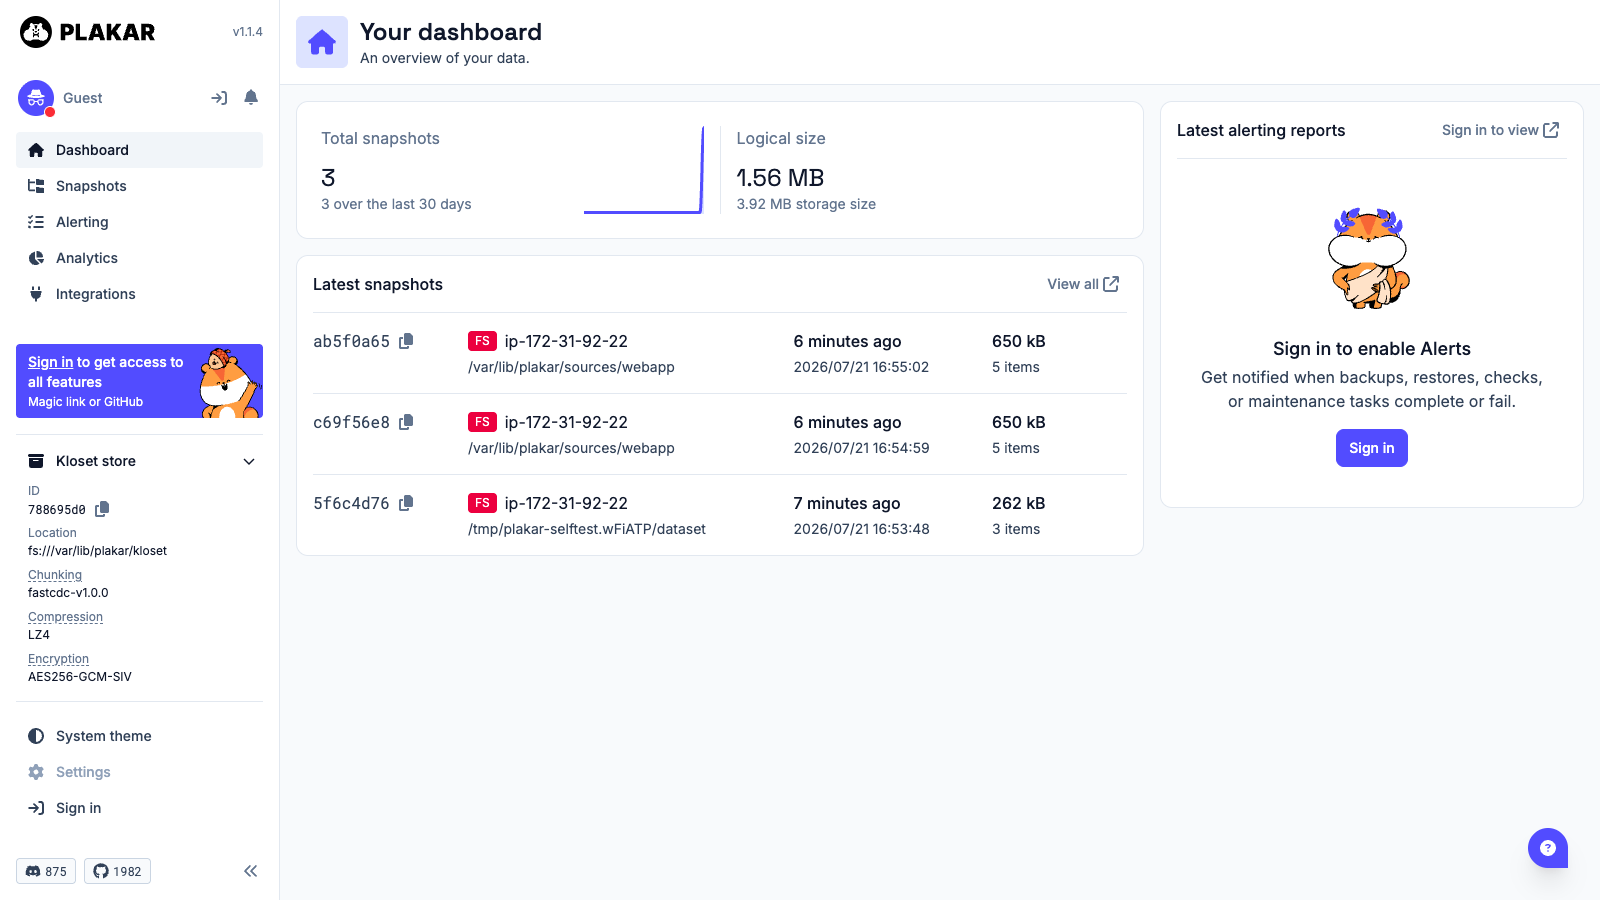
The Kloset store panel in the sidebar shows the repository location, the chunking algorithm, the compression codec and the encryption cipher in use, so you can confirm at a glance that your data is encrypted at rest.
Step 8: Browse Snapshots
Select Snapshots in the sidebar to see every snapshot in the repository, each with its identifier, source path, age, size and item count.
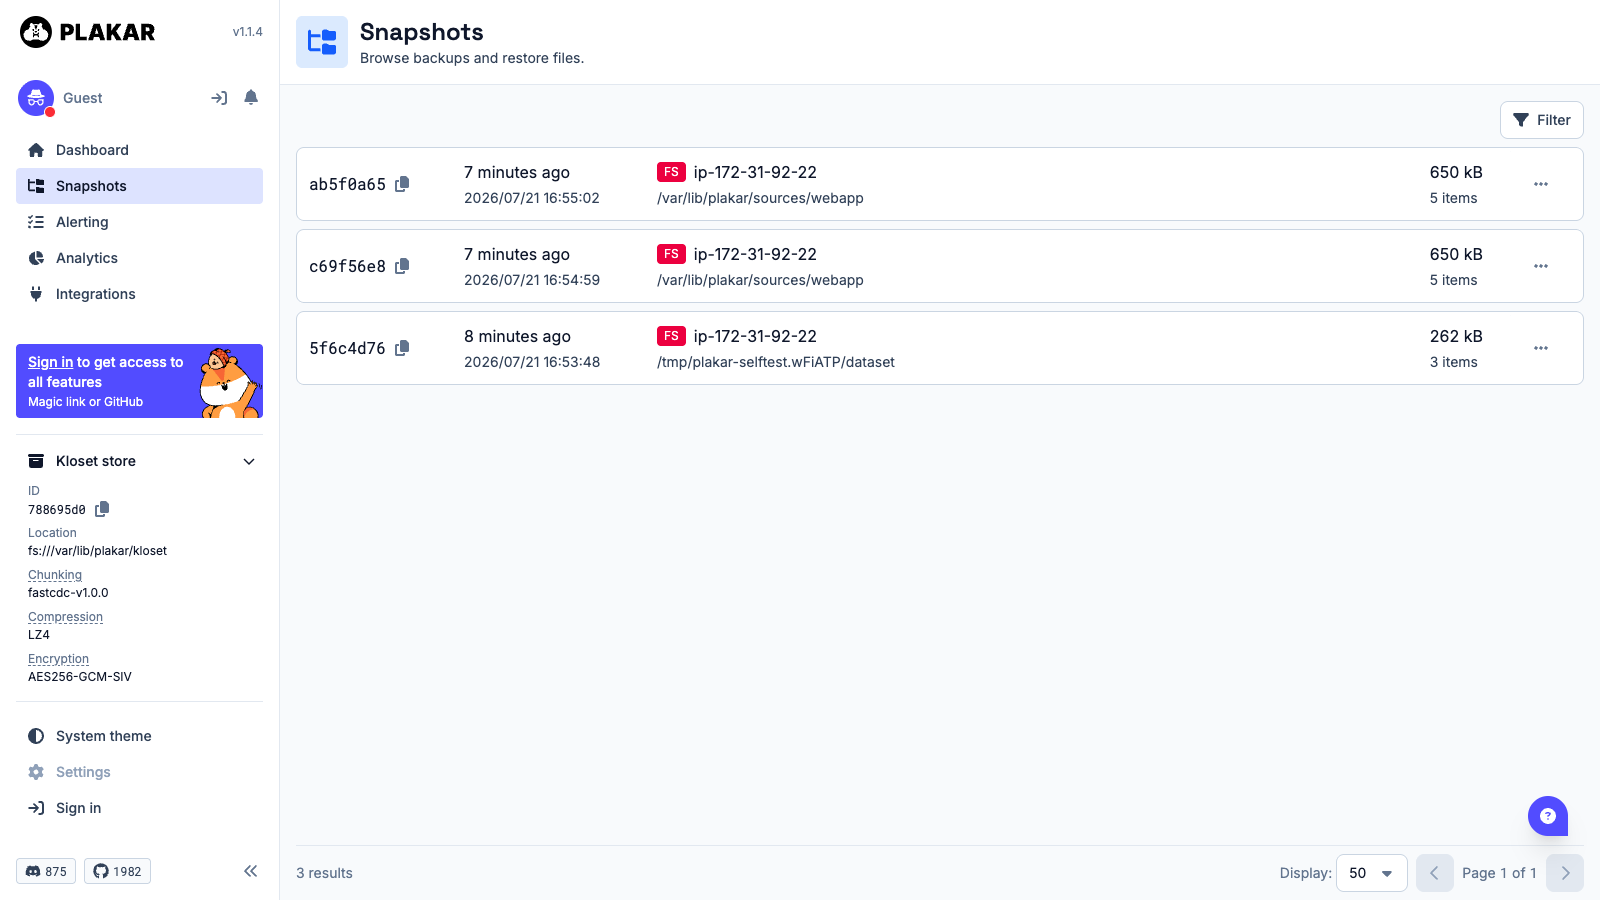
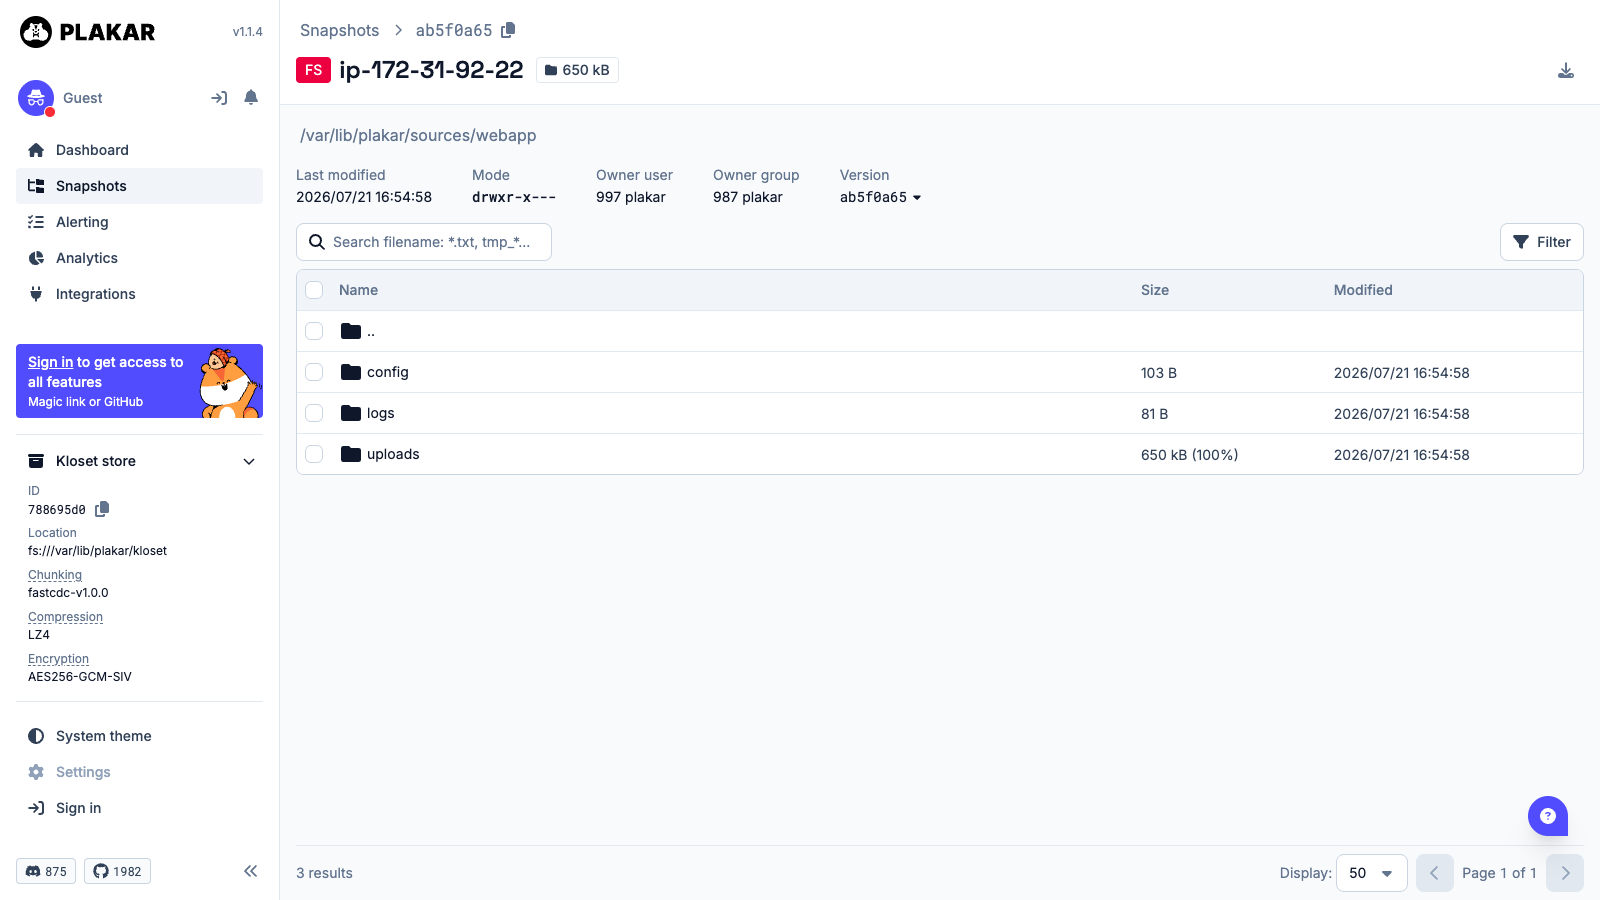
Select any snapshot to browse its contents exactly as they were when the backup ran, with the original file modes, ownership and timestamps preserved.
Drill into a directory to reach individual files. The percentage beside each size shows that file's share of the snapshot, and the Version selector at the top lets you compare the same path across different snapshots.
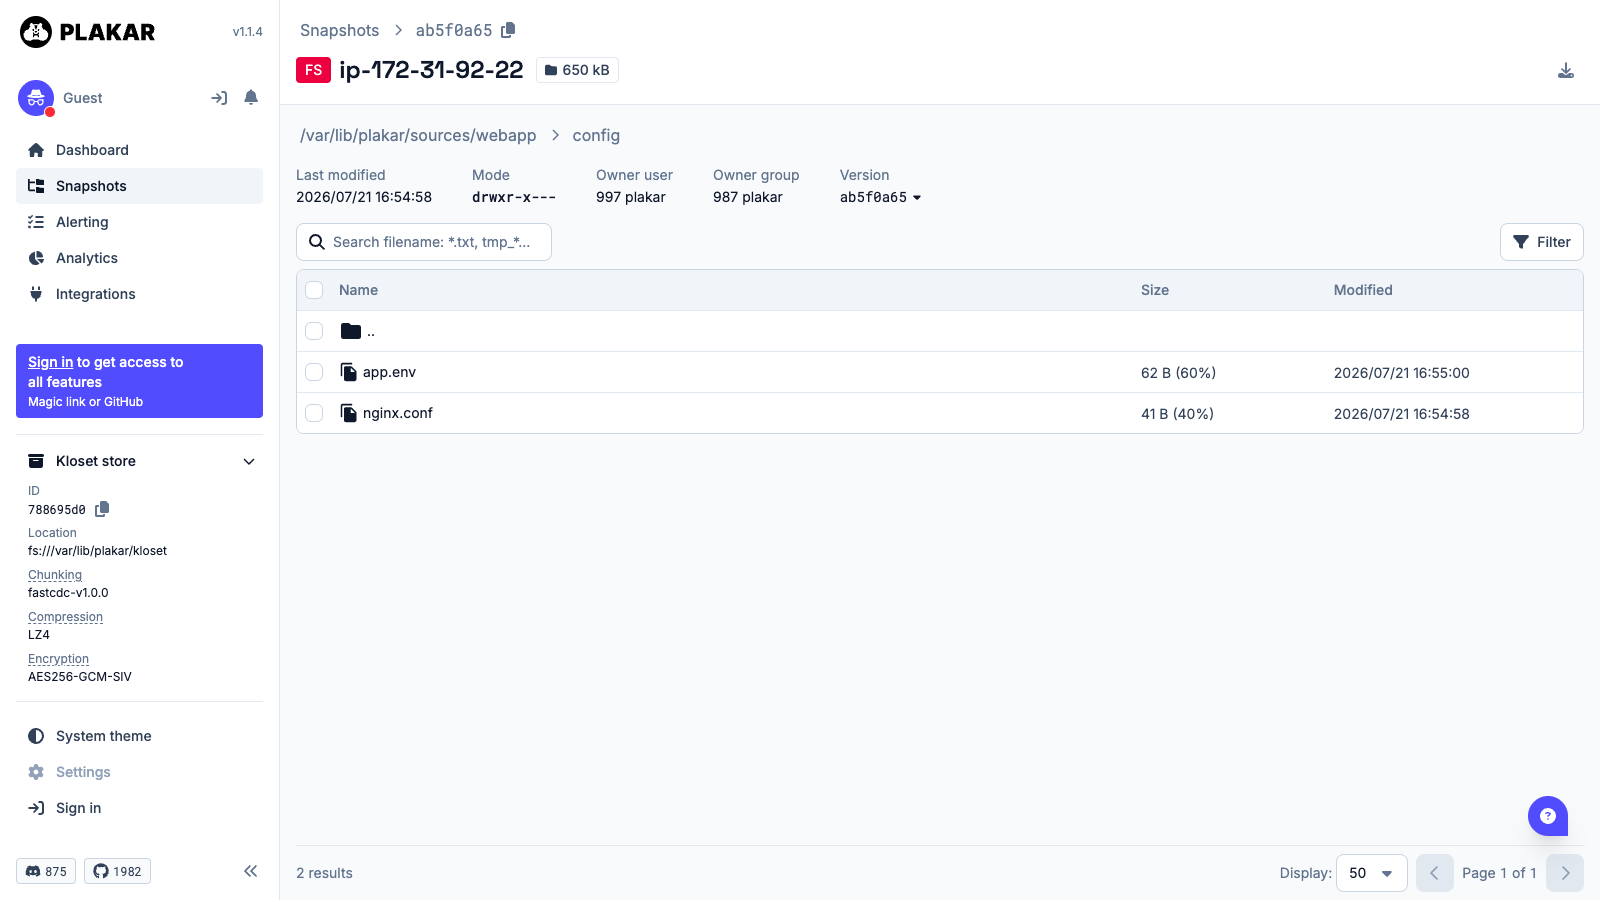
Select the checkbox beside any file or directory and use the download control at the top right to restore just that item through the browser, without a command line restore of the whole snapshot.
Step 9: Verify the Appliance End to End
A backup system is only worth what it can restore. The image ships a self test that proves the whole path rather than checking a version string. It writes a known dataset, backs it up into your real encrypted repository, restores it to a different location, and compares every restored file against the original by checksum. It then runs a full integrity check and exercises four negative controls, each of which must fail: a wrong passphrase must not open the repository, a bogus snapshot identifier must not restore, an unauthenticated API call must be refused, and a wrong token must be refused.
sudo /usr/local/sbin/plakar-selftest
A selftest OK line followed by SELFTEST_SUCCESS means backup, restore, byte for byte integrity, encryption and API authentication are all genuinely working on this instance. The self test is safe to re run at any time; it only ever adds its own small snapshot. Run it after any change to the instance, and as part of your disaster recovery drills.
Step 10: Back Up Your Own Data
Plakar reads the repository passphrase from the keyfile at /etc/plakar/passphrase via the -keyfile flag, which keeps it out of the process list. Run backups as the plakar service account so that ownership and cache locations stay consistent with the web interface service.
To back up a directory:
sudo -u plakar HOME=/var/lib/plakar plakar \
  -keyfile /etc/plakar/passphrase \
  at /var/lib/plakar/kloset \
  backup /path/to/your/data
To list the snapshots in the repository:
sudo -u plakar HOME=/var/lib/plakar plakar \
  -keyfile /etc/plakar/passphrase \
  at /var/lib/plakar/kloset \
  ls
To restore a snapshot to a chosen location, using the snapshot identifier from the listing above:
sudo -u plakar HOME=/var/lib/plakar plakar \
  -keyfile /etc/plakar/passphrase \
  at /var/lib/plakar/kloset \
  restore -to <backup-dir> <snapshot-id>
To verify the integrity of everything in the repository:
sudo -u plakar HOME=/var/lib/plakar plakar \
  -keyfile /etc/plakar/passphrase \
  at /var/lib/plakar/kloset \
  check
Restoring to a path that already holds data will overwrite files at that path. Restore to an empty directory first and move the recovered files into place once you have inspected them.
Step 11: Schedule Regular Backups
Plakar has no built in scheduler in this image, so use systemd timers. Create a unit that runs your backup command, and a timer that triggers it. The following is a starting point to adapt; write these files with your preferred editor and adjust the path you are protecting:
# /etc/systemd/system/plakar-backup.service
[Unit]
Description=Plakar scheduled backup
After=network-online.target

[Service]
Type=oneshot
User=plakar
Environment="HOME=/var/lib/plakar"
ExecStart=/usr/local/bin/plakar -keyfile /etc/plakar/passphrase at /var/lib/plakar/kloset backup /path/to/your/data
# /etc/systemd/system/plakar-backup.timer
[Unit]
Description=Run the Plakar backup daily

[Timer]
OnCalendar=daily
Persistent=true

[Install]
WantedBy=timers.target
Enable the timer with sudo systemctl daemon-reload followed by sudo systemctl enable --now plakar-backup.timer, and confirm the schedule with systemctl list-timers plakar-backup.timer.
Step 12: Manage Retention
Deduplication makes history cheap, but not free. Plakar can remove snapshots you no longer need and reclaim the space their unique data occupied. Review what you hold before removing anything, because removal cannot be undone:
sudo -u plakar HOME=/var/lib/plakar plakar \
  -keyfile /etc/plakar/passphrase \
  at /var/lib/plakar/kloset \
  rm <snapshot-id>
After removing snapshots, reclaim the freed space:
sudo -u plakar HOME=/var/lib/plakar plakar \
  -keyfile /etc/plakar/passphrase \
  at /var/lib/plakar/kloset \
  maintenance
Run a check afterwards to confirm the repository is still consistent, and keep the self test in your routine so you always know your restores work.
Securing the Deployment
The image is hardened by default, but the following are worth confirming for a production deployment:
- Restrict port 80. The web interface is reached over plain HTTP on port 80. Limit the security group to the networks your operators use rather than leaving it open to the internet.
- Add TLS. For anything beyond a private management network, terminate HTTPS in front of the interface. Point a DNS name at the instance and obtain a certificate with Let's Encrypt, or place the instance behind an Application Load Balancer with an ACM certificate.
- Protect the token. Anyone holding the web interface token can read your backup metadata and restore your files. Treat the credentials file as a secret and rotate the token by editing
/etc/plakar/ui.envand restarting the interface if it is ever exposed. - Back up the passphrase, not just the data. The repository is useless without its passphrase. Store it in your password manager or secrets service the day you launch the instance.
- The Plakar service never listens on the network. It binds to
127.0.0.1:9090and is reachable only through nginx. Do not open port 9090 in the security group.
Support
This image is supported by cloudimg. Email support@cloudimg.co.uk with your instance ID and AWS Region for deployment guidance, repository and volume sizing, restore procedures, TLS termination and version upgrades.
Plakar is open source under the ISC licence, and the licence notice is retained on the image at /usr/share/doc/plakar/LICENSE. There is no licence fee; the cloudimg charge covers packaging, security patching, image maintenance and support. Plakar is a trademark of its respective owner and cloudimg is not affiliated with or endorsed by the Plakar project.