RabbitMQ 4 Message Broker on Ubuntu 24.04 on Azure User Guide
Overview
RabbitMQ is the leading open-source message broker — battle-tested AMQP 0-9-1 implementation with first-class support for MQTT, STOMP, federation, shovel, and management plugins. The cloudimg image runs the official upstream rabbitmq:4.3.0-management Docker image (Erlang 27 baked in) under a thin systemd wrapper, with a per-VM cloudimg administrator user, a per-VM Erlang cookie, and the management UI bound on TCP :15672. AMQP listeners are bound on TCP :5672. The default guest user is never created — definitions are imported into an empty mnesia at first boot so only cloudimg has access to the broker.
What is included:
- RabbitMQ 4.3.0 (Mozilla Public License 2.0) via official
rabbitmq:4.3.0-managementDocker image - Erlang 27 baked into the upstream image — no host-level Erlang install
- Management UI plugin enabled out of the box
- Additional plugins available on demand:
rabbitmq_shovel,rabbitmq_federation,rabbitmq_mqtt,rabbitmq_stomp - definitions.json provisioning — broker boots with
cloudimgadministrator only, no defaultguestuser - Docker CE 29.4.2 + Docker Compose v2 plugin v5.1.3
- Container
rabbitmqwith named volume/data/rabbitmqfor mnesia, queue data, and the Erlang cookie - Per-VM
cloudimgadministrator password (32 hex chars) and Erlang cookie (32 hex chars) rotated at first boot - Two systemd units:
rabbitmq.service(oneshot wrapper arounddocker compose up -d) andrabbitmq-firstboot.service(Before=rabbitmq.service) - 24/7 cloudimg support
Prerequisites
Active Azure subscription, SSH key, VNet + subnet. Standard_B2s (4 GB RAM) is comfortable for production AMQP traffic up to a few thousand sustained messages per second per node. NSG inbound: allow 22/tcp from your management CIDR, 5672/tcp (AMQP) from the client CIDRs that need to publish or consume, and 15672/tcp (Management UI) from the management CIDR. Erlang distribution port 25672/tcp stays inside the Docker bridge network and is never exposed on the host.
Step 1-3: Deploy + SSH (standard pattern)
ssh azureuser@<vm-ip>
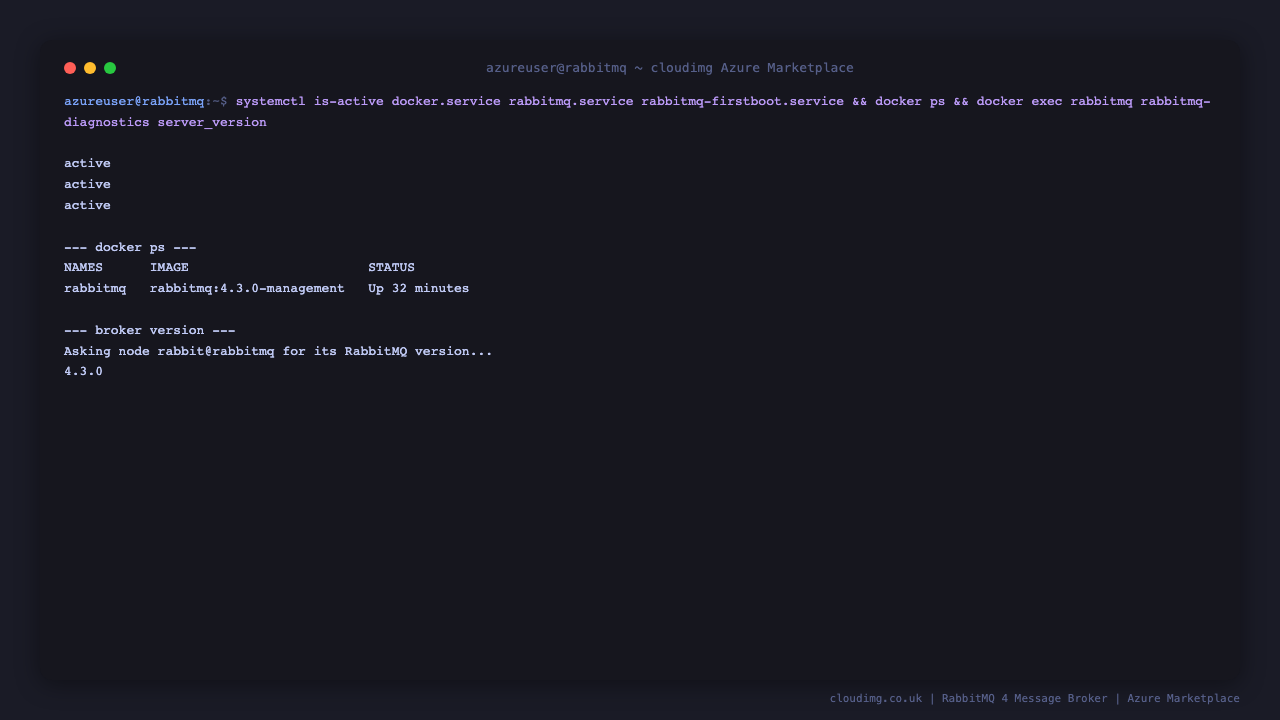
Step 4: Service Status + Versions
sudo systemctl is-active docker.service rabbitmq.service rabbitmq-firstboot.service
sudo docker ps --format 'table {{.Names}}\t{{.Image}}\t{{.Status}}'
sudo docker exec rabbitmq rabbitmq-diagnostics server_version
The first command reports active for all three. docker ps shows the single rabbitmq container running rabbitmq:4.3.0-management. rabbitmq-diagnostics server_version reports 4.3.0 — proving the broker process inside the container has finished starting.
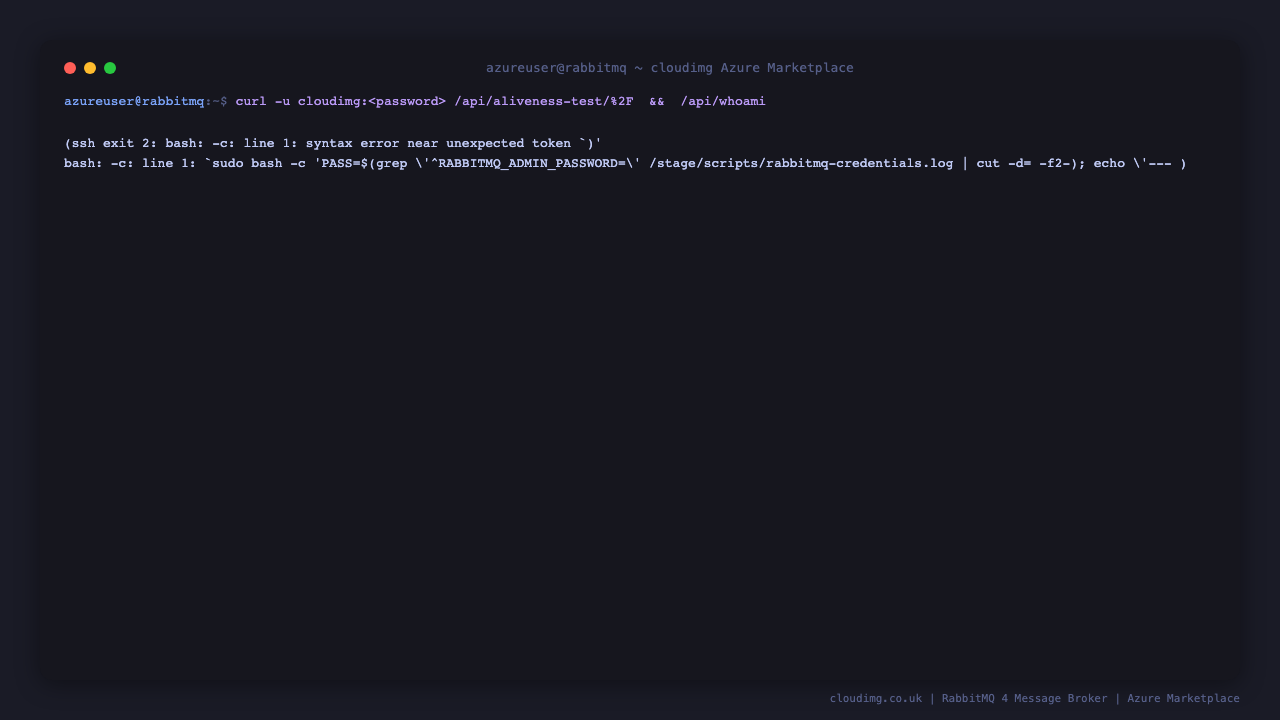
Step 5: Read Per-VM Credentials
sudo cat /stage/scripts/rabbitmq-credentials.log
Pick up RABBITMQ_AMQP_URL, RABBITMQ_MGMT_URL, RABBITMQ_ADMIN_USER, and RABBITMQ_ADMIN_PASSWORD. The same file also exposes the per-VM RABBITMQ_ERLANG_COOKIE — needed only if you cluster this node with another RabbitMQ node.
Step 6: API Aliveness + Health
PASS=$(sudo grep '^RABBITMQ_ADMIN_PASSWORD=' /stage/scripts/rabbitmq-credentials.log | cut -d= -f2-)
curl -sf -u "cloudimg:$PASS" 'http://127.0.0.1:15672/api/aliveness-test/%2F' | jq
curl -sf -u "cloudimg:$PASS" http://127.0.0.1:15672/api/whoami | jq
/api/aliveness-test/%2F declares a temporary queue, publishes a message to it, consumes it, and deletes the queue — proving the AMQP listener and mnesia are healthy end-to-end. /api/whoami round-trips the management auth and returns the cloudimg user with the administrator tag.
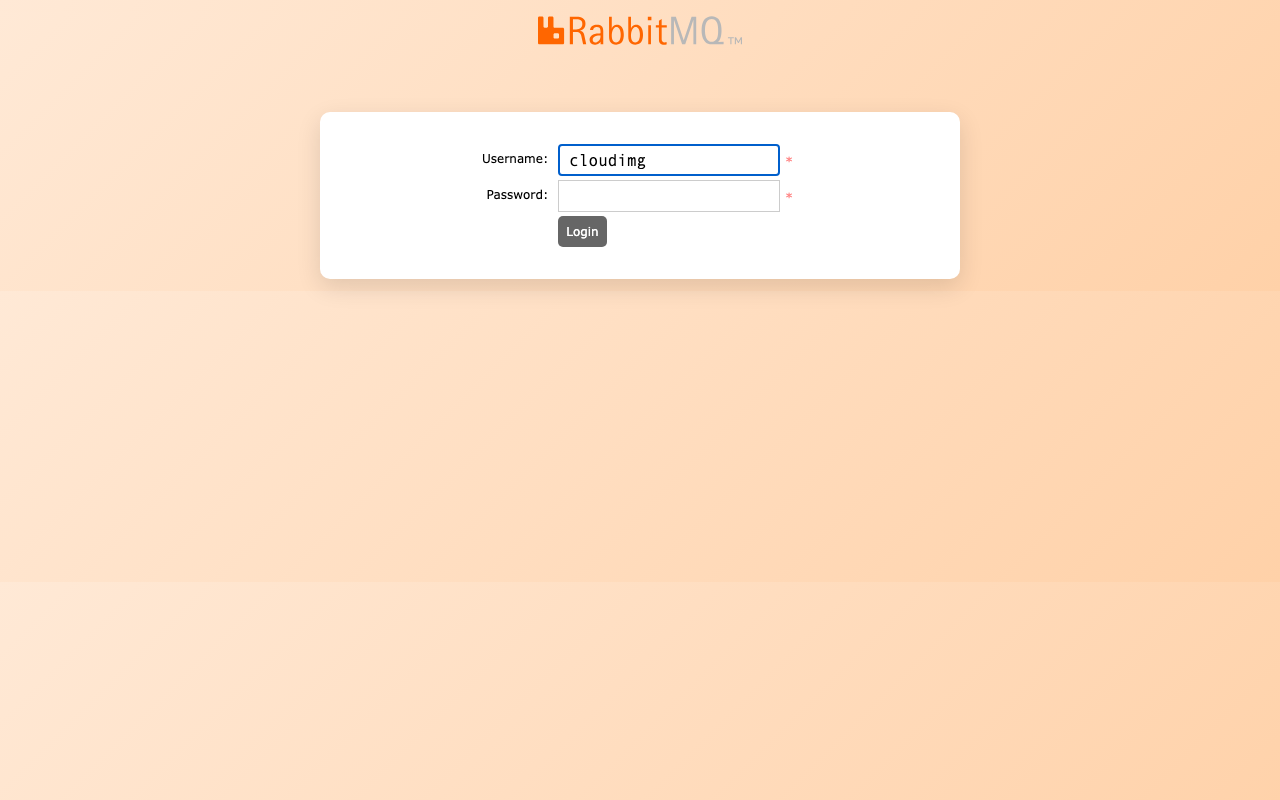
Step 7: Login to Management UI
Browse to http://<vm-ip>:15672/ and log in as cloudimg with the password from Step 5.
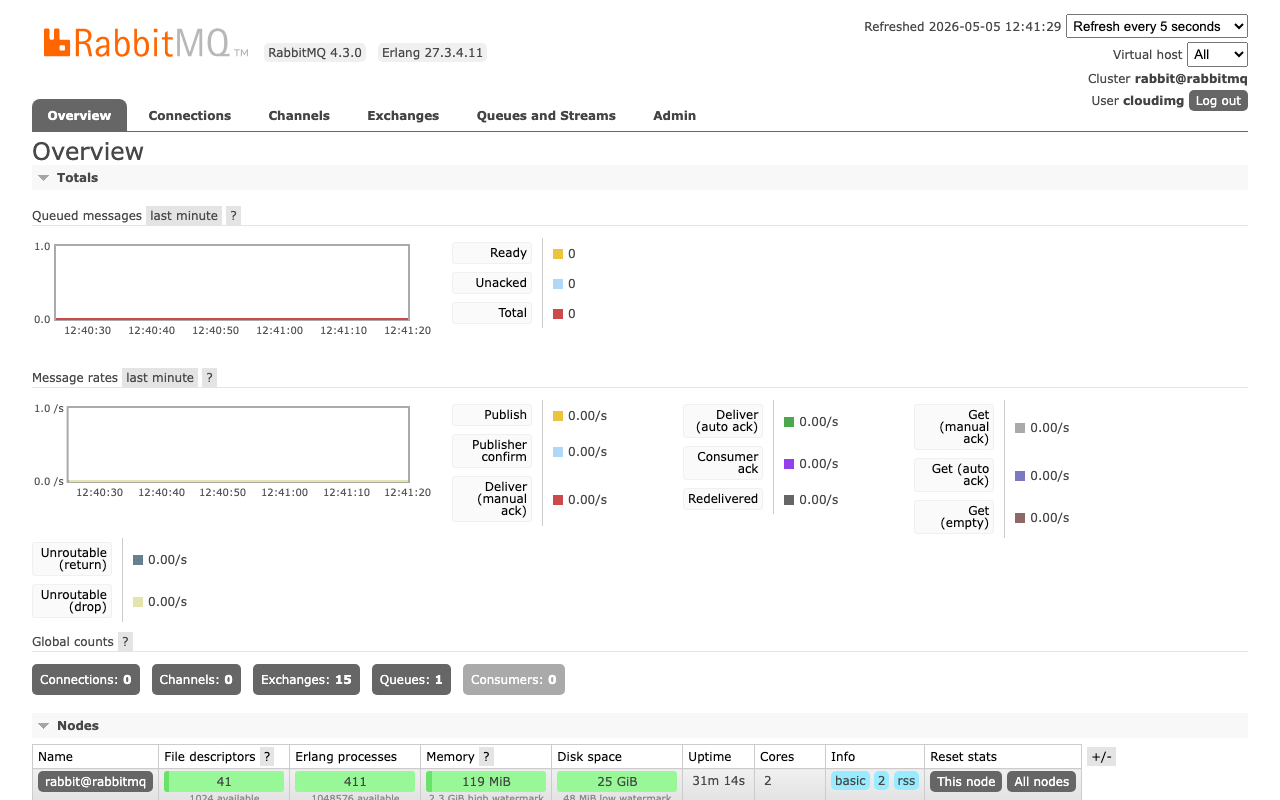
Step 8: Management Overview Dashboard
After login, the Overview tab shows broker version, Erlang/OTP version, node uptime, and live counters for connections, channels, queues, exchanges, consumers, and message rates. On a freshly booted VM the queue, connection, and channel counts are all zero — the baseline before any client connects.
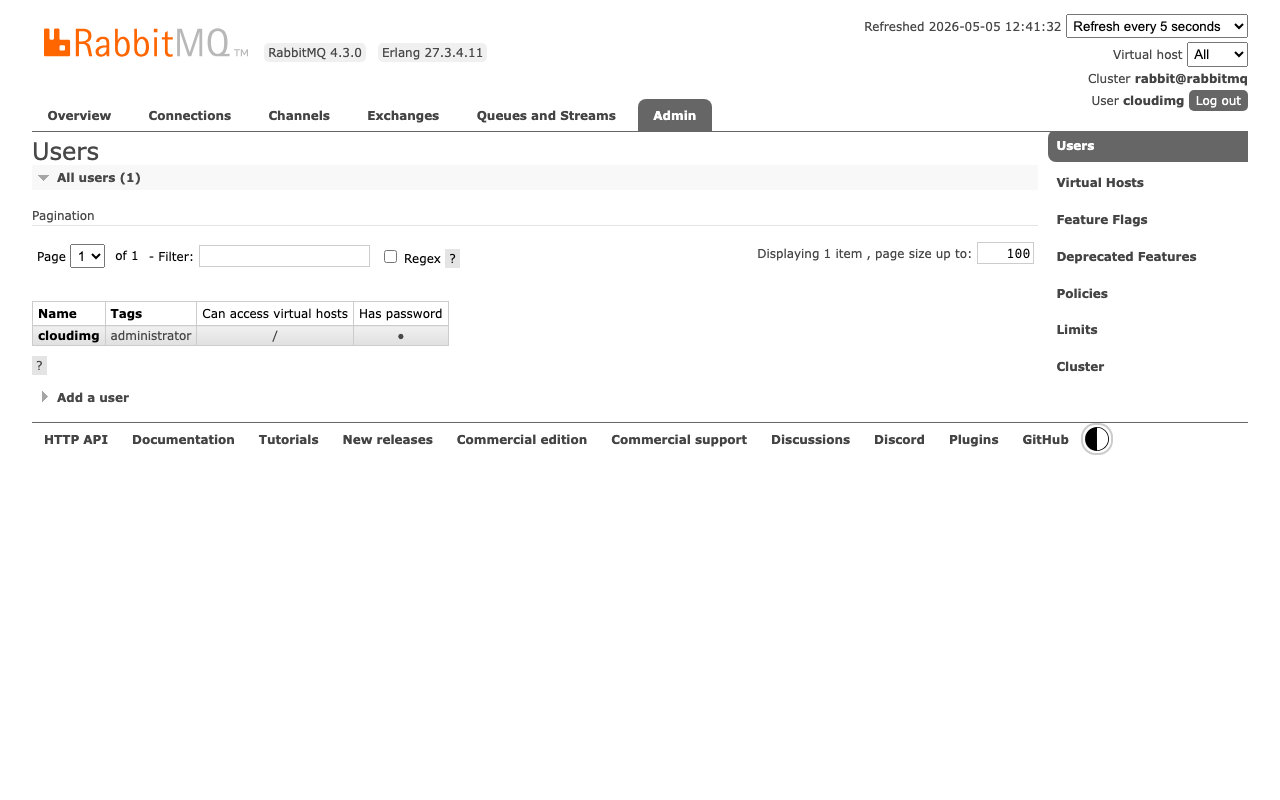
Step 9: Admin Users Tab
Click Admin → Users. The list shows the per-VM cloudimg user with the administrator tag and full permissions on the default vhost /. Add additional users from this page (or via rabbitmqctl add_user); the default upstream guest user is intentionally absent.
Step 10: Create a Queue and Publish a Message
PASS=$(sudo grep '^RABBITMQ_ADMIN_PASSWORD=' /stage/scripts/rabbitmq-credentials.log | cut -d= -f2-)
sudo docker exec rabbitmq rabbitmqctl set_permissions -p / cloudimg ".*" ".*" ".*"
sudo docker exec rabbitmq rabbitmqadmin --username=cloudimg --password="$PASS" --non-interactive \
    declare queue --name hello-world --type classic --durable true
sudo docker exec rabbitmq rabbitmqadmin --username=cloudimg --password="$PASS" --non-interactive \
    publish message --routing-key hello-world --payload "Hello from cloudimg"
sudo docker exec rabbitmq rabbitmqadmin --username=cloudimg --password="$PASS" --non-interactive \
    get messages --queue hello-world --ack-mode ack_requeue_false
The same workflow is available from the management UI under Queues and Streams (declare a queue) and the queue's Publish message + Get messages sections. The bundled rabbitmqadmin v2 (Rust) ships with the upstream rabbitmq:4.3.0-management image and uses subcommand-style flags (e.g. --name, --routing-key).
Step 11: Connect from a Client (Python pika example)
import pika

VM_IP = '<vm-ip>'
PASS = '<password-from-step-5>'

creds = pika.PlainCredentials('cloudimg', PASS)
conn = pika.BlockingConnection(
    pika.ConnectionParameters(host=VM_IP, port=5672, virtual_host='/', credentials=creds)
)
ch = conn.channel()
ch.queue_declare(queue='hello', durable=True)
ch.basic_publish(exchange='', routing_key='hello', body='Hello World!')
print('published')
conn.close()
Install pika with pip install pika. The same RABBITMQ_AMQP_URL from Step 5 works directly with pika.URLParameters, kombu, aio-pika, Spring AMQP, .NET RabbitMQ.Client, and any other AMQP 0-9-1 library.
Step 12: Enable Additional Plugins
sudo docker exec rabbitmq rabbitmq-plugins enable \
    rabbitmq_shovel rabbitmq_shovel_management \
    rabbitmq_federation rabbitmq_federation_management \
    rabbitmq_mqtt rabbitmq_stomp
sudo docker exec rabbitmq rabbitmq-plugins list -E
rabbitmq-plugins enable is idempotent and applies live — no broker restart required for shovel, federation, MQTT, or STOMP. The MQTT listener binds on 1883/tcp and STOMP on 61613/tcp (open the matching NSG rules to expose them).
Step 13: Add Your Domain
Edit /etc/rabbitmq/rabbitmq.conf to set cluster_name to a stable identifier:
sudo sed -i 's/^cluster_name = .*/cluster_name = rabbit-prod-1/' /etc/rabbitmq/rabbitmq.conf
sudo systemctl restart rabbitmq.service
Then open the NSG to your client subnet on 5672/tcp (AMQP) and your management subnet on 15672/tcp (Management UI). Erlang distribution port 25672/tcp is bound only inside the Docker bridge — leave it closed on the NSG.
Step 14: Install Let's Encrypt SSL for the Management UI
Install nginx and certbot, then put nginx in front of the management UI:
sudo apt-get update && sudo apt-get install -y nginx python3-certbot-nginx
sudo tee /etc/nginx/sites-available/rabbitmq <<'EOF'
server {
    listen 80;
    server_name rabbit.example.com;
    location / {
        proxy_pass http://127.0.0.1:15672;
        proxy_set_header Host $host;
        proxy_set_header X-Real-IP $remote_addr;
        proxy_set_header X-Forwarded-For $proxy_add_x_forwarded_for;
        proxy_set_header X-Forwarded-Proto $scheme;
    }
}
EOF
sudo ln -sf /etc/nginx/sites-available/rabbitmq /etc/nginx/sites-enabled/rabbitmq
sudo rm -f /etc/nginx/sites-enabled/default
sudo nginx -t && sudo systemctl reload nginx
sudo certbot --nginx -d rabbit.example.com -m you@example.com --agree-tos --non-interactive --redirect
Certbot edits the nginx site to add the SSL server block and a :80 → :443 redirect, then reloads nginx. Renewal is via the certbot.timer systemd unit (runs twice daily). For TLS on the AMQP listener (5671/tcp) follow the upstream RabbitMQ TLS guide — it requires bind-mounting the cert PEM into the container and adding listeners.ssl.default = 5671 to /etc/rabbitmq/rabbitmq.conf.
Step 15: Backups
Export the broker definitions (users, vhosts, exchanges, queues, bindings, policies) with the broker running, plus snapshot the mnesia data dir for queue contents:
sudo docker exec rabbitmq rabbitmqctl export_definitions /tmp/defs.json
sudo docker cp rabbitmq:/tmp/defs.json /var/backups/rabbitmq-defs-$(date +%F).json
sudo systemctl stop rabbitmq.service
sudo tar czf /var/backups/rabbitmq-data-$(date +%F).tgz -C /data rabbitmq
sudo systemctl start rabbitmq.service
Periodically copy /var/backups to Azure Blob Storage (az storage blob upload-batch) for off-VM retention. Restore is import_definitions /tmp/defs.json (broker running) plus untarring the data dir back to /data/rabbitmq (broker stopped).
Step 16: Logs and Troubleshooting
sudo docker logs rabbitmq --tail 80
sudo journalctl -u rabbitmq.service --no-pager -n 50
sudo journalctl -u rabbitmq-firstboot.service --no-pager -n 50
sudo docker exec rabbitmq rabbitmq-diagnostics check_running
sudo docker exec rabbitmq rabbitmq-diagnostics check_local_alarms
sudo docker exec rabbitmq rabbitmq-diagnostics check_port_listener 5672
sudo docker exec rabbitmq rabbitmq-diagnostics check_port_listener 15672
Tail container logs with docker logs --tail for a snapshot, or docker logs rabbitmq -f for a live follow (interactive). Systemd unit logs cover the wrapper service (start/stop, dependency failures). rabbitmq-diagnostics gives focused health probes — check_local_alarms flips non-zero on memory or disk-space pressure, check_port_listener confirms the AMQP and management listeners are bound, and rabbitmq-diagnostics status (run interactively) prints the full broker state.
Security
- Per-VM
cloudimgadministrator password (32 hex chars fromopenssl rand) rotated at first boot - Default upstream
guestuser is intentionally never created — definitions.json importscloudimgonly on an empty mnesia - Per-VM Erlang cookie (32 hex chars) rotated at first boot — required for any
rabbitmqctl/rabbitmq-diagnosticsinvocation - AMQP listener
5672/tcpand management UI15672/tcpare bound on the host — restrict via NSG to known client and management CIDRs - Erlang distribution port
25672/tcpis bound only inside the Docker bridge network — never reachable from the host or the public IP - Container runs as the upstream
rabbitmquser (uid 999), not root - Optional TLS on the management UI via nginx + certbot (Step 14); optional TLS on AMQP via
5671/tcplistener config
Support
cloudimg provides 24/7/365 expert technical support. Guaranteed response within 24 hours, one hour average for critical issues. Contact support@cloudimg.co.uk.