Shlink URL Shortener on AWS User Guide
Overview
This image runs Shlink, the self hosted URL shortener, behind nginx with PHP FPM 8.4. Short URLs, their visits and all analytics are stored in a SQLite database on a dedicated, independently resizable EBS data volume mounted at /opt/shlink-data, so the data tier is separate from the operating system disk. The official Shlink web client, a single page application, is served on the same instance and is pre connected to the local REST API.
The Shlink REST API and short URL redirects are served at the instance root, with the API under the /rest path. The Shlink web client is served at the instance root as well, so browsing to the instance address opens the management console. A systemd timer runs Shlink's visit processing every fifteen minutes.
A per instance administrator API key is generated on the first boot of every deployed instance. Two instances launched from the same Amazon Machine Image never share a key, and no demo data, short URLs or keys ship in the image. The generated key is written to /root/shlink-credentials.txt with mode 0600 so that only the root user can read it, and the web client's server entry is wired to it automatically.
On first boot the image reads the instance's public address from EC2 instance metadata and uses it as Shlink's default short domain, so generated short URLs use the address customers reach the instance on. To serve short links on your own branded domain, set a custom domain as described later in this guide.
Prerequisites
Before you deploy this image you need:
- An Amazon Web Services account where you can launch EC2 instances
- IAM permissions to launch instances, create security groups, and subscribe to AWS Marketplace products
- An EC2 key pair in the target Region for SSH access to the instance
- A VPC and subnet in the target Region, with a security group allowing inbound port 22 from your management network and inbound ports 80 and 443 from the networks that will use your short links
- The AWS CLI (version 2) installed locally if you plan to deploy from the command line
Step 1: Launch the Instance from the AWS Marketplace
Sign in to the AWS Management Console, open the EC2 service, and select Launch instance. Under Application and OS Images choose AWS Marketplace AMIs and search for Shlink URL Shortener. Select the cloudimg listing and choose Select, then Continue on the subscription summary.
Pick an instance type of m5.large or larger. Choose your EC2 key pair under Key pair (login). Under Network settings select your VPC and subnet, and either create or select a security group that allows inbound port 22 from your management network and inbound ports 80 and 443 from the networks that will use your short links. Leave the root volume and the attached data volume at their default sizes or larger.
Select Launch instance. First boot initialisation takes approximately one minute after the instance state becomes Running and the status checks pass.
Step 2: Launch the Instance from the AWS CLI
The following block launches an instance from the cloudimg Shlink Marketplace AMI into an existing subnet and security group. Replace <ami-id> with the AMI ID shown on the Marketplace listing, <key-name> with your EC2 key pair name, <subnet-id> with your subnet ID, and <security-group-id> with a security group that opens ports 22, 80, and 443 as described above.
aws ec2 run-instances \
  --image-id <ami-id> \
  --instance-type m5.large \
  --key-name <key-name> \
  --subnet-id <subnet-id> \
  --security-group-ids <security-group-id> \
  --block-device-mappings '[{"DeviceName":"/dev/sda1","Ebs":{"VolumeSize":12,"VolumeType":"gp3"}}]' \
  --tag-specifications 'ResourceType=instance,Tags=[{Key=Name,Value=shlink-01}]'
The command prints a JSON document on success. Note the instance ID, then retrieve its public address once it is running with aws ec2 describe-instances --instance-ids <instance-id> --query "Reservations[].Instances[].PublicIpAddress" --output text.
Step 3: Connect and Retrieve the API Key
Connect over SSH with the key pair you selected and the public IP address from step 2. The SSH login user depends on the operating system of the AMI variant you launched:
| AMI variant | SSH login user |
|---|---|
| Shlink 5.1.0 on Ubuntu 24.04 | ubuntu |
Once connected, read the generated API key. It is stored in a root only file, so use sudo:
sudo cat /root/shlink-credentials.txt
The file contains the web client URL, the REST API base URL, and the per instance API key:
shlink.web.client=http://<your-instance-address>/
shlink.api.base=http://<your-instance-address>/rest
shlink.api.key=8f3c9a21-7d4e-4b6a-9c2f-1e5d8a0b3f47
Step 4: Confirm the Service Is Healthy
Shlink exposes an unauthenticated health endpoint. From the instance, confirm it reports pass and the expected version:
curl -s http://127.0.0.1/rest/health
A healthy instance returns a JSON document containing "status":"pass" and "version":"5.1.0".
Step 5: Open the Shlink Web Client
Browse to http://<your-instance-address>/ in a web browser. The Shlink web client loads and automatically connects to this instance using the generated API key, so no manual server set up is required. The Overview page shows your total visits, the number of short URLs, recently created links, and a form to create a new short URL.
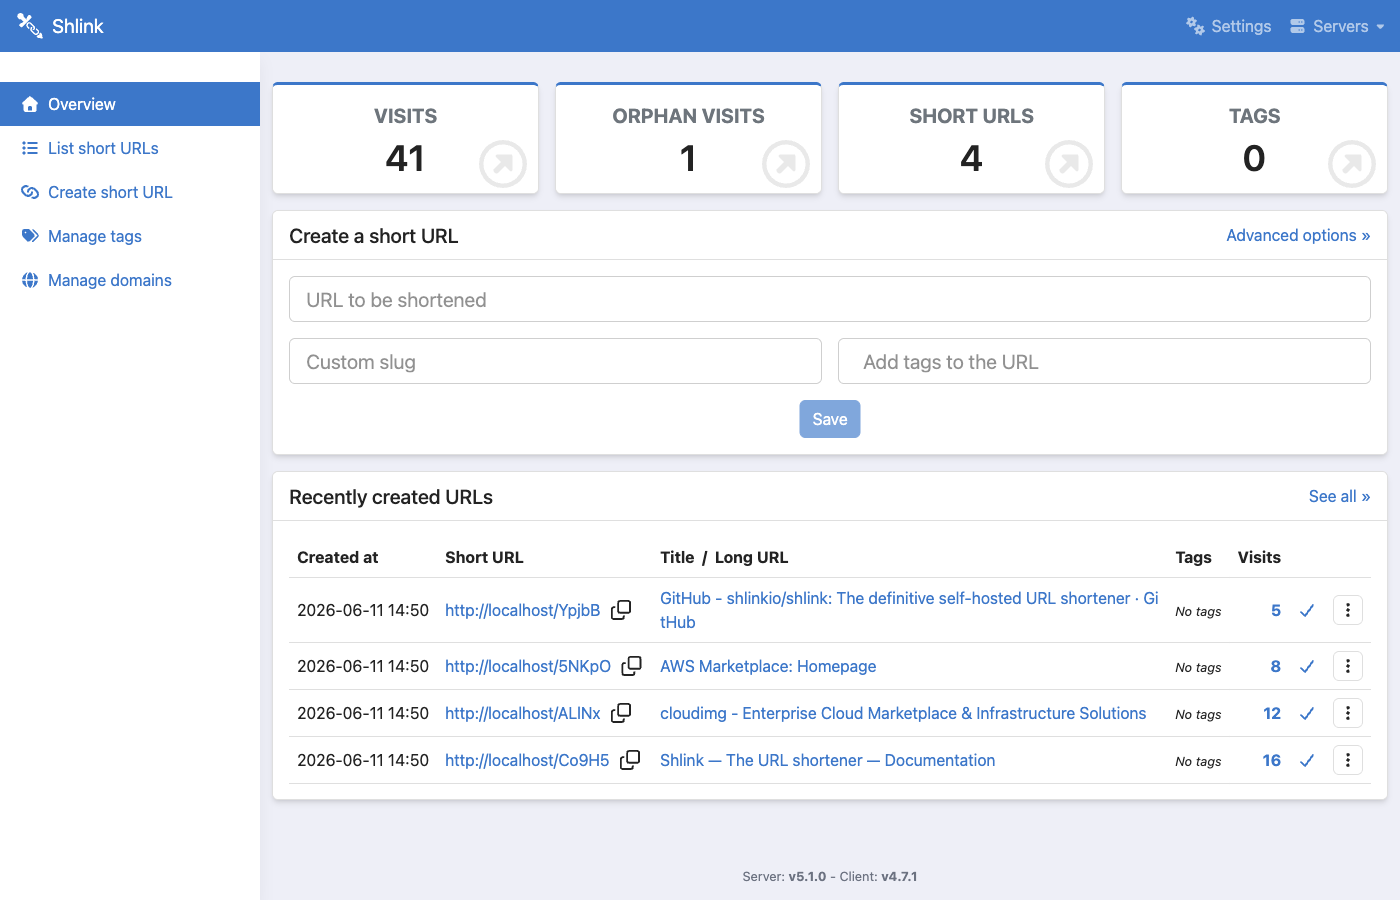
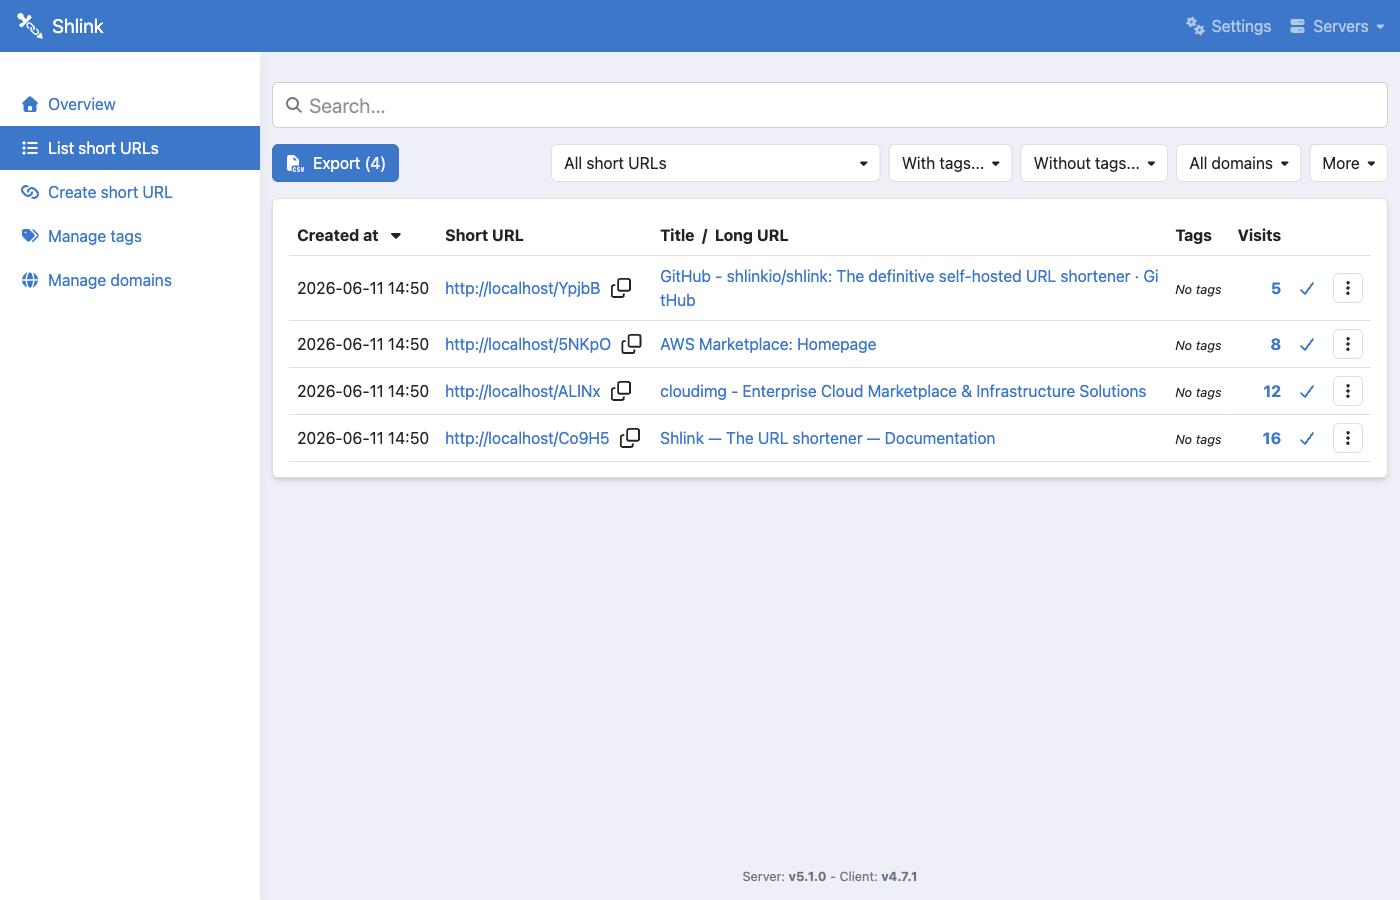
The List short URLs page lists every short URL with its destination, tags and visit count, and provides search and filtering.
Step 6: Create a Short URL
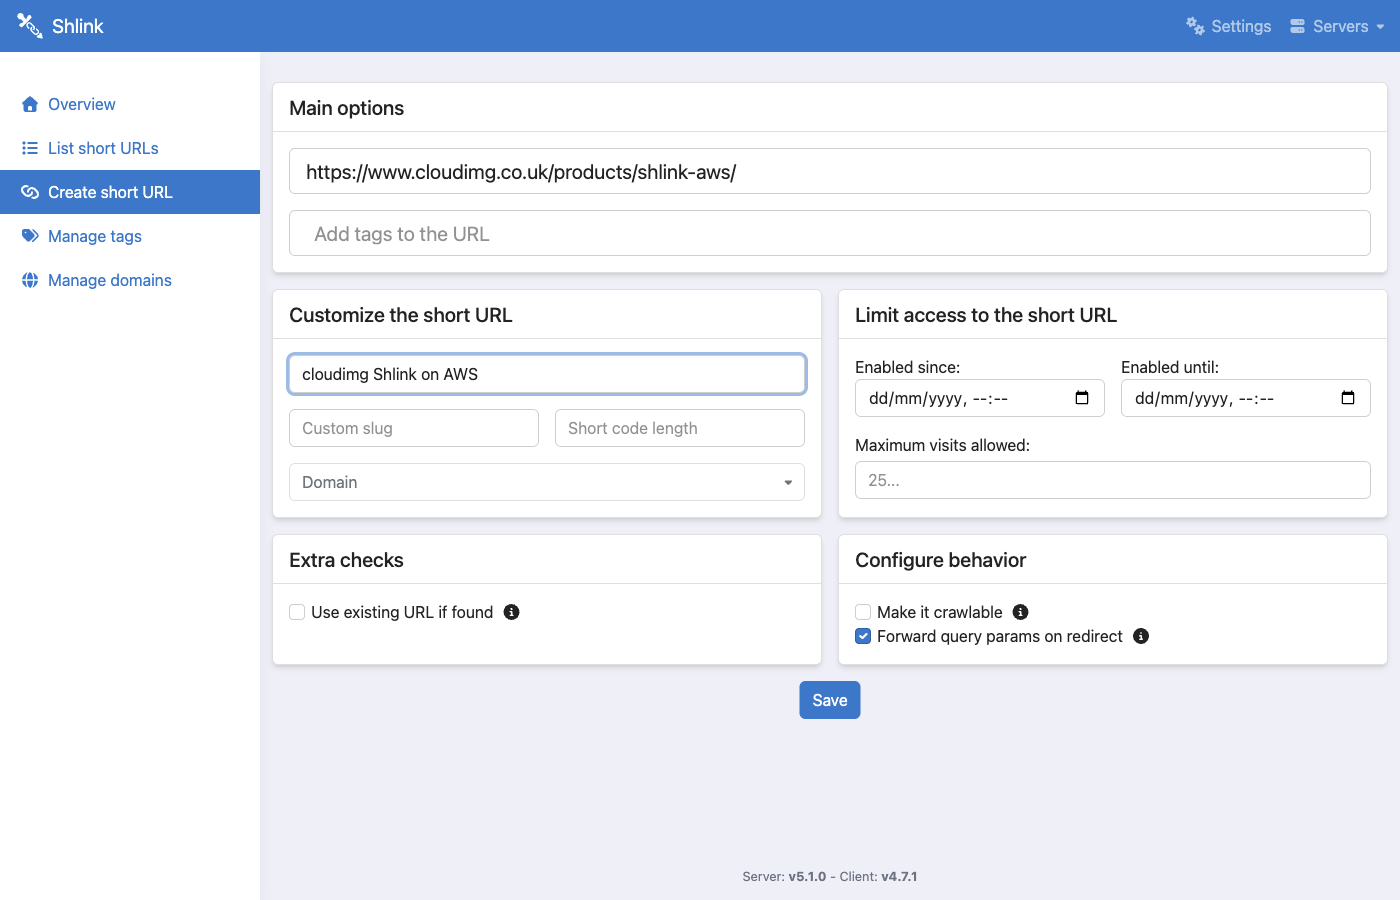
Open Create short URL in the web client, paste the long URL you want to shorten into URL to be shortened, optionally set a title, custom slug, tags or access limits, and select Save. The web client returns the generated short URL, which you can copy with one click.
You can also create a short URL directly through the REST API with the key from step 3. The following command reads the key from the credentials file and creates a short URL for https://www.cloudimg.co.uk:
SHLINK_KEY=$(sudo grep '^shlink.api.key=' /root/shlink-credentials.txt | cut -d= -f2-)
curl -s -X POST -H "X-Api-Key: ${SHLINK_KEY}" -H 'Content-Type: application/json' \
  -d '{"longUrl":"https://www.cloudimg.co.uk","findIfExists":true}' \
  http://127.0.0.1/rest/v3/short-urls
The response is a JSON document describing the new short URL, including its shortCode and full shortUrl.
Step 7: List Short URLs Through the REST API
The same key authenticates read requests. List all short URLs:
SHLINK_KEY=$(sudo grep '^shlink.api.key=' /root/shlink-credentials.txt | cut -d= -f2-)
curl -s -H "X-Api-Key: ${SHLINK_KEY}" http://127.0.0.1/rest/v3/short-urls
Requests without a valid key are rejected. The following request omits the header and returns HTTP 401, confirming the API is protected:
curl -s -o /dev/null -w 'HTTP %{http_code}\n' http://127.0.0.1/rest/v3/short-urls
Step 8: Read Visit Analytics
Every time a short URL is followed, Shlink records a visit. In the web client, select the visit count beside any short URL to open its analytics, which break visits down by time, by context (browser, operating system, referrer) and by location.
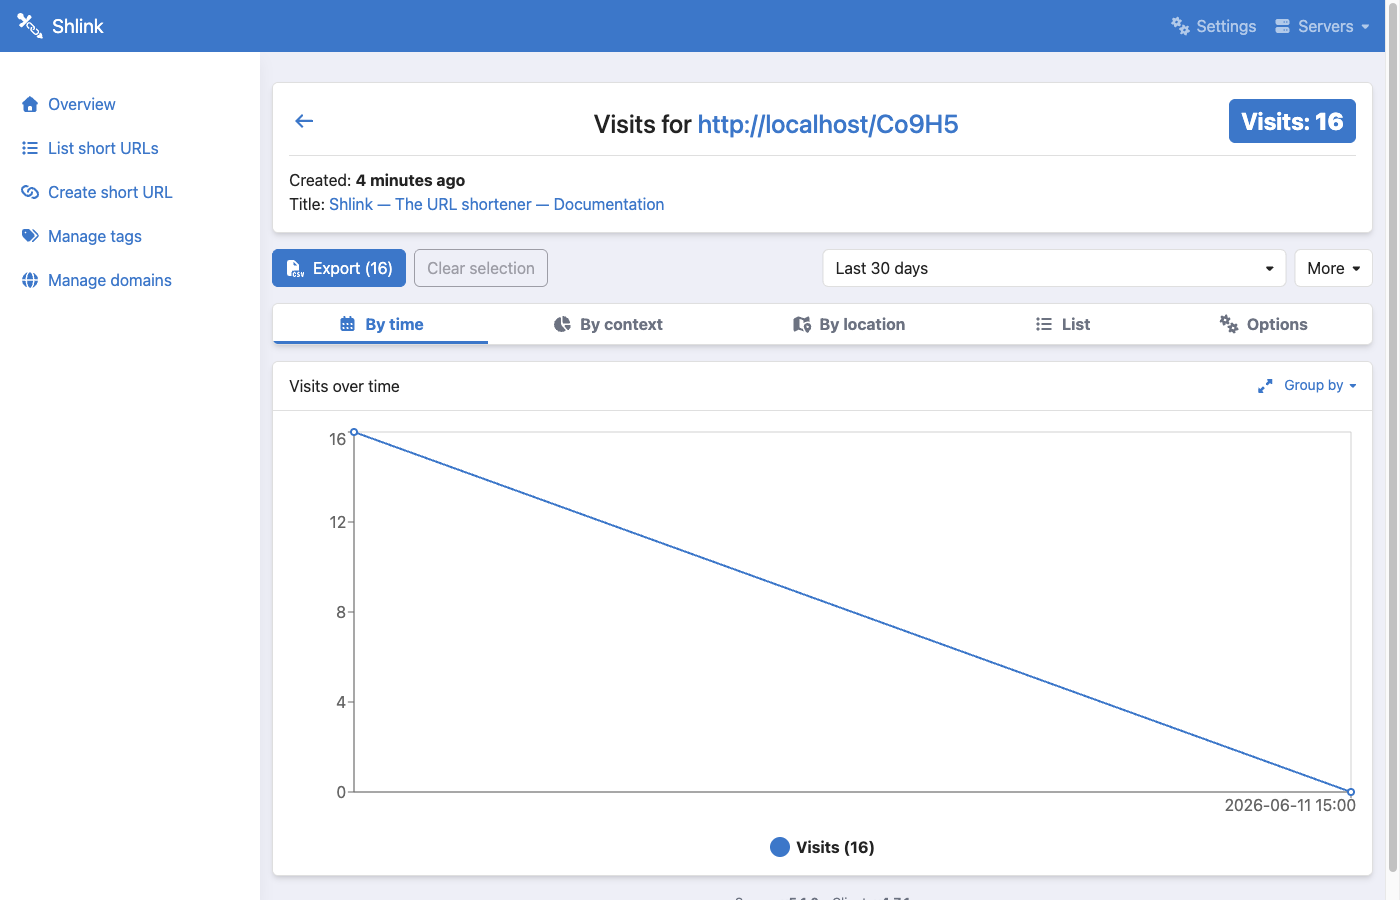
Visit geolocation is resolved by a systemd timer, shlink-visits.timer, which runs every fifteen minutes. Inspect its status with:
systemctl status shlink-visits.timer --no-pager
Geolocation requires a free MaxMind GeoLite2 license key. Without one, visits are still recorded and analysed by time and context; only the location breakdown is unavailable. To enable location resolution, obtain a license key from MaxMind, add 'GEOLITE_LICENSE_KEY' => '<your-key>', to the array in /opt/shlink/config/params/generated_config.php, and run sudo -u www-data php8.4 /opt/shlink/bin/cli visit:download-db.
Step 9: Manage API Keys
Shlink supports multiple API keys with different roles. List the keys on the instance:
sudo -u www-data php8.4 /opt/shlink/bin/cli api-key:list
To generate an additional key, for example for a separate application, use the api-key:generate command. Run it interactively from your SSH session and record the key it prints, because Shlink only shows the full key once at creation:
sudo -u www-data php8.4 /opt/shlink/bin/cli api-key:generate --name=my-application
Step 10: Use a Custom Short Domain
By default short URLs use the instance's address. To serve short links on your own domain, point a DNS record at the instance, then edit /opt/shlink/config/params/generated_config.php and set 'DEFAULT_DOMAIN' to your domain and 'IS_HTTPS_ENABLED' to true once you have TLS in place. Restart the service afterwards with sudo systemctl restart php8.4-fpm nginx.
Step 11: Enable HTTPS
For production use, terminate TLS in front of Shlink. The simplest approach on a single instance is Let's Encrypt with Certbot. Install Certbot and request a certificate for your domain, then set 'IS_HTTPS_ENABLED' => true in the configuration file. Because Certbot prompts interactively for an email address and agreement to the terms of service, run it directly in your SSH session rather than from a script:
sudo apt-get install -y certbot python3-certbot-nginx
sudo certbot --nginx -d your-domain.example.com
Certbot edits the nginx configuration to serve HTTPS and installs a renewal timer. After it completes, reload nginx with sudo systemctl reload nginx.
Step 12: Backups
All Shlink data lives in the SQLite database on the data volume at /opt/shlink-data/data/database.sqlite. Back it up with a consistent copy:
sudo sqlite3 /opt/shlink-data/data/database.sqlite ".backup '/tmp/shlink-backup.sqlite'"
For a complete point in time backup of the data tier, create an EBS snapshot of the data volume from the EC2 console or the AWS CLI. To restore, stop the web tier, replace the database file, and start the web tier again.
Step 13: Service Management
The Shlink stack is managed by systemd. The web tier is php8.4-fpm.service and nginx.service; visit processing is shlink-visits.timer. Check their state with:
systemctl is-active nginx.service php8.4-fpm.service
To restart the web tier after a configuration change:
sudo systemctl restart php8.4-fpm nginx
Support
This image is supported by cloudimg. For assistance with deployment, custom domains, REST API integration, analytics, or database administration, contact cloudimg support 24 hours a day, 7 days a week by email and chat.
All product and company names are trademarks or registered trademarks of their respective holders. Use of them does not imply any affiliation with or endorsement by them.