SQL Server 2022 Standard on Ubuntu 22.04 on Azure User Guide
Overview
This guide covers the deployment and configuration of SQL Server 2022 Standard on Ubuntu 22.04 on Azure using cloudimg Azure Marketplace images. SQL Server 2022 is Microsoft's current relational database platform, delivering Azure Arc enabled services out of the box, a query store that is on by default, intelligent query processing, ledger tables for tamper evident audit, and accelerated database recovery on every edition. Standard Edition is the right choice for departmental workloads, smaller production databases, and teams that do not need the unlimited scale of Enterprise but still need a production supported SQL Server on Linux.
The image ships SQL Server 2022 Standard Edition installed from the official Microsoft APT repository at packages.microsoft.com pinned to Ubuntu 22.04 jammy. The Microsoft GPG key is verified at build time so the chain of trust is unambiguous. On every fresh customer virtual machine, mssql-firstboot.service rotates the SA password from the build time placeholder to a strong random value unique to that virtual machine, creates the default cloudimg database, provisions a cloudimg SQL login with db_owner on that database, removes the build time memory cap, and writes the credentials to /stage/scripts/mssql-credentials.log. This pattern means no two virtual machines ever share an SA password and no password is baked into the image at any point.
Bring Your Own License. This image contains SQL Server 2022 Standard Edition binaries. The Standard software license is NOT included. Customers apply their own Standard product key on first login. Without a product key applied, Standard features run in evaluation mode for 180 days. After the evaluation period expires a valid Standard license must be applied to keep the service operational.
What is included:
-
Microsoft SQL Server 2022 Standard Edition from packages.microsoft.com
-
mssql-tools18 including sqlcmd and bcp for database administration
-
Listener on TCP port 1433 on every interface by default
-
Per VM SA and cloudimg passwords generated on first boot, written to
/stage/scripts/mssql-credentials.log -
Default
cloudimgdatabase created on first boot -
cloudimg SQL login with
db_ownerrole on the cloudimg database -
Systemd service
mssql-server.servicefor automatic startup on boot -
Systemd oneshot
mssql-firstboot.servicefor idempotent per VM credential rotation -
Ubuntu 22.04 LTS base with latest security patches applied at build time
-
Azure Linux Agent for seamless cloud integration and SSH key injection
-
24/7 cloudimg support with guaranteed 24 hour response SLA
Prerequisites
Before deploying this image, ensure you have:
-
An active Azure subscription
-
A subscription to the SQL Server 2022 Standard on Ubuntu 22.04 listing on Azure Marketplace
-
A valid SQL Server 2022 Standard product key for BYOL activation
-
An SSH public key for virtual machine authentication
-
Familiarity with Azure virtual machine management and SSH
-
A virtual network and subnet in the target region
Recommended virtual machine size: Standard_D2s_v5 (2 vCPU, 8 GB RAM) or larger. Standard Edition supports up to 24 cores and 128 GB buffer pool RAM. For typical departmental workloads Standard_D4s_v5 (4 vCPU, 16 GB RAM) is a comfortable starting point with room to grow.
Step 1: Deploy the Virtual Machine from the Azure Portal
Navigate to Marketplace in the Azure Portal, search for SQL Server 2022 Standard, and select the cloudimg publisher entry. Click Create to begin the wizard.
On the Basics tab choose your subscription, target resource group, and region. Set the virtual machine name. Choose SSH public key as the authentication type, set the username to a name of your choice (the examples below use azureuser), and paste your SSH public key. Standard_D2s_v5 is the recommended starting size.
On the Disks tab set the OS disk type to Standard SSD or Premium SSD. SQL Server data lives at /var/opt/mssql/data on the root disk by default. For production workloads attach a separate Premium SSD data disk and bind mount it over /var/opt/mssql/data before starting the service.
On the Networking tab select your existing virtual network and subnet. Attach a network security group that allows inbound TCP 22 from your management IP range and inbound TCP 1433 only from application server subnets or the virtual network CIDR. Do not expose port 1433 to the public internet. The SA password is written in plain text on the virtual machine by design so you can read it without a second trip; an internet exposed SQL Server port would make brute force attacks trivial.
On the Management, Monitoring, and Advanced tabs the defaults are appropriate. Click Review + create, wait for validation to pass, then click Create. Deployment takes around two minutes.
Step 2: Deploy the Virtual Machine from the Azure CLI
If you prefer the command line, use the gallery image resource identifier as the source. The exact resource identifier is published on your Partner Center plan. A representative invocation:
RG="mssql-prod"
LOCATION="eastus"
VM_NAME="mssql-01"
ADMIN_USER="azureuser"
GALLERY_IMAGE_ID="/subscriptions/<sub-id>/resourceGroups/azure-cloudimg/providers/Microsoft.Compute/galleries/cloudimgGallery/images/mssql-2022-standard-ubuntu-22-04/versions/<version>"
SSH_KEY="$(cat ~/.ssh/id_rsa.pub)"

az group create --name "$RG" --location "$LOCATION"

az network vnet create \
  --resource-group "$RG" \
  --name mssql-vnet \
  --address-prefix 10.80.0.0/16 \
  --subnet-name mssql-subnet \
  --subnet-prefix 10.80.1.0/24

az network nsg create --resource-group "$RG" --name mssql-nsg

az network nsg rule create \
  --resource-group "$RG" --nsg-name mssql-nsg \
  --name allow-ssh-mgmt --priority 100 \
  --source-address-prefixes "<your-mgmt-cidr>" \
  --destination-port-ranges 22 --access Allow --protocol Tcp

az network nsg rule create \
  --resource-group "$RG" --nsg-name mssql-nsg \
  --name allow-sql-vnet --priority 110 \
  --source-address-prefixes VirtualNetwork \
  --destination-port-ranges 1433 --access Allow --protocol Tcp

az vm create \
  --resource-group "$RG" \
  --name "$VM_NAME" \
  --image "$GALLERY_IMAGE_ID" \
  --size Standard_D2s_v5 \
  --admin-username "$ADMIN_USER" \
  --ssh-key-values "$SSH_KEY" \
  --nsg mssql-nsg \
  --vnet-name mssql-vnet \
  --subnet mssql-subnet \
  --storage-sku Premium_LRS \
  --location "$LOCATION"
Step 3: Connect to the Virtual Machine
Once the virtual machine is running, SSH in using the private IP address from inside the virtual network, or the public IP if you have configured a bastion or direct management access. The default admin user is azureuser.
ssh azureuser@<vm-ip>
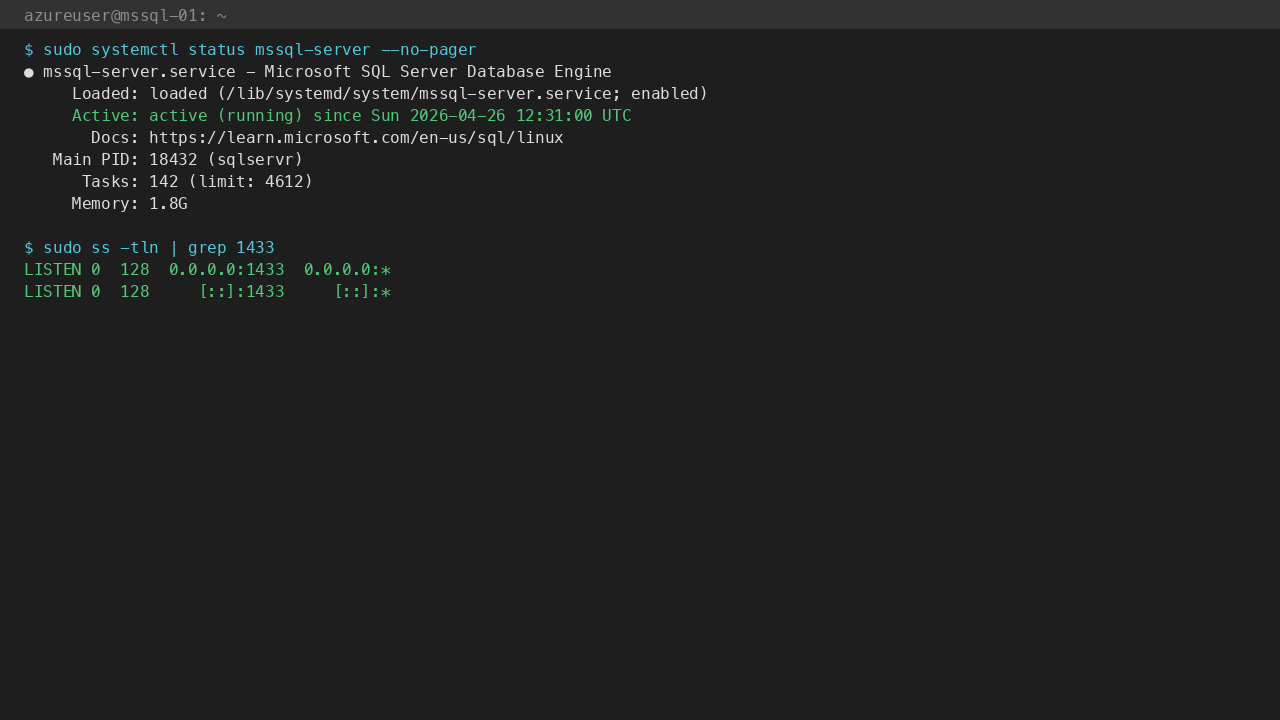
Step 4: Confirm the Service is Running
The mssql-firstboot.service runs automatically on first boot, completing within about 90 seconds. By the time your SSH session is open, the firstboot is typically already done. Confirm the service status:
sudo systemctl status mssql-server.service --no-pager
You should see active (running). Confirm the firstboot sentinel exists:
sudo test -f /var/opt/mssql/.firstboot-done && echo FIRSTBOOT_DONE
Confirm the TCP listener is bound on port 1433:
sudo ss -tln | grep 1433
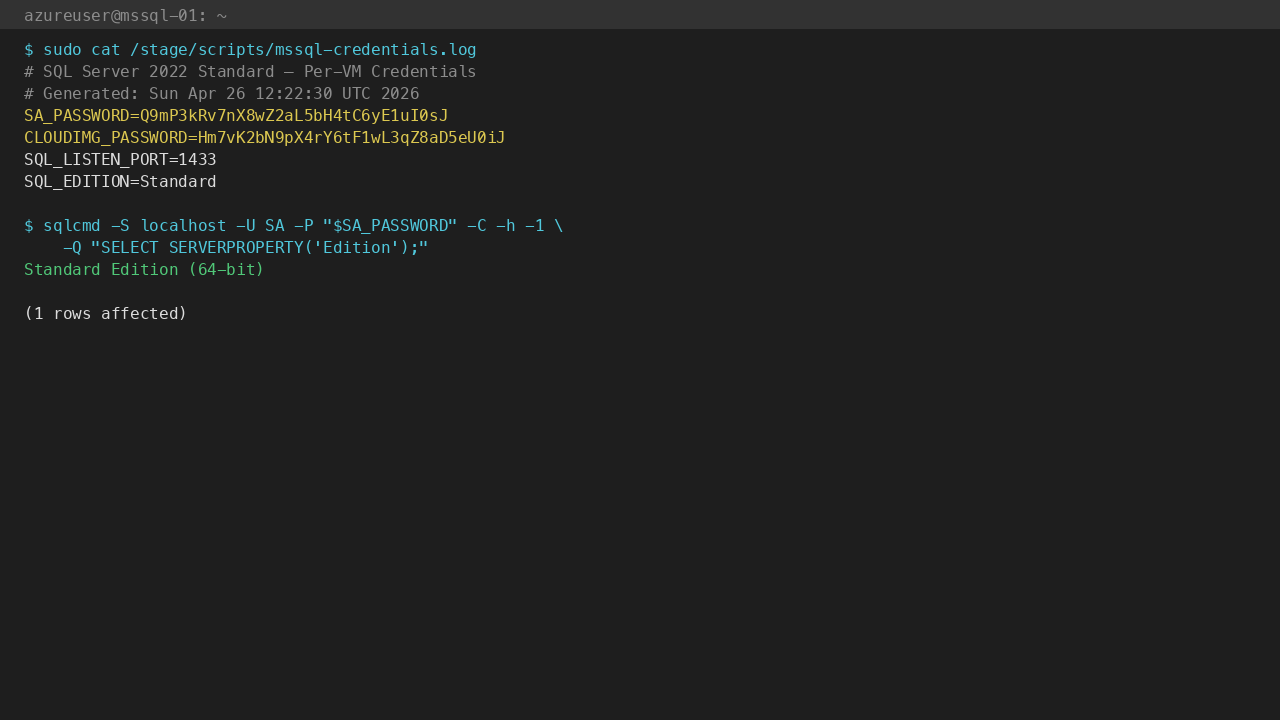
Step 5: Retrieve the SA and cloudimg Passwords
The SA and cloudimg passwords have been randomly generated on this specific virtual machine and written to a root only file. Read them with:
sudo cat /stage/scripts/mssql-credentials.log
You will see lines similar to:
SA_USER=sa
SA_PASSWORD=<SA_PASSWORD>
CLOUDIMG_USER=cloudimg
CLOUDIMG_PASSWORD=<CLOUDIMG_PASSWORD>
CLOUDIMG_DATABASE=cloudimg
Store the values in your secret store. You can shred the credentials file once the passwords are saved, but keeping it root protected at mode 0600 is a reasonable default for the life of the virtual machine.
Step 6: Connect Locally with sqlcmd
The mssql-tools18 package installs sqlcmd at /opt/mssql-tools18/bin/sqlcmd. Verify the binary is on PATH:
sudo ls -l /opt/mssql-tools18/bin/sqlcmd
Connect to the server as SA, reading the password directly from the credentials file:
SA_PASS=$(sudo awk -F= '/^SA_PASSWORD=/{print $2}' /stage/scripts/mssql-credentials.log)
/opt/mssql-tools18/bin/sqlcmd -S localhost -U sa -P "$SA_PASS" -C -Q "SELECT @@VERSION;"
You should see the server reports Microsoft SQL Server 2022.
Step 7: Confirm the Standard Edition
Confirm the running edition is Standard:
SA_PASS=$(sudo awk -F= '/^SA_PASSWORD=/{print $2}' /stage/scripts/mssql-credentials.log)
/opt/mssql-tools18/bin/sqlcmd -S localhost -U sa -P "$SA_PASS" -C -Q "SELECT SERVERPROPERTY('Edition') AS Edition;" -h -1 -W
You should see Standard Edition (64-bit).
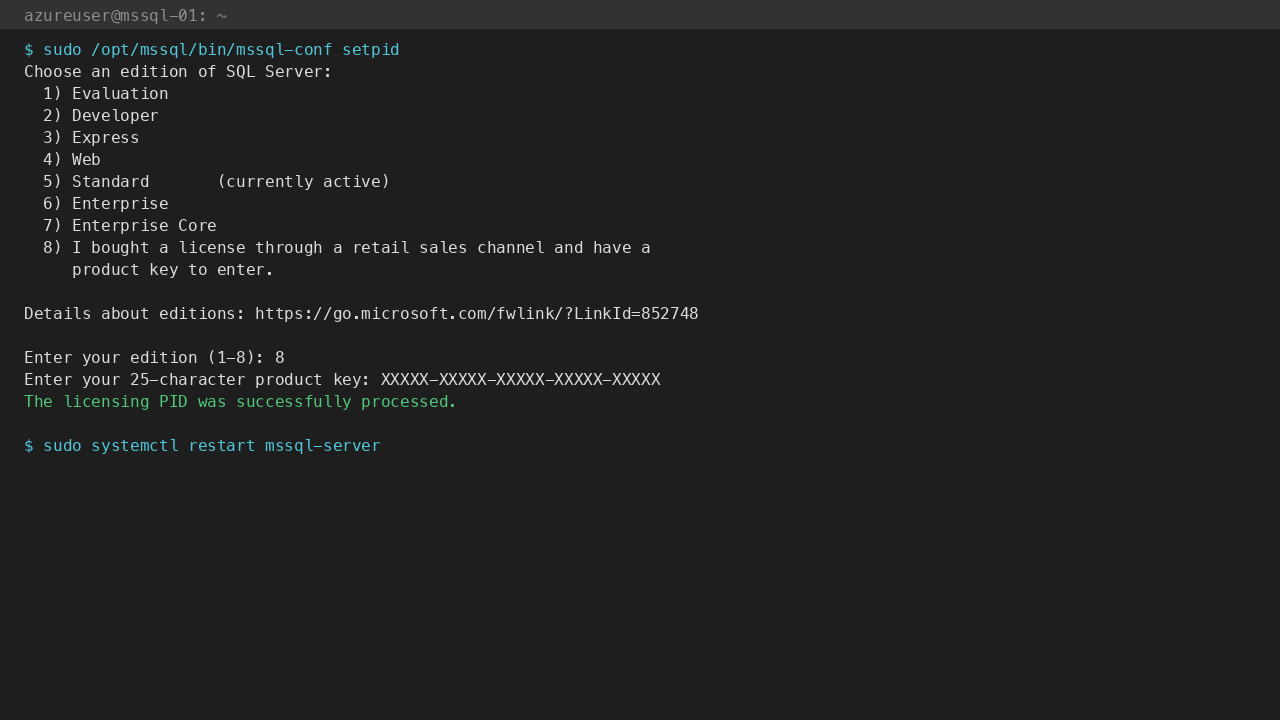
Step 8: Apply Your Standard License Key
The image ships Standard binaries in evaluation mode. Apply your product key to activate the license. Replace YOUR_STANDARD_LICENSE_KEY with the key from your Microsoft Volume Licensing agreement:
sudo /opt/mssql/bin/mssql-conf setpid YOUR_STANDARD_LICENSE_KEY
sudo systemctl restart mssql-server.service
Verify the license is active after the restart:
SA_PASS=$(sudo awk -F= '/^SA_PASSWORD=/{print $2}' /stage/scripts/mssql-credentials.log)
/opt/mssql-tools18/bin/sqlcmd -S localhost -U sa -P "$SA_PASS" -C -Q "SELECT SERVERPROPERTY('LicenseType') AS LicenseType;" -h -1 -W
The value PER_CORE confirms a perpetual Standard license; EVAL indicates the 180 day evaluation period is still active.
Step 9: Round-trip Test with sqlcmd
The cloudimg database and cloudimg login are ready to use from first boot. Run a round-trip query as the cloudimg user:
CL_PASS=$(sudo awk -F= '/^CLOUDIMG_PASSWORD=/{print $2}' /stage/scripts/mssql-credentials.log)
/opt/mssql-tools18/bin/sqlcmd -S localhost -U cloudimg -P "$CL_PASS" -C -d cloudimg -h -1 -W -Q "CREATE TABLE ##probe (id INT, val NVARCHAR(64)); INSERT INTO ##probe VALUES (1, N'cloudimg-ok'); SELECT val FROM ##probe WHERE id=1; DROP TABLE IF EXISTS ##probe;"
The output should include cloudimg-ok, confirming the cloudimg user has the expected permissions on the cloudimg database.

Step 10: Connect from a Remote Client
From any host inside the same virtual network that has sqlcmd or SQL Server Management Studio installed, connect on port 1433 with the SA or cloudimg credentials. A representative sqlcmd invocation from a remote client:
sqlcmd -S <private-ip>,1433 -U sa -P '<SA_PASSWORD>' -C -d cloudimg
SQL Server Management Studio and Azure Data Studio connect the same way, using the virtual machine's private IP and the SA or cloudimg credentials. If you are connecting from a management workstation outside the virtual network, use Azure Bastion or an SSH tunnel. Do not open port 1433 to the public internet.
Step 11: Server Components
Component Path
SQL Server daemon /opt/mssql/bin/sqlservr
sqlcmd client /opt/mssql-tools18/bin/sqlcmd
bcp bulk copy utility /opt/mssql-tools18/bin/bcp
mssql-conf configuration tool /opt/mssql/bin/mssql-conf
SQL Server data directory /var/opt/mssql/data/
SQL Server log directory /var/opt/mssql/log/
Systemd unit /lib/systemd/system/mssql-server.service
Firstboot systemd unit /etc/systemd/system/mssql-firstboot.service
Firstboot script /usr/local/sbin/mssql-firstboot.sh
Credentials file /stage/scripts/mssql-credentials.log
Firstboot sentinel /var/opt/mssql/.firstboot-done
Inspect the running mssql-server package version:
dpkg -l mssql-server mssql-tools18 | awk '/^ii/{print $2, $3}'
Step 12: Filesystem Layout
Mount point Size Description
/ 32 GB Root filesystem (includes /var/opt/mssql)
/boot 1 GB Operating system kernel files
/var/opt/mssql/data (on root) SQL Server data directory
/var/opt/mssql/log (on root) SQL Server transaction logs and error logs
For production workloads attach a separate Premium SSD data disk, format it with xfs, and bind mount it over /var/opt/mssql/data before starting the service. Place the transaction log directory on a separate disk for IO isolation. This keeps database IO off the OS disk and allows independent resize and snapshot of the data and log volumes.
Step 13: Managing the SQL Server Service
SQL Server is started and stopped by systemd via the mssql-server.service unit.
Check service status:
sudo systemctl status mssql-server.service --no-pager
Stop SQL Server:
sudo systemctl stop mssql-server.service && echo "mssql-server stopped"
Start SQL Server:
sudo systemctl start mssql-server.service && echo "mssql-server started"
Restart SQL Server:
sudo systemctl restart mssql-server.service && echo "mssql-server restarted"
View the SQL Server error log:
sudo tail -n 50 /var/opt/mssql/log/errorlog
Step 14: Troubleshooting
Cannot connect to SQL Server on port 1433
-
Verify the service is running:
sudo systemctl status mssql-server.service -
Verify the listener is bound:
sudo ss -tln | grep 1433 -
Check the error log:
sudo tail -n 50 /var/opt/mssql/log/errorlog -
Confirm the network security group allows TCP 1433 from your client source IP
-
Confirm the virtual machine NIC is in the expected subnet with the NSG attached
Authentication errors after connecting
-
Re read the SA password:
sudo awk -F= '/^SA_PASSWORD=/{print $2}' /stage/scripts/mssql-credentials.log -
Verify the firstboot sentinel exists:
ls -la /var/opt/mssql/.firstboot-done. If it is absent,mssql-firstboot.servicedid not complete; check its journal -
Check the firstboot journal:
sudo journalctl -u mssql-firstboot.service --no-pager
Firstboot service did not run
-
Check the firstboot service status:
sudo systemctl status mssql-firstboot.service --no-pager -
Review the journal:
sudo journalctl -u mssql-firstboot.service --no-pager -n 100 -
Verify SQL Server started:
sudo systemctl status mssql-server.service -
If SQL Server failed to start, check the error log:
sudo tail -n 100 /var/opt/mssql/log/errorlog
License evaluation expiry
-
Run
SELECT SERVERPROPERTY('LicenseType')to see the current state;EVALmeans the 180 day evaluation is still active -
Apply your Standard product key:
sudo /opt/mssql/bin/mssql-conf setpid <your-product-key>thensudo systemctl restart mssql-server.service -
Confirm the new state is
PER_COREafter the restart
Service fails to start
-
Check systemd journal:
sudo journalctl -u mssql-server.service --no-pager -n 100 -
Check the SQL Server error log:
sudo tail -n 100 /var/opt/mssql/log/errorlog -
Check filesystem space:
df -h /var/opt/mssql -
Verify data directory ownership:
sudo ls -la /var/opt/mssql/data | head; files should be ownedmssql:mssql
Step 15: Security Recommendations
-
Rotate the SA password on a schedule using
ALTER LOGIN [sa] WITH PASSWORD=N'<new-password>'; -
Create application specific logins with minimal privileges, never connect application code as SA
-
Restrict port 1433 to trusted application server subnets only in your NSG
-
Disable the SA login once named logins are in place:
ALTER LOGIN [sa] DISABLE; -
Back up regularly with native BACKUP DATABASE statements or SQL Agent jobs
-
Keep SQL Server updated by running
sudo apt-get update && sudo apt-get upgrade mssql-serverperiodically; the official packages.microsoft.com APT repository is already configured on this image -
Shred the credentials file once the passwords are stored in your secret store:
sudo shred -u /stage/scripts/mssql-credentials.log
Step 16: Support and Licensing
SQL Server 2022 Standard Edition is Microsoft proprietary software. A valid per core Standard license is required for production use after the 180 day evaluation period. Microsoft Server and SQL Server are registered trademarks of Microsoft Corporation.
cloudimg provides commercial support for this image separately from the upstream Microsoft product. Contact us at any time for support questions, architectural advice, capacity planning, or migration help.
-
Email: support@cloudimg.co.uk
-
Website: www.cloudimg.co.uk
-
Support hours: 24/7 with guaranteed 24 hour response SLA
Deploy on Azure
Launch SQL Server 2022 Standard on Ubuntu 22.04 with 24/7 support from cloudimg.
View on Marketplace
Need Help?
Our support team is available 24/7.
support@cloudimg.co.uk