
Supabase on AWS User Guide
Overview
This image runs Supabase as a single node deployment. Supabase is the open source Firebase alternative: a full PostgreSQL database with instant auto generated REST and Realtime APIs, an authentication and user management service, object storage and a Studio web dashboard, all from a single open source stack. The image delivers the official Supabase self host Docker Compose stack fully installed and configured, so a complete backend as a service is running within minutes of launch.
Supabase runs as a Docker Compose stack: a PostgreSQL database, GoTrue for authentication, PostgREST for the auto generated REST API, the Realtime server for live subscriptions, the Storage and imgproxy services for object storage, postgres-meta and the Studio dashboard for database management, the Kong API gateway, the Supavisor connection pooler and the supporting services. The whole stack is brought up and down by a single supabase.service systemd unit at boot. Docker Engine and the Docker Compose plugin are installed from the official Docker package repository.
The Kong API gateway is the single entry point to the whole stack. It listens on the loopback address only, and nginx on port 80 reverse-proxies to it. Kong enforces HTTP basic authentication on the Studio dashboard routes using the DASHBOARD_USERNAME (supabase) and the per instance DASHBOARD_PASSWORD, so the Studio user interface and the management routes are reachable on port 80 only with the generated dashboard credentials.
Every secret in the stack is generated on the first boot of each deployed instance. Two instances launched from the same Amazon Machine Image never share a database password, a JWT secret, a dashboard password or the derived API keys. The generated credentials are written to /root/supabase-credentials.txt with mode 0600 so that only the root user can read them.
The PostgreSQL data directory and the Storage object data live on a separate, independently resizable EBS volume mounted at /var/lib/supabase. The database and the uploaded objects land on this dedicated disk rather than the operating system disk.
Prerequisites
Before you deploy this image you need:
- An Amazon Web Services account where you can launch EC2 instances
- IAM permissions to launch instances, create security groups, and subscribe to AWS Marketplace products
- An EC2 key pair in the target Region for SSH access to the instance
- A VPC and subnet in the target Region, with a security group allowing inbound port 22 from your management network and inbound port 80 from the network you will reach the Studio dashboard from
- The AWS CLI (version 2) installed locally if you plan to deploy from the command line
Step 1: Launch the Instance from the AWS Marketplace
Sign in to the AWS Management Console, open the EC2 service, and select Launch instance. Under Application and OS Images choose AWS Marketplace AMIs and search for Supabase. Select the cloudimg listing and choose Select, then Continue on the subscription summary.
Pick an instance type of t3.large or larger. Supabase runs about a dozen containers in its Compose stack including a PostgreSQL database, the Realtime server and the Kong gateway, so it benefits from at least two vCPUs and 8 GiB of memory. Choose your EC2 key pair under Key pair (login). Under Network settings select your VPC and subnet, and either create or select a security group that allows inbound port 22 from your management network and inbound port 80 from the network you will reach the dashboard from. Leave the root volume at the default size or larger. The image also attaches a separate 30 GiB gp3 data volume mounted at /var/lib/supabase for the database and object storage.
Select Launch instance. First boot initialisation takes approximately three to five minutes after the instance state becomes Running and the status checks pass; Supabase rotates every secret and brings its full Compose stack up on the customer's first boot.
Step 2: Launch the Instance from the AWS CLI
The following block launches an instance from the cloudimg Supabase Marketplace AMI into an existing subnet and security group. Replace <ami-id> with the AMI ID shown on the Marketplace listing, <key-name> with your EC2 key pair name, <subnet-id> with your subnet ID, and <security-group-id> with a security group that opens ports 22 and 80 as described above.
aws ec2 run-instances \
  --image-id <ami-id> \
  --instance-type t3.large \
  --key-name <key-name> \
  --subnet-id <subnet-id> \
  --security-group-ids <security-group-id> \
  --block-device-mappings '[{"DeviceName":"/dev/sda1","Ebs":{"VolumeSize":20,"VolumeType":"gp3"}}]' \
  --tag-specifications 'ResourceType=instance,Tags=[{Key=Name,Value=supabase-01}]'
The command prints a JSON document on success. Note the instance ID, then retrieve its public address once it is running with aws ec2 describe-instances --instance-ids <instance-id> --query "Reservations[].Instances[].PublicIpAddress" --output text.
Step 3: Connect and Retrieve Initial Credentials
Connect over SSH with the key pair you selected and the public IP address from step 2. The SSH login user depends on the operating system of the AMI variant you launched:
| AMI variant | SSH login user |
|---|---|
| Supabase self-host on Ubuntu 24.04 | ubuntu |
The first boot service rotates every secret and writes the credentials file before it completes, so the file is always in place when you log in for the first time.
sudo cat /root/supabase-credentials.txt
You will see a plain text file containing the Supabase URL, the Studio dashboard username (supabase) and password, the auto generated anon and service_role API keys, and the PostgreSQL superuser password. Copy these values somewhere secure (a password manager or encrypted vault). Do not commit them to source control.
From the same SSH session you can confirm the deployment is healthy. The nginx liveness endpoint returns ok, and an authenticated request to the auto generated REST API through the Kong gateway returns 200 once the database, the gateway and PostgREST are all up:
curl -fsS http://127.0.0.1/health
ANON=$(sudo grep '^supabase.anon.key=' /root/supabase-credentials.txt | cut -d= -f2-)
curl -fsS -o /dev/null -w '%{http_code}\n' -H "apikey: ${ANON}" http://127.0.0.1/rest/v1/
The first command returns ok and the second returns 200, confirming nginx, the Kong gateway and the database backed REST API are all up. The Kong gateway requires the apikey header on the API routes, so an unauthenticated request to those routes returns 401 by design.
You can also inspect the Compose stack directly:
sudo docker compose -f /opt/supabase/docker/docker-compose.yml ps
Every container is reported as Up (most with a (healthy) marker) once the stack has warmed up.
Step 4: First Login to the Studio Dashboard
Open a web browser and navigate to http://<public-ip>/. The Kong gateway presents an HTTP basic authentication challenge for the Studio dashboard.

Enter the dashboard username supabase and the dashboard password from /root/supabase-credentials.txt. After authenticating, the Studio dashboard opens on the default project. The navigation rail down the left of every page links to the table editor, the SQL editor, the authentication panel, the storage browser, the database tools, the auto generated API documentation and the project settings.
Step 5: The Table Editor
Select Table Editor in the navigation rail. The table editor is a spreadsheet style view of your PostgreSQL tables. On a freshly launched instance the default public schema is empty. Select New table to create your first table: give it a name, define its columns and types, choose whether to enable Row Level Security, and save. Supabase creates the table in PostgreSQL and immediately exposes it over the auto generated REST and Realtime APIs.

Step 6: The SQL Editor
Select SQL Editor in the navigation rail. The SQL editor runs arbitrary SQL against the PostgreSQL database with the full power of Postgres: create tables, define functions and triggers, write Row Level Security policies, install extensions and query your data. The following statement creates a simple table and inserts a row; paste it into the editor and select Run:
create table if not exists notes (
  id bigint generated always as identity primary key,
  title text not null,
  created_at timestamptz default now()
);
insert into notes (title) values ('Hello from cloudimg');
select * from notes;
The results grid shows the inserted row. The new notes table now appears in the table editor and is immediately queryable over the REST API.
Step 7: The Auto Generated REST API
Supabase exposes every table in the exposed schemas over a RESTful API generated by PostgREST, served on the same port 80 through the Kong gateway under the /rest/v1/ prefix. Authenticate with the anon API key from the credentials file. The following block queries the REST API root, which PostgREST answers with an OpenAPI description of every endpoint available on your database:
ANON=$(sudo grep '^supabase.anon.key=' /root/supabase-credentials.txt | cut -d= -f2-)
curl -fsS -o /dev/null -w 'rest api http %{http_code}\n' \
  -H "apikey: ${ANON}" \
  -H "Authorization: Bearer ${ANON}" \
  http://127.0.0.1/rest/v1/
A 200 response confirms the REST API is live. Once you create a table such as the notes table from step 6, it is immediately reachable at http://<public-ip>/rest/v1/notes?select=* from any client that can reach the instance on port 80 and presents the anon key.

The API Docs page in the Studio dashboard documents every auto generated endpoint for your tables, with ready to paste snippets for the JavaScript, Python and other Supabase client libraries.
Step 8: Connecting a Client Library
The Supabase client libraries connect to the instance with the project URL and the anon key. In JavaScript, for example:
import { createClient } from '@supabase/supabase-js'
const supabase = createClient('http://<public-ip>', '<anon-key>')
const { data, error } = await supabase.from('notes').select('*')
Use the anon key in browser and mobile clients (it is safe to expose and is governed by your Row Level Security policies). Use the service_role key only on a trusted server: it bypasses Row Level Security and must never be shipped to a client.
Step 9: The Authentication Service
Select Authentication in the navigation rail. Supabase ships GoTrue, a complete authentication and user management service. From the dashboard you can invite users, configure email and password sign in, enable social login providers, set up magic links and manage the JSON Web Token settings. Every authenticated request carries a JWT signed with the per instance JWT secret, and your Row Level Security policies can reference the authenticated user with the auth.uid() helper.
Step 10: The Storage Service
Select Storage in the navigation rail. Supabase Storage is an S3 compatible object store for files such as images, videos and documents, with the same Row Level Security model as the database. Create a bucket, upload files through the dashboard or the client libraries, and serve them through the storage API. The imgproxy service provides on the fly image transformations. The object data is stored on the dedicated data volume at /var/lib/supabase/storage.
Step 11: Server Components
The deployed image contains the following components:
| Component | Purpose |
|---|---|
| Supabase self-host stack | The open source Firebase alternative: database, auth, APIs, storage, Studio |
| Docker Engine | Container runtime that hosts the Supabase Compose stack |
| Docker Compose plugin | Brings the Supabase stack up and down as a single Compose project |
nginx |
Reverse proxy on port 80, forwards to the Kong gateway on loopback |
supabase.service systemd unit |
Wraps docker compose up -d / down at the install directory |
supabase-firstboot.service systemd unit |
One shot service that rotates every secret on first boot |
Inside the Compose stack the following containers run:
| Container | Purpose |
|---|---|
supabase-db |
The PostgreSQL database |
supabase-kong |
The Kong API gateway, the single entry point to the stack |
supabase-auth |
GoTrue authentication and user management |
supabase-rest |
PostgREST auto generated REST API |
supabase-realtime |
Realtime subscriptions over WebSockets |
supabase-storage |
Object and file storage service |
supabase-imgproxy |
On the fly image transformations for storage |
supabase-meta |
postgres-meta, the database management API |
supabase-studio |
The Studio web dashboard |
supabase-pooler |
Supavisor PostgreSQL connection pooler |
Step 12: Filesystem Layout
| Path | Purpose |
|---|---|
/opt/supabase/docker/ |
Supabase Compose stack: docker-compose.yml, .env, volumes/ |
/opt/supabase/docker/.env |
Stack configuration and the per instance secrets |
/opt/supabase/docker/docker-compose.yml |
The Compose definition for the whole stack |
/var/lib/supabase/ |
Stateful data root on a dedicated EBS volume |
/var/lib/supabase/db-data/ |
PostgreSQL data directory |
/var/lib/supabase/storage/ |
Storage object data |
/root/supabase-credentials.txt |
Per instance dashboard + API credentials, generated on first boot, root only |
The data volume is mounted by UUID in /etc/fstab with the nofail option, so the instance always boots even if the volume is detached.
Step 13: Managing the Services
The Supabase Compose stack is started by systemd at boot through the supabase.service unit. Manage it as follows:
sudo systemctl status supabase.service
To restart the whole stack:
sudo systemctl restart supabase.service
To inspect or follow individual containers, use docker compose from the install directory:
cd /opt/supabase/docker && sudo docker compose ps --format 'table {{.Name}}\t{{.Status}}'
sudo docker compose -f /opt/supabase/docker/docker-compose.yml logs --tail 100 supabase-kong
sudo docker compose -f /opt/supabase/docker/docker-compose.yml logs -f supabase-db
To follow the systemd unit log:
sudo journalctl -u supabase.service -n 50 --no-pager
Step 14: Connecting to PostgreSQL Directly
The PostgreSQL database is reachable inside the instance. Connect with the psql client in the database container using the superuser password from the credentials file:
PGPASS=$(sudo grep '^supabase.postgres.password=' /root/supabase-credentials.txt | cut -d= -f2-)
sudo docker exec -e PGPASSWORD="$PGPASS" -i supabase-db psql -U postgres -c '\dt'
For external clients, the Supavisor connection pooler exposes a pooled connection. For production workloads keep the database on the private network and connect through a bastion or a VPN rather than exposing the database port to the internet.
Step 15: Enable HTTPS
The stack listens on plain HTTP on port 80. For any deployment beyond a trusted management network, enable HTTPS so credentials and data cannot be intercepted. The simplest approach is to terminate TLS at nginx. Obtain a certificate for your domain, then add a TLS server block to the nginx site at /etc/nginx/sites-available/supabase that listens on 443 with your certificate and proxies to the Kong gateway exactly as the port 80 block does, and reload nginx:
sudo nano /etc/nginx/sites-available/supabase
# add a 'listen 443 ssl;' server block with ssl_certificate / ssl_certificate_key
sudo nginx -t
sudo systemctl reload nginx
If you need a free, automatically renewed certificate, install certbot, point it at your domain, and let it manage the nginx TLS configuration. After enabling HTTPS, update SITE_URL, API_EXTERNAL_URL and SUPABASE_PUBLIC_URL in /opt/supabase/docker/.env to your https:// URL and restart the stack with sudo systemctl restart supabase.service so the dashboard and the auth redirects use the correct external URL. Then restrict the instance security group so port 443 carries the live traffic.
Step 16: Backups and Maintenance
Supabase has two data sources that must be backed up together: the PostgreSQL database in /var/lib/supabase/db-data, which holds your schema, rows, users and policies, and the Storage object data in /var/lib/supabase/storage, which holds the uploaded files. The cleanest database backup is a logical dump taken from the running database container:
PGPASS=$(sudo grep '^supabase.postgres.password=' /root/supabase-credentials.txt | cut -d= -f2-)
sudo docker exec -e PGPASSWORD="$PGPASS" supabase-db pg_dumpall -U postgres | sudo tee /var/backups/supabase-$(date +%F).sql > /dev/null
Ship the artefact to an Amazon S3 bucket or another object store, and copy the contents of /var/lib/supabase/storage alongside it. Because the data root is on its own EBS volume, you can also take EBS snapshots of that volume for point in time recovery; stop the stack with sudo systemctl stop supabase.service first for a consistent snapshot.
For kernel and package updates, Ubuntu's unattended-upgrades is enabled by default, so security patches apply automatically. To upgrade Supabase itself, follow the Supabase self hosting upgrade documentation at https://supabase.com/docs/guides/self-hosting/docker, pull the new images with sudo docker compose -f /opt/supabase/docker/docker-compose.yml pull, and restart the stack.
Step 17: Scaling Beyond a Single Instance
For larger deployments decouple the stateful tiers from the single instance pattern:
- Move the PostgreSQL database to Amazon RDS for PostgreSQL or Amazon Aurora by pointing the database connection settings in
.envat the external endpoint - Move the Storage object data to Amazon S3 with the storage service's S3 backend
- Front the Kong gateway with an Application Load Balancer for managed TLS termination and horizontal scaling of the stateless services
- Or run Supabase on Amazon EKS for a fully orchestrated deployment
Screenshots
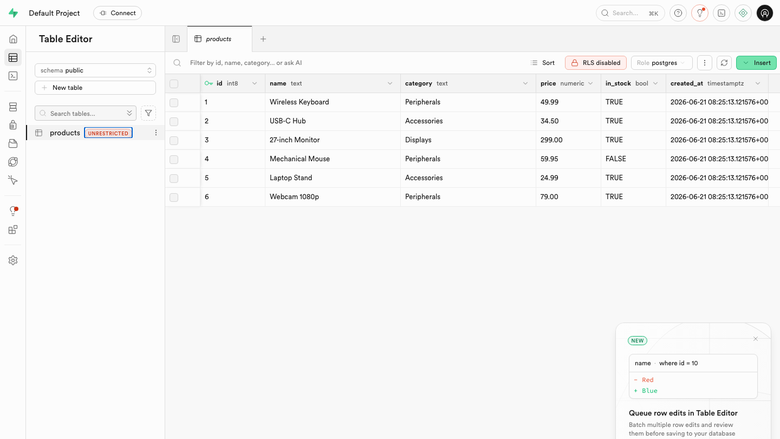
The Supabase Studio table editor, served on port 80 through an authenticating gateway, showing a database table with its columns and rows.
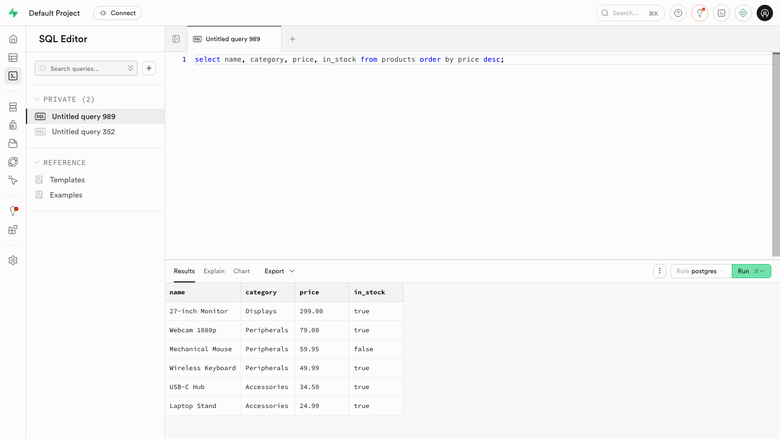
The Supabase Studio SQL editor running a query against the preinstalled PostgreSQL database and returning rows in the results grid.
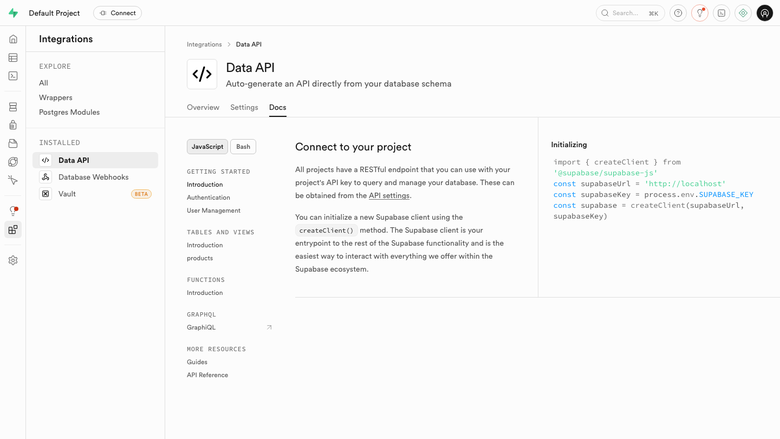
The Supabase Studio API documentation page, listing the auto generated REST endpoints and client snippets for the database tables.
Support and Resources
- cloudimg support: 24/7 by email and chat for deployment, schema design, Row Level Security, authentication, storage and backups
- Supabase documentation:
https://supabase.com/docs - Supabase self hosting guide:
https://supabase.com/docs/guides/self-hosting/docker - Supabase GitHub:
https://github.com/supabase/supabase