TensorFlow Serving 2 on Ubuntu 24.04 on Azure User Guide
Overview
TensorFlow Serving is Google's production-grade machine learning model server — the same component that backs internal Google ML inference at scale. It ships as a high-performance C++ data plane with native support for hot-swapping model versions, batching, and both gRPC and REST APIs. The cloudimg image runs the official tensorflow/serving:2.19.1 Docker container under a thin systemd wrapper, with a half_plus_two sample model pre-staged so you can validate inference end-to-end before you upload your own SavedModel. Models live at /data/models/<name>/<version>/ on the host and are mounted into the container at /models, so dropping a higher-numbered version directory hot-swaps the served model without restarting the server. There is no built-in authentication — TensorFlow Serving is designed to sit behind a reverse proxy, service mesh, or API gateway in production.
What is included:
- TensorFlow Serving 2.19.1 from the official Google Docker image
tensorflow/serving:2.19.1 - Sample model
half_plus_two(formula y = 0.5x + 2) staged at/data/models/half_plus_two/1/for instant inference validation - Docker CE 29.4.2 plus Docker Compose v2 plugin v5.1.3
- Container
tfservingmanaged bydocker composefrom/opt/tfserving/docker-compose.yml - Volume mount: host
/data/models→ container/models - Ports:
8500/tcp(gRPC) and8501/tcp(REST) - systemd:
tfserving.service(oneshot, ExecStart=docker compose up -d) plustfserving-firstboot.service(Before=tfserving.service) - Per-VM credentials log at
/stage/scripts/tfserving-credentials.logwithTFSERVING_VERSION,TFSERVING_REST_URL,TFSERVING_GRPC_URL,TFSERVING_SAMPLE_MODEL,TFSERVING_SAMPLE_PREDICT_URL,TFSERVING_API_KEY - 24/7 cloudimg support
There is no web UI — TensorFlow Serving administration is API-only via REST on :8501, gRPC on :8500, or the bundled tensorflow_model_server CLI inside the container.
Prerequisites
Active Azure subscription, SSH key, VNet plus subnet. Standard_B2s (4 GB RAM) is the minimum for the sample model and small custom SavedModels; production workloads should use Standard_D2s_v5 or larger, sized for your model's memory footprint and throughput. NSG inbound: allow 22/tcp from your management CIDR, and 8501/tcp (REST) plus 8500/tcp (gRPC) only from clients that need direct access. TensorFlow Serving has no built-in authentication — production deployments must put nginx, Envoy, or a service mesh in front of these ports for auth and TLS. Do not expose 8500 or 8501 to the public internet without a reverse proxy.
Step 1-3: Deploy + SSH (standard pattern)
ssh azureuser@<vm-ip>
Step 4: Service Status + Versions
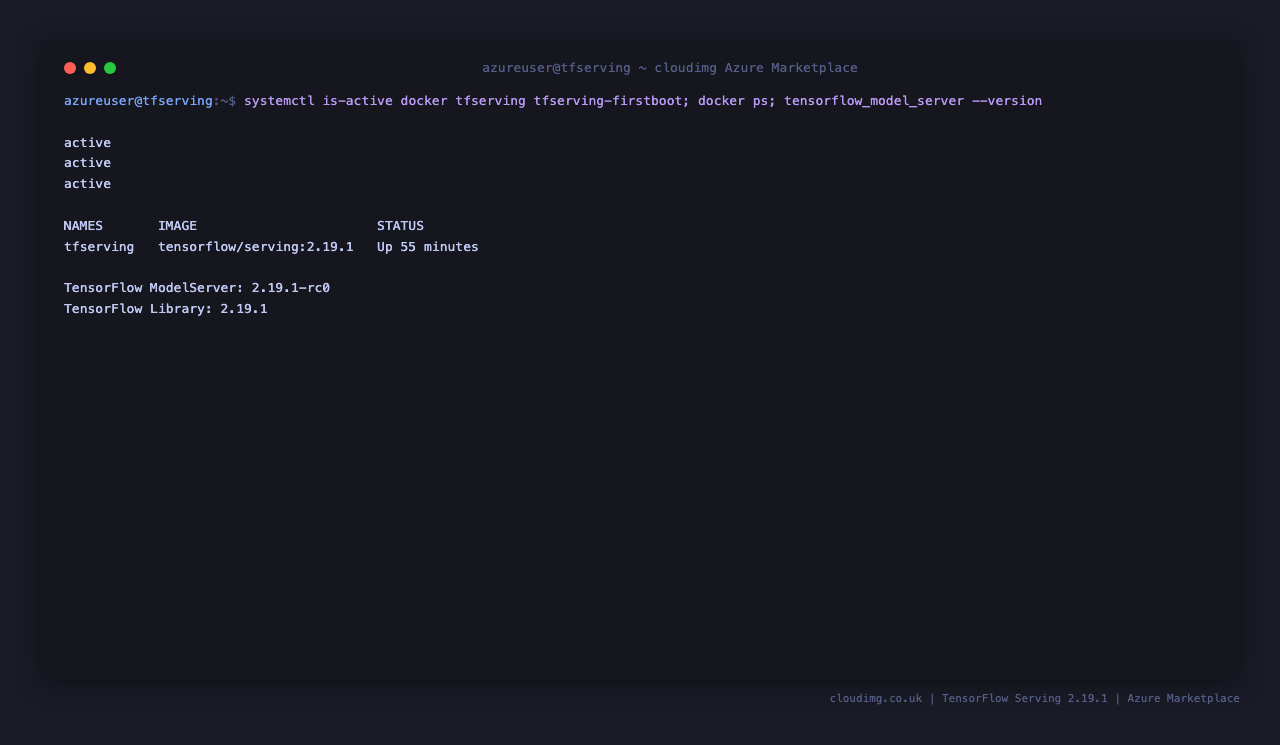
sudo systemctl is-active docker.service tfserving.service tfserving-firstboot.service
docker ps --format 'table {{.Names}}\t{{.Image}}\t{{.Status}}'
docker exec tfserving tensorflow_model_server --version
All three services should report active. The tfserving container should show image tensorflow/serving:2.19.1 and an Up status. tensorflow_model_server --version reports the embedded TensorFlow build banner.
Step 5: Read Per-VM Credentials and URLs
sudo cat /stage/scripts/tfserving-credentials.log
Pick up TFSERVING_REST_URL (default http://127.0.0.1:8501), TFSERVING_GRPC_URL (default 127.0.0.1:8500), TFSERVING_SAMPLE_PREDICT_URL (the ready-made POST URL for the sample model), and TFSERVING_API_KEY (a per-VM placeholder string for use with a downstream nginx auth layer — not enforced by TF Serving itself). The file is root:root 0600.
Step 6: Sample Model Status
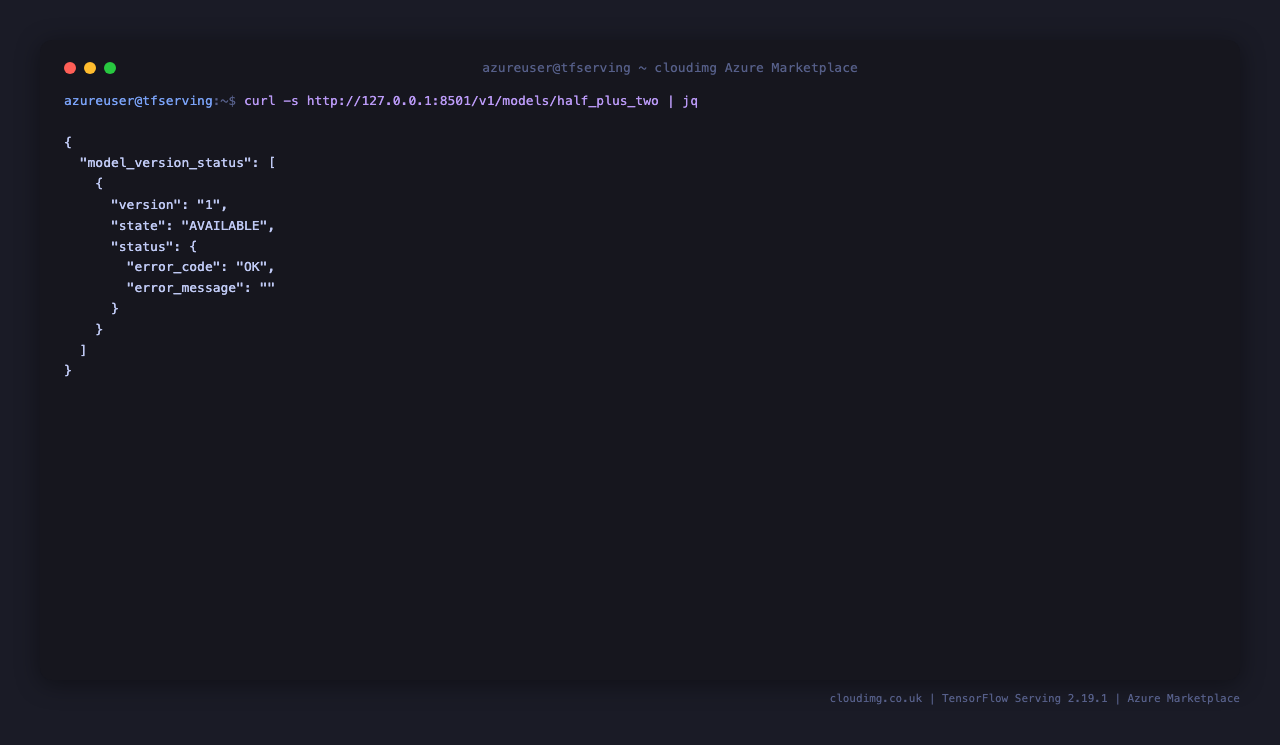
curl -sf http://127.0.0.1:8501/v1/models/half_plus_two | jq
The response shows model_version_status[0].state = "AVAILABLE" and version = "1", which proves the SavedModel at /data/models/half_plus_two/1/ was loaded and is ready to serve predictions. The status.error_code = "OK" field confirms there were no load-time errors.
Step 7: Run a Prediction
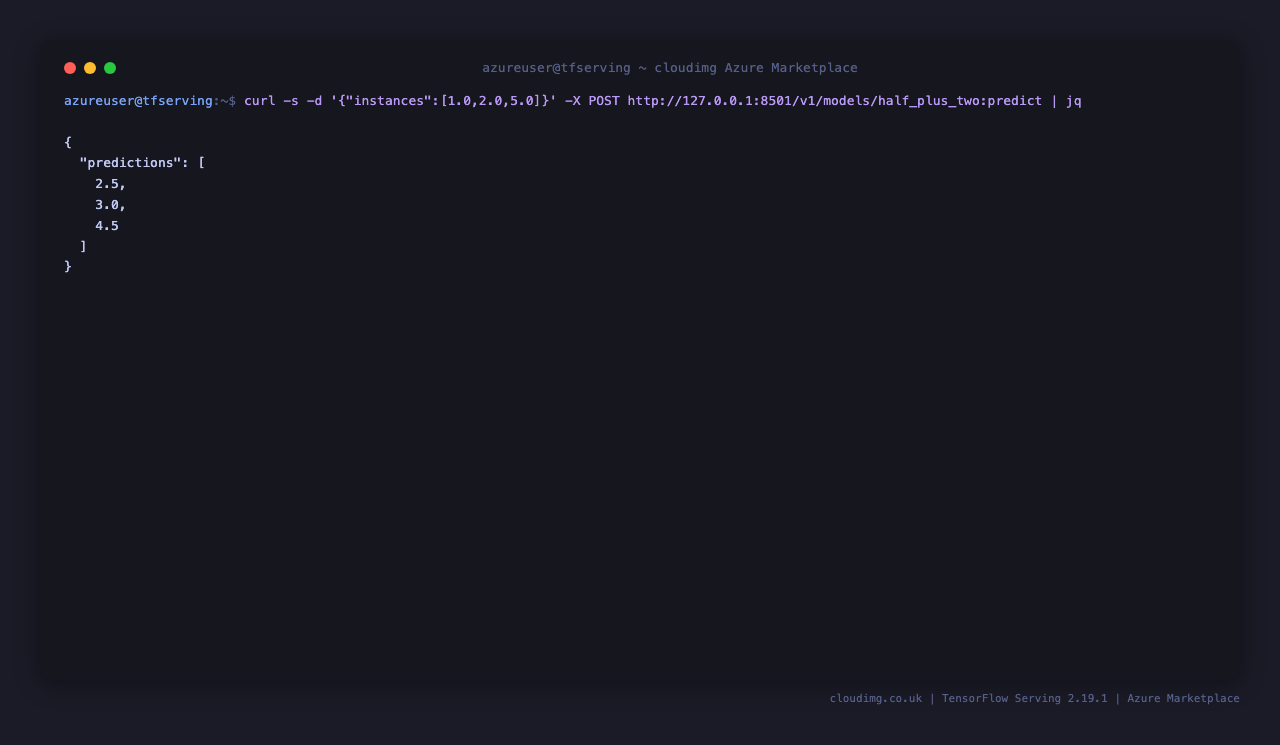
The sample model implements y = 0.5x + 2, so inputs [1.0, 2.0, 5.0] should return [2.5, 3.0, 4.5]:
curl -sf -X POST -H 'Content-Type: application/json' \
  -d '{"instances": [1.0, 2.0, 5.0]}' \
  http://127.0.0.1:8501/v1/models/half_plus_two:predict | jq
Response: {"predictions": [2.5, 3.0, 4.5]}. This proves the full inference path is wired up — the request reaches the container, the SavedModel runs the math, and the response comes back over REST. Replace half_plus_two with your own model name once you drop a SavedModel into /data/models/.
Step 8: Inspect Model Metadata
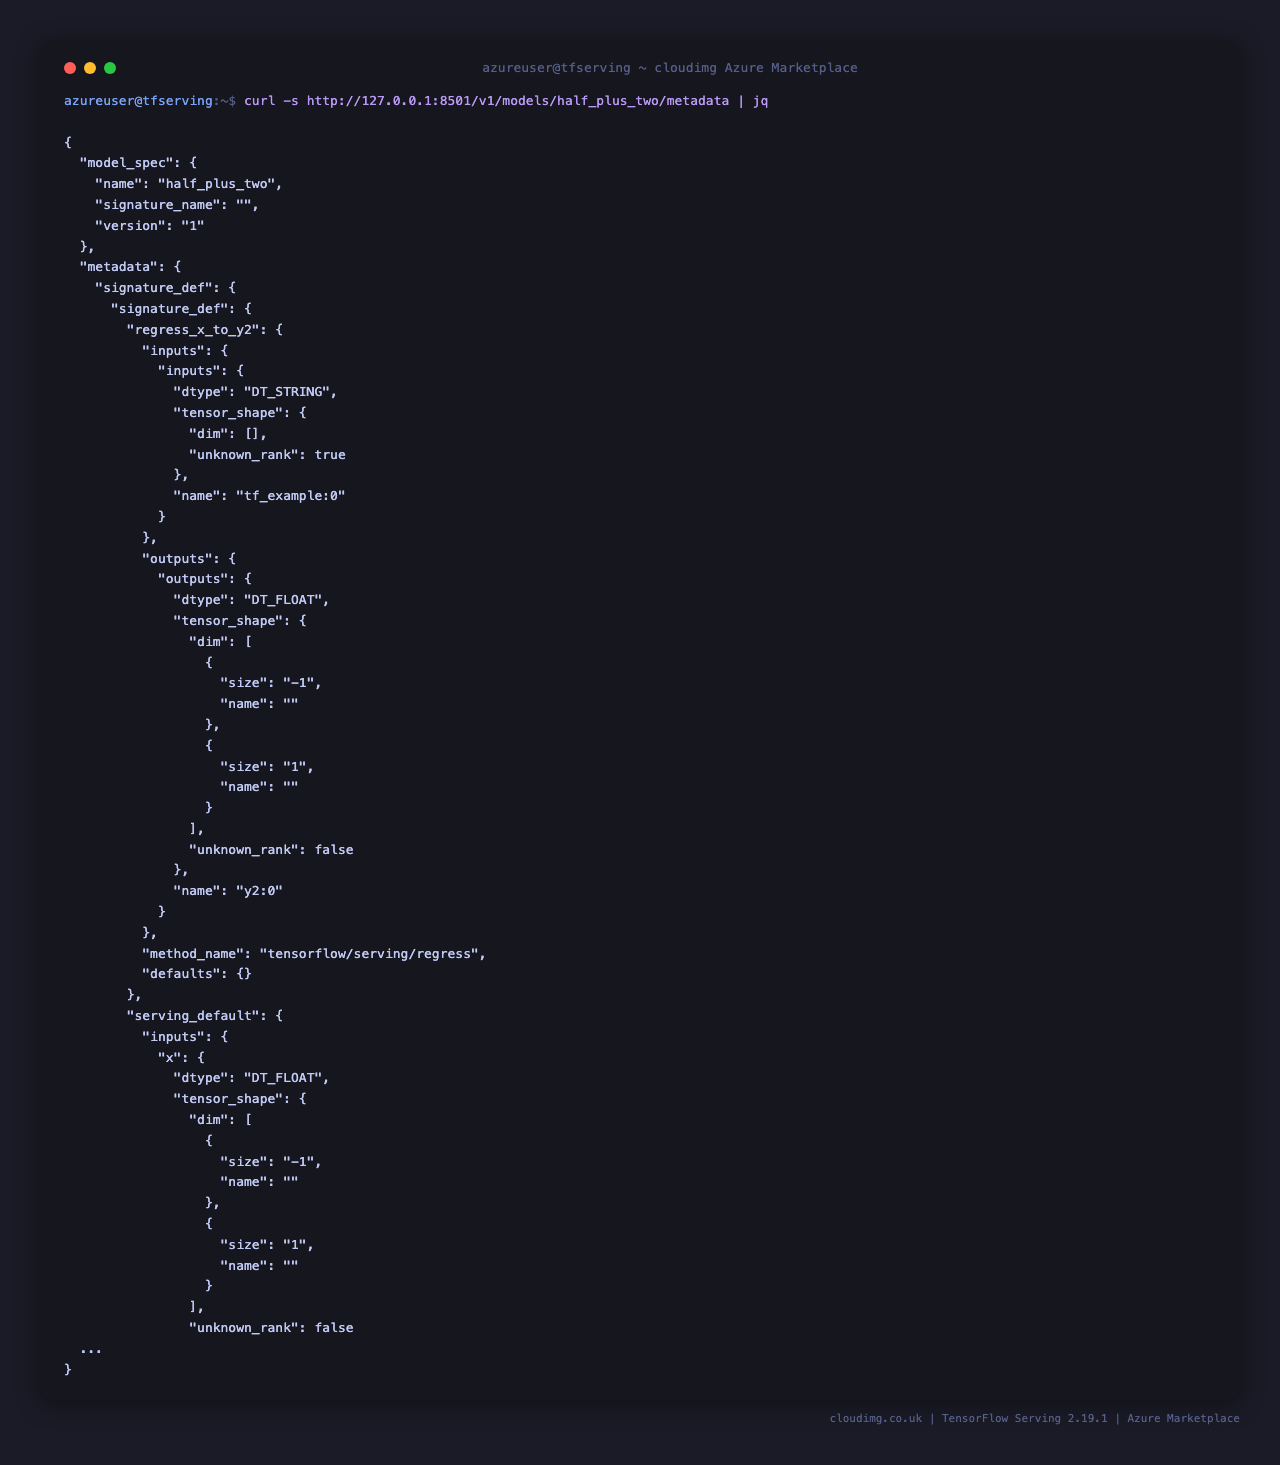
curl -sf http://127.0.0.1:8501/v1/models/half_plus_two/metadata | jq
The signature_def block is the contract every client needs in order to call the model — it lists the named input tensors (with dtype and shape), the named output tensors, and the signature method name (typically tensorflow/serving/predict or tensorflow/serving/classify). When you wire up a Python or Go client, point it at this endpoint first to discover input and output tensor names without having to read the SavedModel by hand.
Step 9: Deploy Your Own Model
TensorFlow Serving expects the on-disk layout <model_root>/<model_name>/<version>/saved_model.pb plus the variables/ and assets/ directories that tf.saved_model.save() produces. Drop your SavedModel into /data/models/:
sudo mkdir -p /data/models/my_model/1
sudo cp -r /path/to/saved_model/* /data/models/my_model/1/
sudo chown -R root:root /data/models/my_model
sudo systemctl restart tfserving.service
sleep 5
curl -sf http://127.0.0.1:8501/v1/models/my_model | jq
TensorFlow Serving has automatic version detection — drop a higher-numbered version directory (e.g. /data/models/my_model/2/) into the same model root and TF Serving will hot-swap to the new version on its next file-system scan, with no restart needed. The previous version is unloaded once the new one is fully ready, so in-flight requests are not dropped.
Step 10: Multi-Model Serving
To serve more than one model at once, edit /opt/tfserving/models.config and list every model in the model_config_list block:
sudo tee /opt/tfserving/models.config <<'EOF'
model_config_list {
  config { name: "half_plus_two" base_path: "/models/half_plus_two" model_platform: "tensorflow" }
  config { name: "my_model"      base_path: "/models/my_model"      model_platform: "tensorflow" }
}
EOF
sudo systemctl restart tfserving.service
curl -sf http://127.0.0.1:8501/v1/models/my_model | jq
Mount the config file into the container by adding a --model_config_file=/models/models.config flag to the command: entry in /opt/tfserving/docker-compose.yml (replacing the single-model --model_name and --model_base_path flags). Then docker compose up -d to apply.
Step 11: gRPC Client Example (Python)
For lower-latency, higher-throughput access (binary protobuf instead of JSON), use the gRPC endpoint on :8500:
import grpc
import tensorflow as tf
from tensorflow_serving.apis import predict_pb2, prediction_service_pb2_grpc

channel = grpc.insecure_channel('<vm-ip>:8500')
stub = prediction_service_pb2_grpc.PredictionServiceStub(channel)

request = predict_pb2.PredictRequest()
request.model_spec.name = 'half_plus_two'
request.model_spec.signature_name = 'serving_default'
request.inputs['x'].CopyFrom(
    tf.make_tensor_proto([1.0, 2.0, 5.0], dtype=tf.float32)
)

print(stub.Predict(request, 5.0))
Install the client deps with pip install tensorflow tensorflow-serving-api grpcio. The gRPC API supports the same Predict, Classify, Regress, MultiInference, and GetModelMetadata calls as REST, but with proto-encoded tensors that are roughly 30–60% smaller on the wire and avoid JSON parsing overhead on both ends.
Step 12: Tune Batching and Resources
For throughput-sensitive workloads, enable server-side batching so concurrent client requests get coalesced into a single GPU/CPU forward pass:
sudo tee /opt/tfserving/batching.config <<'EOF'
max_batch_size { value: 32 }
batch_timeout_micros { value: 5000 }
num_batch_threads { value: 4 }
max_enqueued_batches { value: 100 }
EOF
Then in /opt/tfserving/docker-compose.yml extend the command: array to include:
- --enable_batching=true
- --batching_parameters_file=/models/batching.config
Mount the batching config by ensuring /data/models (which maps to /models in the container) contains the file. Apply with sudo systemctl restart tfserving.service. CPU resources can be tuned per-container with cpus: and mem_limit: keys in docker-compose.yml; for GPU inference, swap the image for tensorflow/serving:2.19.1-gpu and add the runtime: nvidia key (requires the NVIDIA Container Toolkit on a GPU-equipped VM such as Standard_NC6s_v3).
Step 13: Secure with nginx Reverse Proxy + Auth
TensorFlow Serving has no built-in auth, so a fronting nginx is the conventional way to add HTTP basic auth (or mTLS, JWT, OAuth via a sidecar) and TLS:
sudo apt-get update
sudo apt-get install -y nginx apache2-utils
sudo htpasswd -bc /etc/nginx/.tfserving.htpasswd tfclient "$(openssl rand -base64 24)"
sudo tee /etc/nginx/sites-available/tfserving <<'EOF'
server {
    listen 80;
    server_name _;
    location / {
        auth_basic "TF Serving";
        auth_basic_user_file /etc/nginx/.tfserving.htpasswd;
        proxy_pass http://127.0.0.1:8501;
        proxy_set_header Host $host;
        proxy_set_header X-Real-IP $remote_addr;
    }
}
EOF
sudo ln -sf /etc/nginx/sites-available/tfserving /etc/nginx/sites-enabled/tfserving
sudo rm -f /etc/nginx/sites-enabled/default
sudo nginx -t && sudo systemctl reload nginx
Once nginx is in front, lock the NSG so 8500/tcp and 8501/tcp are reachable only from 127.0.0.1 (or your private VNet) and only 80/tcp plus 443/tcp are publicly reachable.
Step 14: Install Let's Encrypt SSL
sudo apt-get install -y python3-certbot-nginx
sudo certbot --nginx -d apps.example.com -m you@example.com --agree-tos --non-interactive --redirect
Point your domain's A record at this VM first, then run certbot. The plugin edits the nginx server block in place to add listen 443 ssl;, the certificate paths, and a 301 from port 80. Renewal is handled by the systemd timer certbot.timer that the Ubuntu package installs by default — no further work needed.
Step 15: Backups
TensorFlow Serving is stateless — its only persistent state is the SavedModel files on disk. A backup is just a tarball of /data/models:
sudo tar -czf /var/backups/tfserving-models-$(date +%F).tgz -C /data models
sudo cp /opt/tfserving/docker-compose.yml /var/backups/docker-compose.yml-$(date +%F)
Periodically copy /var/backups to Azure Blob Storage with az storage blob upload-batch for off-VM retention. The container itself does not need to be backed up — the image is pulled from Docker Hub on demand and the wrapper config lives in /opt/tfserving/, which is small enough to keep in version control.
Step 16: Logs and Troubleshooting
sudo journalctl -u tfserving.service --no-pager -n 80
sudo journalctl -u tfserving-firstboot.service --no-pager -n 30
docker logs tfserving --tail 80
docker exec tfserving tensorflow_model_server --version
docker logs tfserving -f follows the live server log — every request hits the access log at INFO level, every load and unload is reported, and any malformed input tensor will surface here as a structured error.
Common issues:
Could not find SavedModel— the on-disk layout is wrong. Required:/data/models/<model_name>/<version>/saved_model.pbplus thevariables/directory next to it. The<version>segment must be a positive integer.No versions of servable <name> found— the model directory is empty or only contains a non-numeric subdirectory. Rename to1/,2/, etc.HTTP 400 Could not parse request body— JSON shape is wrong. The REST API expects{"instances": [...]}for predict and{"signature_name": "serving_default", "examples": [...]}for classify and regress.- Container restarts on boot — confirm
/var/lib/cloudimg/tfserving-firstboot.doneexists; if not,sudo systemctl start tfserving-firstboot.serviceand re-check.
Security
- TensorFlow Serving has no built-in authentication — production deployments MUST front it with nginx, Envoy, a service mesh, or an API gateway that does its own auth. Do not expose
8500or8501directly to the public internet. - Per-VM
TFSERVING_API_KEYplaceholder is generated at first boot for downstream auth integration (e.g. nginxauth_requestagainst an upstream service that checks the header) — TF Serving itself does not check it. - NSG inbound should open
22/tcpplus only the proxy port (80/tcpand443/tcpif you front with nginx) — never8500/tcpor8501/tcpto the public internet. - Container runs as the unprivileged user inside the official
tensorflow/servingimage; the host volume/data/modelsis mounted read-only at the container's/modelspath by default. - SavedModel files are loaded from
/data/models— anything Docker can read on that host path becomes a servable. Do not put untrusted SavedModels there; a malicious model can run arbitrary TensorFlow ops at load time. - Optional TLS at the edge via nginx + certbot (Step 14). Cert renewals are automatic via
certbot.timer.
Support
cloudimg provides 24/7/365 expert technical support. Guaranteed response within 24 hours, one hour average for critical issues. Contact support@cloudimg.co.uk.