Trivy on AWS User Guide
Overview
This image runs Trivy, the open source, Apache-2.0 licensed all-in-one security scanner from Aqua Security. Trivy finds known vulnerabilities (CVEs) in operating system packages and language dependencies, detects infrastructure-as-code and Kubernetes misconfigurations, surfaces hard-coded secrets, and generates and scans software bills of materials (SBOMs). The image is delivered as a ready-to-use scanning workstation, so an engineer can connect over SSH and start scanning with the trivy command line immediately, with no setup.
This is a headless command-line image. There is no web interface, no service to log into and no credentials: you run the trivy CLI against your own container images, filesystems, repositories, SBOMs and infrastructure-as-code. The trivy binary is installed on the system path at /usr/local/bin/trivy and was verified against the official Trivy release checksum at build time.
The Trivy cache and vulnerability database are placed on a dedicated, independently resizable EBS data volume mounted at /var/lib/trivy. The login profile exports TRIVY_CACHE_DIR=/var/lib/trivy for every login shell, so the database persists on durable storage rather than the operating system disk. The full vulnerability database and the Java index database are pre-downloaded into that cache during the build, so the appliance ships ready to scan offline out of the box: point Trivy at a target the moment you log in and get a report in seconds with no download wait.
Prerequisites
Before you deploy this image you need:
- An Amazon Web Services account where you can launch EC2 instances
- IAM permissions to launch instances, create security groups, and subscribe to AWS Marketplace products
- An EC2 key pair in the target Region for SSH access to the instance
- A VPC and subnet in the target Region, with a security group allowing inbound port 22 from your management network
- The AWS CLI (version 2) installed locally if you plan to deploy from the command line
Step 1: Launch the Instance from the AWS Marketplace
Sign in to the AWS Management Console, open the EC2 service, and select Launch instance. Under Application and OS Images choose AWS Marketplace AMIs and search for Trivy. Select the cloudimg listing and choose Select, then Continue on the subscription summary.
Pick an instance type of t3.medium or larger. Choose your EC2 key pair under Key pair (login). Under Network settings select your VPC and subnet, and either create or select a security group that opens port 22 from your management network. Leave the root volume at the default size or larger.
Select Launch instance. First boot initialisation takes a few seconds after the instance state becomes Running and the status checks pass.
Step 2: Launch the Instance from the AWS CLI
The following block launches an instance from the cloudimg Trivy Marketplace AMI into an existing subnet and security group. Replace <ami-id> with the AMI ID shown on the Marketplace listing, <key-name> with your EC2 key pair name, <subnet-id> with your subnet ID, and <security-group-id> with a security group that opens port 22 from your management network.
aws ec2 run-instances \
  --image-id <ami-id> \
  --instance-type t3.medium \
  --key-name <key-name> \
  --subnet-id <subnet-id> \
  --security-group-ids <security-group-id> \
  --tag-specifications 'ResourceType=instance,Tags=[{Key=Name,Value=trivy}]'
When the instance reaches the Running state and its status checks pass, note its public IP address or DNS name from the EC2 console or with aws ec2 describe-instances.
Step 3: Connect to Your Instance
Connect over SSH using your key pair and the login user for your operating system variant.
| OS variant | SSH login user |
|---|---|
| Ubuntu 24.04 | ubuntu |
ssh -i <key-name>.pem ubuntu@<public-ip>
The login shell exports TRIVY_CACHE_DIR=/var/lib/trivy automatically, so Trivy reads the pre-loaded database on the data disk without any further configuration. A welcome banner prints the most useful commands, and sudo cat /root/trivy-info.txt shows the full getting-started notes.
Step 4: Verify the Install
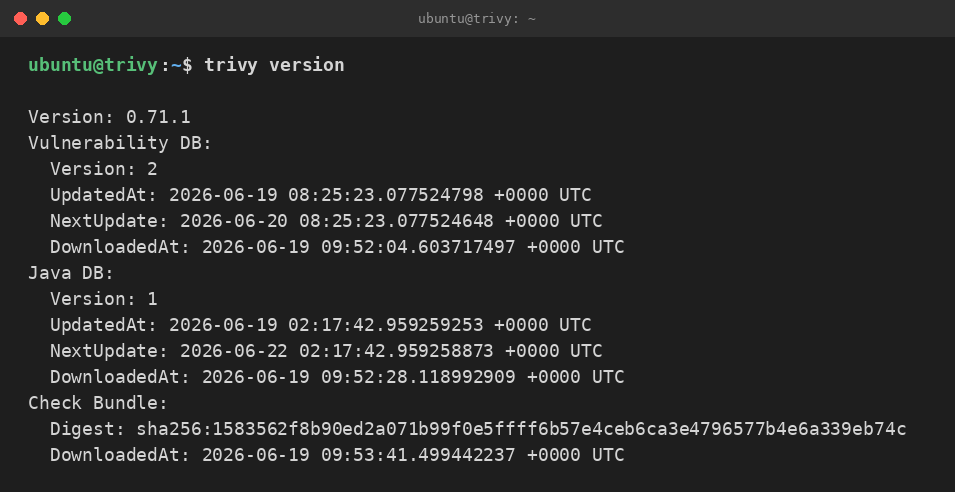
Confirm the toolchain is installed and on the system path, and inspect the bundled vulnerability database metadata, by printing the Trivy version:
trivy version
You should see Version: 0.71.1 reported, followed by the Vulnerability DB and Java DB blocks with their Version, UpdatedAt, NextUpdate and DownloadedAt timestamps. Those blocks confirm the database ships pre-loaded on this image, so your first scan returns results immediately with no download wait.
Step 5: Scan a Filesystem or Project
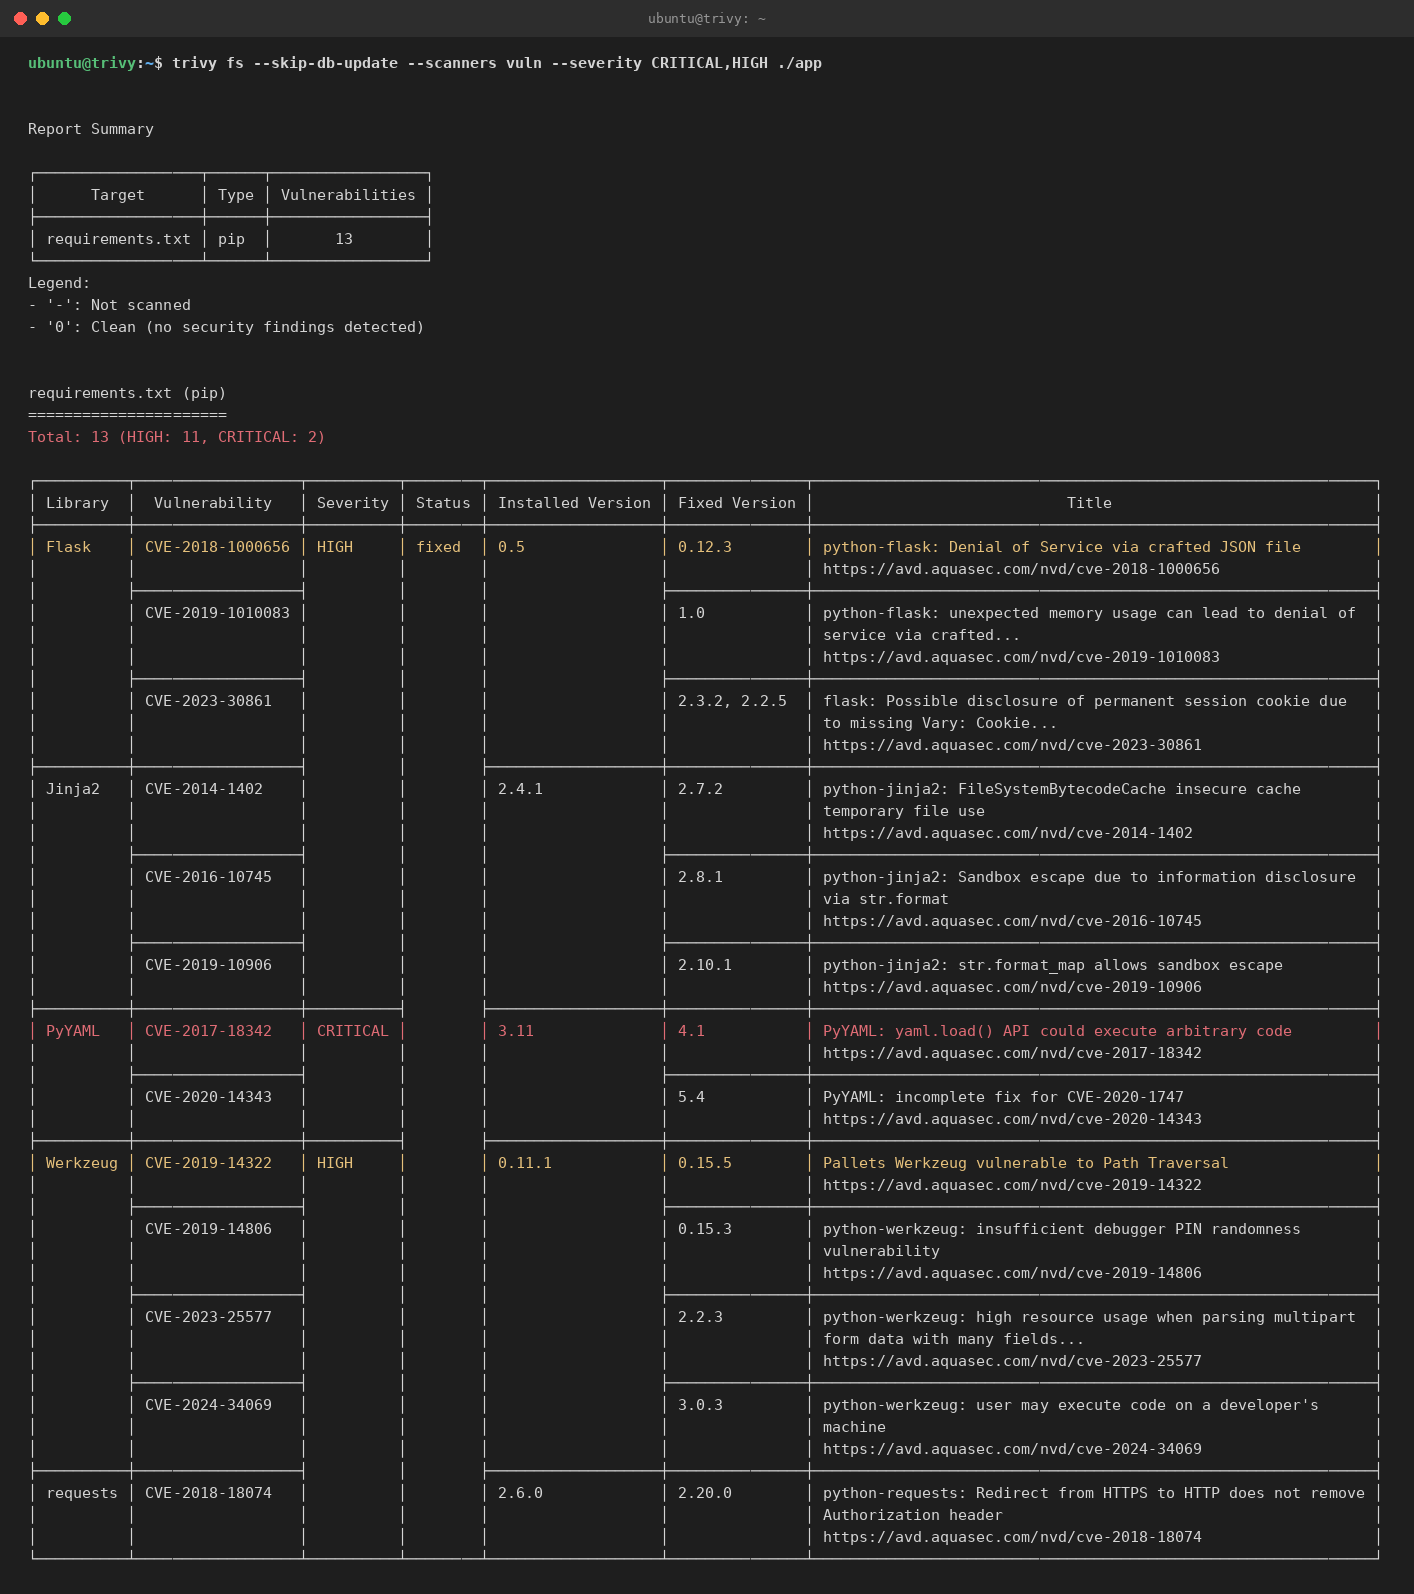
trivy fs scans a local directory for vulnerable language dependencies and operating-system packages. The vulnerability database is pre-loaded, so adding --skip-db-update keeps the scan completely offline and fast. The example below writes a tiny project with deliberately out-of-date Python dependencies and scans it, so the report shows real CVEs:
export TRIVY_CACHE_DIR=/var/lib/trivy
mkdir -p /tmp/demo-app
cat > /tmp/demo-app/requirements.txt <<'REQ'
Flask==0.5
Jinja2==2.4.1
Werkzeug==0.11.1
PyYAML==3.11
requests==2.6.0
REQ
trivy fs --skip-db-update --scanners vuln --severity CRITICAL,HIGH /tmp/demo-app
Trivy prints a Report Summary, the total count broken down by severity (for example Total: 13 (HIGH: 11, CRITICAL: 2)), and a table listing each library, the CVE identifier, the installed and fixed versions, and a one-line title with a link to the Aqua vulnerability database. Point trivy fs at any of your own project directories to scan them the same way. Add --scanners vuln,secret to also detect hard-coded secrets and API keys.
Step 6: Scan a Container Image
trivy image scans a container image for vulnerable OS packages and language dependencies. Replace <name:tag> with the image you want to scan; Trivy pulls it from the registry (or reads a local image if you have a container runtime) and scans it against the pre-loaded database:
trivy image <name:tag>
To scan an image you have already exported to a tar archive, point Trivy at the file instead, which needs no registry access:
trivy image --input <image>.tar
Add --severity CRITICAL,HIGH to focus on the findings that matter most, and --exit-code 1 to make Trivy return a non-zero status when it finds anything at or above that severity, which is what you use to gate a CI pipeline.
Step 7: Scan Infrastructure-as-Code
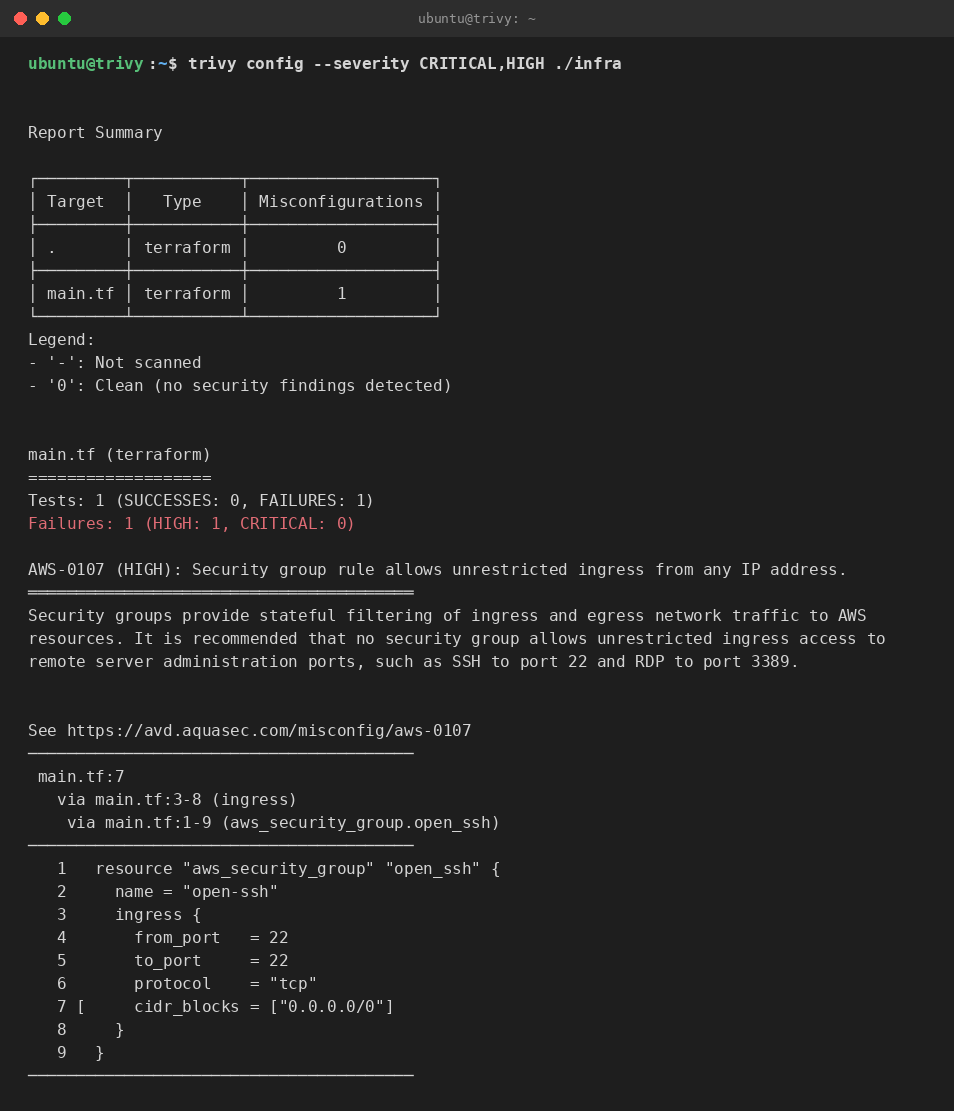
trivy config scans infrastructure-as-code for misconfigurations: Terraform, CloudFormation, Kubernetes manifests, Helm charts, Dockerfiles and more. The misconfiguration checks are bundled in the image, so --skip-check-update keeps the scan offline. The example below writes a tiny Terraform file with a security group that exposes SSH to the whole internet and scans it:
export TRIVY_CACHE_DIR=/var/lib/trivy
mkdir -p /tmp/demo-iac
cat > /tmp/demo-iac/main.tf <<'TF'
resource "aws_security_group" "open_ssh" {
  name = "open-ssh"
  ingress {
    from_port   = 22
    to_port     = 22
    protocol    = "tcp"
    cidr_blocks = ["0.0.0.0/0"]
  }
}
TF
trivy config --skip-check-update --severity CRITICAL,HIGH /tmp/demo-iac
Trivy reports the misconfiguration (for example AWS-0107 (HIGH): Security group rule allows unrestricted ingress from any IP address), the offending lines with a code excerpt, and a link to the remediation guidance. Point trivy config at any directory of Terraform, CloudFormation, Kubernetes or Dockerfiles to audit it the same way.
Step 8: Scan a Git Repository and Generate an SBOM
trivy repo scans a remote Git repository directly, with no local checkout. Replace <url> with the repository to scan:
trivy repo <url>
Trivy also generates and scans software bills of materials. To produce a CycloneDX SBOM for a container image, replace <name:tag> with your image:
trivy image --format cyclonedx -o sbom.json <name:tag>
You can then scan that SBOM file with trivy sbom sbom.json, which lets you re-check a previously generated bill of materials against the latest vulnerability data without rebuilding the artifact.
Step 9: The Vulnerability Database
The full vulnerability database and the Java index database are pre-downloaded into the cache on the data volume during the build, so the appliance scans offline out of the box. Every scan in this guide adds --skip-db-update (or --skip-check-update for config scans) to use only that pre-loaded data and never touch the network.
Trivy refreshes the database on its own schedule when you run an online scan. To refresh it on demand, download just the database without running a scan. This command reaches out to the Trivy database registry, so it requires outbound internet access from the instance:
trivy image --download-db-only
In an air-gapped environment, mirror the database into your own registry and point Trivy at it, or copy a fresh /var/lib/trivy/db directory in from a connected host. Because the cache lives on the dedicated data volume, a refreshed database persists across reboots and instance stop/start.
Step 10: The Data Volume
The Trivy cache and the pre-loaded vulnerability database live on a dedicated EBS volume mounted at /var/lib/trivy, exported as TRIVY_CACHE_DIR for every login shell. This keeps the database off the operating system disk and lets you resize or snapshot it independently. Confirm the mount with:
df -h /var/lib/trivy
To grow the volume, expand the EBS volume in the AWS console, then grow the filesystem on the instance with sudo resize2fs on the underlying device. The cache directory is owned by the ubuntu login user, so scans run as ubuntu can read and refresh the database.
Support
This image is published and supported by cloudimg. Support covers scan configuration, severity gating and exit codes for CI integration, ignore policies, SBOM generation, infrastructure-as-code and Kubernetes misconfiguration scanning, secret detection, database refresh and air-gapped operation. Contact cloudimg through the support channel listed on the AWS Marketplace listing.
All product and company names are trademarks or registered trademarks of their respective holders. Use of them does not imply any affiliation with or endorsement by them.