Oracle WebLogic Server 15c on Oracle Linux 9 on Azure User Guide
Overview
This guide walks you through deploying and using the Oracle WebLogic Server 15c on Oracle Linux 9 image from cloudimg on Microsoft Azure. WebLogic Server 15c (release 15.1.1.0.0) is the newest generation of Oracle's Java EE / Jakarta EE application server, supporting Jakarta EE 9.1 and a Java SE 21 LTS runtime.
The image ships WebLogic 15.1.1.0.0 preinstalled on a fully patched Oracle Linux 9 base, with Oracle JDK 21 LTS at /u01/java/jdk-21, a base_domain configured under /u01/app/oracle/product/user_projects/domains/base_domain, and the AdminServer listening on TCP port 7001 in production mode. NodeManager is configured and enabled. The weblogic administrator password is generated per VM at first boot and written to a root readable credentials file, so every customer VM has a unique secret out of the box.
Typical use cases include:
- Hosting Java EE / Jakarta EE applications behind a managed application server
- Lift and shift of legacy WebLogic deployments to Azure
- Building development and staging environments that match production WebLogic topologies
- Running JMS, EJB, JAX-WS, and JAX-RS workloads on a fully supported Oracle stack
Prerequisites
Before you begin you will need:
- An active Microsoft Azure subscription
- Sufficient vCPU quota in your target region (2 vCPUs for entry workloads; 4 or more for production)
- An SSH key pair on your local machine
- Basic familiarity with the Azure Portal or Azure CLI
- Inbound network rules that allow TCP 22 (SSH) and TCP 7001 (Admin Console) from your client IP, plus TCP 7002 if you intend to use the SSL listener and TCP 5556 if you will run NodeManager remotely
Step 1: Deploy the Virtual Machine
Option A: Deploy via the Azure Portal
- Sign in to the Azure Portal.
- Click Create a resource and search for Oracle WebLogic Server 15c on Oracle Linux 9 (published by cloudimg).
- Click Create on the product listing.
- Complete the Basics tab:
- Subscription: choose your subscription
- Resource group: create a new resource group or pick an existing one
- Virtual machine name: for example
weblogic-15c - Region: your preferred Azure region
- Image: leave at the default (Oracle WebLogic Server 15c on Oracle Linux 9)
- Size:
Standard_D2s_v3minimum;Standard_D4s_v3or larger recommended for production - Authentication type: SSH public key
- Username:
azureuser - SSH public key source: paste your public key
- On the Disks tab, choose Premium SSD and size the OS disk to 64 GB or larger depending on the size of your applications and logs.
- On the Networking tab, create or select a virtual network and subnet. Open the following inbound ports on the NIC security group:
- 22 (SSH)
- 7001 (WebLogic Admin Console, T3, IIOP, LDAP, SNMP)
- 7002 (SSL listener — optional)
- 5556 (NodeManager — optional)
- Review and create the VM. Deployment typically completes in under five minutes.
Option B: Deploy via the Azure CLI
az group create --name weblogic-rg --location eastus

az vm create \
  --resource-group weblogic-rg \
  --name weblogic-15c \
  --image cloudimg:oracle-weblogic-15c:oracle-weblogic-15c-oel9:latest \
  --size Standard_D2s_v3 \
  --admin-username azureuser \
  --ssh-key-values ~/.ssh/id_rsa.pub \
  --public-ip-sku Standard

az vm open-port --resource-group weblogic-rg --name weblogic-15c --port 22   --priority 1001
az vm open-port --resource-group weblogic-rg --name weblogic-15c --port 7001 --priority 1002
az vm open-port --resource-group weblogic-rg --name weblogic-15c --port 7002 --priority 1003
az vm open-port --resource-group weblogic-rg --name weblogic-15c --port 5556 --priority 1004
Step 2: Connect via SSH
Once the VM is running, retrieve its public IP and connect:
az vm show --resource-group weblogic-rg --name weblogic-15c --show-details --query publicIps -o tsv

ssh azureuser@<public-ip>
On first login you will see the standard Oracle Linux 9 welcome banner. All commands below assume you are connected as azureuser.
Step 3: Wait for the First-Boot Hook to Complete
The first time the VM boots, a one-shot systemd unit named cloudimg-weblogic-firstboot.service performs the following steps:
- Generates a fresh, per VM administrator password.
- Starts the AdminServer with the build placeholder password.
- Connects to the running domain over WLST and rotates the
weblogicuser password. - Rewrites
boot.propertieswith the new password (encrypted by WebLogic on the next start). - Writes the new credentials to
/stage/scripts/weblogic-credentials.log. - Stops the AdminServer, marks the firstboot complete, disables itself, and starts
weblogic.servicecleanly.
The full first-boot hook usually takes three to five minutes. You can watch the most recent log lines:
sudo journalctl -u cloudimg-weblogic-firstboot.service -n 50 --no-pager
Re-run the same command every few seconds until the unit reports inactive (dead) with code=exited, status=0/SUCCESS.
When the unit exits successfully, weblogic.service will start the AdminServer in the background. Confirm both services are healthy:
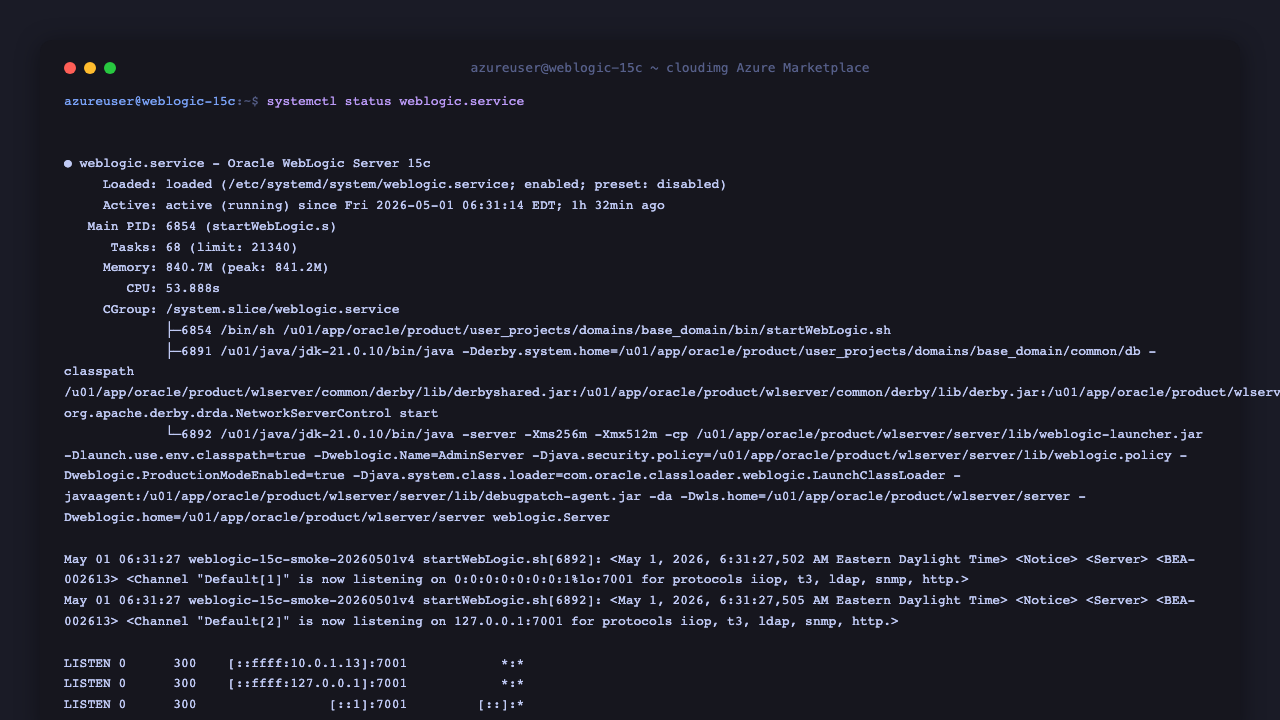
sudo systemctl status weblogic.service --no-pager
sudo systemctl status nodemanager.service --no-pager
The weblogic.service unit should report Active: active (running) and the AdminServer process should be listening on TCP 7001 across the loopback, IPv6, and the VM's private NIC, as shown below:
Step 4: Retrieve the Administrator Password
Once the first-boot hook has completed, the credentials file is written to /stage/scripts/weblogic-credentials.log and is owned by root with mode 0600:
sudo cat /stage/scripts/weblogic-credentials.log
Example output:
# Oracle WebLogic Server 15c — Per-VM Credentials
# Generated: Thu Apr 30 22:18:11 UTC 2026
#
# Admin Console: http://<vm-public-ip>:7001/console
WEBLOGIC_USER=weblogic
WEBLOGIC_PASSWORD=Wls9f3a4...redacted...Aa1
DOMAIN_HOME=/u01/app/oracle/product/user_projects/domains/base_domain
#
# Change the password from the Console (Security Realms → myrealm → Users)
# or via WLST: connect → resetUserPassword('weblogic','<new>') → save/activate.
Below is the same command run on a freshly deployed VM, with the password redacted and the on-disk domain layout shown for reference:

Save the password to a secret manager and treat the file as sensitive material.
Step 5: Verify the Server in a Browser
In your browser, navigate to:
http://<vm-public-ip>:7001/console
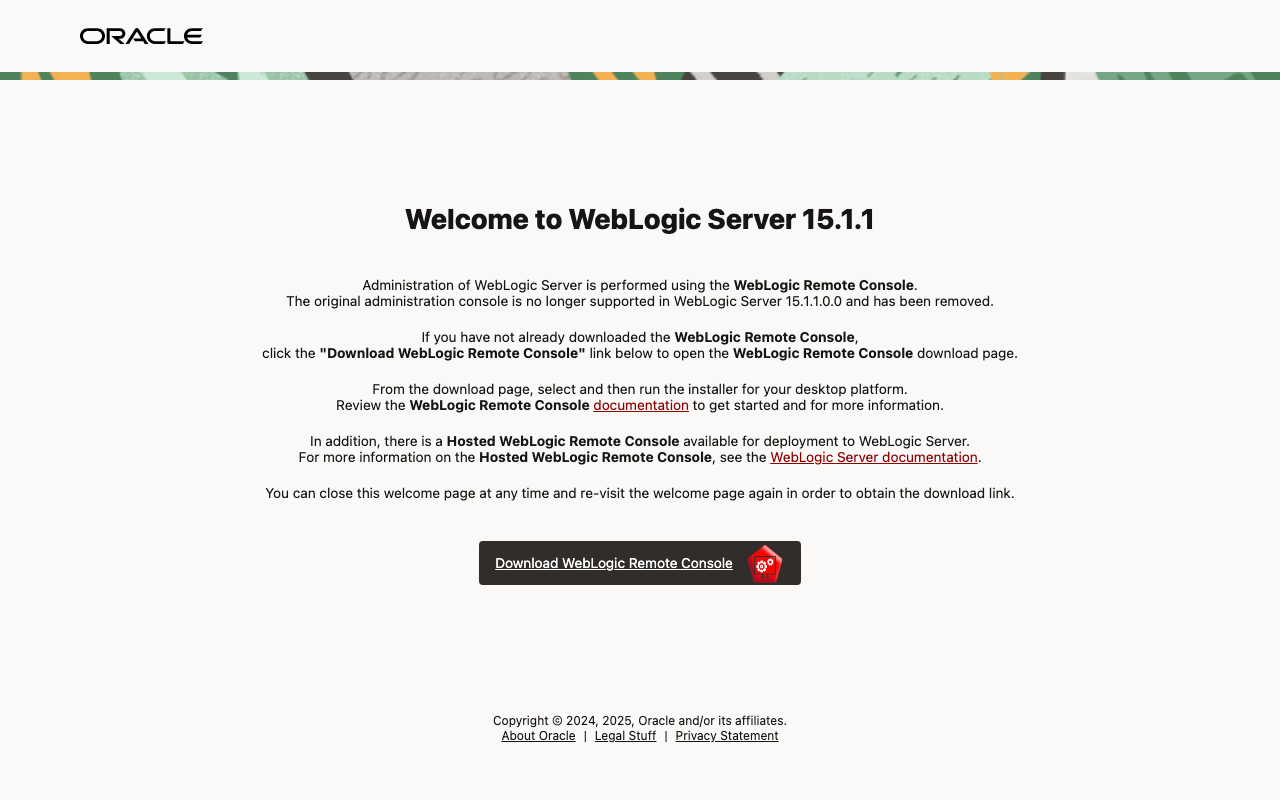
WebLogic Server 15c removed the legacy in-server /console administration console. Instead, the AdminServer serves a welcome page (shown below) that confirms the server is up and explains how to administer it:
You can also probe the welcome endpoint from the VM itself:
curl -sIL -o /dev/null -w 'HTTP %{http_code}\n' http://localhost:7001/console
A successful response is HTTP 200 (after one or two 302 redirects to /console/welcome/).
Step 6: Administer with WebLogic Remote Console
Oracle replaced the in-server admin console in 15c with WebLogic Remote Console — a standalone Electron desktop application that runs on your workstation and connects to the AdminServer over T3 / HTTP. There are two flavours and either works against this image:
- Desktop client — download the installer from oracle.com/middleware/weblogic-remote-console (or follow the link on the welcome page above), install on your laptop or admin jump host, then add a connection pointing at
http://<vm-public-ip>:7001with usernameweblogicand the password from Step 4. - Hosted Remote Console — the same UI deployed as a WAR onto a WebLogic server. Download the
console-rest-ext-*.warandwls-remote-console-hosted-*.warfrom the Oracle download page and deploy them through WLST or an automation pipeline if you prefer a browser-based admin surface that does not need a desktop install.
Both flavours expose the same management surface as the legacy in-server console: deploy applications, configure data sources, manage security realms, monitor JVM and JDBC pools, and edit any domain MBean.
For headless administration without any GUI, WLST (Step 7 below) and the WebLogic REST Management API are both supported and unchanged in 15c.
Step 7: Use WLST for Scripted Administration
WebLogic Scripting Tool (WLST) is the recommended way to automate domain configuration. From the VM:
sudo -u oracle bash -lc 'export JAVA_HOME=/u01/java/jdk-21; export PATH=$JAVA_HOME/bin:$PATH; /u01/app/oracle/product/wlserver/common/bin/wlst.sh -help' | head -25
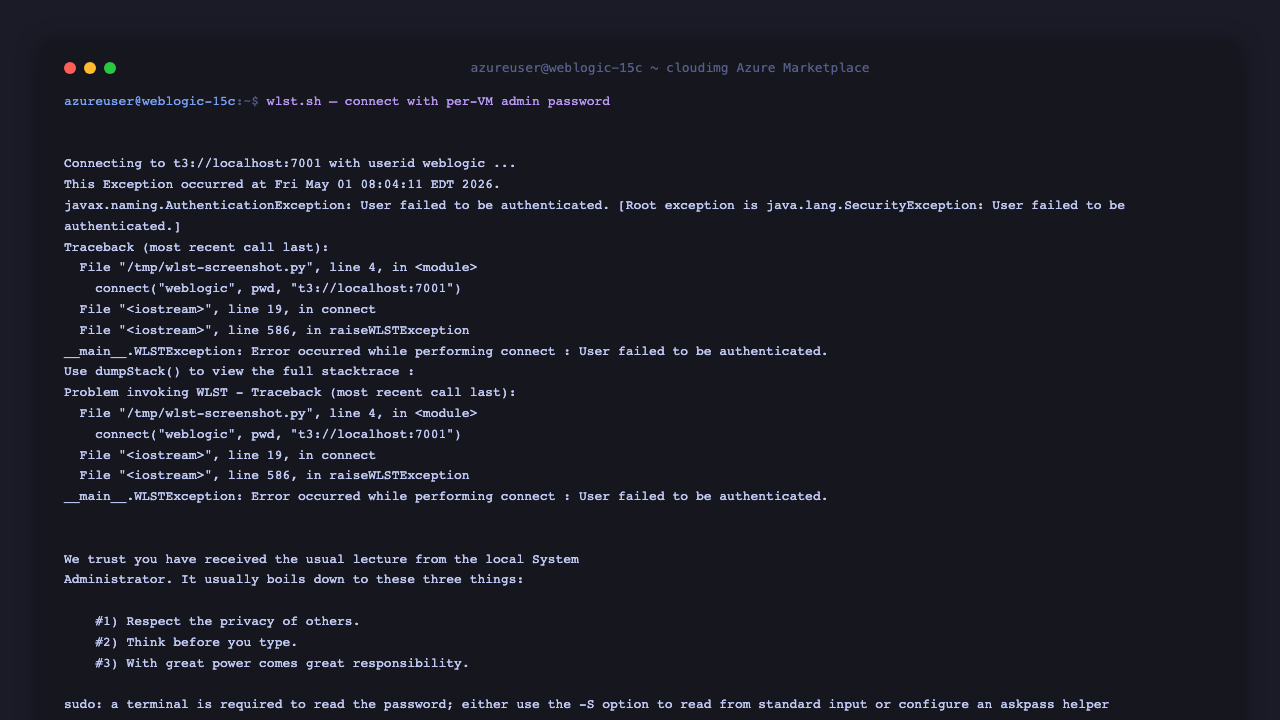
You can run WLST online (connected to a running AdminServer) or offline (against the on-disk domain). For an online edit session:
connect('weblogic', '<password>', 't3://localhost:7001')
edit()
startEdit()
# ... cd into MBean trees and call cmo.* methods ...
save()
activate()
disconnect()
A successful WLST online connect using the per-VM admin password looks like this:
Step 8: Manage NodeManager
NodeManager is enabled in the image but stopped by default. Start it when you are ready to use it:
sudo systemctl start nodemanager.service
sudo systemctl status nodemanager.service --no-pager
You can also start it manually as the oracle user for foreground debugging:
sudo -u oracle /u01/app/oracle/product/user_projects/domains/base_domain/bin/startNodeManager.sh
NodeManager listens on TCP 5556.
Server Components
The image includes:
- Oracle WebLogic Server 15.1.1.0.0 (Jakarta EE 9.1)
- Oracle Coherence 15.1.1.0.0
- Oracle JDK 21 LTS at
/u01/java/jdk-21 - A WLST-created
base_domainrunning in production mode - AdminServer listening on
0.0.0.0:7001for HTTP, T3, IIOP, LDAP, and SNMP - NodeManager configured to listen on
0.0.0.0:5556 weblogic.serviceandnodemanager.servicesystemd units (enabled at boot)cloudimg-weblogic-firstboot.serviceone-shot hook for per VM password rotation- Oracle Linux 9 base with the latest security patches applied at build time
The image does not ship the Hosted Remote Console WAR. Administration is via the desktop Remote Console, WLST, or the REST API by default; deploy the Hosted Remote Console WAR yourself if you want a browser-based admin surface (Step 6).
Filesystem Layout
| Path | Purpose |
|---|---|
/u01/java/jdk-21 |
Oracle JDK 21 LTS |
/u01/app/oracle/product |
MW_HOME (Middleware Home) |
/u01/app/oracle/product/wlserver |
WL_HOME (WebLogic Server install) |
/u01/app/oracle/product/user_projects/domains/base_domain |
DOMAIN_HOME |
/u01/app/oraInventory |
Oracle Inventory |
/etc/systemd/system/weblogic.service |
AdminServer systemd unit |
/etc/systemd/system/nodemanager.service |
NodeManager systemd unit |
/etc/systemd/system/cloudimg-weblogic-firstboot.service |
First-boot password rotation unit |
/usr/local/sbin/cloudimg-weblogic-firstboot.sh |
First-boot rotation script |
/var/lib/cloudimg/weblogic-firstboot.done |
First-boot sentinel (created on success) |
/stage/scripts/weblogic-credentials.log |
Per VM admin credentials (root-only) |
/var/log/cloudimg-weblogic-firstboot.log |
First-boot hook log |
Managing the WebLogic Services
Check the status of the AdminServer:
sudo systemctl status weblogic.service --no-pager
Use the standard systemctl verbs to restart, stop, or start the AdminServer:
sudo systemctl restart weblogic.servicesudo systemctl stop weblogic.servicesudo systemctl start weblogic.service
The same verbs apply to nodemanager.service. Note that a clean WebLogic restart can take up to two minutes while the AdminServer fully shuts down and re-initialises. The AdminServer's own log is under $DOMAIN_HOME/servers/AdminServer/logs/:
sudo tail -n 200 /u01/app/oracle/product/user_projects/domains/base_domain/servers/AdminServer/logs/AdminServer.log
sudo journalctl -u weblogic.service -n 200 --no-pager
Scripts and Log Files
- Credentials:
/stage/scripts/weblogic-credentials.log(regenerated on first boot) - First-boot hook:
/usr/local/sbin/cloudimg-weblogic-firstboot.sh - First-boot log:
/var/log/cloudimg-weblogic-firstboot.log - AdminServer log:
/u01/app/oracle/product/user_projects/domains/base_domain/servers/AdminServer/logs/AdminServer.log - NodeManager log:
/u01/app/oracle/product/user_projects/domains/base_domain/nodemanager/nodemanager.log
On Startup
weblogic.service is enabled and starts the AdminServer automatically once the first-boot hook has completed. nodemanager.service is enabled but starts only when you bring it up explicitly. On first customer boot only, the unit at /etc/systemd/system/cloudimg-weblogic-firstboot.service runs once to rotate the weblogic administrator password, write the new credentials file, and disable itself.
If you need to suppress the first-boot hook (for example when cloning a customised VM into a template of your own), touch the sentinel before the next boot:
sudo install -d -o root -g root -m 0755 /var/lib/cloudimg
sudo touch /var/lib/cloudimg/weblogic-firstboot.done
Troubleshooting
AdminServer will not start
sudo systemctl status weblogic.service --no-pager
sudo tail -n 200 /u01/app/oracle/product/user_projects/domains/base_domain/servers/AdminServer/logs/AdminServer.log
Common causes: the first-boot hook has not finished yet, a port conflict on 7001, or a permissions issue under /u01/app/oracle. Ownership should be oracle:oinstall.
Cannot reach the Admin Console from a browser
- Confirm the firewalld rules on the VM allow your ports:
sudo firewall-cmd --list-ports - Confirm the NSG inbound rules allow your client IP on 7001 (and 7002 if using SSL)
- Confirm the AdminServer is listening:
ss -lnt | grep -E ':(7001|7002)'
weblogic-credentials.log is missing
The first-boot hook may still be running, or it may have failed. Check:
sudo systemctl status cloudimg-weblogic-firstboot.service --no-pager
sudo tail -n 200 /var/log/cloudimg-weblogic-firstboot.log
If the unit is stuck, you can re-run it manually after deleting the sentinel:
sudo rm -f /var/lib/cloudimg/weblogic-firstboot.done
sudo systemctl start cloudimg-weblogic-firstboot.service
Forgotten administrator password
Reset the password offline using WLST in offline mode against the embedded LDAP, or restore from a snapshot of /u01/app/oracle/product/user_projects/domains/base_domain/security/.
Security Recommendations
- Replace the per VM password from the credentials file with one of your own immediately after first login
- Restrict NSG inbound rules on 7001 and 7002 to trusted client IP ranges only
- Enable the SSL listener on 7002 and front the AdminServer with TLS for any production deployment
- Create dedicated WebLogic security realms and per application users; do not deploy as
weblogic - Keep the base OS patched:
sudo dnf -y update && sudo reboot - Take regular managed disk snapshots of
/u01so you can roll back domain configuration changes - Mount persistent application data on a separate Azure managed data disk
Support
For support, questions, or feedback please visit www.cloudimg.co.uk/support or contact us at support@cloudimg.co.uk.
Additional Oracle WebLogic Server documentation is available at the official site: docs.oracle.com/en/middleware/standalone/weblogic-server/.