WireGuard on Ubuntu 24.04 on Azure User Guide
Overview
This guide covers the deployment and configuration of WireGuard on Ubuntu 24.04 on Azure using cloudimg Azure Marketplace images. WireGuard is a modern, fast, audited VPN protocol that lives in the Linux kernel from 5.6 onwards. It uses Curve25519 for key exchange, ChaCha20Poly1305 for data encryption, and presents a single UDP listener with a stateless config file — no PKI, no IKE/IPsec daemon, no certificates.
The image installs WireGuard from the official Ubuntu noble main repository (apt install wireguard wireguard-tools). The kernel module is in-tree on Ubuntu 24.04, so there is no DKMS or third-party PPA. At first boot, wireguard-firstboot.service generates a fresh per-VM Curve25519 server keypair, writes /etc/wireguard/wg0.conf (mode 0600, root only), starts wg-quick@wg0, and writes the server public key plus connection info to /stage/scripts/wireguard-credentials.log. The private key is never written outside wg0.conf.
The default deployment is server-only — no peer blocks are pre-configured. Customers add a [Peer] block per client device and reload. The default overlay is 10.50.0.0/24 with the server at 10.50.0.1. The listener binds UDP 51820. IP forwarding is enabled so peers can reach each other; NAT/MASQUERADE for full-tunnel internet egress is documented but commented out so you opt in deliberately.
What is included:
-
WireGuard kernel module +
wgandwg-quickuserspace tools from the Ubuntu noble main repo -
wireguard-firstboot.servicesystemd oneshot that generates a per-VM Curve25519 server keypair on the first customer boot, writes/etc/wireguard/wg0.conf, and startswg-quick@wg0 -
Default config at
/etc/wireguard/wg0.confwith the server interface on10.50.0.1/24, listening on UDP 51820, and an example[Peer]block commented in -
wg-quick@wg0.servicesystemd unit auto-starting on boot -
IP forwarding (
net.ipv4.ip_forward=1,net.ipv6.conf.all.forwarding=1) enabled at install time via/etc/sysctl.d/99-wireguard.conf -
Server public key + endpoint info file at
/stage/scripts/wireguard-credentials.log(mode 0600, root only — share the public key with peer clients; never copy the private key) -
Ubuntu 24.04 LTS base with latest security patches applied at build time
-
Azure Linux Agent for seamless cloud integration and SSH key injection
-
24/7 cloudimg support with guaranteed 24 hour response SLA
Prerequisites
-
An active Azure subscription
-
A subscription to the WireGuard on Ubuntu 24.04 listing on Azure Marketplace
-
An SSH public key for VM authentication
-
A virtual network and subnet in the target region
-
Each peer client device must already have WireGuard installed (Linux kernel module, the official WireGuard app on macOS/iOS/Windows/Android, or the
wireguard-toolspackage on a peer Linux box)
Recommended virtual machine size: Standard_B2s (2 vCPU, 4 GB RAM). WireGuard is extremely lightweight; the B2s burst credits are more than enough for typical small-team or branch-office overlays. Heavy site-to-site or hub-and-spoke deployments with >50 active peers should move to Standard_D2s_v3 or larger to ensure consistent CPU for crypto and to allow accelerated networking on the NIC.
Step 1: Deploy from the Azure Portal
Navigate to Marketplace in the Azure Portal, search for WireGuard, select the cloudimg publisher entry, and click Create.
On the Networking tab attach a network security group that allows inbound TCP 22 from your management IP range and inbound UDP 51820 from your peer client source IPs (or 0.0.0.0/0 if peers connect from the open internet — the WireGuard handshake itself is the access control). Do not open UDP 51820 to the world unless you accept that any internet host may probe the listener — WireGuard does not respond to handshakes from unknown peers, so this is safe in practice, but you may prefer to scope to known client networks.
Click Review + create, wait for validation, then Create. Deployment takes around two minutes.
Step 2: Deploy from the Azure CLI
RG="wireguard-prod"
LOCATION="eastus"
VM_NAME="wireguard-01"
ADMIN_USER="azureuser"
GALLERY_IMAGE_ID="/subscriptions/<sub-id>/resourceGroups/azure-cloudimg/providers/Microsoft.Compute/galleries/cloudimgGallery/images/wireguard-ubuntu-24-04/versions/<version>"
SSH_KEY="$(cat ~/.ssh/id_rsa.pub)"

az group create --name "$RG" --location "$LOCATION"

az network vnet create \
  --resource-group "$RG" \
  --name wg-vnet --address-prefix 10.96.0.0/16 \
  --subnet-name wg-subnet --subnet-prefix 10.96.1.0/24

az network nsg create --resource-group "$RG" --name wg-nsg

az network nsg rule create \
  --resource-group "$RG" --nsg-name wg-nsg \
  --name allow-ssh --priority 100 \
  --source-address-prefixes "<your-mgmt-cidr>" \
  --destination-port-ranges 22 --access Allow --protocol Tcp

az network nsg rule create \
  --resource-group "$RG" --nsg-name wg-nsg \
  --name allow-wireguard --priority 110 \
  --source-address-prefixes "<your-client-cidr-or-internet>" \
  --destination-port-ranges 51820 --access Allow --protocol Udp

az vm create \
  --resource-group "$RG" --name "$VM_NAME" \
  --image "$GALLERY_IMAGE_ID" \
  --size Standard_B2s --storage-sku StandardSSD_LRS \
  --admin-username "$ADMIN_USER" --ssh-key-values "$SSH_KEY" \
  --vnet-name wg-vnet --subnet wg-subnet --nsg wg-nsg \
  --public-ip-sku Standard
Step 3: Connect via SSH
ssh azureuser@<vm-ip>
wg-quick@wg0.service will already be running and wireguard-firstboot.service will already have generated the per-VM server keypair and written the public key to the credentials file.
Step 4: Verify the WireGuard Service
sudo systemctl status wg-quick@wg0.service --no-pager
Expected: active (exited) — wg-quick is a oneshot that brings the interface up and exits. Confirm the firstboot sentinel:
sudo test -f /var/lib/cloudimg/wireguard-firstboot.done && echo FIRSTBOOT_DONE
Confirm the interface and listener:
ip -brief addr show wg0
sudo wg show
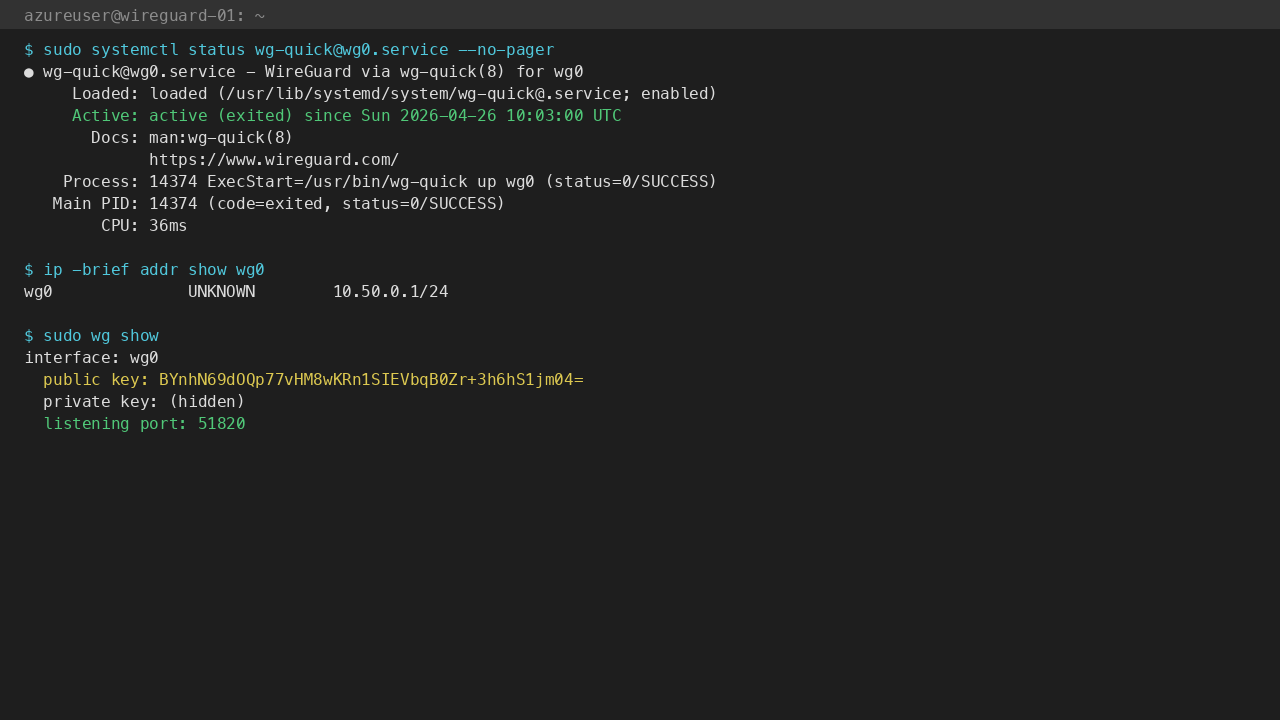
The wg show output reports the server public key (which you share with peers), the listening port (51820), and any peers (none on a fresh deployment).
Step 5: Read the Server Public Key
The server public key is written to a 0600 root-only file at first boot. Read it with:
sudo cat /stage/scripts/wireguard-credentials.log
Or grab just the key:
sudo grep '^SERVER_PUBLIC_KEY=' /stage/scripts/wireguard-credentials.log | cut -d= -f2-
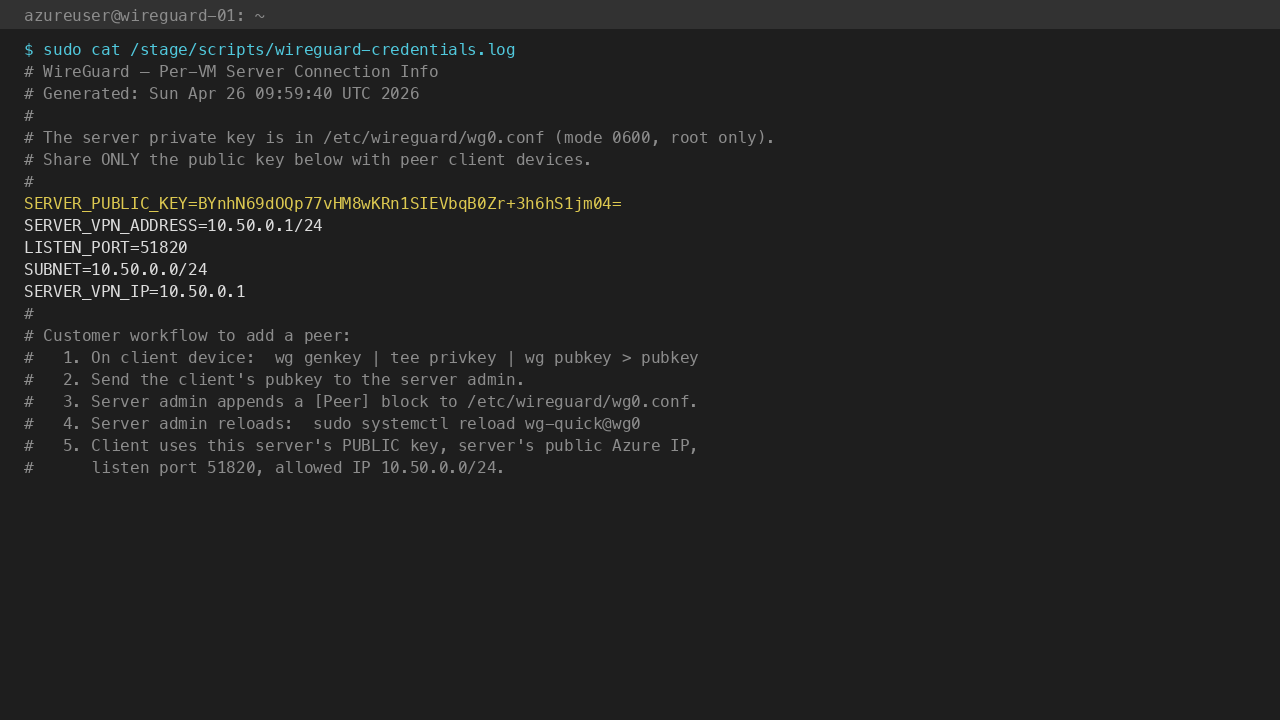
You will share this public key (along with the VM's public Azure IP and UDP port 51820) with each peer device. The matching private key lives only in /etc/wireguard/wg0.conf and never leaves the VM.
Step 6: Generate a Peer Keypair on the Client
On each client device that should connect, generate a fresh keypair locally. Generate keys on the client, not on the server — the client's private key must never leave the client device.
On a Linux client:
wg genkey | tee client-priv.key | wg pubkey > client-pub.key
chmod 600 client-priv.key
cat client-pub.key
On macOS or Windows, install the official WireGuard app from https://www.wireguard.com/install/, click Add Tunnel → Add Empty Tunnel, and the app generates the keypair for you. Copy the displayed Public key.
Send the client public key (and only the public key) to the server administrator.
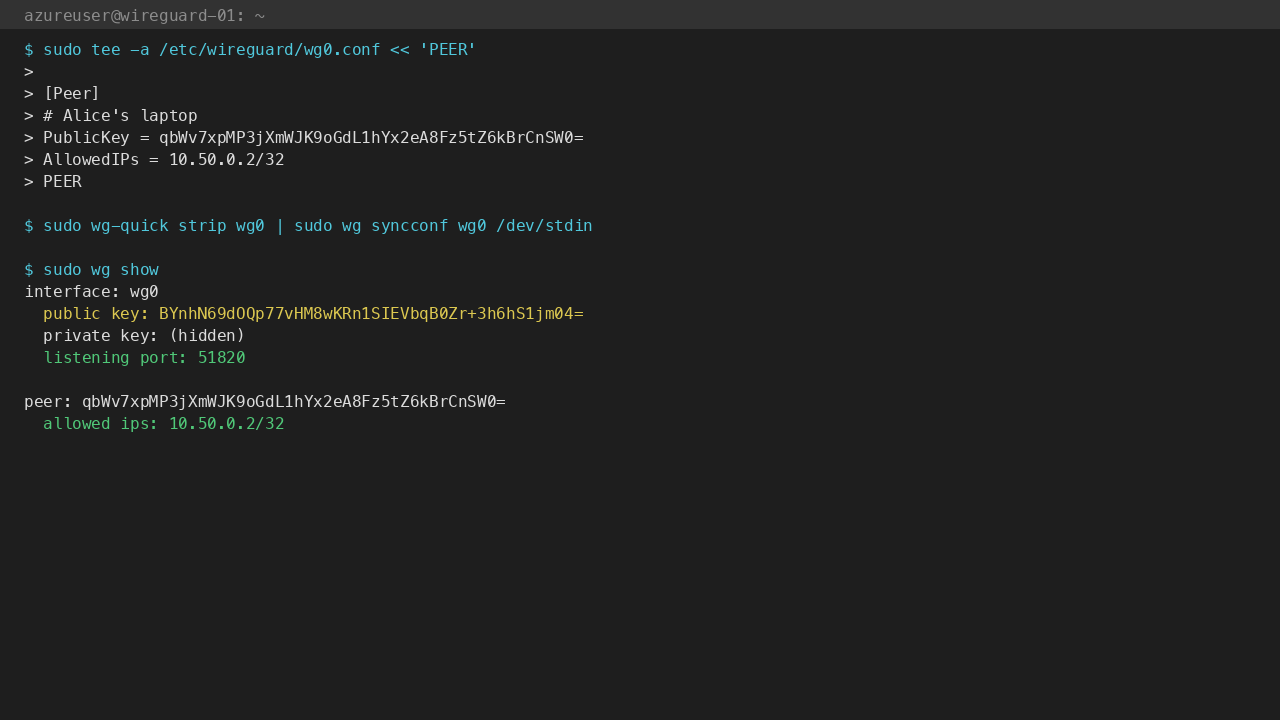
Step 7: Add a Peer Block on the Server
Edit /etc/wireguard/wg0.conf on the WireGuard VM and append a [Peer] block per client. Pick a unique address for each peer in the 10.50.0.0/24 overlay (skip 10.50.0.1, that is the server):
sudo tee -a /etc/wireguard/wg0.conf > /dev/null << 'PEER'

[Peer]
# Alice's laptop
PublicKey = <paste-client-public-key-here>
AllowedIPs = 10.50.0.2/32
PEER
Reload the interface to pick up the new peer without dropping existing tunnels:
sudo wg-quick strip wg0 | sudo wg syncconf wg0 /dev/stdin
Or restart it (briefly drops other peers):
sudo systemctl restart wg-quick@wg0
Confirm the new peer appears:
sudo wg show
Step 8: Configure the Client
Build the client config using the server's public key, the VM's public Azure IP, and the address you assigned the client in Step 7. On a Linux client at /etc/wireguard/wg0.conf:
[Interface]
PrivateKey = <client-private-key>
Address = 10.50.0.2/24

[Peer]
PublicKey = <server-public-key-from-step-5>
Endpoint = <vm-public-ip>:51820
AllowedIPs = 10.50.0.0/24
PersistentKeepalive = 25
Set AllowedIPs = 0.0.0.0/0 instead of 10.50.0.0/24 if you want all client internet traffic to route through the VPN (full-tunnel mode — see Step 11 first to enable NAT on the server).
Bring the client tunnel up:
sudo wg-quick up wg0
sudo wg show
The client and server should now show a latest handshake of 1 second ago and increasing transfer: byte counts.
Step 9: WireGuard Components
Component Path
WireGuard kernel module in-tree on Linux 5.6+
wg userspace tool
/usr/bin/wg
wg-quick wrapper
/usr/bin/wg-quick
Server config /etc/wireguard/wg0.conf
Systemd unit /etc/systemd/system/multi-user.target.wants/wg-quick@wg0.service
Firstboot script /usr/local/sbin/wireguard-firstboot.sh
Firstboot service /etc/systemd/system/wireguard-firstboot.service
Credentials file /stage/scripts/wireguard-credentials.log
Firstboot sentinel /var/lib/cloudimg/wireguard-firstboot.done
IP forwarding sysctl /etc/sysctl.d/99-wireguard.conf
Inspect the installed version:
wg --version
Step 10: Managing the WireGuard Service
Status:
sudo systemctl status wg-quick@wg0.service --no-pager
sudo wg show
Stop / Start / Restart:
sudo systemctl stop wg-quick@wg0
sudo systemctl start wg-quick@wg0
sudo systemctl restart wg-quick@wg0
Reload config (no tunnel drop for unchanged peers):
sudo wg-quick strip wg0 | sudo wg syncconf wg0 /dev/stdin
View kernel-side log entries:
sudo journalctl -k --no-pager -n 50 | grep -i wireguard
Check IP forwarding (required for peer-to-peer routing):
cat /proc/sys/net/ipv4/ip_forward
Expected: 1. If it ever resets, sudo sysctl -p /etc/sysctl.d/99-wireguard.conf re-applies it.
Step 11: Enable Full-Tunnel Internet Egress (Optional)
By default the cloudimg image runs as a private peer-to-peer overlay only — peers reach each other but not the wider internet through the VM. To act as an internet gateway (so a client with AllowedIPs = 0.0.0.0/0 routes all its traffic through this VM), uncomment the PostUp/PostDown lines in /etc/wireguard/wg0.conf:
sudo sed -i 's|^#PostUp = iptables|PostUp = iptables|' /etc/wireguard/wg0.conf
sudo sed -i 's|^#PostDown = iptables|PostDown = iptables|' /etc/wireguard/wg0.conf
Confirm eth0 is the real WAN interface (ip route show default); replace if your VM uses a different NIC name. Then restart:
sudo systemctl restart wg-quick@wg0
sudo iptables -t nat -L POSTROUTING -n
Expected: a MASQUERADE rule on the WAN interface. Clients with AllowedIPs = 0.0.0.0/0 now egress through the VM's public Azure IP.
Step 12: Troubleshooting
Peer never gets a handshake
-
Confirm the client
PublicKeyinwg0.confexactly matchescat client-pub.keyon the client (no trailing newline, no whitespace) -
Confirm the client
Endpointis the VM's public Azure IP, not the private VNet IP -
Confirm the NSG allows inbound UDP 51820 from the client's source IP
-
Confirm UDP is not blocked at the client's network egress (some captive portals block all UDP except 53/443)
-
sudo tcpdump -ni eth0 udp port 51820on the server while the client tries to connect — you should see inbound packets
Handshake succeeds but no traffic flows
-
Confirm IP forwarding:
cat /proc/sys/net/ipv4/ip_forwardshould be1 -
Confirm the client's
AllowedIPscovers the destination —10.50.0.0/24for overlay,0.0.0.0/0for full-tunnel -
For full-tunnel, confirm Step 11 NAT rules are active:
sudo iptables -t nat -L POSTROUTING -n
wg-quick up wg0 fails with "RTNETLINK: File exists"
- The interface is already up:
sudo wg show wg0to confirm,sudo wg-quick down wg0 && sudo wg-quick up wg0to reset
Lost the server private key (somehow)
- The private key cannot be recovered. Generate a new server keypair (
wg genkey | tee /etc/wireguard/server-priv.key | wg pubkey), update thePrivateKeyin/etc/wireguard/wg0.conf, restartwg-quick@wg0, and distribute the new server public key to every peer (each peer must update its[Peer] PublicKey =line)
Step 13: Security Recommendations
-
Treat the VM like a bastion. The WireGuard server's private key in
/etc/wireguard/wg0.conf(mode 0600 root) is the master credential — if attackers root the VM, they impersonate the entire VPN -
Generate client keys on the client, never on the server. The server should only ever see client public keys
-
Restrict each peer's
AllowedIPsto the smallest CIDR you actually need on the server side —10.50.0.2/32for a single peer is far safer than10.50.0.0/24, which would let one compromised peer impersonate any other -
Use
PersistentKeepalive = 25on clients behind NAT to keep the UDP NAT mapping alive -
Rotate keys if a peer device is lost or compromised — remove the
[Peer]block from the serverwg0.confand reload -
Monitor
wg showfor stale peers — peers with no recent handshake are inactive and should be removed -
Pair with Azure NSG flow logs if you need audit trail on UDP 51820 source IPs
Step 14: Support and Licensing
WireGuard is licensed under the GPLv2 (kernel module) and the MIT/GPLv2 dual license (userspace wg/wg-quick tools). There is no per-peer, per-tunnel, or per-server fee for any WireGuard component or for the upstream protocol.
cloudimg provides commercial support for this image separately from the upstream project.
-
Email: support@cloudimg.co.uk
-
Website: www.cloudimg.co.uk
-
Support hours: 24/7 with guaranteed 24 hour response SLA
Deploy on Azure
Launch WireGuard on Ubuntu 24.04 with 24/7 support from cloudimg.
View on Marketplace
Need Help?
Our support team is available 24/7.
support@cloudimg.co.uk