WordPress Multisite 6.9 on Ubuntu 24.04 on Azure User Guide
Overview
WordPress Multisite lets you run a network of sites from a single WordPress install, sharing one codebase, plugins and themes while each site keeps its own content, users and settings. The cloudimg image installs WordPress 6.9 from wordpress.org alongside Apache 2.4, MySQL 8.0 and PHP 8.3 (all from Ubuntu noble universe, no third-party APT repositories) and pre-configures the network in subdirectory layout so you can add http://your-host/site2/, http://your-host/blog/, etc. with no wildcard DNS work.
What is included:
- WordPress 6.9 with Network Multisite enabled at
/var/www/html/wordpress - Apache 2.4.x with mod_rewrite plus the multisite RewriteRule block built into the vhost (no .htaccess dependency)
- MySQL 8.0.x with
wordpressDB andwpuserMySQL user (per-VM password) - PHP 8.3.x with mysqli, gd, mbstring, xml, curl, zip, imagick extensions
- WP-CLI 2.x at
/usr/local/bin/wp wordpress-multisite-firstboot.servicerotating MySQL root, WP DB and WP admin passwords, and rewriting siteurl, home, wp_blogs.domain and DOMAIN_CURRENT_SITE to the per-VM public IP- Apache plus MySQL
enabledand auto-starting on boot - 24/7 cloudimg support
Prerequisites
Active Azure subscription, SSH key, VNet plus subnet. Standard_B2s (4 GB RAM) is fine for small networks (under 20 sites, low traffic); bump to D2s/D4s for medium networks or WooCommerce stores.
Step 1 to 3: Deploy and SSH (standard pattern)
ssh azureuser@<vm-ip>
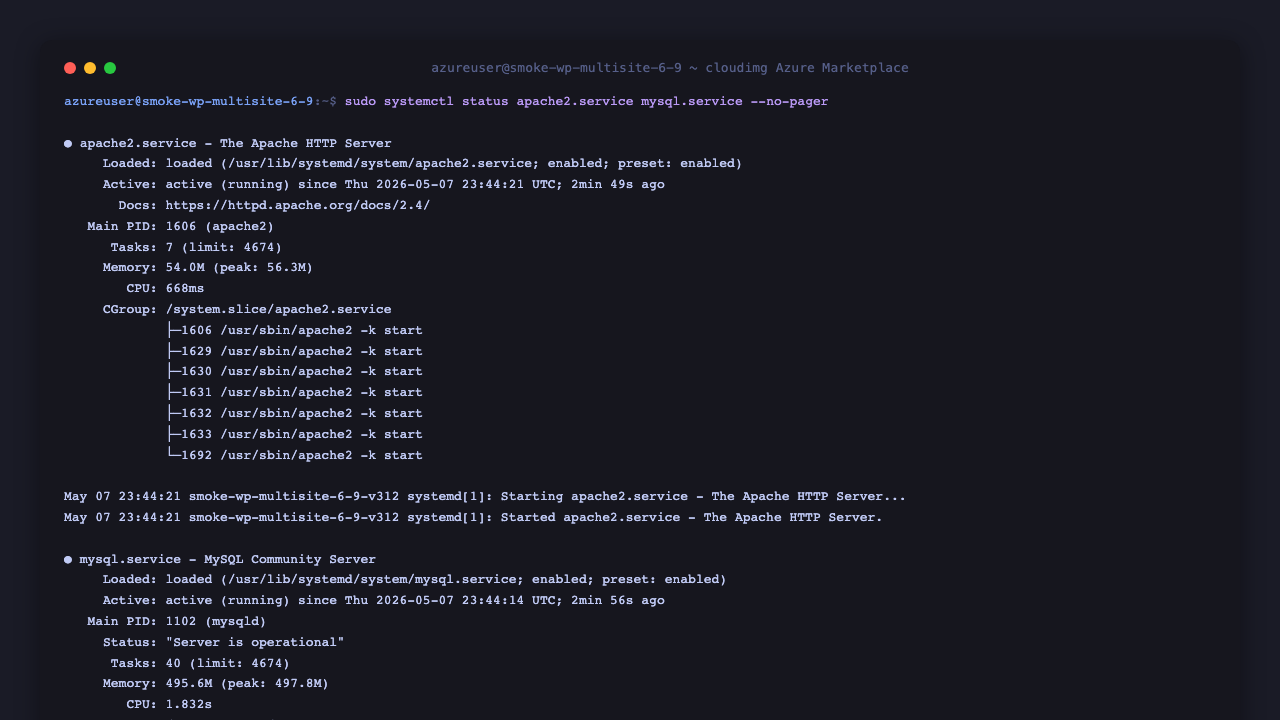
Step 4: Verify Services
sudo systemctl status apache2 mysql --no-pager | head -20
Step 5: Read Per-VM Credentials
The first-boot service rotates passwords and writes the per-VM credentials to /etc/cloudimg-credentials.txt. Read it as root:
sudo cat /etc/cloudimg-credentials.txt
You will see:
WP_URL=http://<vm-ip>/
WP_ADMIN_URL=http://<vm-ip>/wp-admin/
WP_NETWORK_ADMIN_URL=http://<vm-ip>/wp-admin/network/
WP_ADMIN_USER=admin
WP_ADMIN_PASSWORD=<random>
WP_DB_NAME=wordpress
WP_DB_USER=wpuser
WP_DB_PASSWORD=<random>
MYSQL_ROOT_PASSWORD=<random>
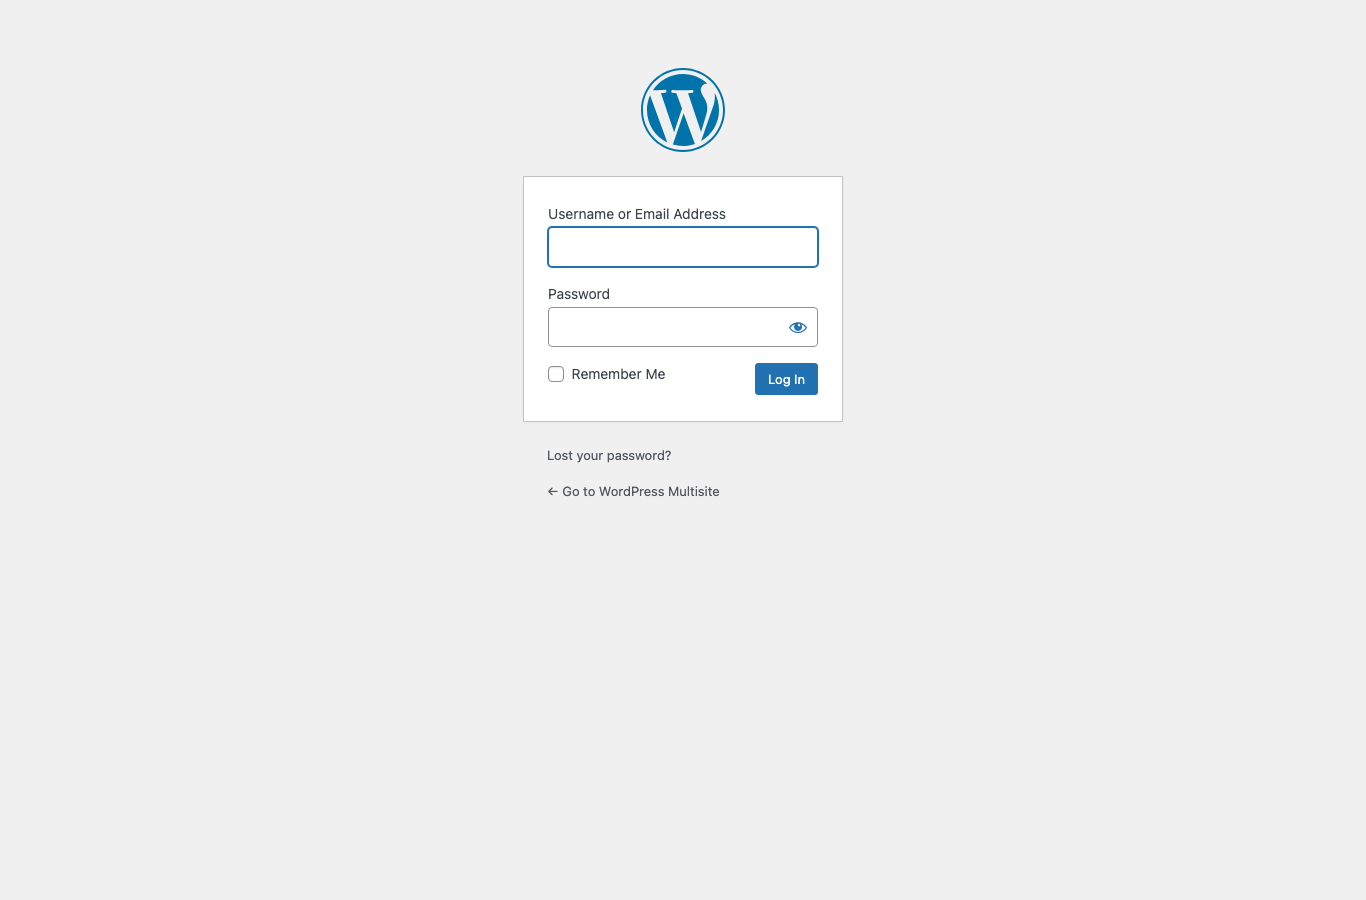
Step 6: Login to wp-admin
Browse to http://<vm-ip>/wp-login.php and authenticate as admin with the password from Step 5.
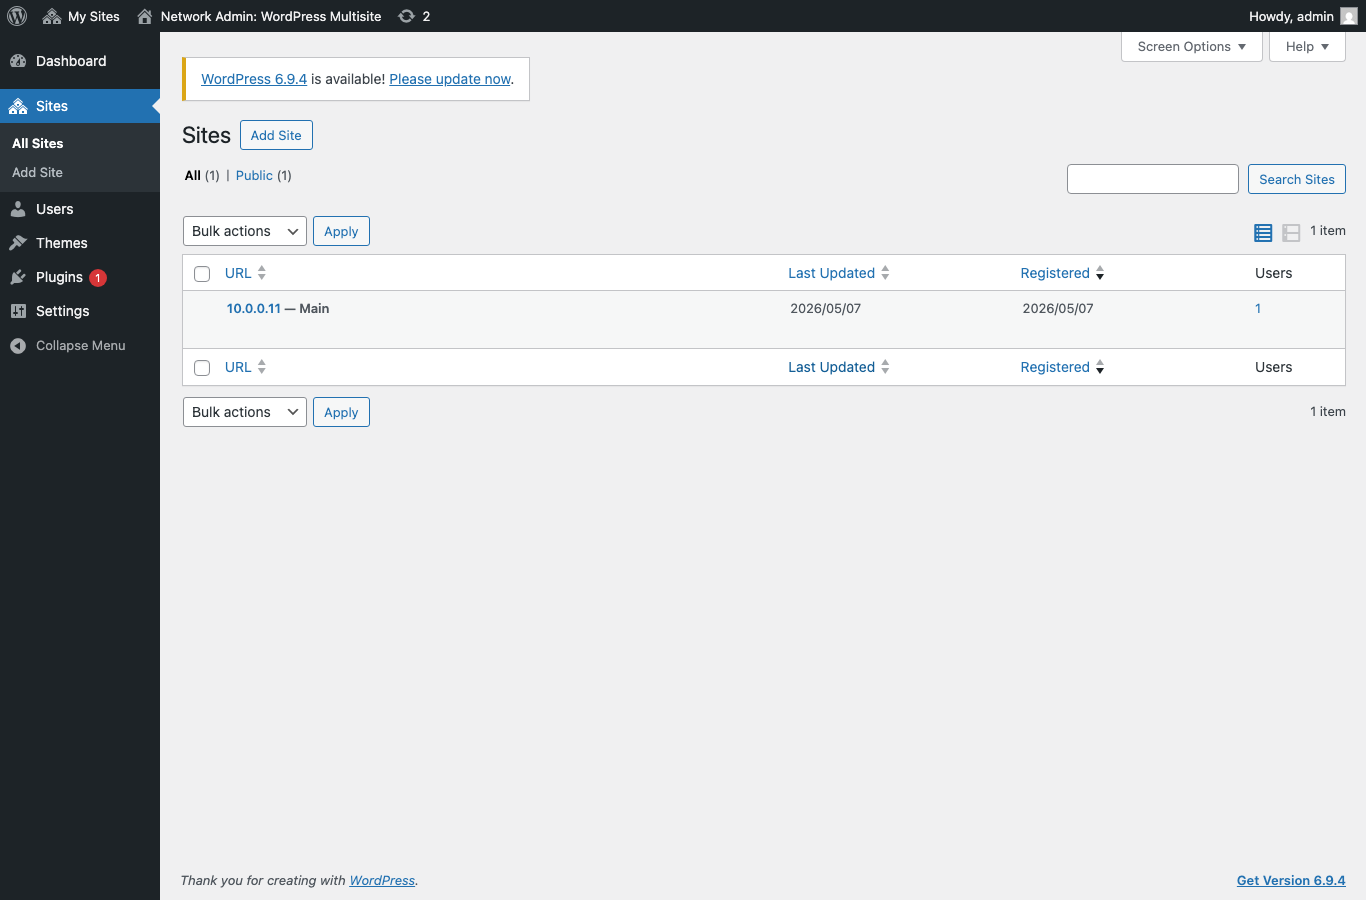
Step 7: Network Admin — Sites
After login, browse to http://<vm-ip>/wp-admin/network/sites.php to see your network's sites. The primary site (blog_id=1) is created automatically.
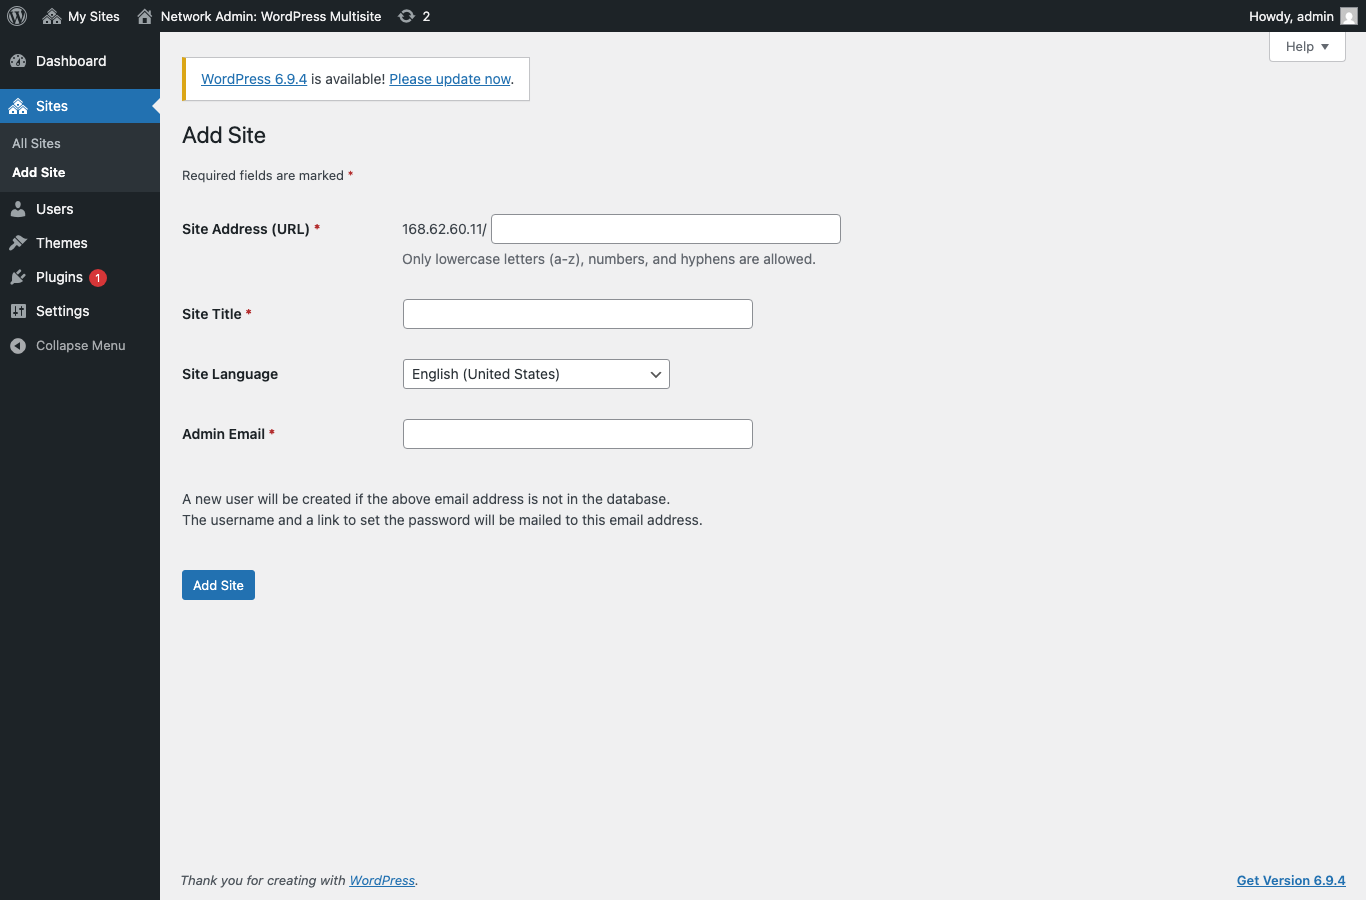
Step 8: Add a New Site
From the Network Admin Sites page click Add New to create another site in the network. Subdirectory layout means new sites live under paths like http://<vm-ip>/blog/ or http://<vm-ip>/store/ with no DNS work.
Step 9: WP-CLI Network Operations
WP-CLI is fully network-aware. List sites in your network:
sudo -u www-data /usr/local/bin/wp site list --path=/var/www/html/wordpress
Create a new site without using the UI:
sudo -u www-data /usr/local/bin/wp site create --slug=blog --title="Blog" --path=/var/www/html/wordpress
List network plugins:
sudo -u www-data /usr/local/bin/wp plugin list --network --path=/var/www/html/wordpress
Step 10: Components
| Component | Path |
|---|---|
| WordPress install | /var/www/html/wordpress/ |
| wp-config.php (with multisite block) | /var/www/html/wordpress/wp-config.php |
| Apache vhost (with multisite RewriteRules) | /etc/apache2/sites-available/wordpress.conf |
| Apache logs | /var/log/apache2/wordpress-{access,error}.log |
| MySQL data | /var/lib/mysql/ |
| WP-CLI | /usr/local/bin/wp |
| Firstboot script | /usr/local/sbin/wordpress-multisite-firstboot.sh |
| Credentials | /etc/cloudimg-credentials.txt (mode 0600 root:root) |
Step 11: Security
- HTTPS: install certbot and obtain a Let's Encrypt cert with the
--apacheplugin:sudo apt-get install -y certbot python3-certbot-apache && sudo certbot --apache. With multisite you will want a wildcard cert if you ever switch to subdomain layout, otherwise the certbot apache plugin handles the primary host fine. - Restrict NSG so port 80 is only open to your CDN, load balancer or Cloudflare; keep 22 to your management CIDR only
- Update plugins and themes monthly at the network level:
wp plugin update --all --networkandwp theme update --all --network - Enable two-factor auth network-wide via Wordfence or the Two Factor Authentication plugin (network-activate it)
- Patch monthly:
apt-get update && apt-get upgrade && reboot - Limit super-admins — only the
adminuser should be a super-admin; per-site admins should be regular admins
Multisite Notes
- Subdirectory vs subdomain: this image is configured in subdirectory layout (sites at
/site2/,/blog/etc.). To switch to subdomain layout editwp-config.phpand changedefine('SUBDOMAIN_INSTALL', false);totrue, then add a wildcard A record*.your-domain.com -> <vm-ip>and re-runwp core multisite-convert --subdomainsif you have not yet added new sites. - Network Admin URL:
http://<vm-ip>/wp-admin/network/(not/wp-admin/) - Adding sites via UI: the per-site admin URL is
http://<vm-ip>/<site-slug>/wp-admin/
Licensing
WordPress is GPL-2.0+ — free to use commercially. cloudimg provides commercial support separately. support@cloudimg.co.uk.