
Node.js LTS on AWS User Guide
Overview
This image runs Node.js 22 LTS, the JavaScript runtime that powers modern API servers, real-time services, server-side rendered web apps and JavaScript build tooling. Node.js is installed from the official NodeSource repository (Node 22.x) with the bundled npm, plus pnpm and PM2 installed globally. A small sample Express + EJS application ships under /opt/nodeapp/cloudimg, owned by the unprivileged nodeapp system account, run by PM2 under systemd as cloudimg-app.service. nginx 1.24 fronts the runtime on port 80 and reverse-proxies dynamic routes to the Express app on 127.0.0.1:3000, while serving static assets directly from /opt/nodeapp/cloudimg/public/.
Two per-instance secrets are generated on the first boot of every deployed instance: a 32-byte hex SESSION_SECRET used for Express session signing, and a 32-byte hex ADMIN_API_KEY that protects the sample admin endpoint. Two instances launched from the same Amazon Machine Image never share these values. They are written to /root/nodejs-credentials.txt with mode 0600 so that only the root user can read them, and also written to the application's environment file at /etc/nodeapp/cloudimg.env.
The sample app reads no instance metadata. The Express homepage and the JSON APIs serve on whatever public DNS name or IP address visitors reach the instance on, so deployments behind an Application Load Balancer, in a private subnet, or on a custom domain all work without changes.
Prerequisites
Before you deploy this image you need:
- An Amazon Web Services account where you can launch EC2 instances
- IAM permissions to launch instances, create security groups, and subscribe to AWS Marketplace products
- An EC2 key pair in the target Region for SSH access to the instance
- A VPC and subnet in the target Region, with a security group allowing inbound port 22 from your management network and inbound port 80 from the networks your visitors will use
- The AWS CLI (version 2) installed locally if you plan to deploy from the command line
Step 1: Launch the Instance from the AWS Marketplace
Sign in to the AWS Management Console, open the EC2 service, and select Launch instance. Under Application and OS Images choose AWS Marketplace AMIs and search for Node.js LTS. Select the cloudimg listing and choose Select, then Continue on the subscription summary.
Pick an instance type of m5.large or larger. Choose your EC2 key pair under Key pair (login). Under Network settings select your VPC and subnet, and either create or select a security group that allows inbound port 22 from your management network and inbound port 80 from the networks your visitors use. Leave the root volume at the default size or larger.
Select Launch instance. First boot initialisation takes approximately one minute after the instance state becomes Running and the status checks pass.
Step 2: Launch the Instance from the AWS CLI
The following block launches an instance from the cloudimg Node.js LTS Marketplace AMI into an existing subnet and security group. Replace <ami-id> with the AMI ID shown on the Marketplace listing, <key-name> with your EC2 key pair name, <subnet-id> with your subnet ID, and <security-group-id> with a security group that opens ports 22 and 80 as described above.
aws ec2 run-instances \
  --image-id <ami-id> \
  --instance-type m5.large \
  --key-name <key-name> \
  --subnet-id <subnet-id> \
  --security-group-ids <security-group-id> \
  --block-device-mappings '[{"DeviceName":"/dev/sda1","Ebs":{"VolumeSize":30,"VolumeType":"gp3"}}]' \
  --tag-specifications 'ResourceType=instance,Tags=[{Key=Name,Value=nodejs-cloudimg-01}]'
The instance returns to a running state in roughly thirty seconds. First-boot credential rotation runs as a oneshot systemd service and takes another twenty to forty seconds before cloudimg-app.service and nginx.service are fully up.
Connecting to your instance
| AMI variant | SSH login user |
|---|---|
| Node.js 22 LTS on Ubuntu 24.04 | ubuntu |
From your workstation:
ssh -i <path/to/key.pem> ubuntu@<instance-public-dns>
Step 3: Retrieve your per-instance credentials
Read the credentials file as root:
sudo cat /root/nodejs-credentials.txt
Real output from the build instance used to author this guide:
# Node.js 22 LTS — Per-instance Credentials
# Generated: Sat May 24 21:28:25 UTC 2026
NODEAPP_URL=http://32.192.52.220/
NODEAPP_API_INFO_URL=http://32.192.52.220/api/info
NODEAPP_ADMIN_URL=http://32.192.52.220/api/admin
NODEAPP_ADMIN_API_KEY=5ab8c9390b16b54b7cb52aa7d4f458922369bff48a8d7fd27310f3d776610709
NODEAPP_SESSION_SECRET=<32-byte hex, redacted in this guide>
NODEAPP_ADMIN_API_KEY is the secret that the sample admin endpoint expects in the X-Admin-Key HTTP header. NODEAPP_SESSION_SECRET is the per-instance secret that Express session middleware uses to sign session cookies. Both values are unique to this instance.
Step 4: Open the sample welcome page
In a browser, navigate to http://<instance-public-dns>/. The cloudimg sample Express app returns a rendered EJS page with live Node.js runtime metadata and links to the available endpoints:

Step 5: Exercise the JSON API
The /api/info endpoint returns runtime metadata as JSON. It needs no authentication and is safe to call from a load balancer health check.
curl -s http://<instance-public-dns>/api/info
Real response from the build instance:

The same shape is available via the static healthcheck file served directly by nginx without invoking Node:
curl -s http://<instance-public-dns>/static/healthcheck.txt
returns the literal string ok.
Step 6: Call the authenticated admin endpoint
The /api/admin endpoint returns Node runtime stats only when the per-instance ADMIN_API_KEY is supplied as the X-Admin-Key HTTP header. Calls without the header receive HTTP 401.
KEY=$(sudo grep '^NODEAPP_ADMIN_API_KEY=' /root/nodejs-credentials.txt | cut -d= -f2-)
curl -s -H "X-Admin-Key: ${KEY}" http://127.0.0.1/api/admin
Real authenticated response from the build instance:

Step 7: Inspect the running stack
The runtime is composed of three systemd units: nodejs-firstboot.service (oneshot, runs once at first boot), cloudimg-app.service (the Express app under PM2's pm2-runtime), and nginx.service (the reverse proxy). Inspect them with:
sudo systemctl is-active nodejs-firstboot.service cloudimg-app.service nginx.service
sudo systemctl status cloudimg-app.service --no-pager
sudo PM2_HOME=/var/lib/nodeapp/.pm2 pm2 list
The Express process logs to the journal:
sudo journalctl -u cloudimg-app.service -f
and PM2 writes its own stdout/stderr to /var/log/nodeapp/out.log and /var/log/nodeapp/error.log.
Step 8: Replace the sample app with your own code
The sample lives under /opt/nodeapp/cloudimg and is owned by nodeapp:nodeapp. To deploy your own application:
- Stop the service and copy your code into place:
bash
   sudo systemctl stop cloudimg-app.service
   sudo rsync -av --delete <your-app>/ /opt/nodeapp/cloudimg/
   sudo chown -R nodeapp:nodeapp /opt/nodeapp/cloudimg
- Install dependencies as the unprivileged user:
bash
   sudo -u nodeapp -H bash -c "cd /opt/nodeapp/cloudimg && npm install --omit=dev"
-
Either update
ecosystem.config.jsto point at your entry script, or replace it entirely. The default points at./server.jslistening on127.0.0.1:3000because that is where nginx forwards traffic. Keep that port unless you also update/etc/nginx/sites-available/nodeapp-cloudimg. -
Start the service again:
bash
   sudo systemctl start cloudimg-app.service
   sudo systemctl status cloudimg-app.service --no-pager
If your app needs additional per-instance environment variables, add them to /etc/nodeapp/cloudimg.env (mode 0640, owner root:nodeapp). cloudimg-app.service reads this file via EnvironmentFile=, so the variables are exported into the Node process at start.
Step 9: Tune the V8 heap
Node.js 22's default V8 heap is around 1.7 GB. For memory-heavy SSR workloads, raise it explicitly. Edit /etc/nodeapp/cloudimg.env and add:
NODE_OPTIONS=--max-old-space-size=4096
Then sudo systemctl restart cloudimg-app.service to apply.
Step 10: Enable HTTPS
The image ships with nginx terminating HTTP only on port 80. To add HTTPS:
-
Recommended for production: terminate TLS at an upstream Application Load Balancer or CloudFront distribution and forward HTTP to the EC2 instance. This is the cleanest option for autoscaling groups and lets the load balancer rotate certificates centrally.
-
Per-instance Let's Encrypt: if you run a single instance with a public DNS name, install certbot and let it modify the nginx config in place:
bash
  sudo apt-get install -y certbot python3-certbot-nginx
  sudo certbot --nginx -d <your-domain>
certbot adds a listen 443 ssl block to /etc/nginx/sites-available/nodeapp-cloudimg and schedules a renewal timer.
Step 11: WebSocket smoke test
The sample app also runs a WebSocket echo service at /ws. From an instance with wscat installed:
npx wscat -c ws://<instance-public-dns>/ws
< {"type":"hello","nodeVersion":"v22.22.2"}
> hello from cloudimg
< {"type":"echo","payload":"hello from cloudimg"}
nginx's site config already sets proxy_http_version 1.1 plus the Upgrade and Connection headers under location /ws, so the upgrade succeeds without further changes.
Step 12: Logs
| Source | Path |
|---|---|
| First-boot script | journalctl -u nodejs-firstboot.service and /var/log/cloudimg-firstboot.log |
| Express app via PM2 | journalctl -u cloudimg-app.service, /var/log/nodeapp/out.log, /var/log/nodeapp/error.log |
| nginx access | /var/log/nginx/access.log |
| nginx errors | /var/log/nginx/error.log |
Step 13: Updating Node.js and the app
To apply updates from the NodeSource repository on a running instance:
sudo apt-get update
sudo apt-get -y install nodejs
sudo systemctl restart cloudimg-app.service
PM2 itself updates via npm:
sudo npm install -g pm2@latest
sudo systemctl restart cloudimg-app.service
Step 14: Resetting the per-instance secrets
If you ever need to rotate ADMIN_API_KEY or SESSION_SECRET on an already-running instance, remove the firstboot sentinel, restart the firstboot service, and restart the app:
sudo rm -f /var/lib/cloudimg/nodejs-firstboot.done
sudo systemctl start nodejs-firstboot.service
sudo systemctl restart cloudimg-app.service
sudo cat /root/nodejs-credentials.txt
A fresh ADMIN_API_KEY and SESSION_SECRET are generated and the credentials file is rewritten.
Step 15: Support
cloudimg provides 24/7 technical support for this image. Open a support request via the cloudimg support portal for help with Node.js deployment, PM2 cluster mode, nginx tuning, TLS via Let's Encrypt or an upstream load balancer, log shipping, runtime upgrades, or any questions about extending the sample app for production.
Screenshots
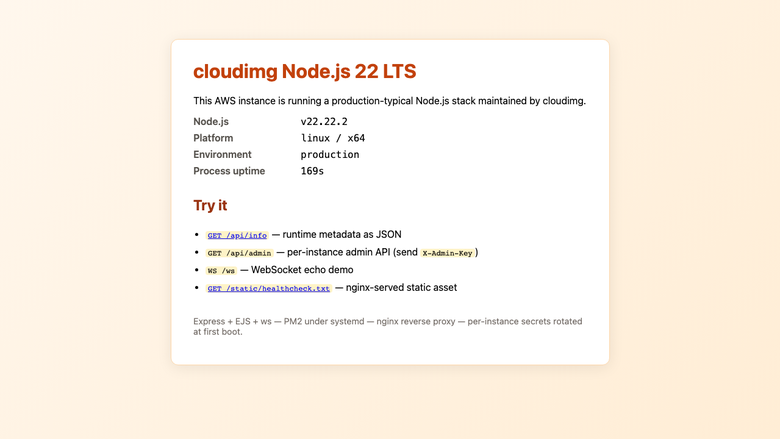
The cloudimg sample Express + EJS welcome page served by nginx on port 80, with live Node.js runtime metadata.
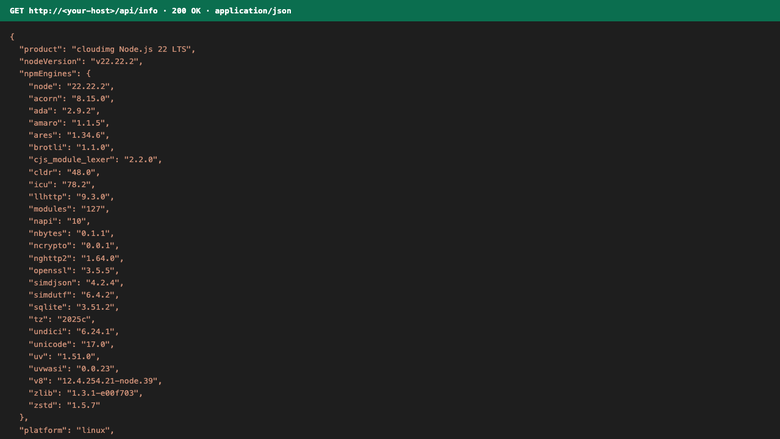
Runtime metadata returned by the unauthenticated /api/info JSON endpoint, including Node version and dependency versions.
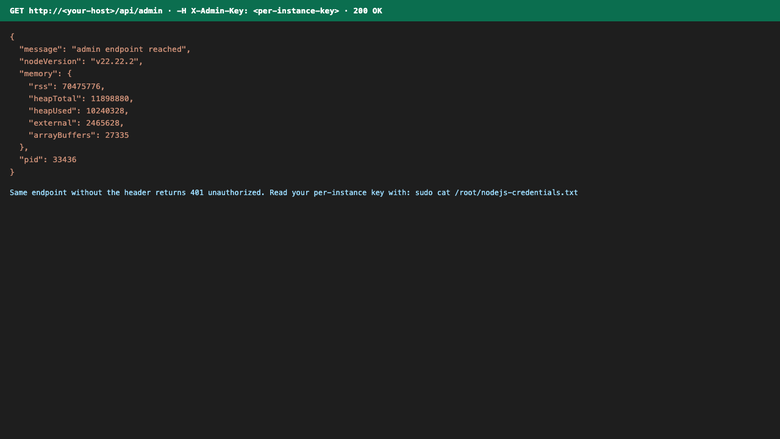
Per-instance admin endpoint returning runtime stats when the per-instance X-Admin-Key header is supplied.